

Pro Tools has been the best DAW for recording vocals for quite some time. The vocal recording process is all about layering multiple passes, utilizing the comping feature (combining the best takes from multiple passes, no matter how big or small the part), then mixing levels and adding dynamics processing and EQ.
To get the best sounding audio you also need a proper interface (digital to analog/analog to digital audio converter) with decent preamps and the ability to record audio files at high bit depths (24 - 32-bit float) and sample rates (at least 48k - 192k). This will ensure the highest possible audio quality and thus result in high-quality vocals.
There are many features to consider besides those stated above if you're looking for optimal vocal recording. Being the trailblazer that it is, Pro Tools garnered a lot of the common vocal recording workflows decades ago. This elite DAW makes the lives of engineers, producers, and mixers much easier with the best audio recording functionality in the music production game.
Recording Vocals
Markers
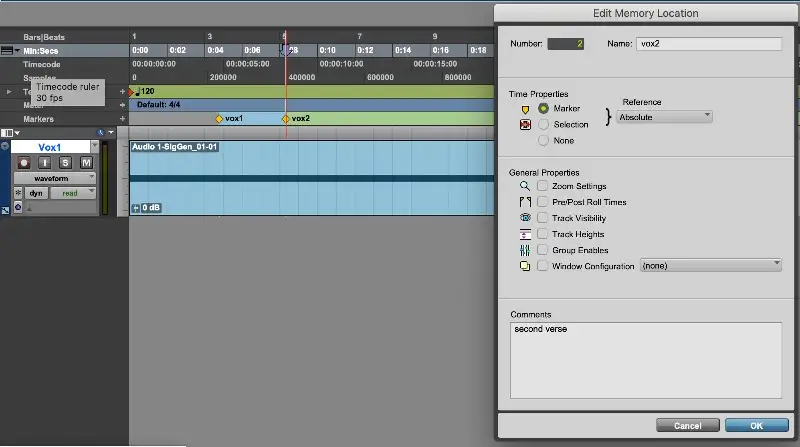
When recording vocals in a song you need to be able to move freely around the timeline and punch in at will, in a non-linear fashion. Pro Tools allows for the user to drop markers at any point in time, and with those markers, keep important data about why that marker is there.
For instance, if you need to get to the first bar of the first chorus of the song, simply name the marker "First Chorus - Bar 1". You can further click on the dropped marker icon to show more space to record metadata and comment on certain types of vocal inflection or something you liked about the part specifically.
Granted the process of recording vocals is usually pretty snappy, you might not have time for this much granularity.
Markers can easily be recalled by clicking on their icon in the timeline or with the ". number ." key command. Pro Tools also has a floating marker window for easy marker access where you can also access different properties of the markers' functionality.
For example, a marker could be set as a selection in time and not just a single in-point. You can also adjust properties such as zoom settings, pre/post-roll times, window configs, and more.
All of these assist in a smoother vocal recording experience for both the engineer and the vocalist. It helps you know the song and recall points in time in the rapid environment that is recording vocals.
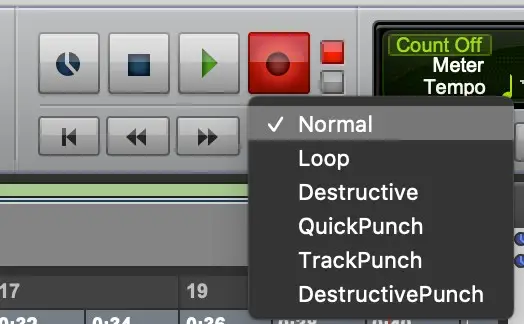
Record Modes
One of Pro Tools' unique recording features is the fact that it has more record modes than any other DAW. It doesn't matter if it's Logic Pro, FL Studio, Cubase, Nuendo, or Ableton Live - only the mighty Pro Tools contains 6 punch modes for audio recording.
There are a few reasons why it's nice to have these extra punch modes for recording vocals. The reasons will change per the mode, but one global reason is for keeping your session and audio files neat and organized. Gone are the days where you hit record and let it roll for unnecessarily long passes then hit stop when the vocalist is done.
You can be as exact as you want with QuickPunch mode, and a separate file will be created with each punch in/out. TrackPunch will allow for QuickPunching functionality, but with the added capability of record enabling/disabling desired tracks while the DAW is actively recording. Another way to save hard drive space from recording unwanted audio files and extra session clutter.
Loop record is an obvious use case, where the vocalist can simply loop over a certain point in time, get in the groove, and knock out take after take until they get what they want. That can be later used in conjunction with Pro Tools' incredibly useful vocal comping feature, which we will cover later in this article.
Audio Interface
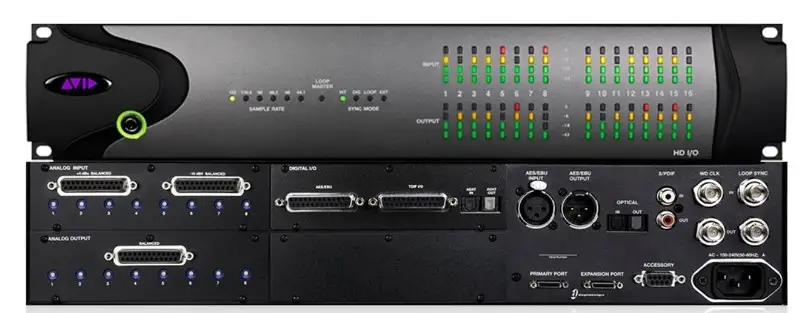
The audio interface being used is very important, especially when recording vocals because they're likely going to be the most upfront thing in the mix. For professional-sounding vocals and the highest quality audio production possible, you need the nicest analog to digital/digital to analog converter you can afford, with multiple inputs.
Luckily, Avid Pro Tools supports some of the best audio interfaces money can buy in their HD line, be it HD Native or HDX. It's a crucial addition to any studio and one that you'll find in professional studios all over the world. Quality is king.
Pre/post-roll
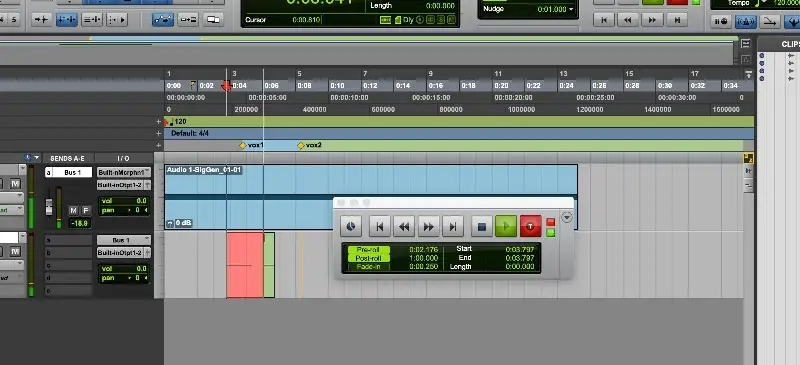
Almost everything in the digital audio workstation continuum has something like a pre-roll/post-roll feature. Pro Tools has boasted this feature since what seems like the beginning of time.
It's a simple concept that allows for engineers to set a place in time, either pre or post the insertion point. This is useful because you want to give a vocalist space to come in before the point at which the recording starts.
A post-roll is most useful when coming out of a loop but still wanting a bit of time before the loop starts again. You want the vocalist to be as comfortable as possible and to stay in a certain rhythm of the song so that you can capture the best possible performance when recording vocals.
Comping Feature
Automatically Create New Playlists When Loop Recording

The first step in setting up your session to record vocals and ready them for comping, is to turn on a feature called "Automatically Create New Playlists When Loop Recording" in Preferences/Operation/Record.
Then when in loop record (which you can activate either by control-clicking the record button on the transport window, or in the Options menu), set up your desired loop selection, arm record globally, and on the track you're recording to, and play.
This will work in conjunction with the playlist feature and automatically add playlists to the track that you're recording.
Playlist Feature with Comping
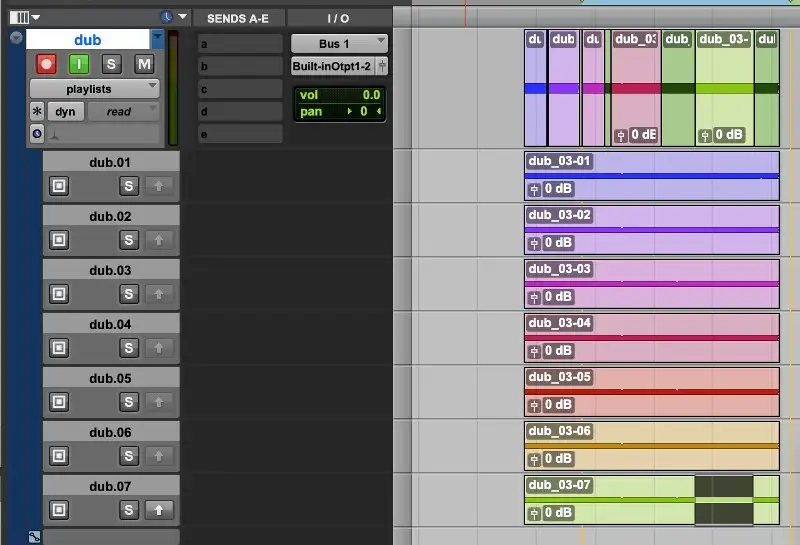
The next step in using the comping feature is to enable "playlists" on the audio track you're recording to. When you enter that mode, you'll see all the vocal recordings you just recorded while in loop record, below the main playlist.
If you're an audio engineer, this is your best friend when it comes time to edit vocals. On the far left of the playlist tracks, you'll notice a square "target" icon to symbolize the "Target Playlist". This allows you to dynamically change the playlist that you want to promote comped takes to, essentially flexibly changing your main playlist.
Next to the target playlist icon, there's a traditional solo button for soloing playlists to audition the take before you start to take some or all of it and add that to the target playlist.
This brings us, finally, to the up arrow icon. This is the mechanism by which you "promote" selections to the target playlists.
This arrow will be disabled by default and enabled as soon as the user makes a selection on the desired playlist. Engaging that button will then non-destructively move that selection up to the target playlist, no matter how big or small the selection. Short of any fades or desired vocal edits that you'd like to make, this is a trusted procedure that results in professional-sounding vocals.
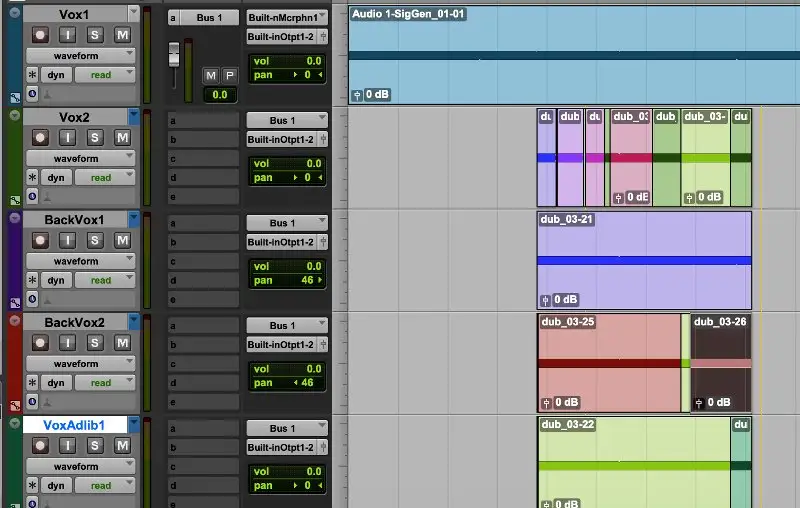
On the production and editing side of things, you can easily access other playlists made during the recording process from any of your audio tracks created in the session view (with playlist mode disabled on the previous track). This is crucial for processing, mixing, and editing. This is useful for genres from electronic music and hip hop to opera and rock and roll.
Mixing Vocals
Layering
Layering vocals is a traditional recording process. When you record vocals, you may think that your take is amazing and you nailed it, and that may be true.
However, you will never be done with that single amazing take. The knee-jerk reaction needs to be to immediately record another take, then a double, then harmony, then another harmony, then an ad-lib (which can be background noise, talking, emphasis on certain words or annunciations, etc).
You'll quickly have a stack of vocal performances that will sound 10x more professional than your initial lone recording. There could be a use for it in certain situations, for a certain effect, but 95% of the time you're going to want to layer different vocal takes.
Processing Recorded Vocals

After you have vocal recordings that you're satisfied with, it's time for dynamics processing, i.e. compression and limiting, equalization, and filtering. Rarely are vocals so perfect that you don't have to do this. Also, depending on what style of music production you're engaging in, certain sounds and techniques may be necessary.
Typically, you're going to filter/EQ out the bottom end. Vocals hardly ever need 120Hz. Even if there's not much audibly in the recording, you still want to get rid of this, because it will add up at the end of a mix and clash with other low-end instruments and sounds. The objective is separation and clarity.
Next, you're going to want to compress the vocal recording so that it pops out a bit and brings the softer parts up, and compresses the louder parts. This will allow for more cohesiveness for the vocals to fit within the song, while still maintaining them as the centerpiece of the mix.
If you're recording vocals with electronic music producers, you'll probably end up utilizing side chaining so that you can duck the vocals with key input.
This means you can take a signal, usually, a kick or a snare (or both, i.e., parallel compression), route it to the side-chain input of the compressor you're using, and have that stimuli compress the vocals each time the signal is sent. This emphasizes the rhythmic aspect of the song, tying the vocals into the beat and vice versa.
You can perform this with different plugins and different DAWs, but not paired with all the playlist and comping features that are contained in Avid's flagship digital audio workstation, putting it at the top of the list of best daws for recording vocals.
Conclusion
In conclusion, this software is elite for recording vocals. You can use these techniques in live recordings as well. In that case, you might even use more filtering and EQ due to low-end growing due to proximity effects.
No DAW software goes as deep as Pro Tools when it comes to vocal recording, editing, and mixing workflows. The stock plugins are stellar, the main feature for comping is unparalleled, and you can apply it to any genre.
You can even use it when recording voiceovers for post-production projects. No other DAWs have as comprehensive an arrangement view for vocal organization. Pro Tools is not just a good DAW, it's a great DAW. Make your life (and everyone else's life) easier as a producer, mixer, engineer, and artist, and learn how to use it.


