


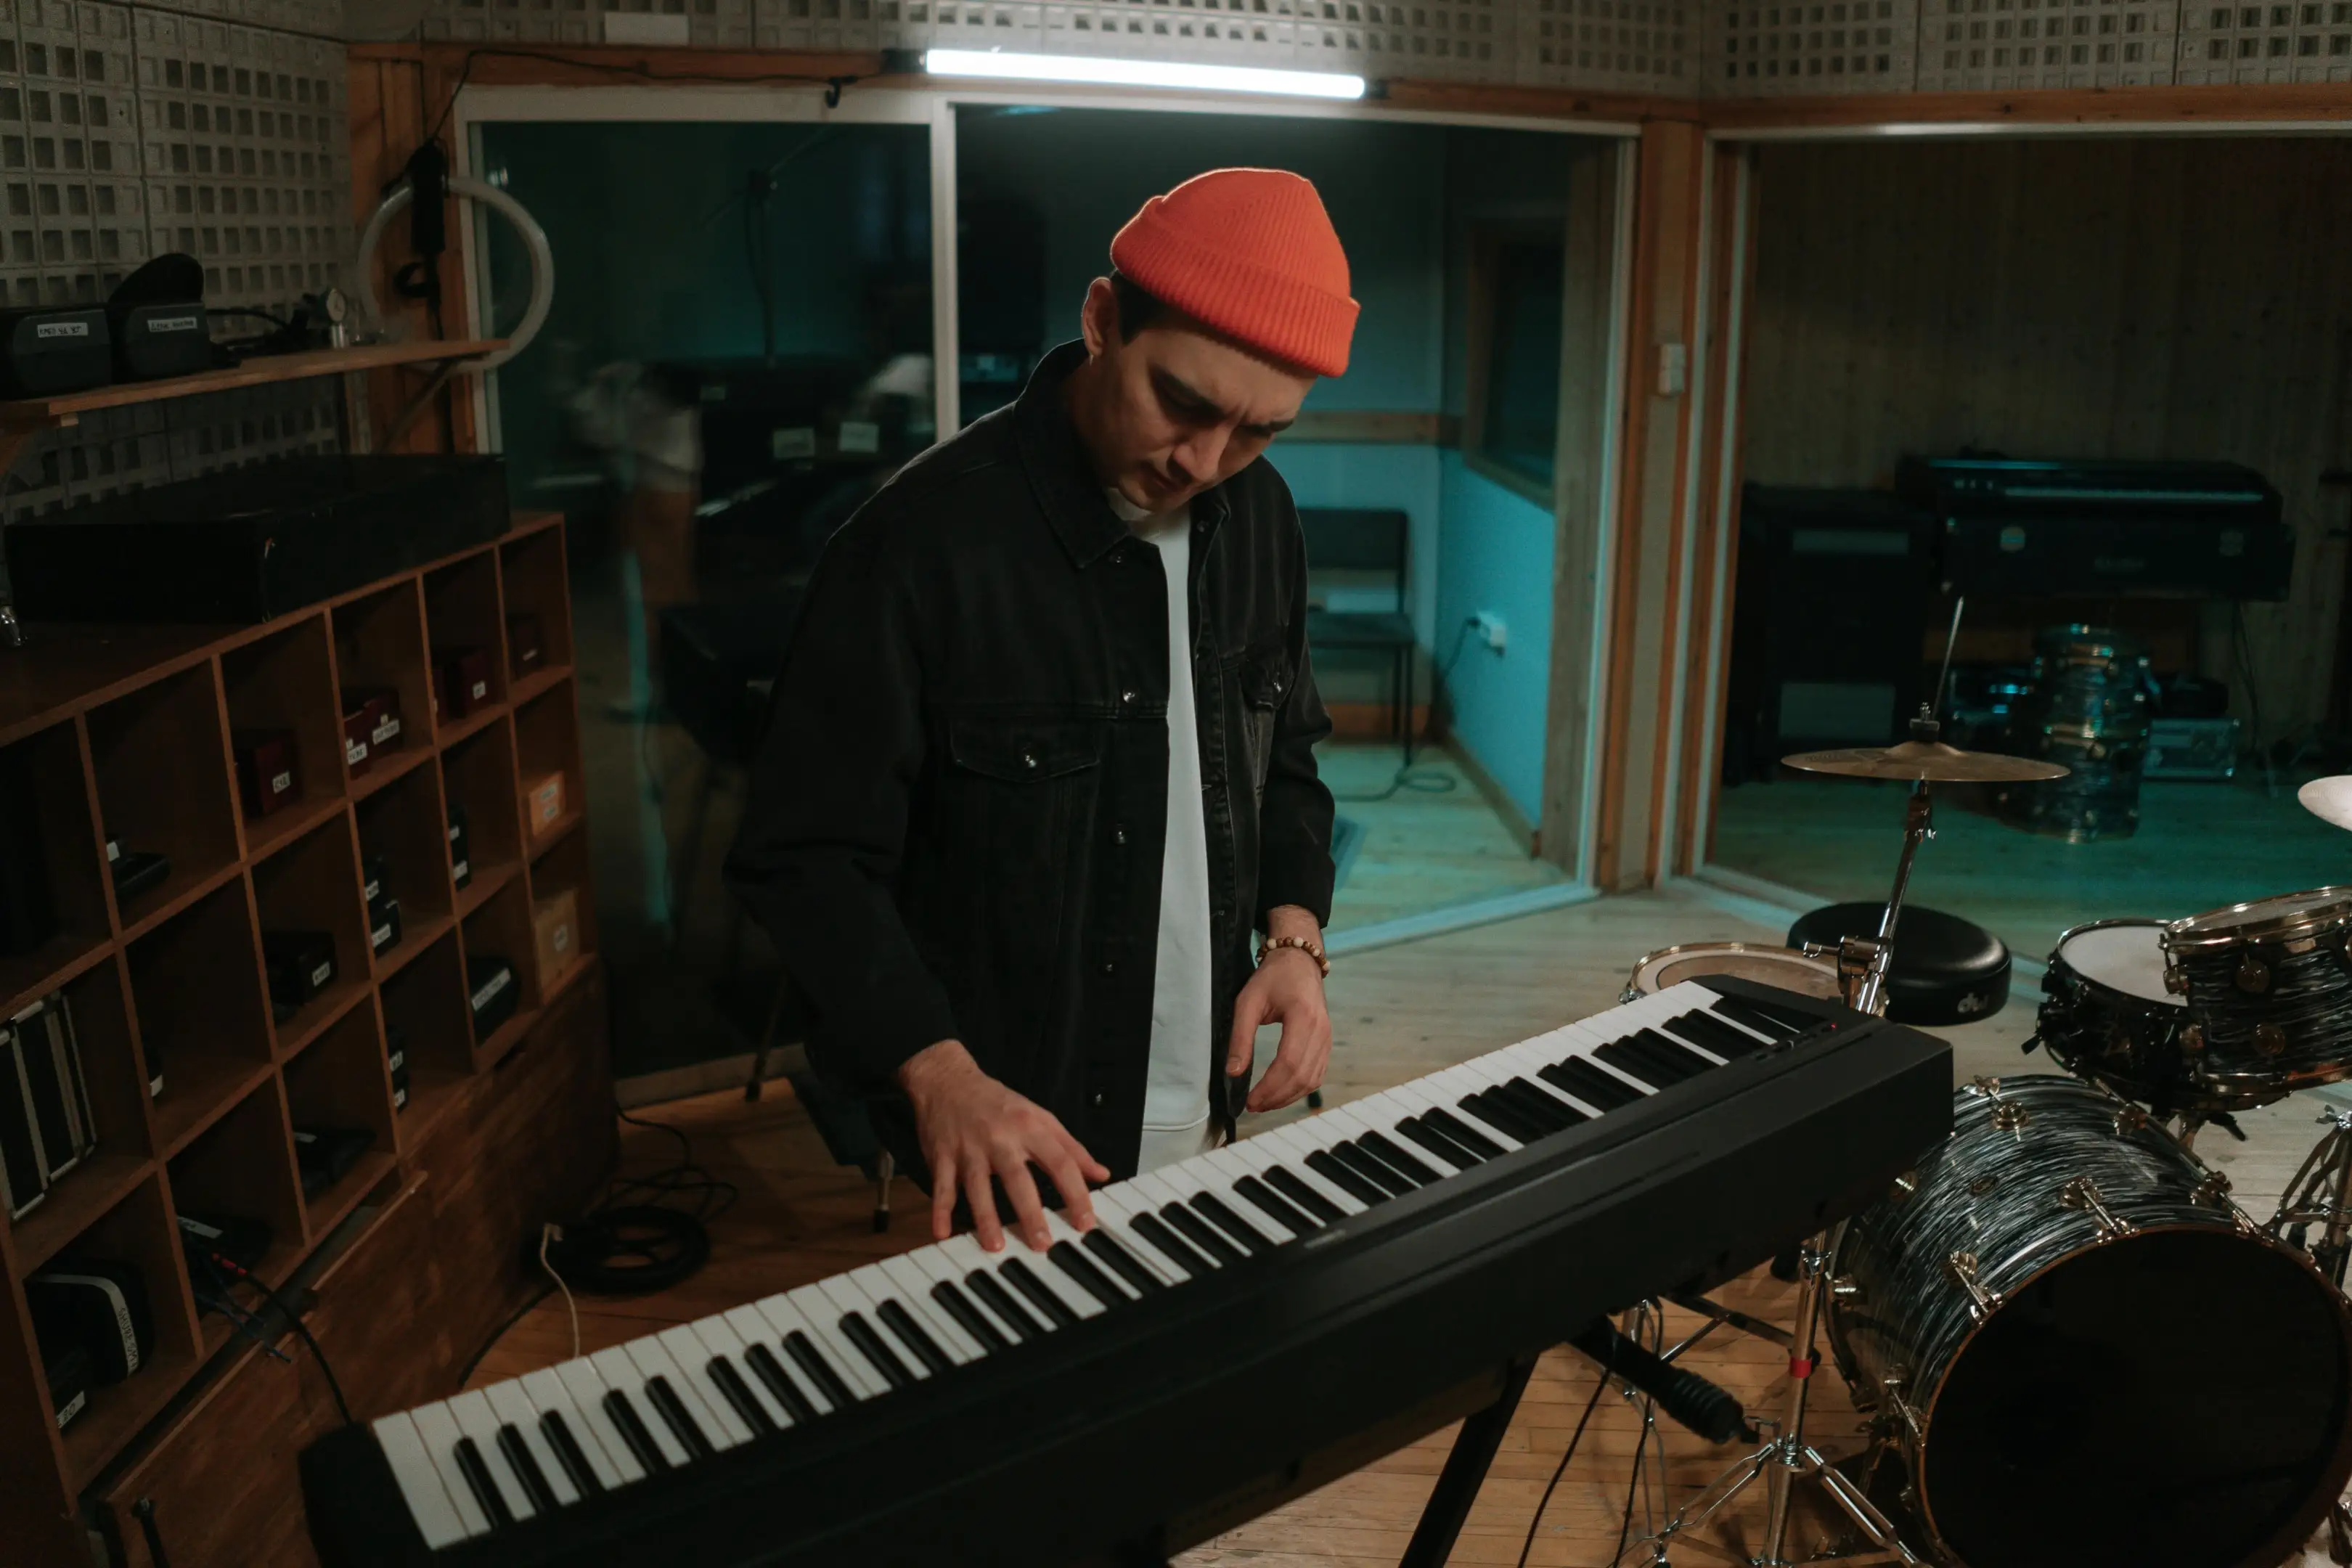
The piano is one of the most ubiquitous instruments across all genres of music for good reason. This instrument clearly illustrates some of the most foundational aspects of sound theory and acoustics, making it one of the best instruments to learn the art of music with.
The piano sound is also incredibly dynamic and can convey many ranges of emotion. While you can load up a piano or keyboard emulation in your digital audio workstation, it's worth having a strong understanding of how to record an acoustic piano, whether you're an engineer, musician, or music producer.
Not sure where to start? No worries! We'll provide the complete guide to achieving pristine sound quality in your piano recordings. Below, we'll detail how you can optimize your recording space, technique, and instrument to produce the cleanest sound possible.
How to Record Piano: In a Nutshell
Recording a grand piano can be more difficult than you might expect, as sound is produced from multiple points across the instrument. Every engineer has his or her own philosophy when it comes to mic placement and mic position while tracking the stereo image of a piano, but you can basically boil it down to a couple of strategies, which we'll dive into more below:
- Close Miking: Two omnidirectional, small diaphragm microphones are placed directly over the strings, just past the hammers of the piano. You'll want to have the microphones about 7 inches above the strings.
- Spaced Pair Condensers: Using identical condenser microphones, sound is captured between 1 and 3 feet away from the soundboard of the piano, angled outwards at 110 degrees. Increasing the distance between the two mics can create a wider stereo image in the recorded sound.
- X/Y Recording: A set of two mics, set slightly off axis in an X/Y pattern, are aimed towards the strings of the piano or near the pianist's head.
- Mid-Side Recording: A cardioid microphone is pointed directly at the sound source, with the lid open in the case of a grand piano. A bidirectional microphone is oriented sideways to capture the stereo image.
- Single Microphone: If you're in a pinch while piano recording, you can certainly use a condenser microphone to capture your piano. Have the mic stand set up to capture the string board of the piano, with the microphone angled at the soundboard.
The process of recording is always evolving, and what may feel like a direct sound may shift depending on the context of your composition and the room acoustics of where your piano is located. Just take a look at this video demonstrating how much microphone placement can affect the character of the recording:
What Will I Need to Record Piano? The Basics
Before diving into microphone placement strategy and recording considerations, here are the basic components you'll need to record a piano:
- Grand or Upright Piano in Good Condition: Your piano type will dictate how you record and capture the sound of the instrument. We'll detail some basic piano maintenance later on in this guide, but it should be tuned and in optimal condition. Mechanical noises and detuned keys will all carry through to the final recording.
- Microphones: You can record a piano with just one microphone, but it's certainly not preferable. Ideally, you have several microphones at your disposal to capture the sound of your keys. You'll find that many engineers record piano with pairs of identical mics and while its not a dealbreaker if all of your microphones are different, it may make it more difficult to achieve a balanced, cohesive sound. You should have microphones that have cardioid and bidirectional polar patterns. Some engineers also use omni mics to capture more detail, or take in the room's ambiance, but cardioid and bidirectional polar patterns are most common when it comes to tracking keys.
- Audio Interface: Presumably, you will be editing and tracking your piano recordings into a digital audio workspace like Pro Tools, Ableton Live, or Logic Pro. Your audio interface serves as the bridge between your microphones and your computer.
- Long, Balanced XLR Cables: Balanced cables are ideal when tracking something like piano, where you want to avoid noise interference as much as possible. You'll likely need several long (10 feet or more) XLR cables available since micing your way around the piano can create more distance than you might expect.
- Preamplifiers: While not a necessity, some microphones might perform best with preamplifiers, offering a bit more headroom and lower noise levels in your recording. You can also consider baking in hardware compressors or other effects into your chain on your computer, but remember that anything that's recorded directly "in the box" cannot be edited later. It might make more sense to focus on getting a clean recording first, and then moving to add effects and processing during the mixing stage of the process.
- Monitoring Path: If you're recording in the same room as your piano, you'll need to monitor the mix with headphones so that you don't create feedback in the microphones. You should use studio headphones so that you have a clear representation of the raw sound, not consumer-marketing headphones or Bluetooth hands-free options. These headphones should be connected directly into your audio interface so that you can listen back and make adjustments as needed throughout the recording process.
The Anatomy of a Piano
In order to understand how to direct microphone placement for a piano, you have to have a good idea of the different components of the instrument. We will be referring to grand pianos for the majority of this article since they are a bit more complex than upright pianos recording wise, but the parts all work the same: in an upright piano, the strings are just strung vertically to conserve space. As a result, upright pianos tend to have less dynamic range.
With that in mind, here are the roles of the different components of a piano:
Hammers
The hammers are the wood parts of the piano that strike the piano keys when played, thus creating sound. The hammers are covered in felt and the velocity at which the hammers impact the string can determine the overall quality of the sound.
Action
This is the main mechanical system that allows the keys and hammers to communicate properly. The action of the pianos includes levers, small mechanical parts, and pivots that allow for more detailed expression. In this way, the action of the piano provides nuance, giving way for a wide range of dynamics and expression.
Soundboard
The soundboard amplifies the vibrations of the strings of the piano. It is a large wooden board that lies underneath the bridge and strings, creating a rich, full sound. When played, the vibrations from the strings are transmitted to the soundboard. The large surface area of the soundboard and specialized wood vibrate and create an amplified sound. Soundboards can be made out of a variety of wood, but spruce is common.
Tuning Pins
As you might expect, the tuning pins are responsible for controlling the pitch of the piano. These pins are metal and rest within a wooden pinblock, where the strings of the piano are wrapped around these pins. To tune the piano, piano technicians utilize a specialized wrench which alters the tension and tuning of the overall sound. It's recommended that pianos are tuned once a year as a general rule of thumb.
Bridge
Similar to a guitar, the bridge of the piano is a wooden strip that is attached to the soundboard. When played, the strings exert vibrations onto the bridge, transmitting the vibrations of the strings to the soundboard to create sound. The type of wood used within the bridge of the piano can speak to the overall quality of the instrument.
Damper
The damper is a felt pad that stops the strings from vibrating after they've been played, stopping the sound. The damper rests on the piano strings so that when a key is released, the damper and string intersect, stopping the sound. Pianos have what is known as a damper pedal, which lifts all the dampers at once, providing a sustained effect after the keys are released.
The Drawbacks of Using a Digital Piano
You might find yourself thinking, "Why wouldn't I just use a digital piano?" While this method is perfectly valid, it can come with some drawbacks to take into consideration:
- The Imperfections of Human Performance: Digital pianos, and any virtual instrument, can sometimes be a little too perfect. We naturally crave the small imperfections that come from real musicians performing live, and so digital pianos can have the tendency to sound a bit lifeless if not contextualized carefully.
- Loss of Dynamic Range: Playing piano live will create a higher level of dynamic range and expression, which can do a lot in terms of adding to the emotion of a piece.
- Virtual Instruments Can Have a Synthesized Quality: Virtual instruments are infamous for lacking some level of realism. If you're going for a true-to-life piano sound, you might have trouble replicating a true acoustic piano without the aid of potentially prohibitively expensive sample libraries. Digital piano can also require more programming than live piano, since you may have to write in parameters like velocity and volume automation, whereas these characteristics are just baked into a live performance.
- Acoustic Context: Sometimes, it's not just the sound of the piano you're looking for; you're also trying to capture the space in which the piano is played. Digital keys do not instantly carry the tone and space differences that say, an acoustic piano would carry when played in a small room versus a church. Capturing the tones and physical space surrounding an actual piano can help with world-building and make for a more immersive sound.
What type of microphone is best for recording piano?
There are many different types of microphones that can be used to record a piano. Here is an overview of the main categories so that you can select the best option for tracking your keys:
Condenser
The condenser microphone is the most popular choice in the recording studio and when it comes to recording piano, for good reason. Condenser microphones produce a clear, crisp sound that captures a wide range across the frequency spectrum, making them excellent all around recording microphones.
Condenser microphones all require the use of Phantom Power to operate, which can be provided through the use of a compatible audio interface, or in some cases, built into the mechanism with an internal battery.
Dynamic
Dynamic microphones are the most durable out of all microphones, making them a great choice for capturing particularly loud sound sources that condenser mics or ribbon mics might otherwise be too sensitive for.
The trade off is that dynamic microphones tend to be a little less detailed in terms of sound pickup, so while they may make a great room mic for picking up just enough ambiance in the piano room, they might not pick up the nuances of your pianist, depending on the situation.
Ribbon
Ribbon microphones are not traditionally used to record piano, but they are worth understanding as you make your choices as an engineer. Ribbon microphones are similar to condenser mics in that they are highly sensitive, with a large diaphragm, picking up much of the sound across the frequency spectrum.
In terms of timber, they can read a bit darker than the famously bright condenser mic. It's important to note that older ribbon microphones are extremely fragile and ofter are passive, meaning that they do not require Phantom Power.
In fact, the use of Phantom Power on vintage ribbon microphones that do not require it as such can actually damage the microphone, which speaks to the importance of knowing the ins and outs behind your equipment before incorporating it into a session.
Understanding Polar Patterns
Recording piano requires that you have a basic knowledge of several microphone polar patterns. Polar patterns are just pickup patterns that dictate the way in which any particular microphone picks up sound.
Many microphones have multiple polar patterns to choose from. You'll mainly be working with cardioid (the microphone picks up sound from the front in a "heart" shaped pattern), bidriectional or figure 8 (the microphone picks up sound from the front and back but not the sides), and omnidirectional polar patterns (the microphone picks up sound from all sides) when tracking piano.
How to Prep Properly For Your Recording
Ahead of your session, be sure to do the following to ensure that you're in for an productive recording:
Gain Staging
Gain staging is a fancy way of explaining that you should set the gain levels of your instrument properly for each stage of recording. Make sure you test out your recording settings before your session player arrives so that you have a good baseline to draw from. You will likely have to make some adjustments once your player is at the session, but it's a good idea to have everything more or less dialed in.
Monitor Levels
In live recording settings, actively monitoring dynamics is paramount to ensure that you don't unintentionally bake in debilitatingly low signal or clipped audio into your recordings.
Microphone Placement
Make sure your microphones are more or less put into position before your session player has arrived. This will give your the opportunity to experiment with different microphone techniques and pick one according to taste so that you can focus on your pianist's performance upon their arrival.
Pianist Comfort
As in any session, coaching your musician is a part of the job of the engineer. Make sure that they are well hydrated, physically comfortable, and offer words of encouragement throughout the session to keep the mood running high. All of these details can definitely come out in a recording.
What is the best way to record a piano?
The best way to record piano ultimately comes down to your preference as an engineer and the overall context of the record. Here are the main strategies you can use to record piano:
Close Miking
The phrase "close miking" refers to placing microphones inside of the piano, positioning microphones above the strings and hammers. Many engineers use this technique since it creates direct, bright, and intricate recordings, which are particularly useful for pop and rock contexts where you want the piano sound to cut through in the mix.
While useful, close miking might not be the perfect choice for every situation since it can occasionally overemphasize the percussive nature of the hammers, or even pick up mechanical noises of the piano if the microphone placement is too close.
Ambient Miking
Ambient miking refers to recording sound from outside the piano. This can create a more natural sound, and will include the ambience of the space that the piano was played in. Ambient mics are often placed in the pianist's perspective, or several feet from the piano, aimed towards the soundboard.
This technique is great for building a natural sound, but it can be challenging as without proper room treatment, you can be susceptible to capturing unnecessary reflections and room noise.
Combination Miking
In most professional settings, a combination of the two techniques (close and ambient miking) are used to provide a balanced, clear sound with a sonic distinction setting. This method is definitely the most equipment and data-intensive out of the three, but it's the most surefire way to get a thorough recording of your piano sound.
Direct Sound Recording with Digital Pianos
There are some digital pianos and hybrid keyboards that allow you to directly connect to your DAW via a line or MIDI connection. These keyboards won't have the same sound as a traditional piano since they are essentially already pulling from electronic sound libraries rather than creating sound in real time, but it's worth considering if you're looking for a happy medium.
Recording Piano Methodology: Microphone Placement Strategies
Now that we have an overview of how engineers approach their microphone positioning and placement, here are some key strategies to inform your microphone placement and recording:
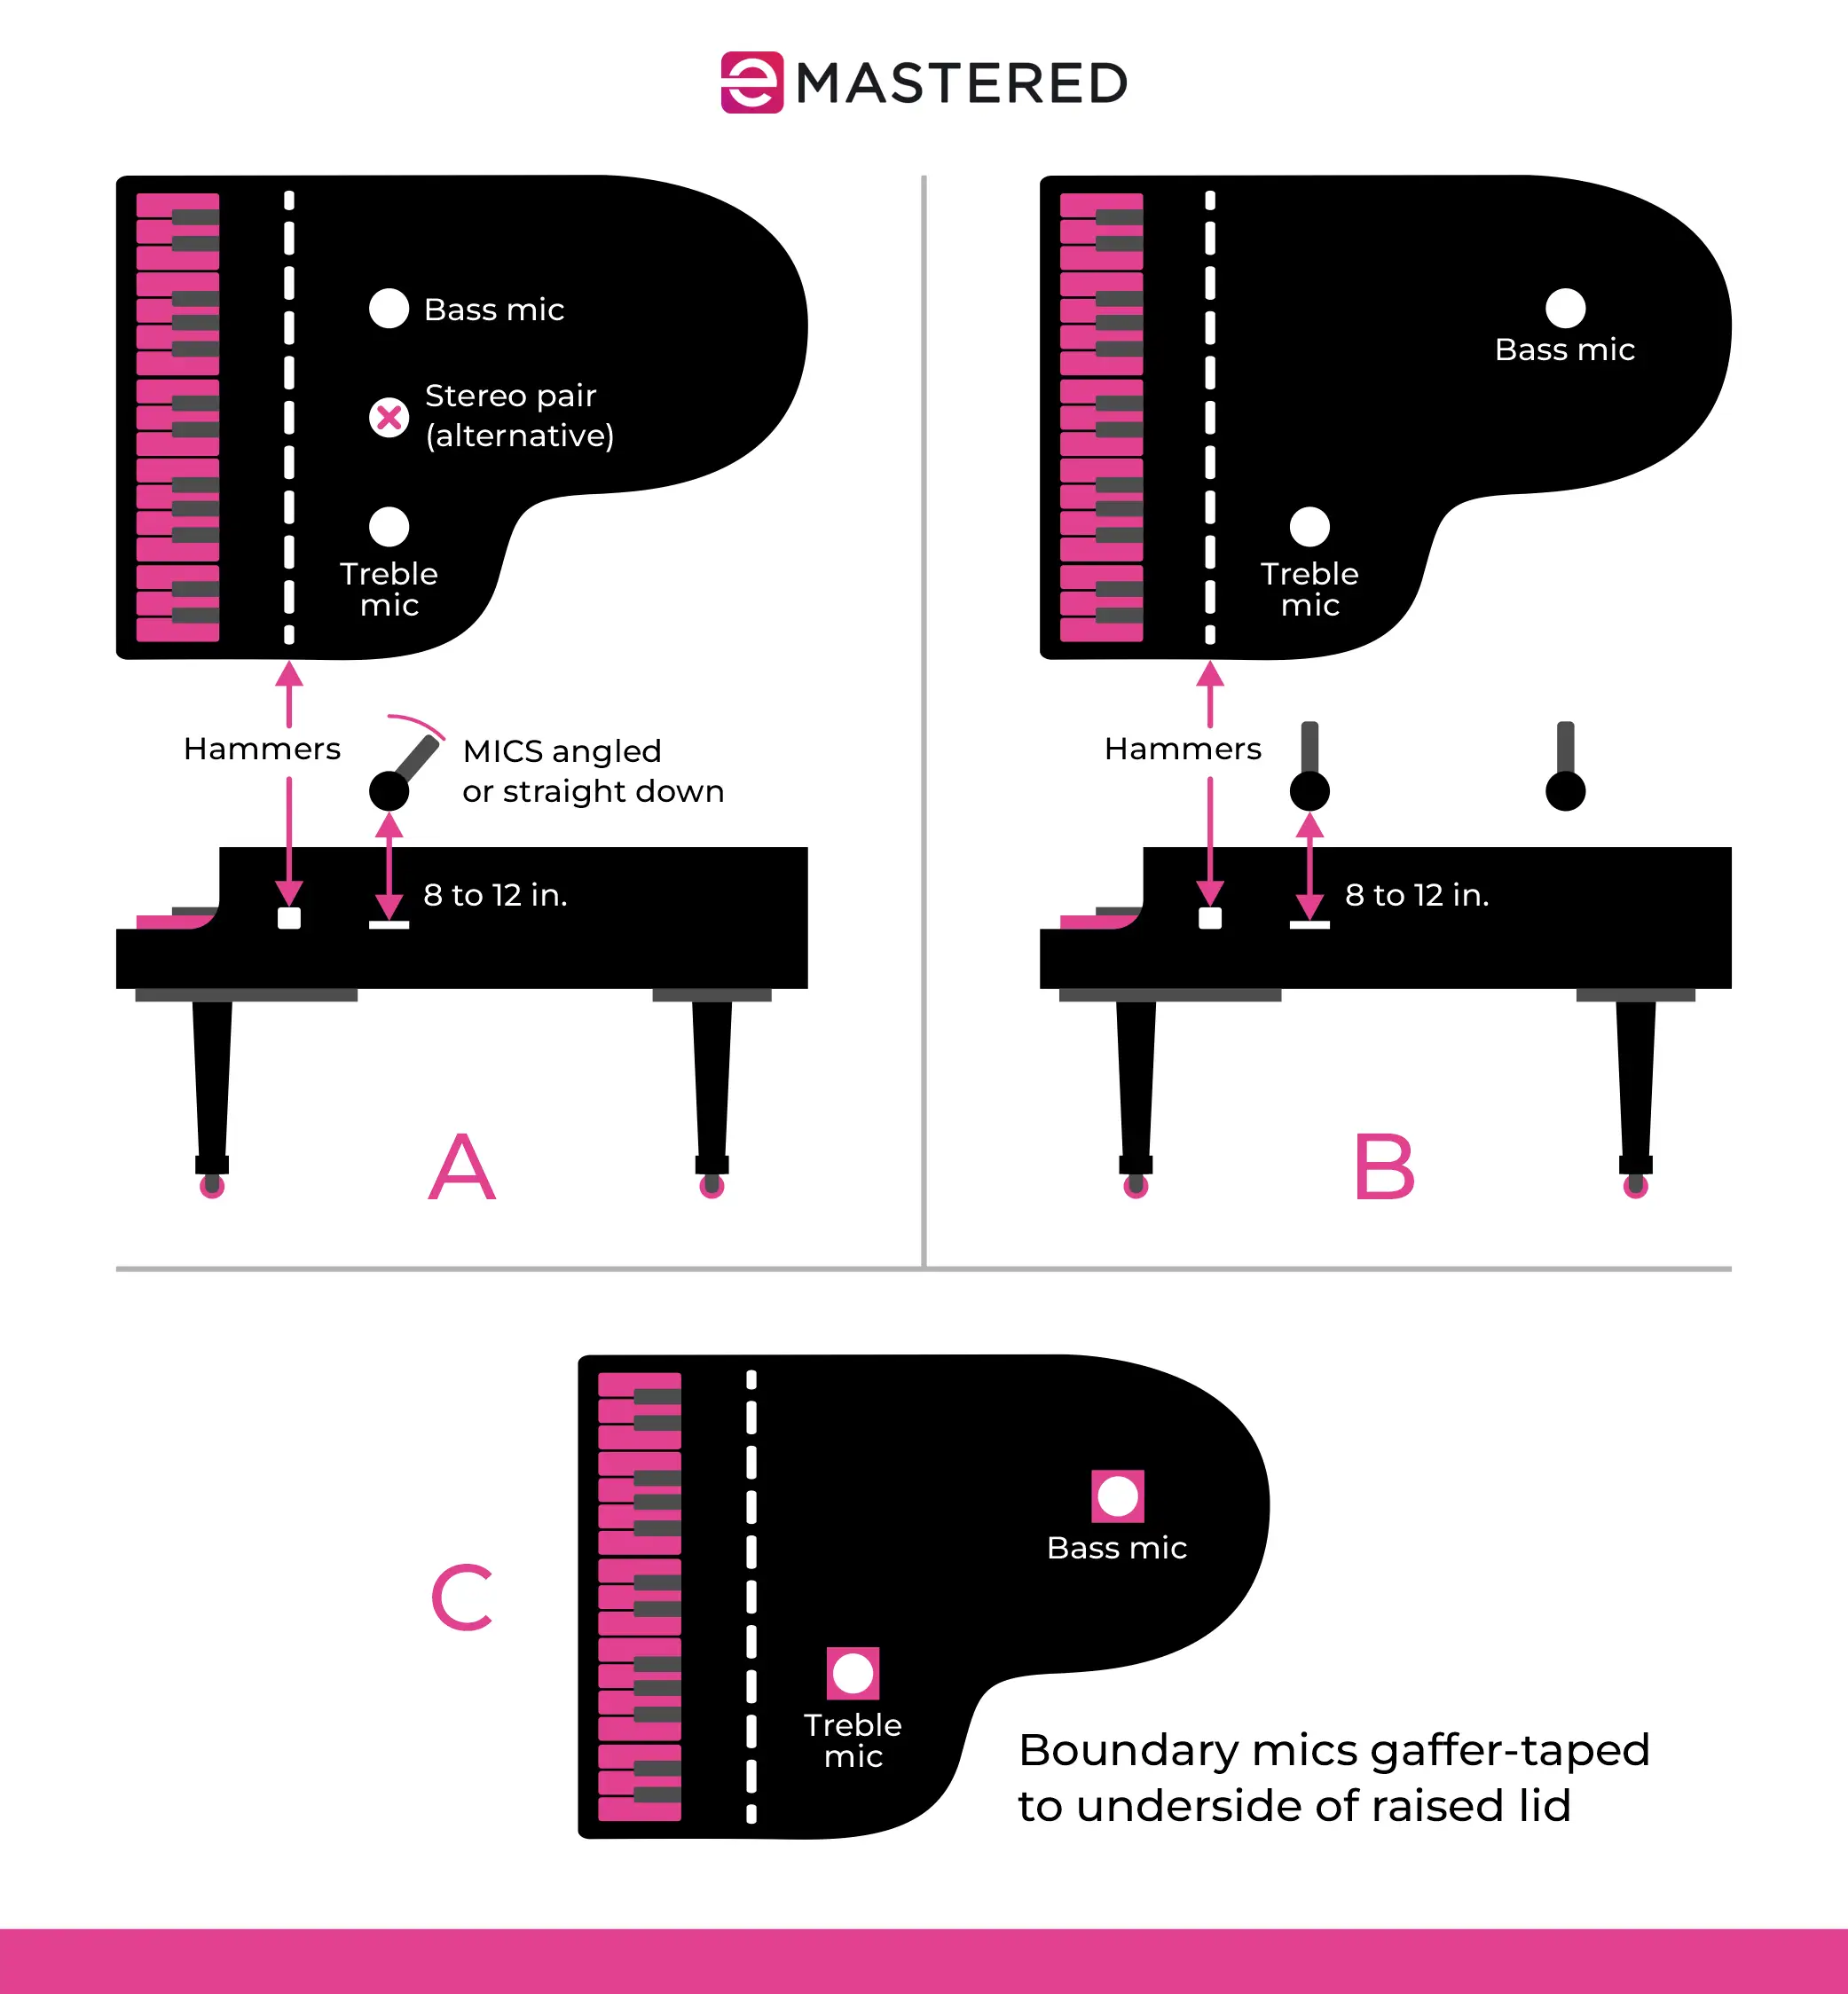
Spaced Condenser Pair
Two identical microphones (usually small or large-diaphragm condensers) are positioned a few inches above the hammers of the piano. You're aiming to position one microphone towards the higher strings and another on the lower strings to capture both the bright and treble sounds.
You might have to play around with how fair each microphone is positioned above the hammers, as with this method, you can accidentally capture overpowering mechanical noise. If you're getting excess noise in your recording, lift your microphones higher above the hammers and consider bringing down the gain.
This approach has several variations, namely the ORTF or AB Methods. ORTF, known as side-other-side, involves angling two identical microphones outwards at about 110 degrees, with the capsules of the microphones spaced about 6 inches apart. This method is designed to mimic human hearing, giving you some imaging spread while still being mono-compatible.
The AB method involves placing two identical microphones in parallel, with a distance of 3 feet or more apart aimed at the soundboard or from the player's position. You'll definitely achieve a wider stereo image with this method, but it can create too much space between the two sources if the stereo pair is placed too far apart.
X/Y Configuration
In this method, you'll again use two cardioid condenser microphones. These microphones are placed with their capsules very close together, angled at 90 degrees, creating a sort of X/Y pattern as exemplified in the diagram.
Microphone placement in relation to the piano may vary, but near the center of the strings, right above the player's position, or angled towards the soundboard are all good places to start. This provides a focused stereo image that's still mono-compatible for mixing.
Blumlein Condenser Pair
This technique gets its name from Alan Blumlein, with the idea that two figure-8 or bidirectional microphones at an angled intersection would more accurately recreate the spatial characteristics of a sound. You can use any two identical condenser microphones that have a figure 8 pattern to achieve this effect, where one microphone is positioned upright, with its diaphragm angled at the sound source.
The second microphone is directly above the original microphone, upside down at a 90-degree angle. Engineers turn to the Blumlein variation since you can capture the direct sound of the piano while also getting some of the natural ambiance of your recording space. As a result, you're left with a naturalistic, spacious stereo image.
Single Condenser Microphone
Ideally, you're able to set up more than one microphone to create a fuller stereo image, or even as a contingency if one of your recordings does not come out in the way you intended. However, if you can only get one microphone to track your piano, you'll find to get a high-quality condenser microphone.
This mic can either be placed inside the piano (but be careful as large diaphragm condensers can be sensitive to close transients), above the hammers, or strings. You can also affix the microphone to a stand about 3 feet away from the piano, angled at the sound board with the top of the piano open. Experiment with omnidirectional polar patterns with interior condenser mics for a varied sound.
How to record piano using phone?
A phone microphone is not ideal when it comes to tracking clear, crisp, professional piano recordings, but it can work if you're going for a low fidelity sound or just want another recording perspective and you only have one professional microphone available.
You can use DAWs like BandLab or simply record using your Voice Memos app. You would place your phone similarly to how you would place a microphone, resting it on a tripod or holder for hands-free stability. You can hear the difference between a phone recording and other options in this demonstration:
What is the best app to record piano?
An app is not going to change the recording capabilities of your phone, so in terms of quality, there isn't really a "best" app.
If you can, upgrading to a single condenser microphone, even if it's a little more user-accessible via USB microphones, would be much more beneficial to upgrading your recording process. If you're bent on recording with your phone alone, you can consider checking out hardware add-ons like the Audigo recorder.
Miking Upright Pianos
With upright pianos, the soundboard is located at the back of the instrument, in a vertical configuration. Sound escapes from the front of the keyboard, which will affect where you place your microphones. It may be more difficult to create a natural, wide stereo image than with a grand piano. For a more detailed guide to miking upright keys, check out this video:
Perfecting Your Room Acoustics
Capturing a stellar piano recording isn't just about the piano or microphones, it's also incredibly important to tailor the sound of your space. You'll want to select a room that is well balanced between being too "dead" and overly reflective in terms of sound profile.
If you have the bandwidth to invest in acoustic treatment, do so, or at the very least, eliminate the opportunities for excessive echoes in your recordings. Ideally, your recording environment has enough space to where your piano's sound can reflect properly across the space.
Piano Performance Considerations
Don't forget that your recording is only as good as the performance and how any particular expression fits within the context of a composition. Make sure you optimize piano voicing and dynamic expression as it relates to the song. The major drawback of recording any instrument live is that you can not fine tune parameters of performance like dynamics, velocity, and general tone or expression after the session has concluded, so don't forget to asses as needed.
Should I Use Two Microphones by Different Brands?
When it comes to microphone selection, you'll definitely want to go for identical pairs for X/Y recording or when opting for a condenser pair method. For different microphone positions, having the same microphone is not as important.
However, if you're using two mics with the intention of capturing the full range of the stereo image, you should use identical microphones because otherwise, they won't feel consistent and will defeat the purpose of trying to recreate the stereo image.
Once You've Completed Your Recording
Once you've finished tracking your piano recordings, the work doesn't stop there! Here are the basic steps you can expect during the post-production process:
File Management
It's easy to overlook file management, but this step is critical for live recording and production. After your session, take the time to carefully name each of your tracks, signifying where you recorded as well as the microphone you used so that you have a clear reference later.
Once you've labeled your tracks, create a backup of them, whether that's on a physical drive or uploaded to a cloud drive service. You'll never know when you might need access to the original recordings.
On that note, whenever you start manipulating the files within your session, it's good practice to save a new session version whenever you do some major work within your project. You might not need to now, but you'd be surprised how often musicians request to revert back to some of the earliest versions of a project.
It may seem redundant, but I advise musicians to back up project versions they're particularly excited about on a hard drive or to the cloud to be sure they have all of their project saved in the event of a computer error.
Microphone Storage
Microphones are sensitive to humidity fluctuations, dust, and physical interference. Take the time to put away and store your microphones properly to keep them in tip-top shape for future use. Remember that in particular, condenser and ribbon mics are sensitive and can have their capsules damaged from being bumped or falling to the floor.
Balancing Levels
The most important part of mixing is balancing levels. If your tracks were properly gain-staged, this process should be fairly straightforward. Before reaching for any effects, get your levels in check with your piano parts in relation to the rest of the mix.
If you tracked with multiple mics, it's a good idea to put each mono and stereo recording within a single group. While you'll process each individual track differently, grouping them and adding compression can create a more cohesive feel across your piano tracks.
Comping
When recording audio live, you're bound to find imperfections across the recordings. Once you've achieved a rough working balance of your piano tracks, you might be able to get away with stitching together (or comping) multiple recordings into one main track to create a more perfected performance.
As with any compiled tracks of audio, it's imperative that you add fades in between audio tracks to ease the transition into other parts of the audio.
Effects
When it comes to classical music or any genre in which the piano is kept fairly pure, you shouldn't have too much of a need for effects.
However, you can consider cleaning up imperfections with EQ and reducing the dynamic range with compression. A light use of reverb can also help a piano recording gel with the room sound if you're looking for more of a dramatic effect or want to artificially enhance the stereo image.
The Piano is Powerful
There are few instruments that are as universally and instantly recognizable as grand pianos. This instrument continues to move forward the music culture we know today, despite dating back to some of the earliest music recordings ever dated.
Hopefully, this guide provided you with a stronger perspective on how to track piano sounds from a variety of perspectives, but at the end of the day, remember the resounding rule: trust your ears.
There is no one right way to incorporate a sound into a piece of music, namely because the creative process is so dynamic. Not every track is meant to be paired with perfectly recorded keys - in some cases, it may make more sense to have a lower fidelity recording to fit better within the context of your composition.
If it sounds good when placed in the world of your track, it's worth tracking. Use these general strategies and tips to help guide your initial recording technique, but don't be afraid to break the rules should the composition call for it. Having fun recording piano in your next mix!


