


Jungle might sound like total rhythmic anarchy at first, with its lightning-fast breakbeats, low-end rumble, and samples from who-knows-where, but once you pull back the curtain, it’s one of the most rewarding genres to produce. It’s chaotic, sure, but it’s the kind of chaos that makes sense once you learn the rules (and how to break them).
Despite its breakneck tempos and raw energy, jungle is surprisingly beginner-friendly to produce. The willingness to let your drum programming get a little unhinged is pretty much the ticket.
In this guide, we’ll dig into what makes jungle music and walk you through how to produce it step by step, from drums and basslines to atmosphere and arrangement.
What is Jungle Music?
Now, obviously, you can’t make jungle if you don’t know what it is . Unfortunately, there are a lot of producers out there, especially in electronic music, who jump into genres without ever actually soaking in the real thing.
Jungle isn’t just a subset of drum and bass. It’s the blueprint. It came first. Born in early-’90s UK rave culture, jungle was a wild blend of breakbeats, dub, reggae, hip-hop, and acid house. It eventually evolved and branched into what we now know as drum and bass, which is generally cleaner, more clinical, and less chaotic in structure.
Jungle, by contrast, is all about vibe. It’s gritty. Rough around the edges. Heavy on character. It came out of a DIY scene where producers were pushing cheap gear to its limits, chopping up funk drum breaks like the Amen and Think breaks, and fusing them with deep dub basslines, spaced-out atmospherics, and sound system energy pulled straight from Jamaican ragga and dancehall, until it gradually split off into its own beast.
Core Jungle Characteristics:
- Breakbeat-heavy drums (typically 160–170 BPM) with lots of edits, ghost notes, and syncopation
- Deep, rolling sub-basslines that you feel before you hear
- Chopped vocal samples , dub sirens, reggae stabs, and movie snippets
- Lo-fi textures and grit — jungle is unapologetically raw
- Atmospheric pads and FX that create tension and space
If you’re just getting into jungle production, here’s the move: listen to as much jungle as possible .
Seriously, crate-dig like it’s 1994. Study the classics (think LTJ Bukem, Remarc, DJ Hype, Dillinja, Aphrodite), pay attention to structure, and let your ears guide you. Reference those tracks while you produce. Not to copy but to understand . Jungle production is as much about feel as it is about technical skill. You need to internalize the swing, the space, the madness.
How to Make Jungle Music
Make Some Breakbeats
If jungle music had a beating heart, it’d be the breakbeat. No break, no jungle. It’s that simple.
So what is a breakbeat? In short, it’s a looped drum break, usually lifted from old soul, funk, or R&B records, where the drummer went off-script and played a fill or solo. These raw, live grooves got sampled, chopped, and reimagined into the frantic, syncopated rhythms that define jungle.
https://www.youtube.com/watch?v=GxZuq57_bYM&t=1s
A few of the usual suspects:
- Amen Break – The holy grail. Sourced from The Winstons’ “Amen, Brother,” this six-second loop has been sampled thousands of times.
- Think Break – From Lyn Collins’ “Think (About It),” this one’s all snap and sass.
- Apache Break – From The Incredible Bongo Band’s “Apache,” a funky, tribal roller.
- Hot Pants Break – A James Brown classic, filled with tight snares and crisp hi-hats.
While these loops are the secret sauce, you can’t just drop a loop and walk away. You’ve got to chop it. Great Jungle producers will slice a breakbeat into its individual hits, including kicks, snares, and ghost notes, and rearrange them into patterns that are wild but still groove.
Now, if you’re just getting started, you’ll find tons of polished, pre-chopped jungle loops on Splice, many already at that sweet spot of 165–170 BPM. And that’s great. But for the sake of this guide, we’re building this thing from scratch. Why? Because knowing how to do it yourself means you can actually bend the rules later.
Here's the initial break I started with, which is at 126 BPM:
And here's what I ended up with after speeding it ups to 170 BPM:
The next step from there was to slice it up.
There are two main ways to slice up a break:
- Manually in your DAW – Drop it on the grid, zoom in, and slice every hit by hand. Tedious? Maybe. But it gives you ultimate control.
- Using a sampler – Load the break into something like Ableton’s Simpler, FL’s Slicex, or Logic’s Quick Sampler. These tools will auto-chop it into zones that you can trigger with MIDI.
Manual Chopping
Alright, time to get our hands dirty.
While there are plenty of tools out there to automate break slicing, I’m firmly in the manual chopping camp. Why? Because it gives me control over every little nuance.
One thing you’ll notice pretty quickly when you start chopping breakbeats is that they usually aren’t on the grid . These were live drummers, sometimes playing without a click, so their timing naturally drifts. That swing is part of the magic, but it also means if you just drop the loop into your project and expect it to behave, you’re in for a surprise.
What I do is isolate the kick and snare first and tighten them up to my project tempo (in this case, 170 BPM). I’m not quantizing every hit like a robot - just nudging those key hits into place so the groove drives forward without dragging. The ghost notes and hi-hats can breathe a little. That loose syncopation gives jungle its signature skittering energy.
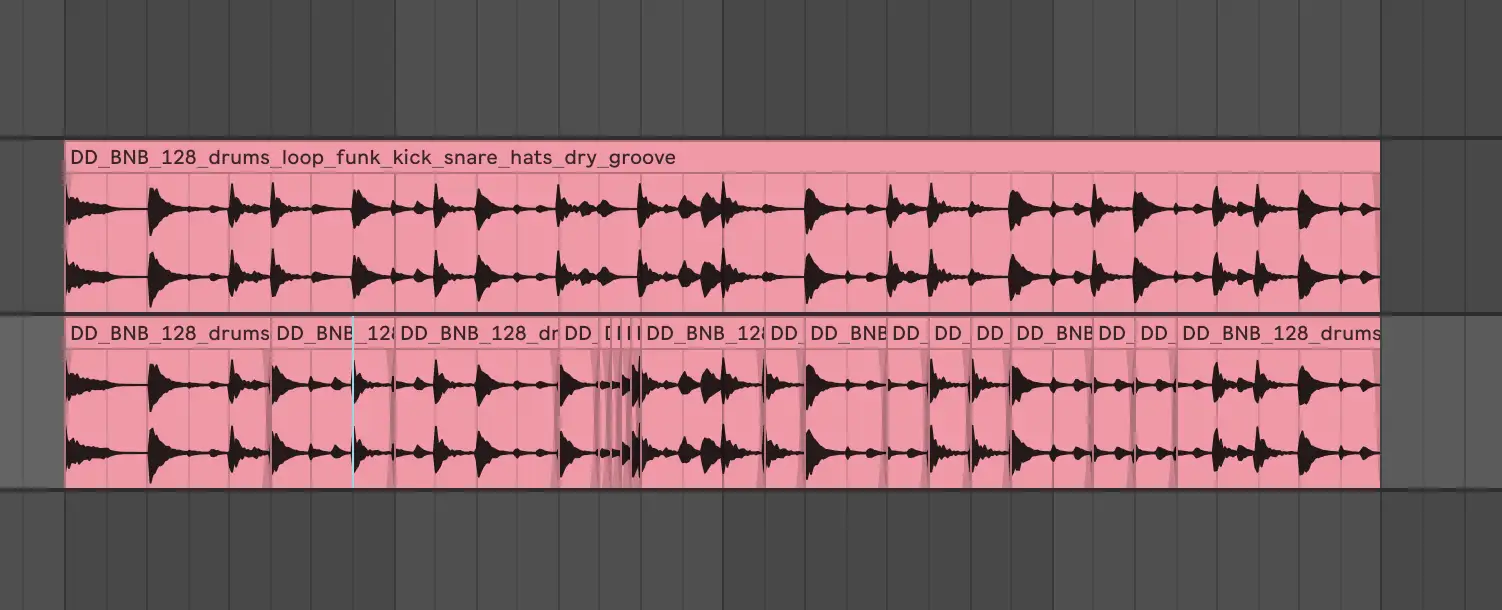
I dropped my break into a new audio track and sliced it up manually. Then I rearranged the hits into a new 4-bar loop. One little touch I’m proud of: in bar two, I created this glitchy stutter effect on the snare, just a quick volume automation curve , and it gives the loop a jolting, broken-machine kind of vibe that I couldn’t get from any stock loop.
Chopping with a Sampler
Not everyone wants to spend time trying to zoom in on waveforms and line things up, and that’s totally fine. If manual chopping isn’t your thing (or if you just want to speed up the workflow), your DAW’s built-in sampler is your best friend.
I’m using Simpler in Ableton Live for this demo, but the concept applies across the board. FL Studio’s Slicex , Logic’s Quick Sampler , or even Maschine’s Slice mode can all get the job done.
How to Slice a Break with Simpler
Here’s how I do it in Ableton:
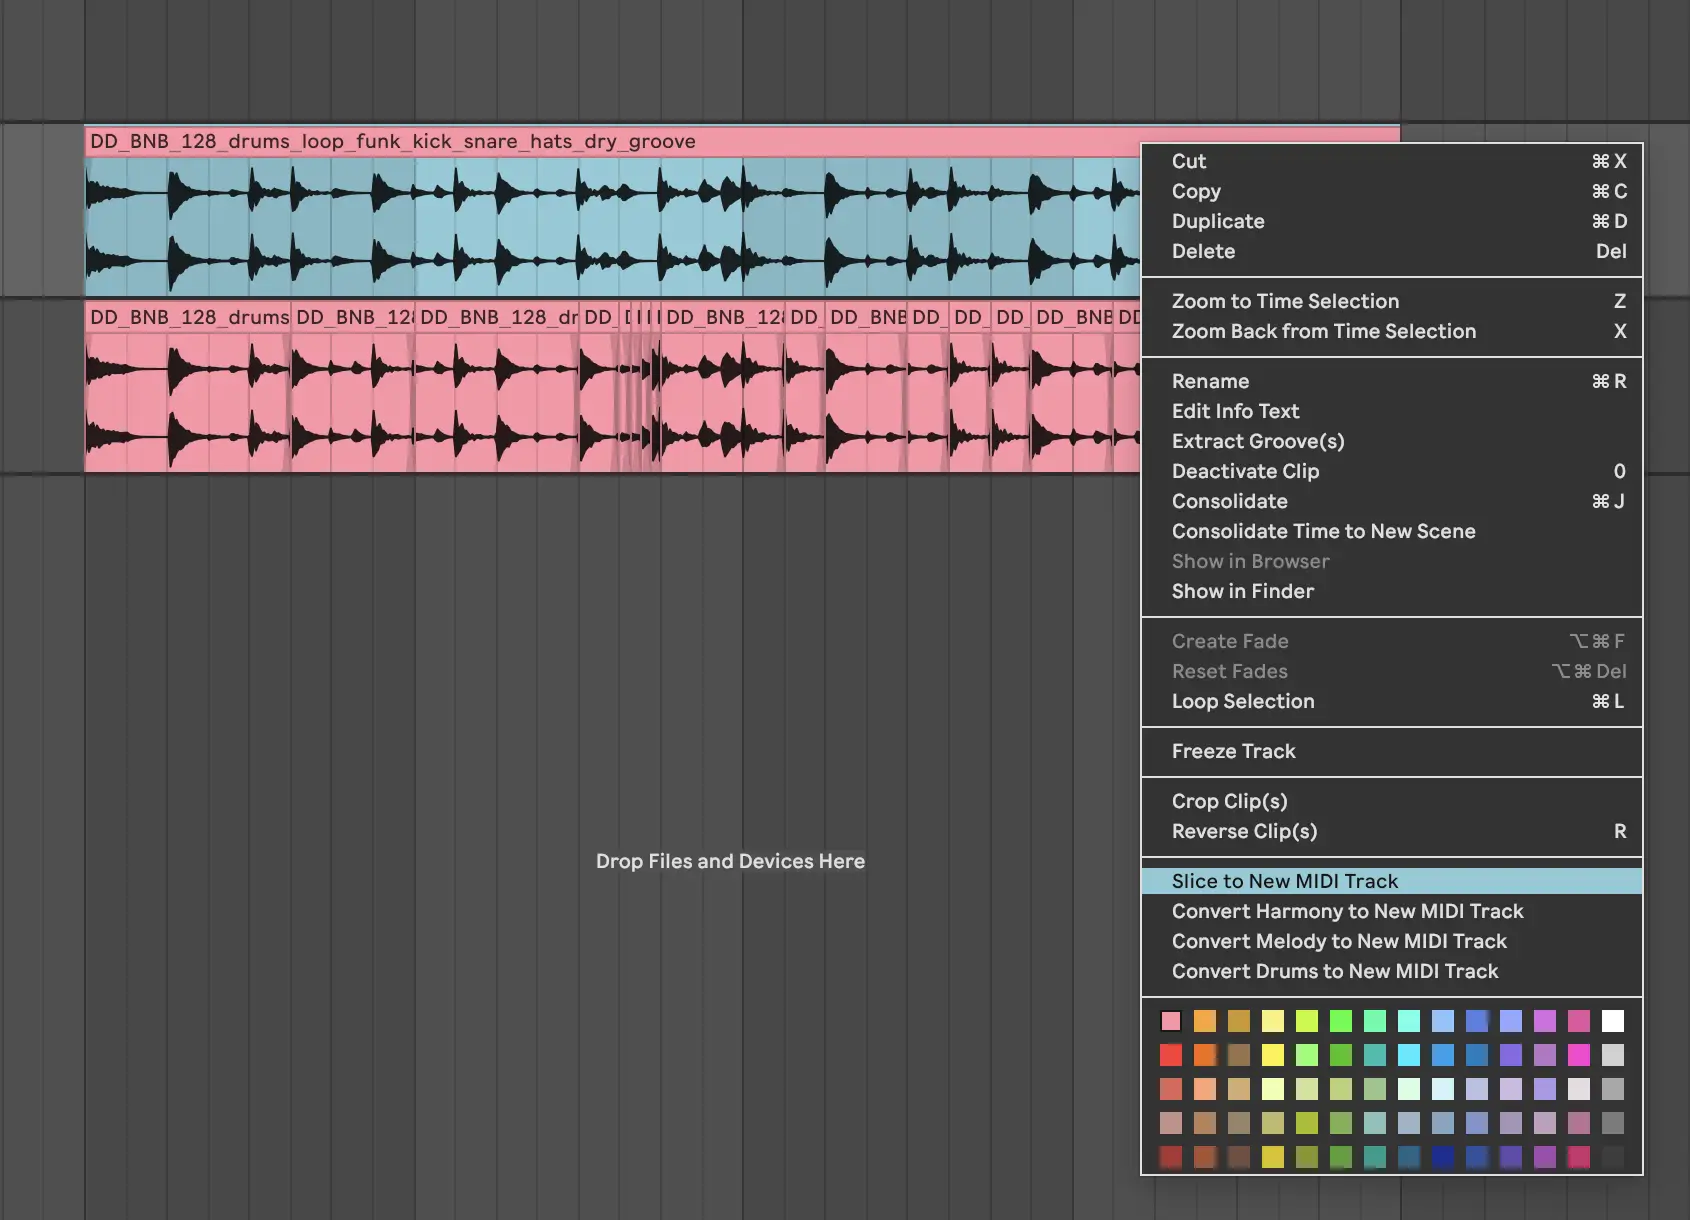
- Drop your breakbeat onto an audio track.
- Right-click on the clip and select “Slice to New MIDI Track.”
- You’ll get a prompt asking how you want to slice — for jungle, I recommend choosing 1/8 or 1/16 note intervals , or “transients” if your break has nice clean hits.
- Ableton creates a new MIDI track with a drum rack, and each slice of the break is now mapped to its own pad .
Boom. You’ve now got a playable jungle break.

With those slices mapped out, you’ll get a fresh MIDI clip sitting in your piano roll. From here, you can draw in a new rhythm using your sliced hits like individual drum samples. Kick on C1, snare on D1, maybe some hats scattered between.
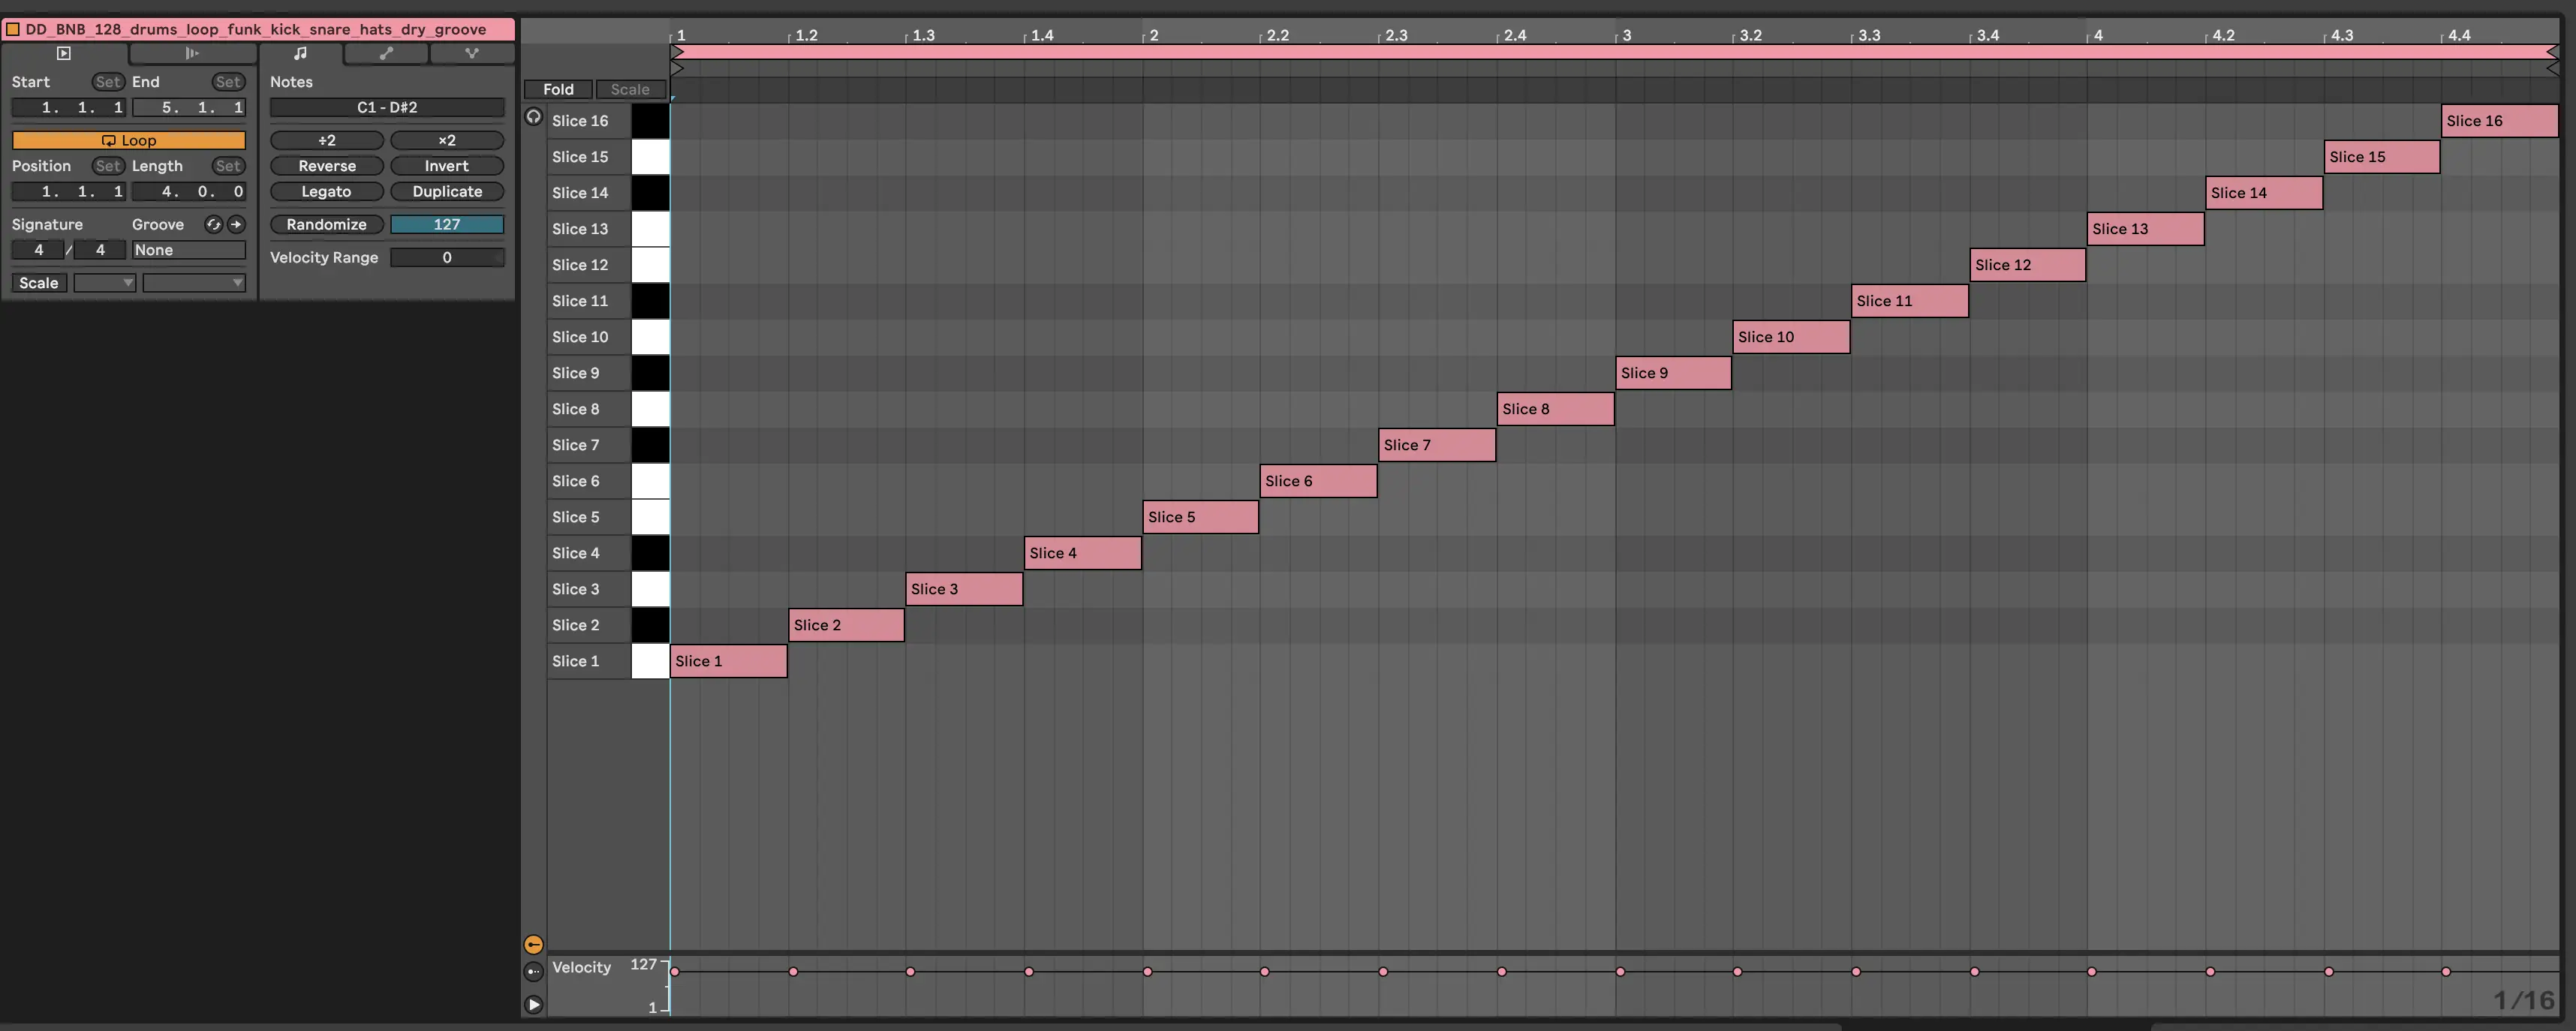
Want to do some funky stuff? Try reversing a slice, pitching one down, or automating filter sweeps on individual hits. Sampler slicing gives you tons of creative freedom with just a few clicks.
This approach might not give you that handcrafted feel of manual slicing, but if you’re just trying to bang out ideas fast (or avoid losing your mind staring at transient spikes), it’s a killer workflow.
Processing the Breakbeat
Alright, so you’ve got your chopped-up jungle break sequenced and grooving, but right now it’s probably sounding a little... dry. Maybe even boring. Don’t worry, that’s normal. Raw breaks are just the clay. Now it’s time to sculpt.
Let’s breathe some life into it and give it that crunchy, kinetic energy jungle is known for. Here are some of my go-to tools for shaping a break into something mean and magical:
- Multiband compression (for punch and glue)
- Saturation/distortion (for bite and character)
- Transient shaping (to tame or hype certain hits)
- Reverb (for space — but don’t drown it!)
- Classic compression (to tame the wild beast)
- EQ (strategically sculpted throughout)
Here’s exactly what I did with this break:
Multiband Compression
I ran the break through a punchy multiband compressor in parallel , squashing everything from about 8kHz down . That leaves the hi-hats and air untouched, so the break still breathes, but now the kicks and snares hit way harder . I mixed the compressed signal back in subtly until it felt tight but not choked.
Full-Spectrum Dirt
Next, I reached for iZotope’s Trash , which is an absolutely savage plugin if you want custom, harmonic destruction . I used it in parallel to lather the break in some rich saturation across the whole frequency spectrum.
If Trash isn’t your thing, I’m also a huge fan of:
- Soundtoys Decapitator for that analog-style “punishment” knob
- FabFilter Saturn for precise multi-band distortion and smooth blending
These all help give your break body, grit, and heat without blowing it out.
Classic Compression
To level the dynamics just a little more, I inserted an 1176-style compressor . Quick attack, quick release, a few dB of gain reduction, nothing wild. It just tightens the hits and keeps everything snappy without overprocessing.
Taming the Snare Ring
After all that compression and saturation, the snare started ringing in a way I really did not like . To fix it, I used a transient shaper to shave off some of the sustain. Instant improvement.
Subtle Space
Last step: space. I sent the break to a return channel with FabFilter Pro-R2 , dialed in a small, tight room , then high-passed everything below 300Hz and low-passed above 7kHz , because I only want the body of the drums to bloom a bit, not the lows or sparkly top.
From there, I blended the reverb in just a hair .
Here's what I ended up with:
Add a Bass Track
You’ve got your drums locked in and rattling like a busted shopping cart on cobblestones. Now it’s time to anchor that chaos with something equally essential: the bass .
While there are a hundred ways to approach jungle bass, one thing is consistent: it’s gotta be deep, subby, and unapologetically heavy .
More often than not, jungle basslines lean toward pure sine or triangle waves , similar to what you’d expect in dub or classic reggae . Smooth, clean, and powerful. It's the kind of bass you should really feel in your car's subs.
Sometimes it’s a Reese bass, sometimes it’s detuned saws, but a good place to start is something sub-focused and simple .
To get things going, I scoured Splice for a solid foundation. Not looking for perfection, just something I could flip. I found a buttery-smooth synth bass loop in F , sitting right in that sweet spot between E and G . That range is perfect for most subwoofers. Here's the initial sample:
Here’s a quick tip: if your bassline is too low (think D or below), it can start to feel muddy unless you're ultra-careful with your mix. F is a happy medium. It's deep, but controlled.
Now, I’m never the type to just drop a Splice sample in untouched . Where’s the fun in that? I chopped up the loop , rearranged it to better complement my break, and added a bit of pitch bending to give it some movement and attitude .
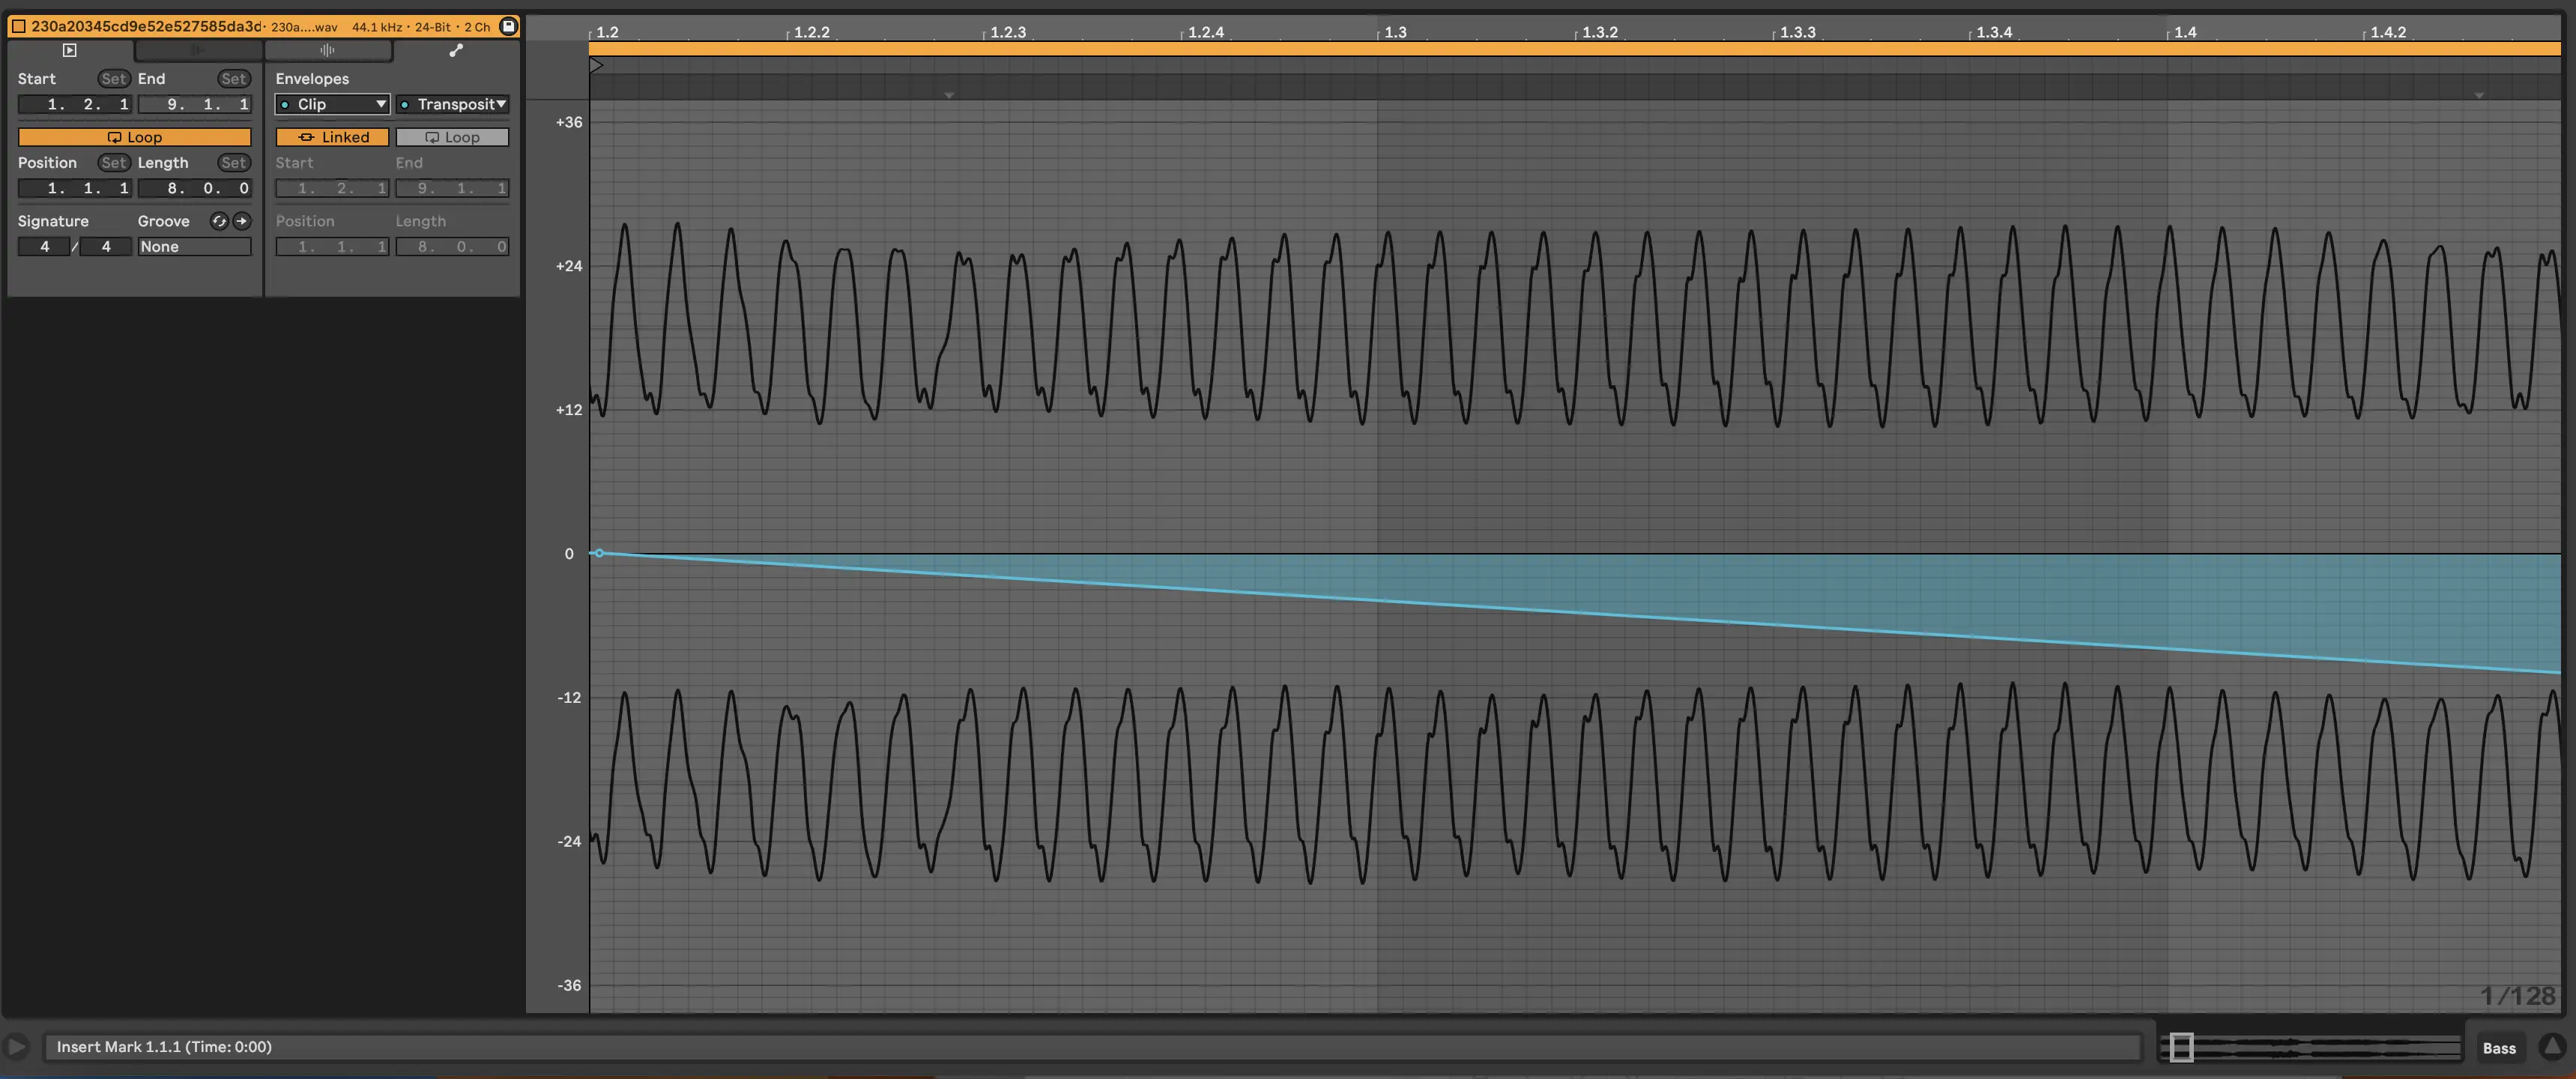
A little filtering, a touch of saturation, and it’s officially mine. Here’s what it sounds like with the break:
Add Percussion
Jungle is nothing if not dense, and I'm a big fan of using thoughtful layers .
So, naturally, I went hunting for another breakbeat to build out the rhythmic foundation and and some extra texture and swing. I chopped it up the same way (tightened the transients, cleaned up the mud), and layered it underneath.
The one thing about jungle percussion is that if your loops don’t groove together, everything falls apart. Even the best shaker in the world will sound awkward if has emphasis on the wrong beats relative to your main break.
So, before layering anything, I paid close attention to:
- Timing – Nudging hits so they land with the main loop
- EQ – Carving space for each layer (low-cut the second break so it doesn’t clash with the kick or bass)
- Volume – Letting the supporting percussion sit back in the mix where it belongs
For this track, I also decided to use a simple shaker loop and slapped Soundtoys’ PanMan on it. This is one of my favorite auto-panners for giving percussion movement in the stereo image.
It’s subtle, but that kind of detail makes the whole thing feel alive.
Here’s what the beat sounds like now, with the percussion and shaker in place:
Add Melodic Elements
This is the part of jungle production where things really start to open up . Rhythm and bass are the foundation but melody is where you get to stamp your personality on the track. Whether you’re going cinematic, dubby, jazzy, or full-on rave, the melodic layer is where you decide what kind of jungle story you’re telling.
That said, some of my favorite jungle tunes keep things real minimal in the melody department. I love a few well-placed sounds weaving in and out of the mix. So, I took the same approach here. Nothing too dense. Just a handful of samples and synths arranged in a way that felt right.
Here's what I used:
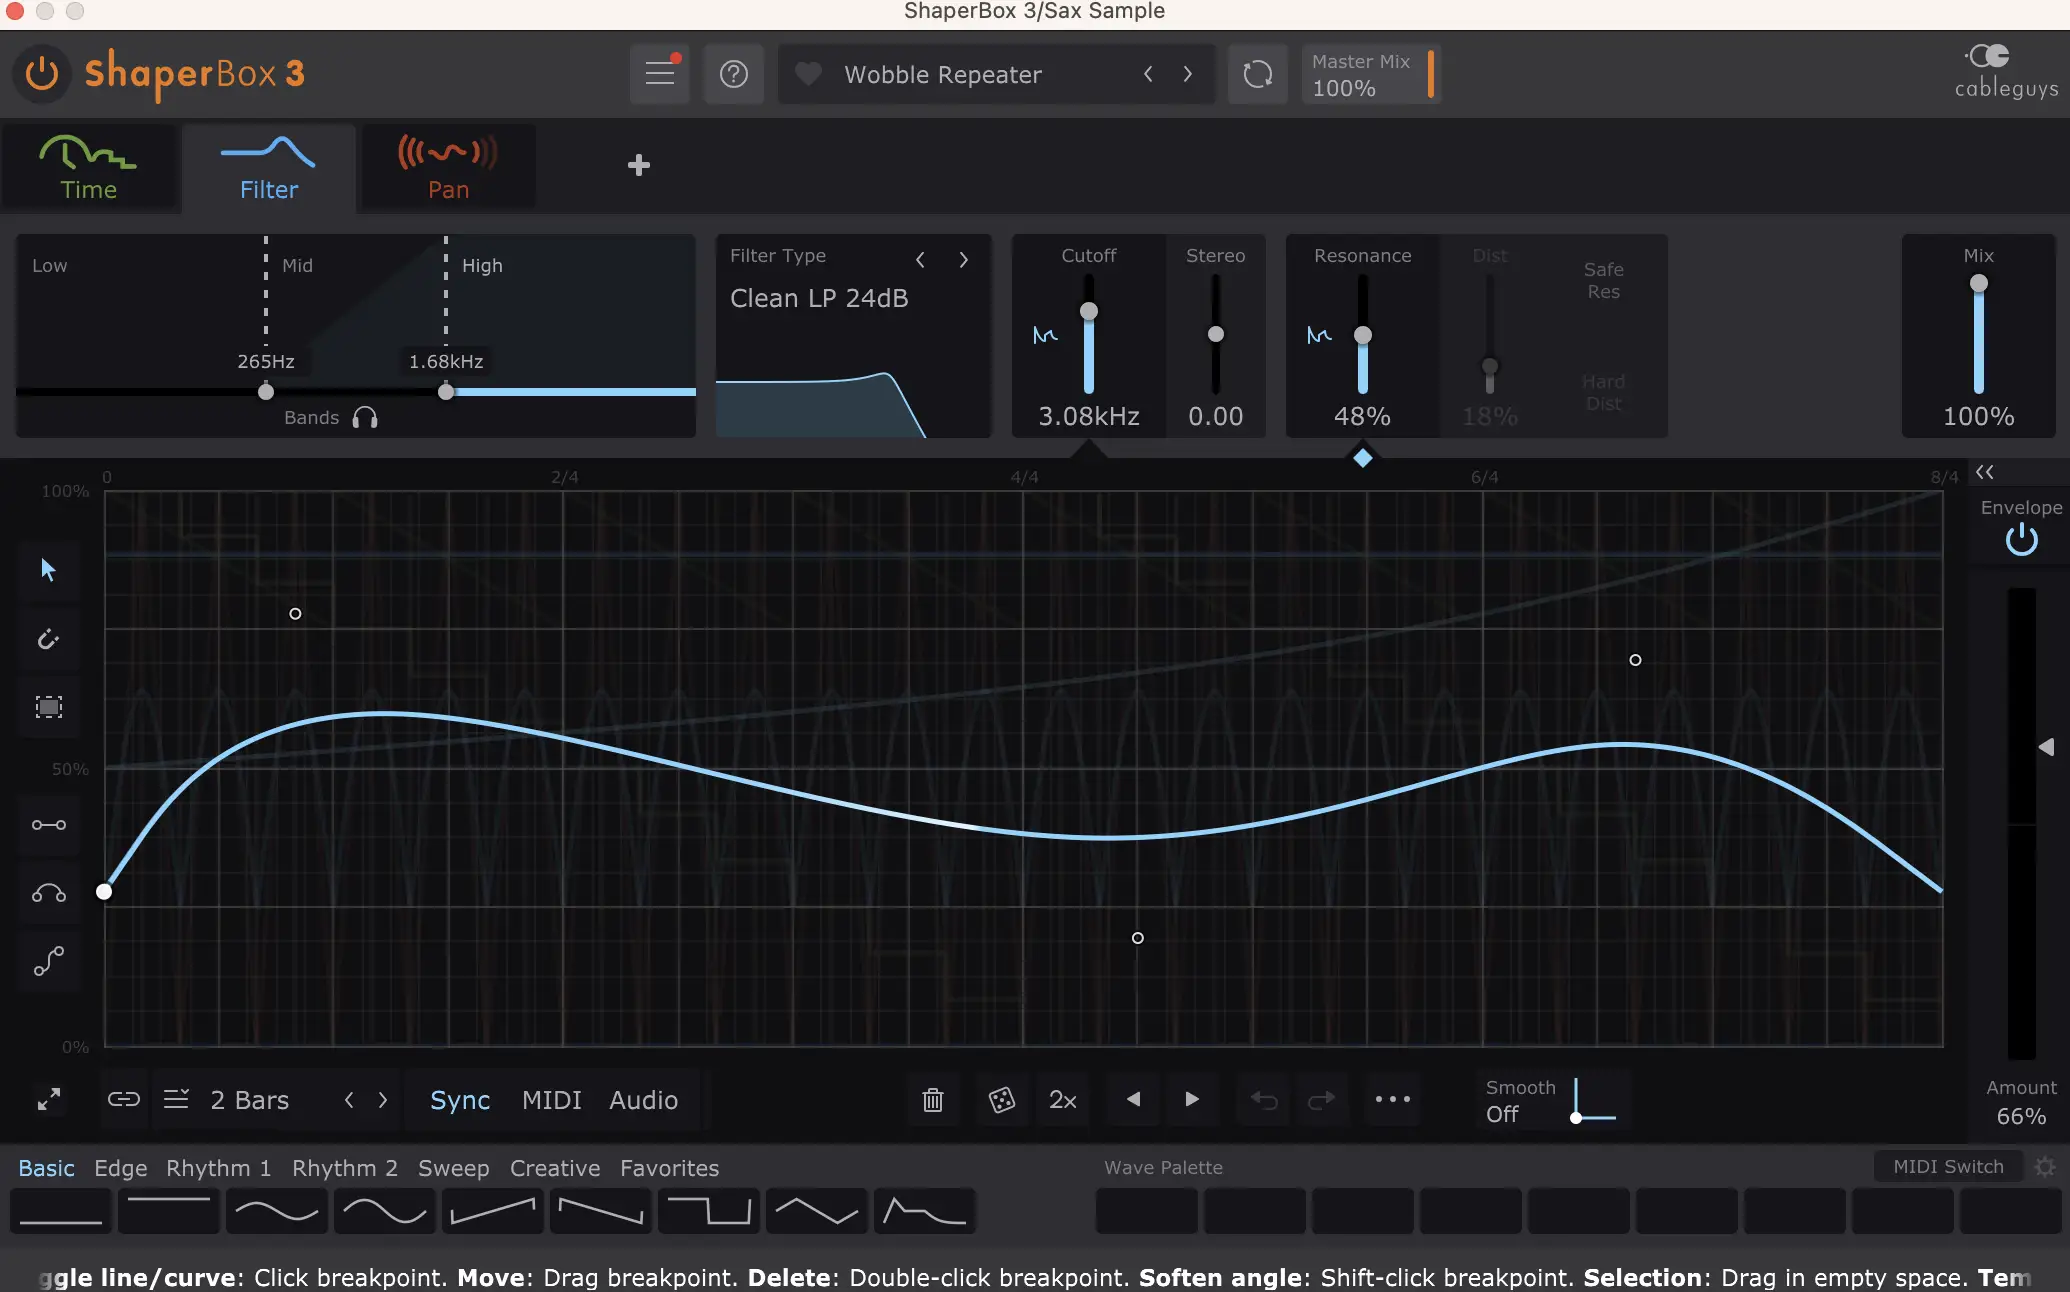
- Saxophone Sample : I chopped up a smooth sax loop and mangled it with ShaperBox 3 , which is one of my absolute go-to tools for glitching, gating, and reshaping samples.
- Rhodes + Ambient Synth Stack : These added a warm, jazzy bed underneath the track.
- 303 Line : Because, why not? I love the classic acid squelch, and it's great for tension and energy.
- Rasta Vocal Sample : Chopped, pitched, and filtered to add a nod to the reggae and dancehall lineage that started it all.
To keep everything in check, I ran all my melodic elements through a dedicated bus , cut a bit of the low end with EQ (to leave room for the bass and drums), and added a gentle sidechain compressor to duck everything slightly when the kick and snare hit . It’s subtle, but it helps the rhythm breathe.
Here's what I ended up with:
Add Some Variation
Now, while an eight-bar jungle loop can hit hard , if you loop it endlessly without any changes, things get stale fast. That’s why we need variation . One of the simplest (and most effective) ways to keep your track from feeling like a flat loop is by introducing what producers call turnarounds .
In this case, I went for something clean and classic.
Here's what I did:
- Bars 7 and 8 : I filtered both the drums and the bass, sweeping out the low and high-end for just a couple bars. It’s subtle, but it builds tension without needing a big crash or fill.
- Bars 9–16 : I stripped out the melodic elements completely and let the drums and bass ride solo . This is one of my favorite tricks. It gives the listener a chance to re-lock into the groove before reintroducing the musical flourishes.
Here’s what that section sounds like:
From there, I ran the whole track through my standard mastering chain with some light EQ and multiband compression to reign in the ultra-low frequencies, a stereo widener to spread it out, and a limiter to give it that slightly crushed sound.
Here's what the final product sounds like:
Make Your First Jungle Track
Now that you know how to make jungle music in its most basic form, it's time for you to start making your own jungle music! Get some drum breaks, some rasta vocal samples, a good sine wave bass, and a melody that hits, and you'll be well on your way into the jungle scene!


