

Drum programming is one of the most essential skills in any music producer's arsenal. The ability to sequence rhythmic patterns has been around since the dawn of hardware drum machines, which rose in popularity during the 1980s to replace human drummers and push the limits of what was possible with drums.
Because modern music is so reliant on rhythm, being a skilled drum programmer can make or break your ability to become a successful music producer. Humans are hard-wired to recognize good rhythm, even on a subconscious level.
Even if you don't know how to describe it, you know when you hear a song with excellent drum programming.
Any great drum programmer will tell you it's all in the details. Your generic four-on-the-floor drum pattern with the same 808 sample pack that every producer and their mother has used will sound boring and mundane. However, taking that same drum pattern and spicing it up with unique samples, syncopation, envelopes, and more can breathe life into it and add a new level of interest for the listener.
Come dive in with us as we explore the ins and outs of drum programming and how you can apply expert techniques to your productions.
What Is Drum Programming?
Let's start by answering the important question,
What is drum programming?
I like to think of drum programming as drum composition. Rather than playing the drums live, you arrange them in a specific sequence.
Drum programming differs from synthesis, as you aren't necessarily creating the samples or sounds you are using to compose, though many producers include drum synthesis in their programming methods.
In essence, you are creating drum patterns that can rearrange, loop, and create variations within.
The Importance of Great Drum Programming
So, what makes great drum programming so, well, great?
It can feel kind of difficult to explain why we feel so connected to one drum loop versus another, and the simplest way I have found to put it into words is groove .
Music needs a groove. Without it, it's hard to dance and move.
The basis of almost every track you make, unless it's some strange, ambient, experimental track, should be a groove. It's more than likely that you want to make people dance and tap their feet when listening to your tracks.
Luckily, there isn't a science here, and there are many approaches to finding a groove, whether you're making a 100BPM hip-hop track or a 175BPM drum and bass track.
If there isn't a science, the question then becomes,
How is a groove formed?
Drum Programming Basics
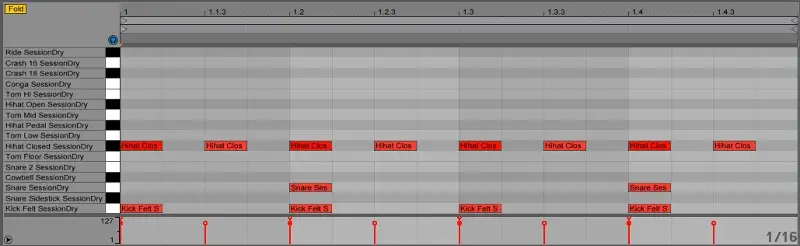
To understand how the groove is formed, we need to start by looking at the basics of drum programming.
You can gain quite a bit by dissecting a good groove and looking at its foundations. As I alluded to earlier, drums are the backbone of just about any modern composition. Until a producer is able to establish a basic foundation, they'll never be able to move into the more intricate complexities of expert drums programming.
On that note, let's look at the various parts of a conventional drum groove and how they might work with one another to form a rhythmic foundation.
Kick
You can think of the kick as the anchor for most drum grooves. From rock to hip-hop to house music, the kick is what keeps us tethered to the tempo. I often like to think of the kick as the most rigid percussive element.
When programming, I often like to keep the kick more "on the grid" than other percussive instruments.
A kick has more of an ability to define the sonic characteristics of a track, such as a genre or style.
Backbeat
The first thing a producer will likely lie on top of a kick drum loop is the backbeat.
The backbeat or "two and four" of the drum beat is typically performed with a snare drum or clap. It takes the role of the primary form of syncopation, providing momentum and energy to help better define the drum pattern's groove. In a little bit, we'll discuss how you can use the backbeat to manipulate your backbeats and make them sound a bit more human.
Cymbals
The cymbals are the upper register instruments in a traditional drum kit setting. A sixteenth note or offbeat hi-hat pattern can add energy to an overall drum pattern, while crashes and other cymbals can help define different sections of a track and add dynamics.
I often like to place other high-frequency rhythm instruments in this category as well, such as tambourines and shakers. You can use these auxiliary percussion instruments to add swing and texture to otherwise conventional grooves.
Percussion Sounds
After shakers in tambourines, you have other pieces of percussion that help add syncopation, create layers, and bring unique textures into your basic drum patterns. The beauty of percussion in the world of drum programming is that it provides you with the most freedom in terms of sample selection and placement.
There are so many different kinds of percussion instruments out there, from bongos to triangles, to woodblocks to marimbas and beyond.
The important thing here is to select high-quality samples that feel cohesive, add dynamics, and feel like they fit with the rest of the groove.
Consider Using Loops
Whether you're just getting started or reading this as a refresher, you probably know about the stigma of using loops in music production.
I find that stigma ridiculous.
A sampled loop can be an excellent tool to introduce complexities into your drum programming while adding a humanized feel.
I also find sampled loops really helpful for getting comfortable with combining audio and MIDI. Even if you don't end up using it in your final mix, a good loop can get your creative juices flowing and jumpstart the production process.
If you refuse to use loops because you heard there was a bad stigma attached to them, you're only putting a hurdle in your workflow.
Going Beyond the Conventional

After you feel comfortable with the basics of drum programming, you can begin to unlock the more complex intricacies of this art by adding syncopation, unique patterns, or nuanced details to bring your drum groove into the upper echelon.
Starting your journey with conventional drum patterns can certainly be beneficial, though, at some point, you want to begin considering more unconventional approaches to drum programming to make your tracks stand out.
Syncopation
I recently wrote an article on syncopation, which you might find helpful as you dig in a bit deeper. However, for the purpose of this article, I want to briefly discuss syncopation and how it can open up more creative doors and help you work from an unconventional standpoint.
Backbeat
Backbeat syncopation has been around for the past century or so. We are so accustomed to it in modern music that it is hard to believe it hasn't always been a foundational style of syncopation. Backbeat syncopation emphasizes the two and four rather than the one and three, which the kick traditionally sits on.
Taking a standard backbeat and manipulating it can give it energy, swing, or whatever characteristic you need to deliver the desired feel.
Offbeat
Offbeat syncopation is used to emphasize a different pulse that sits outside of the conventional downbeat pule. We often use cymbals and percussion elements to create offbeat syncopation. Listen to just about any house track, and you'll likely hear offbeat syncopation in the hi-hats. The hi-hats often sit on the "and" in between the 1-2-3-4 count — 1 and 2 and 3 and 4.
Suspension
Suspension syncopation can create strong emphasis by holding or overlapping a bar or measure with an element from the prior bar or measure. This type of syncopation is unique, as it messes with our traditional expectations of rhythm, creating somewhat of a cascading effect that melds measures together and makes arrangements feel less rigid.
Missed Beat
This type of syncopation has to be one of my favorites, as it puts emphasis on places you wouldn't expect. You can create strange and off-kilter drum grooves with missed beat syncopation, leaving the listener anticipating drum or percussion hits that never arrive or arrive a bit earlier in the drum pattern than they expect.
You'll often hear this in trap music when a producer puts a kick drum in a place a listener wouldn't expect to create anticipation or tension.
Drum Envelopes
One important element of programming that not many producers discuss is the space between the hits. Space or void are such important concepts in music - concepts that we need to actualize in our production.
Consider the fact that most mixes won't ever sound cohesive without a bit of EQ and compression. In the same way, most drum grooves won't ever sound the best without a little bit of envelope tweaking.
For example, you'll notice a palpable drag when placing long percussion elements in a fast groove. A really long, drawn-out snare drum sample in a 160BPM drum groove can make the track feel lazy or detached.
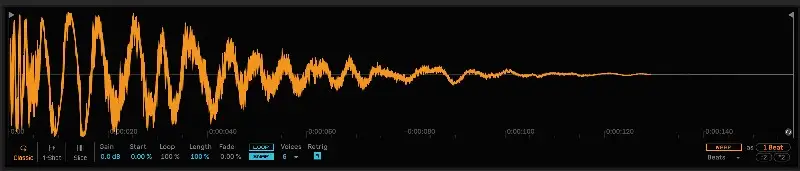
Luckily, most modern DAWs come with samplers, which allow us to manipulate the ADSR envelopes of samples, so we can dial in tighter or looser grooves to provide the proper amount of space within our drum arrangements.
In a fast track, you might consider shortening the sustain of a kick drum so that it doesn't overlap with other samples. On the other hand, in a slow track, you might increase the sustain of that same kick, so it fills out the empty space between the main hits.
Not only can this help your grooves sound tighter and more confident, but it can also give your grooves more headroom without multiple samples overlapping.
Melodic Percussion
Not many drum programmers talk about melodic percussion, even though it can be so much fun to establish central hooks without having to rely on traditional melodic instruments, such as synthesizers, keyboards, or guitars.
Using melodic percussive instruments to take the role of the melodic hook in your song can act as a unique and interesting layer for your groove. There are a few methods that I often like to incorporate into my tracks in this regard, though the most important thing is to look for pitched percussion instruments.
There are many percussion instruments that have tonality, such as steel drums and marimbas, allowing you to shape them into melodies on their own. The important thing here is to make sure these melodic percussion instruments are tuned to your track, so you can use them to create simple melodies and riffs.
Even if you don't use pitch percussion instruments to create standalone melodies, you can use them for calling response rhythmic patterns, posing question-and-answer-like patterns to echo certain melodies or phrases in your track, or use them as layers for lead parts, such as vocals or synth melodies, to elevate the overall energy.
While pitched percussion sounds can be very handy in just about any genre, I often find them most beneficial in genres like techno and house. When people are dancing, they aren't often as concerned with the intricacies of the melody rather than the drum beat of the track. Pitched percussion can offer a more subtle approach to crafting melodies.
Make Your Drums Sound Realistic
One of the hardest aspects of programming "live" drums is making your programmed drums sound realistic.
Giving a human characteristic to your programmed drum grooves can make them more palatable for listeners and make them more exciting to listen to in general.
Let's take a look at a few ways that you can transform your digital drum patterns into realistic-sounding drum grooves.
Be a Drummer
One of the simplest but most important aspects of programming realistic drums is to think like a real drummer.
Sure, going overboard with eccentric or out-of-this-world rhythms can be exciting, though making sure any drum or percussion part you write is something real drummers could play if you want realistic drums is crucial.
Programming a drum part that goes beyond the scope of what a real drummer could play will make it glaringly obvious that you are using software.
There isn't a drummer that I could think of that can play 64th-note hi-hat groove at 150BPM, though there are plenty of drummers that can play a simple four-on-the-floor rhythm at that same tempo.
Knowing what a real drummer could and could not play requires listening intently to real drummers. Listen closely to some of your favorite songs and pay attention to the drum grooves they use to get an idea of what is realistic.
Use a MIDI Instrument
When you program drums that are at a consistent volume throughout and perfectly in time, it becomes pretty obvious that you're using software.
One easy way to combat this and make your software drums sound more realistic is by using a MIDI instrument. You might be a drummer without the ability to record live drums, so you might instead consider using an electronic drum kit and integrating it into your drum software to play your grooves in real time.
I often like to do this when using Addictive Drums 2 software, as it helps me achieve realism without having to go in and make tons of adjustments.
If you aren't a drummer, you might also consider using a MIDI keyboard or drum pad.
Regardless of the hardware you decide to use, making drum patterns with a MIDI instrument will make your track sound far more realistic by varying your timing and velocity.
With that said, you can certainly get the same results without using a MIDI instrument, though it might take a little bit more effort.
Don't Go Crazy with Quantization
Ask any drummer, and they'll tell you how important it is to focus on timing.
However, even the best drummers in the world aren't robots. Record a real drummer, and you'll notice that some notes are slightly off the grid in your DAW. The constant push and pull are what create a realistic rhythm.
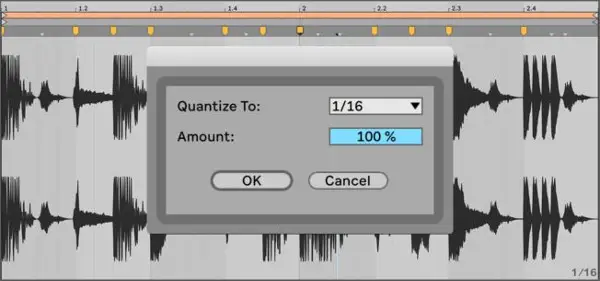
In most DAWs nowadays, we have the option to quantize MIDI notes to lock them onto the grid. Essentially, if a note is not perfectly in time, you can use quantization to snap it onto the rhythmic grid.
While quantization can be helpful for tightening up a groove, going overboard with quantization can make your tracks feel robotic.
If you're programming by hand, it's best to make sure that some of the notes are slightly off the grid if you want them to sound realistic. You can start by quantizing the entire drum groove to lock it into place before going through the pattern and adjusting notes either before or ahead of the beat.
Determining whether to move hits behind or ahead of the beat will depend on the track. If you want your drum groove to sound more energetic, consider placing hits slightly before the grid. On the other hand, if you want your drum groove to feel lazier, consider placing hits behind the grid.
Note that many DAWs have different quantization settings, allowing producers to decide how much they want to lock their hits to the grid. Lower quantization strengths will leave grooves sounding more realistic, while higher quantization strengths will lock elements to the grid.
Adjust the Velocity
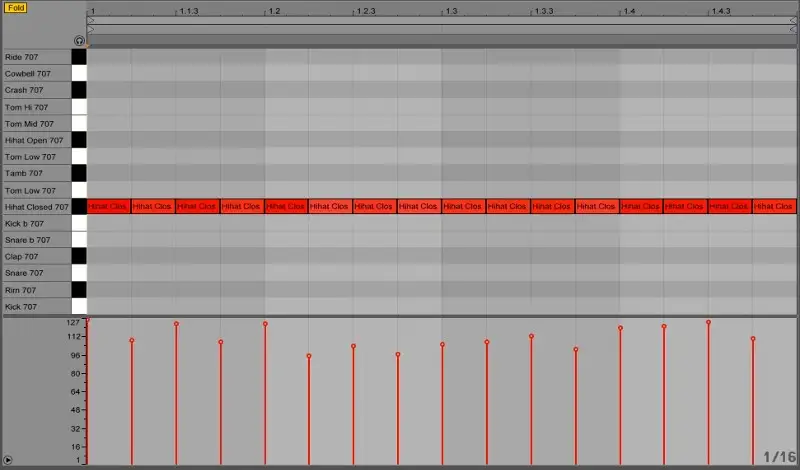
Another important element of making your drum grooves sound more realistic is adjusting the velocity.
All MIDI notes have velocity, which describes how loudly a sample is triggered.
A high-velocity note will sound louder and more intense, while a low-velocity note will sound soft and quiet.
You can accent certain beats in your grooves by changing the velocities of the notes within them. This goes back to thinking like a drummer. A drummer will highlight beats they believe in the most important by hitting those beats harder.
For example, a standard punk rock groove will have an accent on the two and four of each measure, while a one-drop reggae groove will have an accent on the one.
As you go through and adjust the velocities, think of how you would play that groove in real life.
I find that it can be helpful to record yourself tapping along to the drum groove to see what beats you naturally emphasize. You can then adjust the velocities in your MIDI groove to match the changes in velocity in your recorded waveform.
Humanization
Many DAWs, such as Logic and Ableton, come with "humanize" features that make slight adjustments to note timing and velocity. The human eyes feature is a wonderfully efficient way to make MIDI grooves sound less robotic.
It's important to proceed with caution when using the humanize feature, however, as the best way to determine which notes to accent comes down to feel. It can be difficult for a computer to assign velocities and timing inconsistencies based on feel, and assigning those small nuances randomly can make your MIDI drums sound even less realistic.
YouTuber Joshua Casper put out an excellent video on how to utilize the humanization feature in Ableton Live.
Use Real Loops
An easy way to add realism to your MIDI drums is by using pre-made loops.
I often find that combining programmed MIDI drums and live loops gives you the best of both worlds in terms of control and realism.
If you're using a virtual drum instrument with pre-made MIDI grooves, such as Addictive Drums 2 or Steven Slate Drums, you can use the MIDI loops as jumping-off points to get your groove started. These MIDI grooves were recorded by real drummers and arranged by tempo and feel, so the ideal timing and velocity characteristics should already be there.
You can then take the individual MIDI track patterns in these pre-made MIDI loops and move them out across your session to use with different instruments. For example, you can take the snare drum pattern in the MIDI track and use it to trigger a different sample, such as a rim shot or a clap.
You can also stack your MIDI notes with live sample loops to add a unique layer to your drum groove. For example, I often find that realistic hi-hats are the hardest things to program. I'll often supplement my MIDI hi-hats with real hi-hat loops to make them sound more realistic.
Use Your Own Reverb
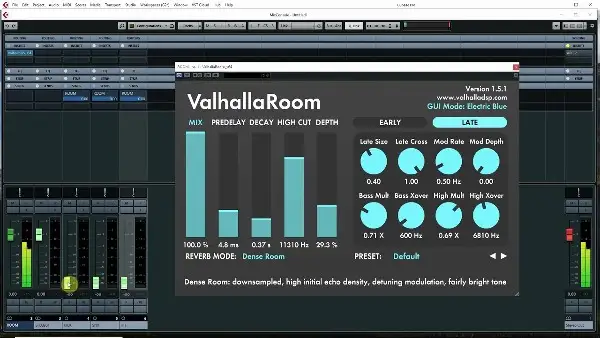
Many professional drum programs have reverb built-in.
While I can sound good on its own, I always find that having too many different types of reverb from different drum programs mashed together can make things sound disconnected. This is why I always mute the internal or stop reverb with the plan of using a room reverb for my mix.
Once I have programmed my entire drum groove, I will send each of the elements to this room reverb in different amounts. The idea here is to get every element sounding as if it was recorded in the same room.
You can then dial in the various parameters of this room reverb to get it to fit with the rest of your mix, such as the size, style, EQ, etc.
Add Saturation
If your programming drum sounds from within a drum VST, you might need to add some saturation to keep things from sounding too pristine. Saturation is one of my favorite effects, as it adds natural artifacts that would be present in a live recording.
While you can throw a saturation plugin, such as a tape machine plugin, onto your drum bus and call it a day, I often find that parallel saturation gives you a bit more control and allows you to dial in just the right amount of grit that you need to make your drums punch through the speakers.
To do this, you can send your drum bus to an aux track with a saturation plugin. Listen to the drums as you turn the drive on your saturation plugin up. The cool thing about parallel saturation is that you can make the saturated aux as dirty as you like, as you only want to tuck it subtly under the dry bus.
Consider what it is that you are missing from your drum bus and see if you can use saturation to dial that in.
Are your drum sounds too thin?
If so, consider dialing in more low-mid saturation.
Maybe they sound too dark?
If that's the case, crank up the high-end to get some expensive sheen.
Once you have a good tone dialed in, you can turn the aux fader all the way down and slowly turn it back up until you have a good combination of clean and dirty.
Adding Fills
Once you have a pretty decent groove going throughout the various sections of a song (verse, pre-chorus, chorus, etc.), you might consider using fills to tie these sections together. I often like to add fills every eight bars or so to break up the monotony of the drum groove and split a long section in half or lead into the next section.
It's pretty easy to program simple fills into a groove. Plus, if you're working with a drum VST, you're more than likely to find an included fill library with tons of fill patterns to choose from.
To make your fill blend in with your existing pattern, you'll want to make sure there are no elements clashing with the elements in the fill. For example, if your added fill uses a snare, you want to take the snare sample out of your original pattern to give it some space. However, keeping other elements in the pattern that don't clash, such as shakers or hi-hats, can give you a more cohesive sound overall.
Once you have your fill in the correct spot, the next step is to sit it correctly in the mix. The main focus should be getting the note velocities in your fill to match the velocities of those same elements in the original pattern. You don't want the snare and your fill to be way louder or harder than the snare in the underlying pattern.
The last thing you need to do is apply a bit of quantization or nudge the timing of the elements in the fill so that they are consistent with the main drum groove. For example, if you are main drum groove is swung, you might consider nudging the fill elements so they sit slightly behind the grid lines.
Finding the Best Drum Samples
You can be great and programming drum grooves and adjusting the various parameters of drum VSTs. However, if you aren't using the right samples, your mixes will still fall flat. Finding quality samples to use in your compositions is easily one of the most important things of which to be mindful of.
Selecting Samples
There are so many great samples and sample packs out there that sound fantastic on their own. However, just because a sample sounds incredible on its own does not mean that it will sound incredible in the context of your mix and the other samples around it. While you can definitely use mixing tools like EQ, compression, and envelope-shaping to manipulate a bad sample, there is only so much you can do.
Plus, trying to mix together samples that don't gel well off the bat only makes more work for you.
You want your drum loops and samples to sound as if they belong with one another from the jumping-off point. Nothing can throw off a listener quite like discontinuity.
While you might be tempted to reach for whatever sample is closest, taking the time to find the perfect samples will pay off big time in the mixing phase.
If you don't already have a collection of samples, I highly recommend checking out Splice .
Tuning Drums
Technically, a drum is an inharmonic instrument, meaning it has overtones that don't contribute to a particular pitch. However, most drums have a fundamental pitch on which these inharmonic overtones build.
The interesting thing about tuning drum samples is that there is no right or wrong approach. With that said, it's pretty easy to hear when the tuning of a sample does not fit in the context of the full drum groove.
One of the most important drum elements to tune is the kick drum, as a kick drum with the wrong fundamental can clash with the bass and the other low-end instruments, leaving you with a mix that never sounds tight or in tune.
This is more of an issue with genres like trap and hip-hop, where the majority of the track relies heavily on the 808. In genres with shorter kicks, it's almost impossible to detect a particular pitch, to begin with.
You can use a spectrum analyzer if you're having trouble hearing the fundamental pitch of a drum.
Beyond keeping things in tune, tuning drums can also give you an entirely different feel. For example, lowering the pitch of a drum can help it sound fatter and mellower. On the other hand, increasing the pitch of a drum can make it sound snappier and give it more energy.
Experiment with tuning or transposing your drums and see if doing so makes them fit in the context of your productions better.
Stepping Outside the Genre
Consider using samples from non-traditional sample packs to create contrast in your grooves. For example, you might choose to use some soft, supportive samples without heavy transients to give your hard-hitting dubstep drums some texture and air.
In the same way, you might consider stacking your techno groove with a live hi-hat to add a sense of realism or use a digital kick atop your live drum groove to give it more impact.
You'll often find samples outside of genre-specific sample packs that can make your programmed drums sound far more interesting. Even if you are a rock producer, don't be afraid to use a punchy snare sample from a future bass pack.
Arrangement
Arrange drums in a way that builds energy over the course of the track.
Even though you're able to stack 20 different drum elements on top of each other to create a massive groove beneath the hook, it doesn't mean that you need to use that massive stack of elements for each hook in the track.
Consider a slow build where you add or introduce new elements in each section so that the final hook, chorus, or drop in your track has the biggest energy payoff. For example, you may consider saving that high-energy shaker for the last chorus.
Best Software for Programming Drums
Addictive Drums 2
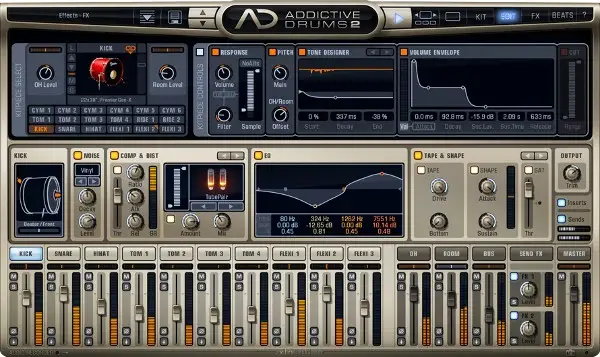
Addictive Drums 2 from XLN Audio has long been one of my favorite drum VSTs for getting realistic-sounding drums. One of the main highlights of this drum VST is that it comes with a wide variety of incredible-sounding drum kits and a massive library of MIDI grooves that were recorded by some of the most legendary drummers in the music industry.
One of my favorite kits is the Fairfax drum kit, which was recorded at Sound City in Los Angeles. You get more than 130 presets with every drum kit, giving you everything from clean and realistic to gritty and distorted.
While I certainly love the intuitive nature of Addictive Drums 2, as it is easy for any beginner to dig in and start crafting high-quality drum grooves, there are plenty of in-depth features that allow you to tweak each sound to your heart's content. You get a 10-channel mixer for the different drum kit elements, as well as individual channels for the overheads, room microphones, and bus.
As for processing, each drum element has individual controls for EQ, compression, saturation, transient shaping, noise contents oh, and more. You can even use the built-in reverb and delay to give you a more three-dimensional drum sound.
Compared to other realistic drum VSTs on the music production market, Addictive Drums 2 feels the most immediate. I might be biased because I've been using it for so long, though even after all these years, the plugin still feels fresh and exciting.
Steven Slate Drums
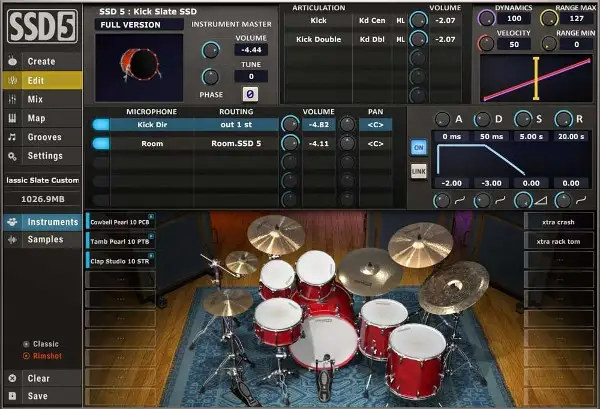
When talking about Legends in the world of drum sampling, you can't go without mentioning Steven Slate. His drum VST, SSD 5, offers an incredible collection of high-quality drum samples, including 112 kick drums, 135 snares, 58 toms, 14 crashes, 11 hi-hats, six rides, and seven splashes/chinas.
Each sound has been pre-arranged into one of 148 drum kit options, many of which were modeled on iconic drum setups from different drumming legends.
Realism is the key to SSD's success. Even with the original collection of drum samples from the first iteration SSD, you get incredibly powerful and realistic drums that hold up in the heaviest of pop, rock, or metal mixes.
As with Addictive Drums 2, you also get a wide range of built-in MIDI grooves in a variety of styles, including rock, jazz, hip-hop, reggae, and funk. However, I would say that the overall sound of the plugin is geared toward the modern rock and metal kit sound.
Battery 4
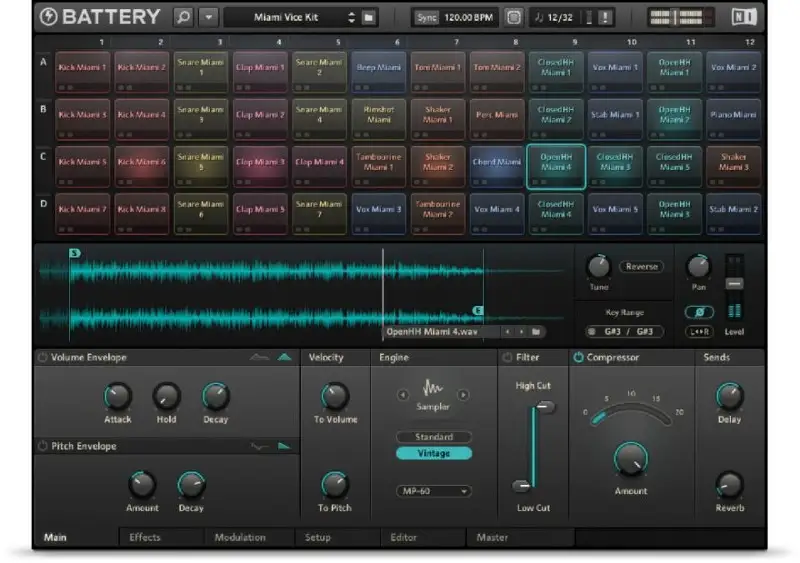
If you're looking for a program that can help you manipulate drum samples, Battery 4 from Native Instruments is one of my absolute favorites. It is a serious powerhouse of a sampler, using a sleek GUI and tons of professional samples to get you started.
The plugin definitely focuses on urban end electronic drum sounds, making it perfect for dance music, though it comes with over 140 different drum kits that work beautifully with just about any style of music. In these kits, you'll also find melodic loops and FX.
The interface is quite unique as well, as you get 128 cells in which you can load the included samples or your own samples, making them easily playable on your MIDI keyboard or drum pad. Every cell has individual ADSR, compression, EQ, and modulation controls. You can also adjust the pitch, panning, and so much more.
I love having the ability to import my own samples and chop them up, trim them down, reverse them, or mangle them until they're almost unrecognizable.
The beauty of Battery 4 is that it can sound however you'd like it to sound, whether quirky, modern, or vintage. It's essentially a blank canvas for programming drums in any way you see fit.
MT Power Drumkit 2
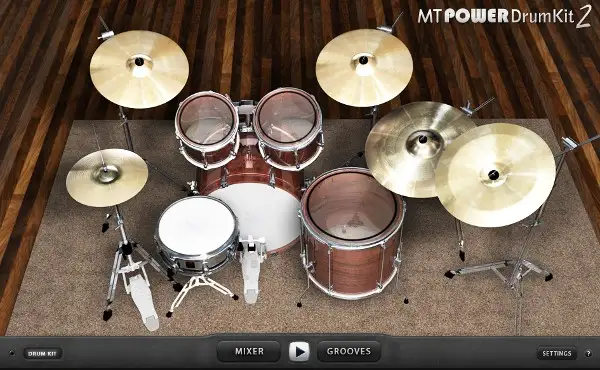
MT Power Drumkit 2 offers a great way to get started with software drums without having to spend a dime. This drum VST offers a range of solid and high-quality sampled acoustic drums with a pretty decent level of editing detail to help the elements fit in your mix.
While you don't get as much control as you do with the above VSTs, the pre-processed nature of the sounds offers the perfect balance of realism and radio-readiness.
It's a very simple and intuitive drum programmer that delivers instant satisfaction no matter how you create drum patterns.
Get In the Groove
Programming drums is an art form that many producers don't pay enough attention to. Making unique drum patterns requires hundreds of small decisions and variations, which eventually culminate into a fresh and exciting groove.
Programming drums is also one instance where I would encourage you to embrace nuance and complexity. Don't shy away from making small adjustments that might feel mundane at the time. In reality, it is the accumulation of these title adjustments that make a major difference in the end.
You can certainly spend months or years studying the technical aspects of programming drums, though getting good at it will take time. There is no way to explain the feeling you get when you lock in the perfect groove. You just know. Start listening more intently to songs by some of your favorite artists to see how they implement specific samples or techniques we discussed above.
Sooner than later, you'll be on your way to making professional-sounding programmed drums.


