


Looking for a way to get an ultra-wide stereo image in your mixes without just slapping on a stereo imager plugin?
Many producers and mixing engineers agree that one of the best ways to achieve a vast and expansive stereo image is to use the Haas effect.
Of course, as with any technique in mixing, there are pros and cons, which is why I want to dig into the gritty details and give you a better understanding of why you might use it, what it entails, what to watch out for, and how you can use it creatively in your mixes.
What Is the Haas Effect?
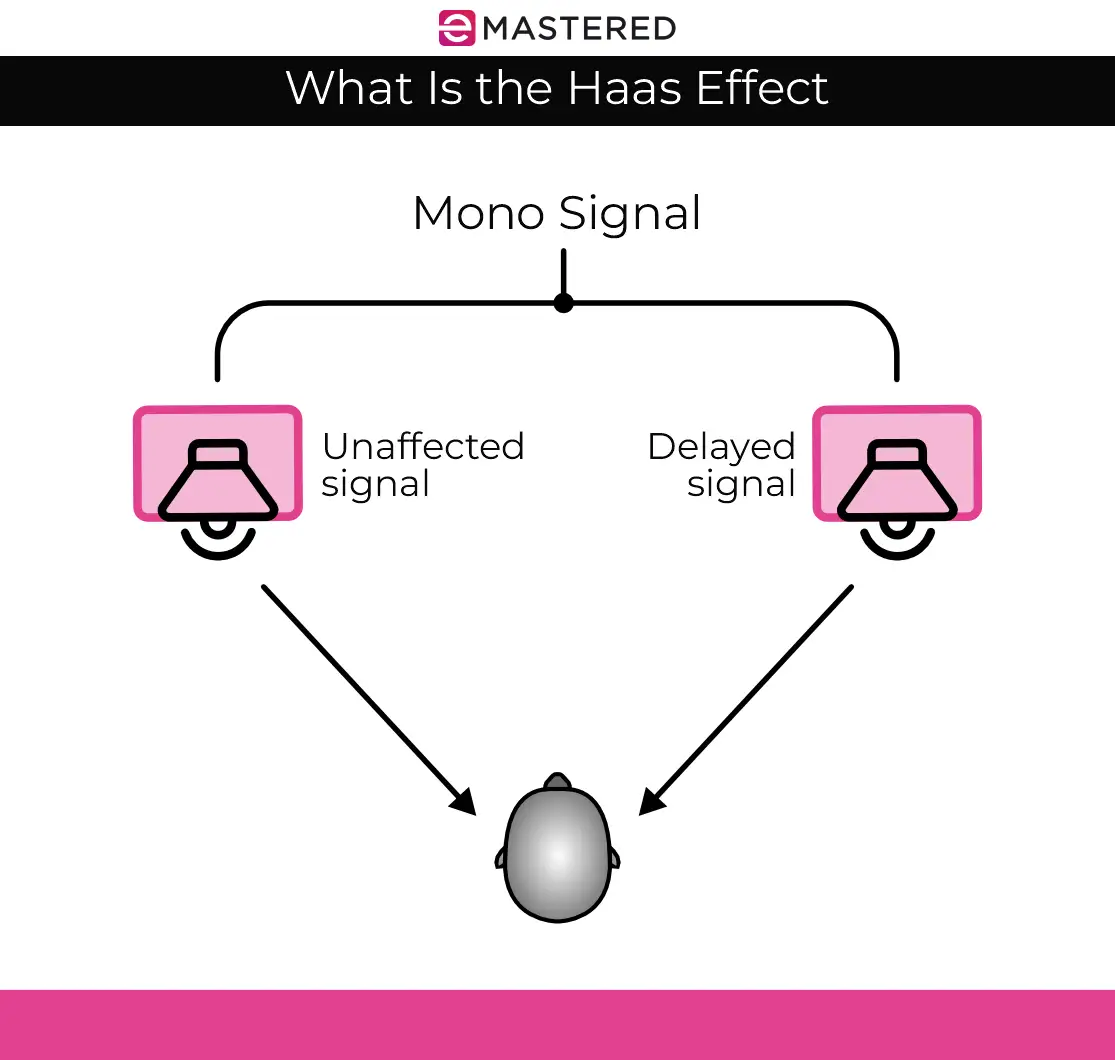
In its simplest definition, the Haas effect, otherwise referred to as the "precedence" effect is a phenomenon in which a person experiences two identical sounds from a single sound separated by a small amount of time.
The Haas effect is based on how our brains process sounds in space. When we hear a sound, our brain not only detects the sound itself but also analyzes the timing differences between sounds arriving at our ears.
Here's where the magic happens: if two similar sounds reach our ears within a very short time frame (typically within 30 milliseconds of each other), our brain combines them into one perceived sound. This merging occurs because our brain thinks the sounds are coming from the same source, just from different directions.
In audio, when you play the same sound from two speakers with a slight delay between them (less than 30 milliseconds), your brain combines these sounds, making them feel like they're coming from a broader space than the actual physical distance between the speakers.
Think of it like a virtual widening of the soundstage. The brain is essentially saying, "Hey, these sounds are so close together in time, they must be coming from the same place," creating a sense of spaciousness in the stereo landscape.
However, it's crucial to use this effect wisely. Too much delay can lead to phase issues and comb filtering, where certain frequencies cancel each other out, causing unwanted artifacts in the sound. So, while it's a cool trick, it requires a delicate balance to avoid audio chaos.
The History of the Haas Effect
The Haas effect is nothing new. In fact, the idea has been around since 1949, when German scientist Helmut Haas first documented the phenomenon in his doctoral thesis. Haas conducted experiments to explore how humans perceive the location of sound sources in space.
Just before Haas, however, in 1948, acoustical engineer Lothar Cremer described and named the "law of the first wavefront." While this term might sound technical, it essentially refers to how our brains process the initial wavefront of a sound, influencing our perception of its location.
Haas sought to take that idea further, exploring how speech perception is affected by a single coherent sound reflection.
He found that we tend to localize sound in the direction of the first arriving sound, even when reflections are present. He also noted that any reflection arriving a single millisecond after the direct sound enhanced the perceived volume and spaciousness without sounding like a distinct, separate echo.
You can get the same effect with delays of up to 30 MS and any reflections in those delays will potentially be louder than the direct sound. The direction of the reflection and its frequency characteristics influence this phenomenon.
How to Set Up the Haas Effect
So, by now you know that if you're looking for a bit of extra volume and spaciousness in a mono track, the Haas effect can be your best friend. Better yet, there are a few easy ways that you can set it up in your DAW.
Let's take a look at a few Haas effect techniques.
Using a Delay
The first way you can utilize the Haas effect is with a delay. The idea here is that similar to the way a short echo would bounce off a reflective space in a room, a delay plugin can create a sense of space in your DAW.
You don’t need a fancy plugin to do this either. Any stock delay plugin should do.
Start by finding the audio track you want to use the Haas effect on and insert a delay plugin on it. Adjust the delay time to be relatively short, ideally within the 1 to 30 milliseconds range. With a short delay time, you get desired Haas effect without it sounding like a distinct echo.
Most importantly, make sure your feedback (the number of times the delay repeats) is set to zero. Then, adjust the dry/wet control to blend the original and delayed sounds to your liking.
You can do this same thing by sending your dry signal or direct sound source to an aux track with the same delay settings at 100% wet and blending the dry signal and delayed sound together to your liking.
Sample Displacement
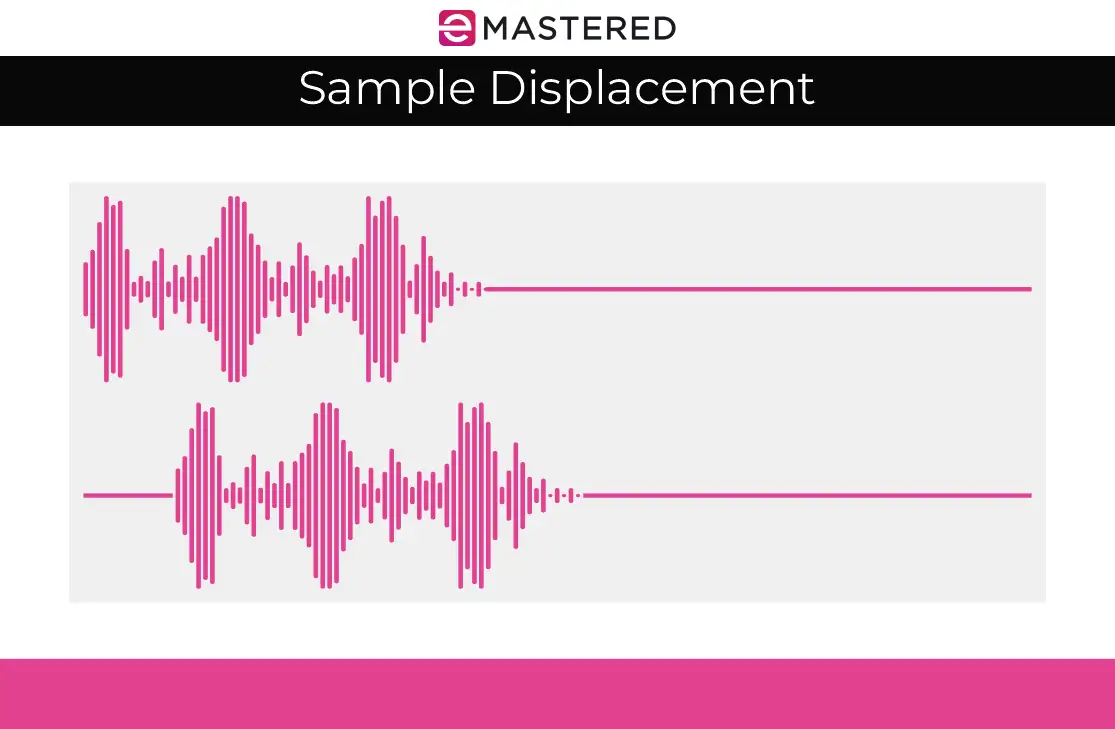
If you don’t want to use a delay, you can simply copy your signal you want to apply the Haas effect on and use sample displacement.
This techniques involves shifting the timing of the duplicated audio to create what sounds like distinct signals.
Once you’ve duplicated your chosen audio, move the duplicated clip slightly ahead in time, in the 1 to 30 milliseconds range. I’ll often pan those two clips hard left and right for the widest possible sound.
Stereo Enhancement
Lastly, you can use dedicated plugins that use the Haas effect for stereo enhancement.
Most DAWs come with stock stereo widening plugins, though if yours doesn’t, there are plenty of great third-party plugins to pick from. Quic Haas by Venn Audio or WIDER by Infected Mushroom are great options.
Looking Out for Comb Filtering
With great power comes great responsibility, and the same can be said for the Haas effect. In fact, what I’m about to tell you can apply to just about any type of stereo mixing.
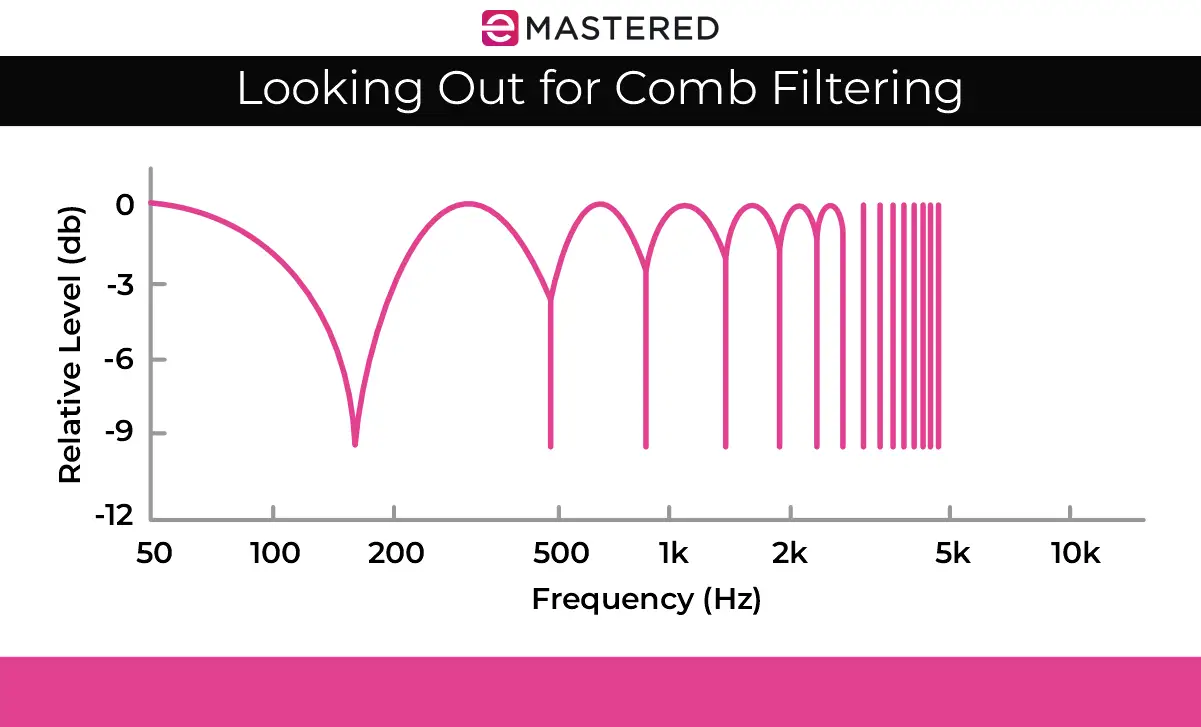
One of the main issues we deal with when using the Haas effect is comb filtering, which occurs when the original and delayed sounds combine in a way that certain frequencies reinforce each other while others cancel out, creating a comb-like frequency response. Comb filtering can be used as a cool effect in some instances, but most of the time we don’t want this.
We can also get phase issues when the phase relationship between the original and delayed sounds is not properly aligned. When summed to mono, it can cancel out specific frequencies, reducing the overall volume of the signals and creating nasty artifacts.
But you might be thinking, “Why should I care about mono compatibility when I’m listening on a stereo system?”
Well, it might surprise you to find out that many audio playback systems, including radios, TVs, and smartphones, play audio in mono. If your mix is not compatible with mono playback, it may sound significantly different or lose certain elements when played on these systems.
I recommend constantly checking your mix in mono to hear if you’re dealing with compatibility issues.
If you end up finding issues with the mono compatibility arising from your Haas effect signals, you can fine-tune a few aspects of the delayed signal, such as the delay time, EQ, and panning, to get that pleasing stereo image without negatively impacting the mono track.
For example, extreme panning can lead to phase issues in mono playback, so you might consider adjusting the panning of the delayed signal to find a balance. In the same way, the delay time you choose can impact the sound. Too short, and you can get the comb filtering effect. Too long, and it’ll sound like a distinct echo.
You have to find the sweet spot to ensure a wide stereo image without compromising mono compatibility, and it may take a bit of trial and error.
I’ve found that one of the best ways to avoid phasing issues in mono is by using EQ to shape the frequency content of the delayed signal, as it keeps the two signals from clashing with one another, mitigating comb filtering issues.
3 Creative Ways to Use the Haas Effect
Widening Vocals
One of the most common uses of the Haas effect is widening mono vocal tracks. It’s a great technique for adding a sense of width to a lead vocal, for example, without compromising the central focus.
When you apply a slight delay to a single vocal track or harmony, you can create a richer, more spacious vocal sound, making them sound larger and wider while maintaining clarity that would otherwise be lost with reverb or delay.
Drum Ambience
Another one of my favorite instruments to use the Haas effect on is drums, especially overheads and room mics.
I’ll often duplicate either the drum overheads or room microphones and apply a delay or widener on them to enhance the perceived spatial dimensions of the drum kit. If it’s sounding a bit muddy, I’ll use a high-pass filter to get rid of the lows and blend it in with the dry drum track.
When you introduce subtle delays to these drum tracks, you can create a more ambient drum sound. I wouldn’t recommend it for busier mixes, as it can get quite muddy and out of control, though it’s an absolutely brilliant little trick in songs where your drums need a greater sense of space, such as in jazz or ambient rock.
Bass Presence
Sometimes, giving bass the clarity it needs to stand out in a mix can be hard. However, with the Haas effect, you can give bass tracks the extra character they need to stand out without compromising the low-end integrity.
I’ll often start by duplicating my bass track, getting rid of the lows (up to around 200Hz or so), and applying a subtle Haas delay to the duplicated bass part. I’ll then mix the duplicated track in with the dry track to give it more presence and definition. In a way, you almost get a chorused sound, all while still retaining that essential low-frequency foundation.
Final Thoughts
There you have it — the Haas effect.
It's a simple mixing and music production trick that many pros use to take a single sound event and create more complex sounds. Of course, while the Haas effect is a great trick, as we went over, it has its limitations.
If you really want width in your mix and you have agency over the recording process, I'd recommend recording two separate takes and panning them hard in the left and right channels. It's a better solution for surefire mono compatibility than trying to finesse a direct and reflected sound source.
The differences in timing from your two recordings, even though they're of the same thing, will have a natural Haas effect. Better yet, if you're recording a second take of a signal, say, an electric guitar part, you might consider adjusting the tone or EQ to get even more width and separation.


