


Drums are arguably one of the trickiest instruments to EQ. They have lots of contrasting frequencies across the whole spectrum, and if that wasn’t enough, they also happen to be the backbone of most tracks, making them a crucial element to get right when mixing and mastering your song.
There's no one-size-fits-all when it comes to EQing drum kits. Whether you want to enhance the power of a hip-hop beat or make an acoustic jazz kit sound more cohesive with the rest of the ensemble, you'll have two completely different approaches to EQing. That's why it's crucial to keep an open mind and always adapt your mixing technique to the track you’re working on.
In this Drum EQ guide, we'll analyze the process and most effective approach to EQing drums and how drums mixed properly should sound. We'll start from the basics, so even if you've never done it before, by the end of the article, you'll be able to handle the frequencies of your drumkit.
Why EQing Drums Is Crucial
When EQing drums, you basically shape and polish the heartbeat of your tracks, making sure that every rhythm is in harmony with the rest of your music. It's about giving your drums their own spotlight while making sure they play nice with everything else in the mix.
EQing helps each element of your drum kit find its voice, cleaning up those moments when the drums seem to step on each other's toes or when they just don't quite fit in the room. By smoothing out the rough edges and brightening up the dull spots, you’ll use your creativity and taste to bring out the emotion and energy in your music.
So, think of EQing drums as your way of getting all the elements of your instrument to play together in perfect harmony within the drum mix, so that they can then blend with the rest of the composition.
The Tools You Need To EQ Drums
EQ plugins can provide you with everything you need for your drum recordings, from the warmth of vintage tones to modern clarity flavors. However, there’s a plethora of different EQ plugins out there, so finding the right one can feel a bit daunting, but when you do, it’ll unlock a new level of your production skills.
High pass filters (HPF) and low pass filters (LPF) are crucial tools in drum mixing. HPFs remove low-frequency rumble and unwanted noise, while LPFs tame high-end frequencies. Together, and when used right, they can create a balanced and cohesive drum sound.
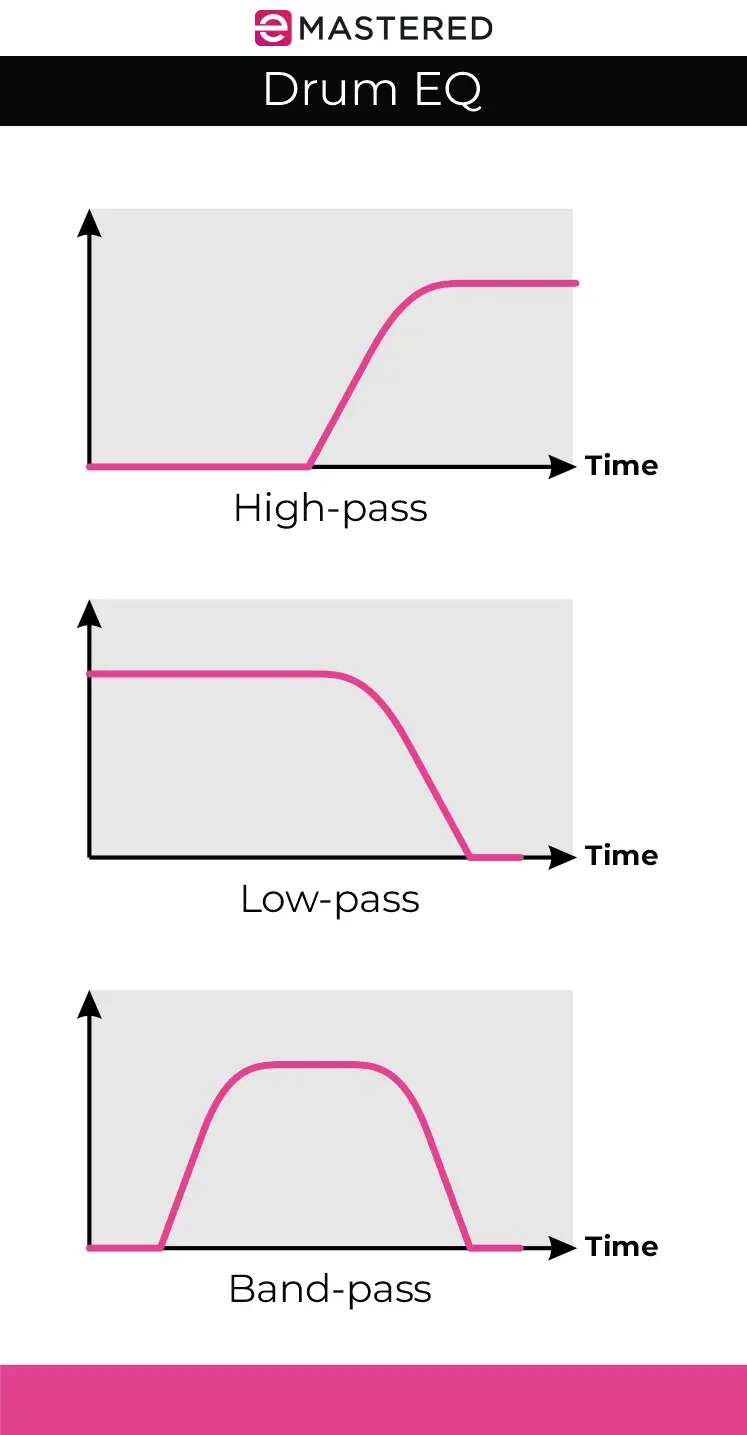
By using these filters, each drum component occupies its own space in the mix, enhancing the balance of your track. In general, HPFs can be applied to cymbals, hi-hats, and toms, while a low pass filter can soften cymbal attack and reduce the harshness of snare drums.
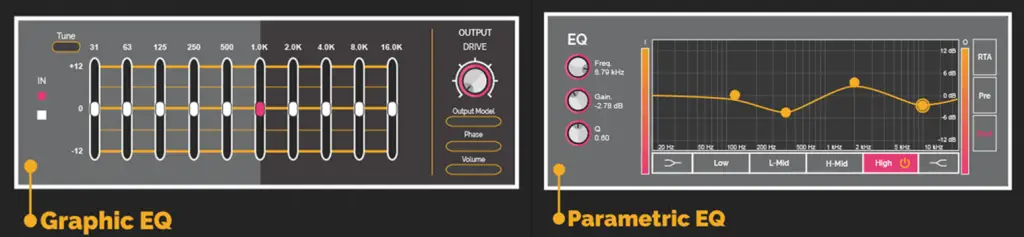
Let’s briefly take a look at the different types of EQ you’ll come across.
Graphic EQs are straightforward and great for quick, broad adjustments, ideal for live settings or when simplicity is crucial.
Parametric EQs offer more precision when you need specific frequency adjustments to your drum sound, boost or cut levels, and bandwidth control.
Finally, Dynamic EQs , blending the traits of parametric EQs with the responsiveness of compressors, are excellent when you need to handle frequencies that fluctuate with volume, suited for dynamic genres like jazz or classical music.
Next, there's the spectrum analyzer , a tool whose purpose is to offer a visual map of your sound. It’ll show how your frequencies behave throughout the track, helping you identify where things are too crowded or too sparse.
Multiband compression is a crucial effect when EQing drums. It can adapt to the music, applying just the right amount of compression or expansion to specific frequency bands, ensuring your drums punch through at the right moments without overwhelming the mix.
Finally, make sure you get a pair of good-quality headphones and studio monitors , which will provide you with an accurate and uncolored representation of your mix, essential for making informed decisions about your EQ adjustments.
Drum EQ guide: Step by Step
EQing drums can be tricky, but with the right approach and tools, you can create a mix that's both cohesive and energizing.
Now we'll walk you through the process of EQing drums for different genres, so you can make your beats sound their best, regardless of whether you're dealing with a heavy metal drummer or a trap producer. I'll cover everything from the key frequencies to focus on for each drum part, to the best EQ techniques and tools to use.
Step 1: Kick Drums
Getting a good kick drum sound will make your song feel alive, bringing out its best qualities: the deep thump, the punchy sound that hits you right in the chest, and that satisfying click of the beater.
I’d suggest you start by giving the bottom end a little attention. Around 50 – 60 Hz is where your bass drum really gets its power from, so a gentle boost here can make your track feel fuller and more grounded. But don’t forget to keep things balanced. Also, cutting a little around 400 Hz will help your kick cut through the mix, giving it a clearer sound that doesn't get lost among the other instruments.
The beater attack is around the 3 – 5 kHz frequency range, so a boost there will add crispiness to the beater sound, making each beat more pronounced. It's like adding a sprinkle of clarity to the mix, especially helpful if you're working with sampled kick drums to keep them feeling lively and dynamic.
Step 2: Snare Drums
EQing the snare drum requires a delicate balance to ensure it captures the listener's attention without overshadowing everything else.
Start with a gentle boost around 400 Hz to add warmth and body to the snare drum, and then mitigate frequencies at 3.5 kHz to smooth out the texture. A high pass filter just below the snare's fundamental pitch is a great tool for cleaning up the low frequencies, and subtle boosts in the range between 100 Hz to 250 Hz can infuse the snare with a punchy, full-bodied sound.
Finally, finetuned adjustments in the high frequencies, usually around 900 Hz, 5 kHz, and 10 kHz, can further enhance the snare’s attack, crispness, and airy presence, respectively.
Step 3: Rack Toms
If you want to have great sounding toms, you’ll need to focus on two main frequency ranges: the low-mid frequencies around 240 – 500 Hz for fullness and body, and the higher frequencies around 5 – 7 kHz for adding clarity and attack to the sound.
First of all, dial in the right amount of body by adjusting within the 240 – 500 Hz range, and add a crispness to the toms' sound by boosting the 5 – 7 kHz area. If necessary, tweak the 500-700 Hz range to remove boxiness for a more modern sound.
Especially in heavier genres like rock and heavy metal, the goal is to enhance the natural sound of the toms, bringing out their best qualities while preserving their essence.
Step 4: Floor Toms
Floor toms are usually easier to handle than rack toms. In terms of frequency spectrum, they’re somewhere in between a kick drum and a tom, so it should sound deep but also cohesive with the rest of your kit.
Boosting around 80 Hz enhances the floor tom's natural depth while rolling off frequencies below 60 Hz maintains clarity and prevents low-frequency clutter. I’d also recommend boosting in the 5 kHz range to add bite and definition, and it will make the floor tom cut through the mix.
There are other things you can do to improve your floor tom's sound, such as boosting between 60Hz-100Hz for punchiness and cutting in the 250 Hz-400 Hz range for unwanted ringing. Finally, subtle boosts between 1kHz-2kHz or around 3kHz-5kHz can add extra character.
Step 5: Hi-Hat
Hi-hats deserve special attention because they can easily cut through your mix with their high-pitched, in-your-face sound.
With hi-hats, a high-pass filter is your best friend. By trimming away the frequencies below 300–500 Hz, you clear the stage for the hi-hats to shine without any muddiness. This helps the hi-hats stand out but also carves out more room for the rest of your instruments to breathe in the mix.
For those moments when the open hi-hat seems to ring a bit too sharply around 7 kHz or when there are other resonant peaks around 5–6 kHz, dynamic EQ steps can help smooth things out. With dynamic EQ, you can tame these peaks without losing the crispness that gives the closed hats their character.
Step 6: Cymbals
Getting the cymbals just right will add a layer of shimmer and texture that can elevate a track. But such balance is not always easy to achieve.
Let's start with tackling the low-end "clang" around 200 Hz so that the true character of the cymbals can shine through.
Next, look into the high end, where the sound signature of a cymbal truly come to life. Boosting a bit between 6 – 7 kHz can enhance the unique characteristics of your cymbal, making them stand out enough to add excitement without overwhelming the listener.
Since cymbals are often captured by overhead mics, they pick up a bit of everything from the drum kit. This is where your high pass filter becomes handy. Cutting below 350 Hz clears out any low-end rumble that sneaks in from the kick and snare, which will reduce drum bleed and ensure your cymbals’ recordings remain clear and defined.
Similarly, the room mics might also pick up some of the snare's boxiness around 500 Hz. A slight cut around that frequency should clean up your cymbals' sound, removing any muffled noise.
If the cymbals sound too harsh, easing off a bit above 10 kHz can soften their impact on the mix, creating a more pleasant listening experience. If you’re still not satisfied, you can try with a boost between 6kHz and 8kHz to define the cymbals’ sound.
Final Result: What It Should Sound Like
When your drums are EQ'd to perfection, they come alive in a way that's both powerful and perfectly consistent, driving the song with an irresistible pulse.
The overall sound of your kit should feel like a cohesive unit, with each drum and cymbal playing off the others in perfect harmony. Altogether, your drums should feel like a unified, dynamic, and expressive instrument, enhancing the diversity between nuanced grooves and powerful drum beats as they push the song forward.
One last thing to keep in mind - when you're EQing your drums, don't forget to consider the bigger picture! It's not just about making the drums sound good on their own, but making them sound great when they're playing together with the rest of the track.
So, as you're fine-tuning your drum sounds, take a step back and think about how they fit into the mix as a whole. Is the kick drum clashing with the bass guitar? Are the cymbals drowning out the vocals?
Check how all the different parts of the mix interact with each other, and make adjustments as needed. In this way, you'll create a well-balanced and polished mix that really lets your drums shine, while still allowing the other elements of the track to stand out.
Have fun mixing drums!


