


Techno is an umbrella term of sorts, which we often use to describe a wide range of electronic music. Creating a guide on "how to make techno" wouldn't really make sense, as there are near-infinite genres, sub-genres, and sounds to pick from.
However, that doesn't mean we can't take a look at some of the basic principles that present themselves in just about any form of techno music. So, without further ado, let's dive in and explore the basics so you can start producing techno music at home.
What Is Techno Music?
Techno music has a pretty rich history, though most modern techno music lovers associate the overarching genre with producers like Adam Beyer or Maceo Plex. However, when it got its roots in Detroit back in the 1980s, much of it was influenced by the sounds of groups like Kraftwerk.
Producers would use drum machines, sequencers, and synthesized sounds in real time to create their own techno tracks.
With that in mind, I feel like it makes sense to take the same approach to the modern production process in order to create a step-by-step tutorial.
1. Collect Your Drum Samples
The first thing we'll want to start with in our track is a 909 kick drum , as the 909 drum machine played a prominent role in the origins of techno music. In fact, Juan Atkins, one of the earliest pioneers of techno music, got his first 909 drum machine from the legendary Chicago DJ Frankie Knuckles.
While you can use a 909 snare for a more classic techno sound, I decided to go with an 808 snare in this instance. I also pulled in a closed hi-hat, a low tom, and a mid tom from an 808 sample pack.
When it comes to creating your basic techno rhythm, this is just about all you need.
Ableton Live has tons of great starter samples that you can work with, though if you want to take it a step up, I'd recommend downloading something like Native Instruments Battery 4 or investing in a Splice subscription.
2. Creating Your First Groove
One of the biggest misconceptions of techno music is that it's all four on the floor . However, there are plenty of techno tracks that rely more on breaks and experimental grooves than the standard kick drum placement.
I prefer the breakbeat style of techno music more, and because of that, I want to lean more on that groove.
Now, while most producers like to start by placing their kick drum down first, I often like to start by letting my metronome run around 125-140 beats per minute , and playing out a groove with something like the toms (which I placed in my rack to begin with), in order to get a groove that I can build around.
This approach does two things:
- It helps humanize your techno track by keeping everything just slightly off the grid
- It gives your drum groove a uniqueness all to you
I think the best approach is to improvise with the metronome playing and see what you come up with. Here is the groove I came up with below:
If your groove is feeling too off the grid, you can always quantize in your DAW.
A techno groove shouldn't feel overwhelmingly freeform. The robotic aspect is part of the sound, so if quantizing all the way to the grid actually works for your sound, go for it.
3. Adding the Hi-Hat
Now that you have a core groove down and it's feeling good, you can use it as your main reference for the rest of the drum elements.
One of the biggest mistakes that many new techno producers make is having multiple elements that are doing their own things. In reality, each drum element should be contributing and collaborating with the other drum elements to ultimately create a singular groove .
With that said, let's put the hi-hat in next, using the same approach that we did with the toms.
While the toms were playing, I played out a hi-hat rhythm that felt right to me before quantizing it to make up for my sub-par finger-drumming skills.
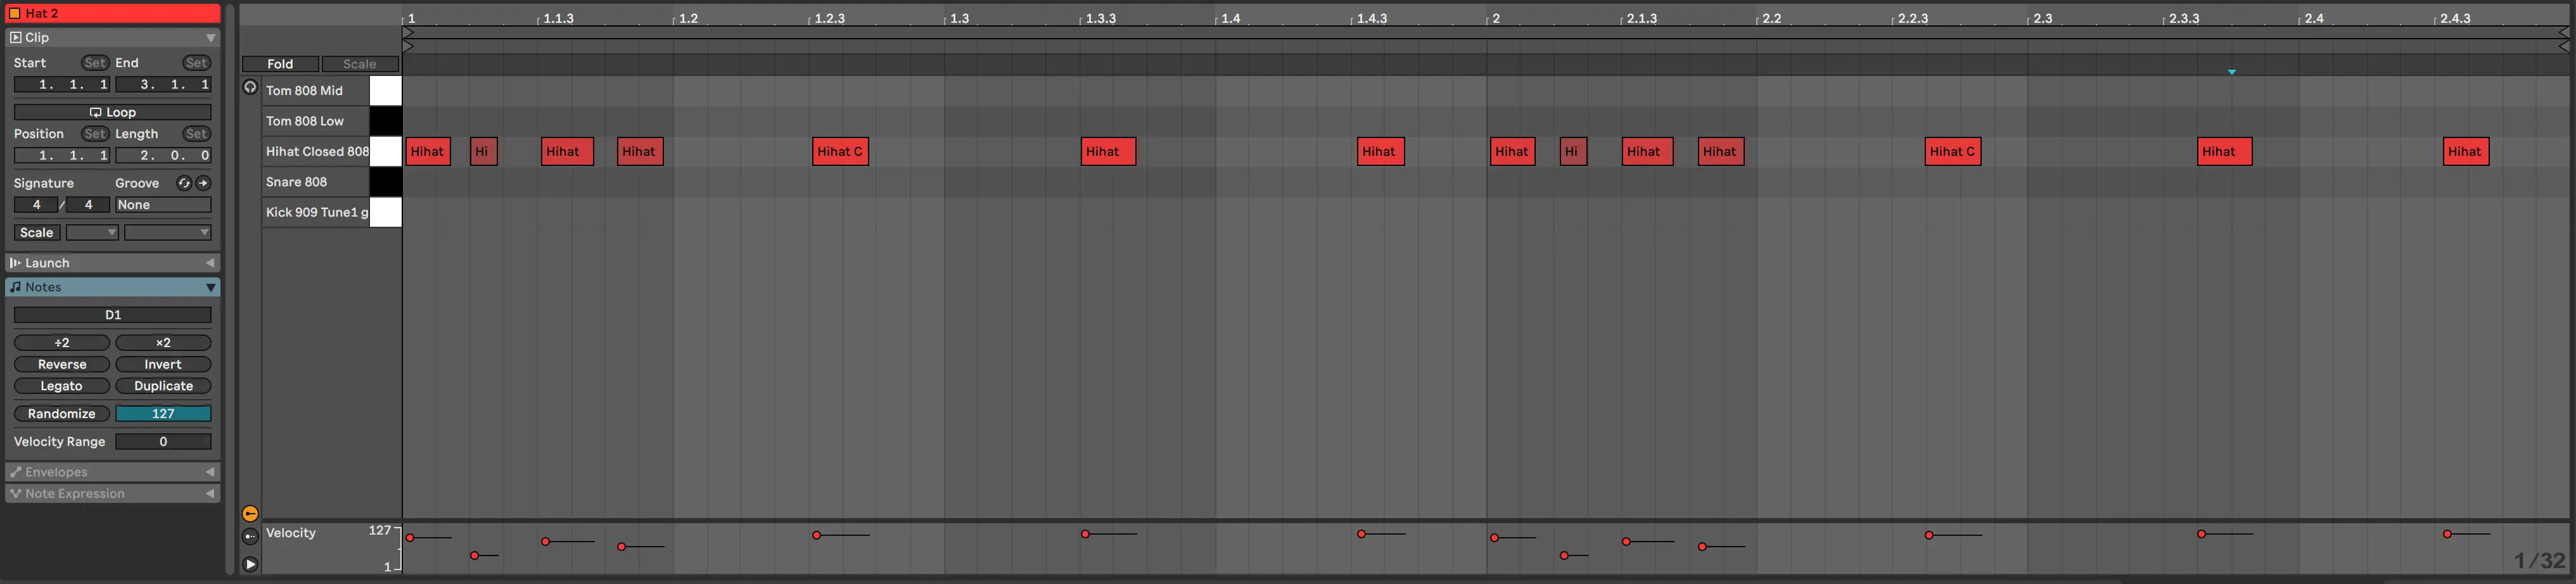
One thing you might notice is if you look at the MIDI groove of both the toms and the hat side by side, you'll see that some of the main points of emphasis match up, which is what I meant earlier by having the two elements play off of one another.
I'm also using syncopation here, throwing in a few offbeat moments between the toms to make the groove dance.
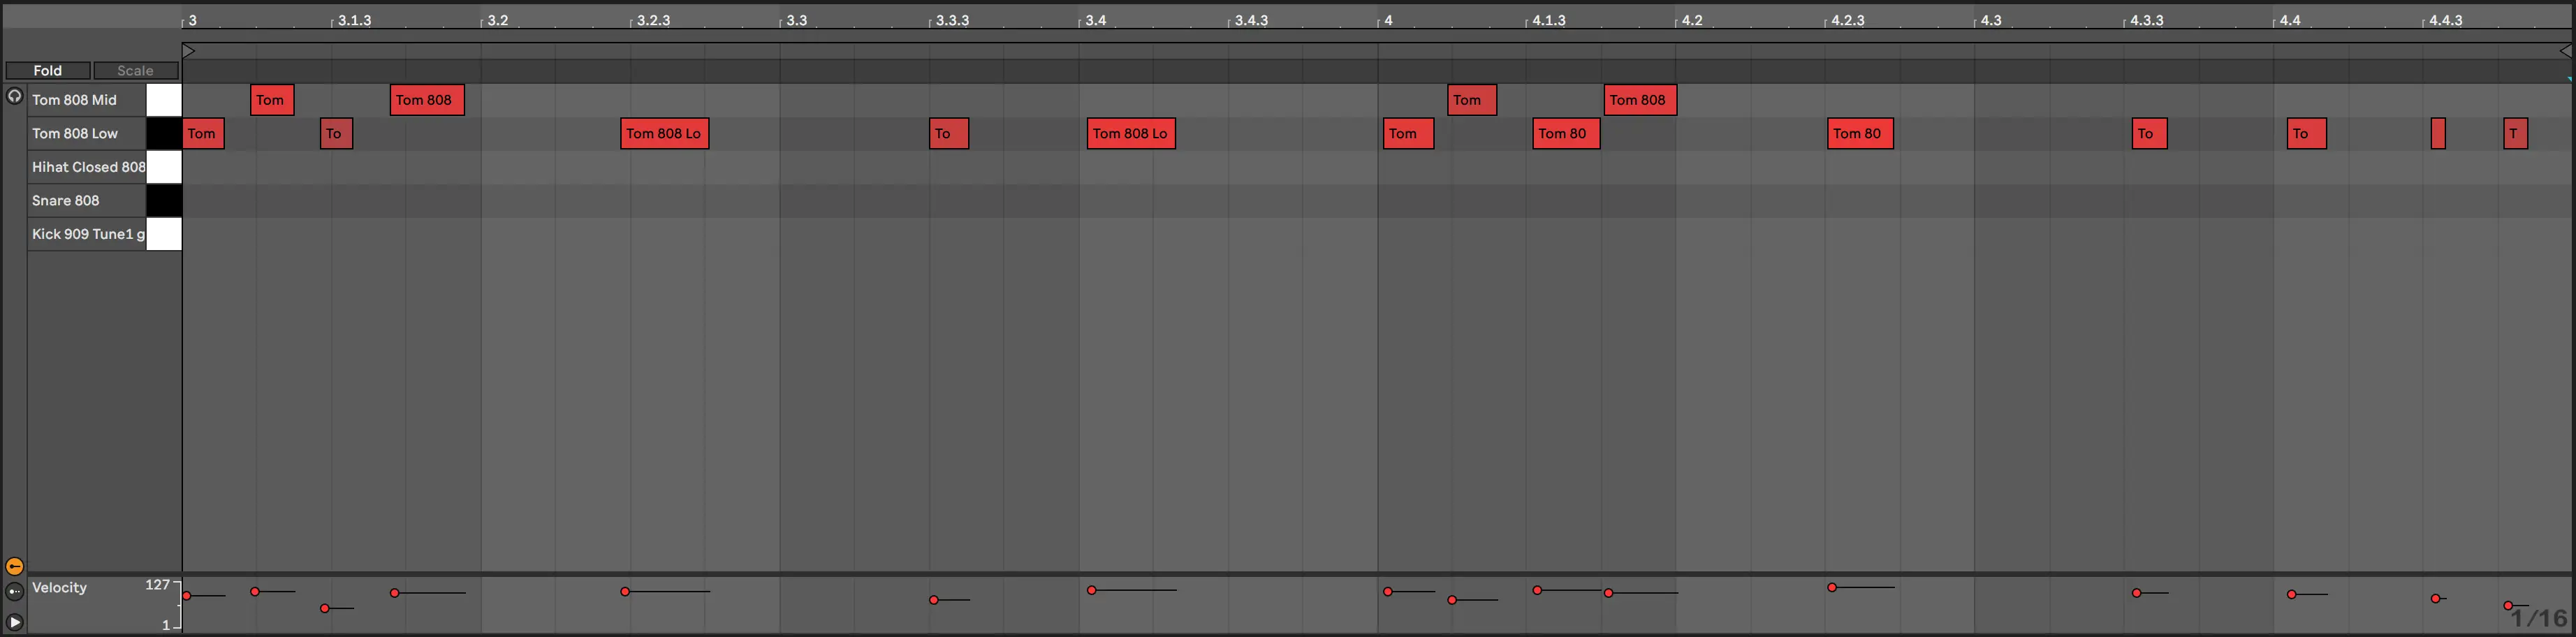
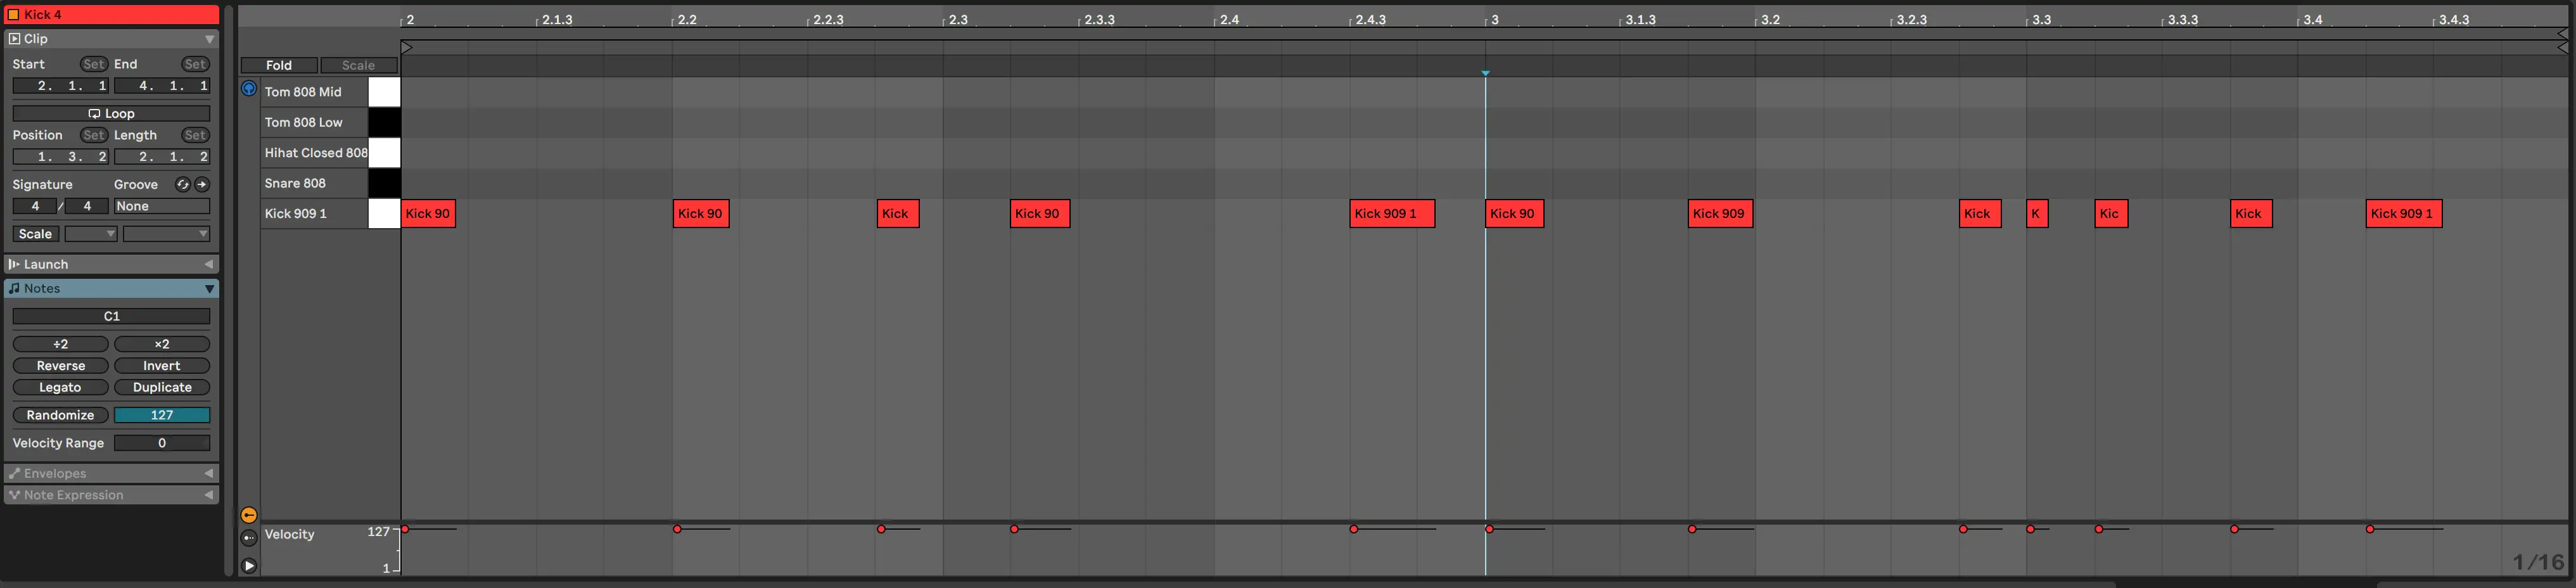
4. Adding the Kick
We'll take the same approach to the kick drum, playing the toms and hi-hat back, hitting record, and feeling out a unique groove. I also took out some of the tom hits at this point, as it was beginning to feel crowded.
Here's what I ended up with:
Side note: Whenever I'm writing out grooves for electronic music, whether it's a techno track, house track, hip-hop track, etc., I often like to make my loops at least four bars long. That way, I can get a loop that sounds mostly uniform throughout with a few slight changes, which often end up near the end of the second and fourth bars.
5. Adding Reverb to the Kick
While this might seem counter-intuitive to anything you've learned about music production before, many styles of techno music utilize reverb on the kick drum. You don't want to drench your kick drum in reverb, though giving it some space is an excellent way to fill out the stereo field and add a bit of tail on the end.
If you're going for an old-school style of techno, you can also put your reverb in mono, so it's straight down the middle.
To do this, we'll create a send track with a reverb plugin of your choice on it, so you can process your reverb in parallel.
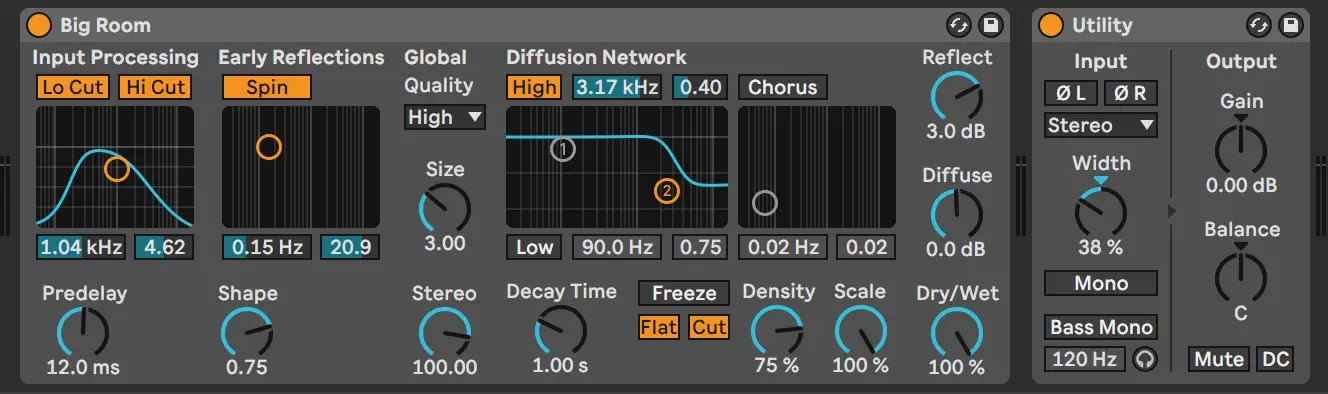
For this reverb, we want a relatively low decay time. A long decay time, especially on a groove element, can start to blur the rhythmic lines between hits. Our brains have an interesting way of interpreting the length of each hit as the time it takes for the tail of the reverb to reach zero.
I often like to use the shortest tail possible so that it almost feels as if the kick is in a small room.
From there, I'll use an EQ plugin after my reverb to get rid of some of the highs using a low-pass filter. The end result should be a deep, dark, industrial sound.
The beauty of our reverb being a send is that we can dial it back and slowly mix it in so that it's ever so subtly behind our dry kick. When you listen in context with the rest of the drums, the reverb shouldn't feel obvious. We just want it loud enough to fill in the dead space between the kick hits and toms.
PRO TIP: If you want to get fancy with your reverb send, you can put a saturation plugin like FabFilter Saturn after it to give it a bit more grit and character.
5. Adding a Snare
Now, we'll take a "choose your own adventure" approach for the snare.
You can either choose to draw it in our play like we did with the above drum elements.
However, the reason I'm going to choose to draw it in is I want my snare to be my anchor element. The rest of the groove isn't as conventional as you might expect from modern techno music, though rather than having our kick say "this is where the beat lands," the snare will take that role.
Let's start by drawing in the snare on the sixteenth notes.
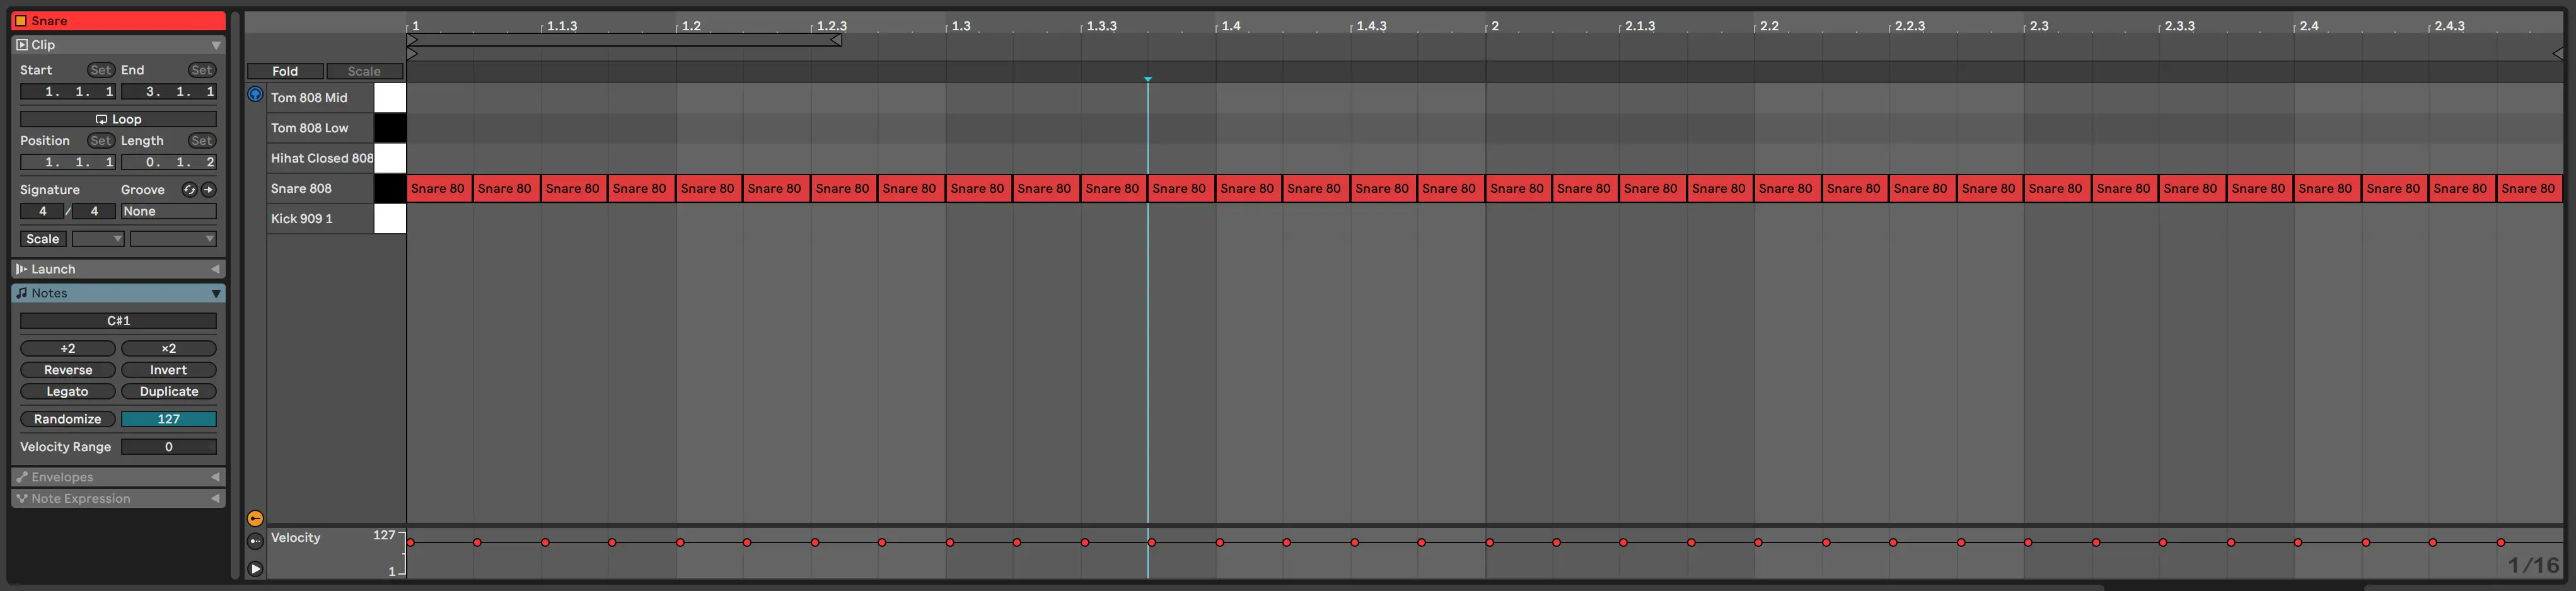
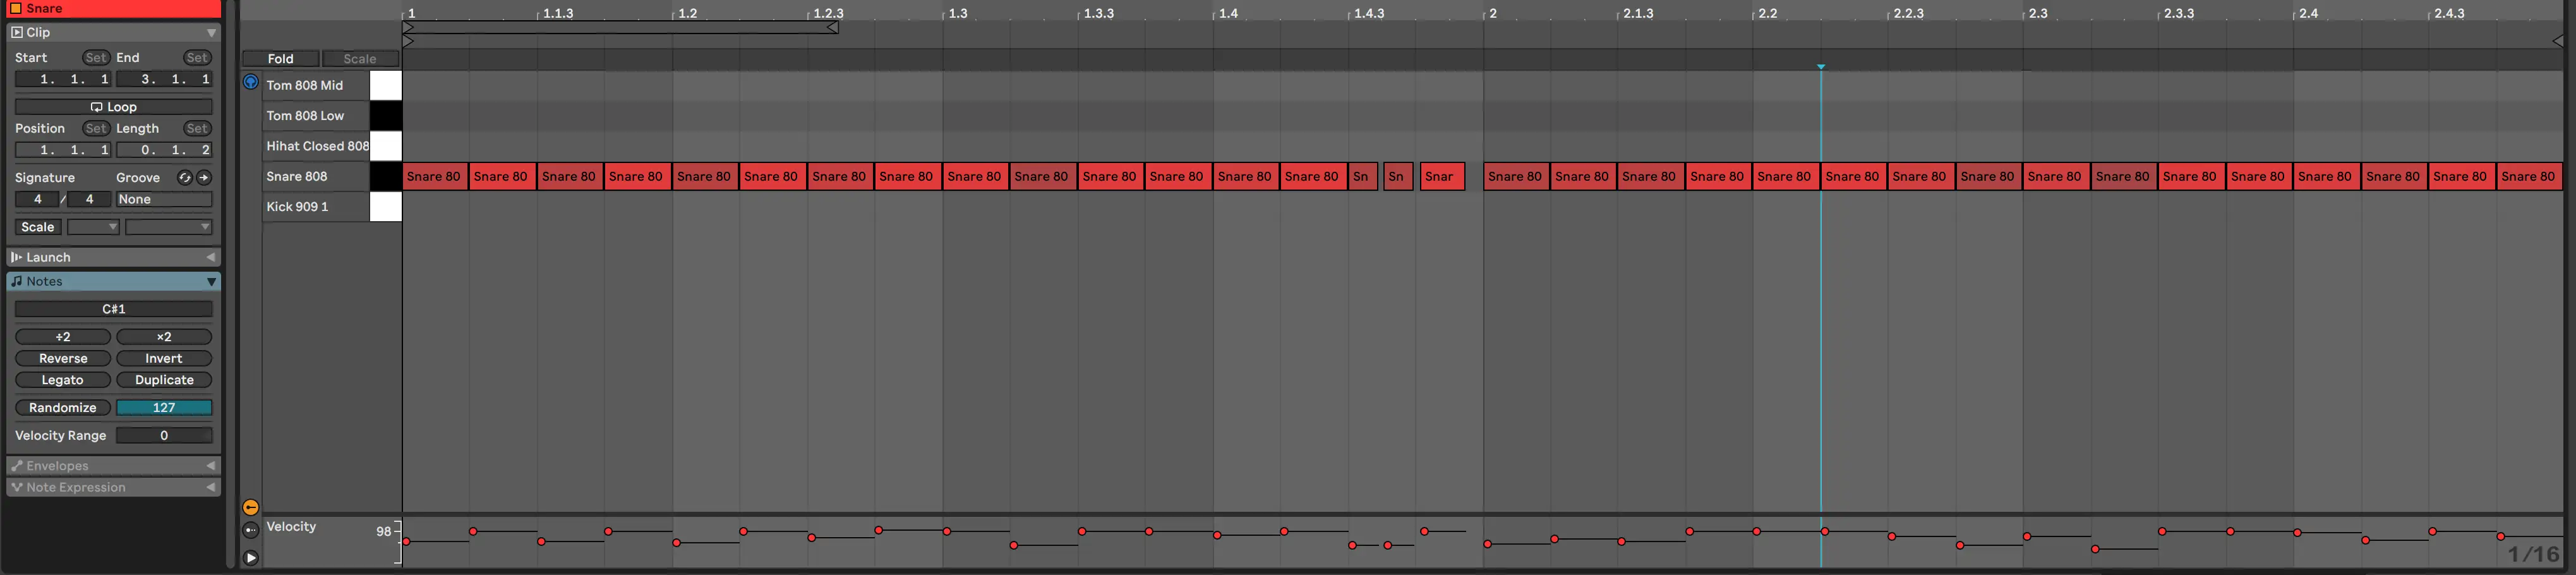
From there, we can adjust the velocity of some of the snare hits where our hats are emphasized to create a small pocket for them to poke out, which makes for a unique groove.

I'll then duplicate that into four bars (like I mentioned earlier) and create some variety with some rolls and such:
I should also mention that one of the most important elements of making techno music is throwing curveballs. The more and more duplicates you make of a four-bar groove, like the one above, for example, the more changes you should make so that the listener thinks they know what to expect, though it's something completely out of the ordinary each time.
Unpredictability and randomness are two of the main things that humanize techno music, so implementing as much of those two elements as you can is key.
6. Get Stabby
Your drum groove should be sounding pretty solid at this point, so now we'll add a melodic element.
Today, I'm feeling a synth chord stab. I'm going to use Serum for this instance, though you can use any VST you please.
So, what chord do we play?
Well, most of the famous techno tracks you know are built on minor chords or minor 7 chords, which are regular minor triads with a seventh degree added. If you're unsure what I'm talking about, you can check out our music theory section on our eMastered blog.
I'll start by dialing in a relatively soft chord stab sound with a bit of reverb directly on the channel to open it up in the stereo field. Then, with my drum loop playing, I'll lay down a rhythmic chord loop using an F minor7 chord.

From there, I'll quantize and make any necessary edits to the actual sound of the chord while it's playing back. We want the ADSR to be short throughout.
PRO TIP: Add an LFO to your chord stab, but don't sync it to the groove. That way, you'll take advantage of the randomness that many techno producers like to let unfold when they produce techno music.
7. Create Your Bassline
The way you approach your bassline in your techno tracks is up to you, though I usually like to base it on what's going on with the melody. Because I'm using a stab synth chord, I'll complement it with a rolling sub.
However, if you were using something along the lines of a pad or drone for the synth, you might choose to make your bass more rhythmic and melodic. Of course, it all depends on the sub-genre you're aiming for.
For this bassline, I decided to go old-school with a Moog emulation from Arturia, which has all of the flavor or the famed monophonic synth bass. It's one of my favorite VSTs when I want a warm, punchy bass sound.
I went with a nice, deep sub without much harmonic content in the mids to keep it out of the way of the synth. While you can draw in your bass notes on the piano roll, I find it more exciting to play them out with your MIDI keyboard and quantize from there.
8. Adding FX and Additional Layers
The most significant parts of your techno track are done, though you might feel like it's sounding a bit sparse. This is where adding a few extra FX and layers can come in handy. With different layers here and there, you have plenty of elements to manipulate and play with, which can add interest to your track.
Consider throwing in some one-shot melodic elements, some risers, and downers, or a few additional percussion loops. You can also get creative with sound design at this point and create your own FX. Listen to some of your favorite techno beats and see what kinds of additional layers are in play.
While there are endless possibilities here, the main thing to keep in mind is that these layers should support the main elements , not overpower them.
9. Arrange Your Track
Once you have a loop that you're happy with, you can begin arranging your techno track so that it's longer than 16 bars.
There are infinite approaches to arrangement, though the one that I often find myself taking with techno music is treating the track as if I were using a hardware drum machine.
Start with one element, such as the toms that we first laid down. After a few measures, add the hi-hat, then the kick, then the snare. Or maybe you forego starting with the drums altogether and give the listeners the stabs to start with.
The main thing here is to create a narrative . You don't want to have all layers playing at all time.
I find it helpful to listen to references and see how other techno producers arrange their tracks. Even though most electronic dance music doesn't follow traditional song structure, we can still think of our arrangement as separate sections (i.e. intro, build-up, hook, interlude, etc.).
In this arrangement, I decided to start by bringing the toms and hi-hat in together. Over the course of the first 16 bars, I slowly introduced some of the other elements to create the sense that I was building up to a larger middle or chorus section.
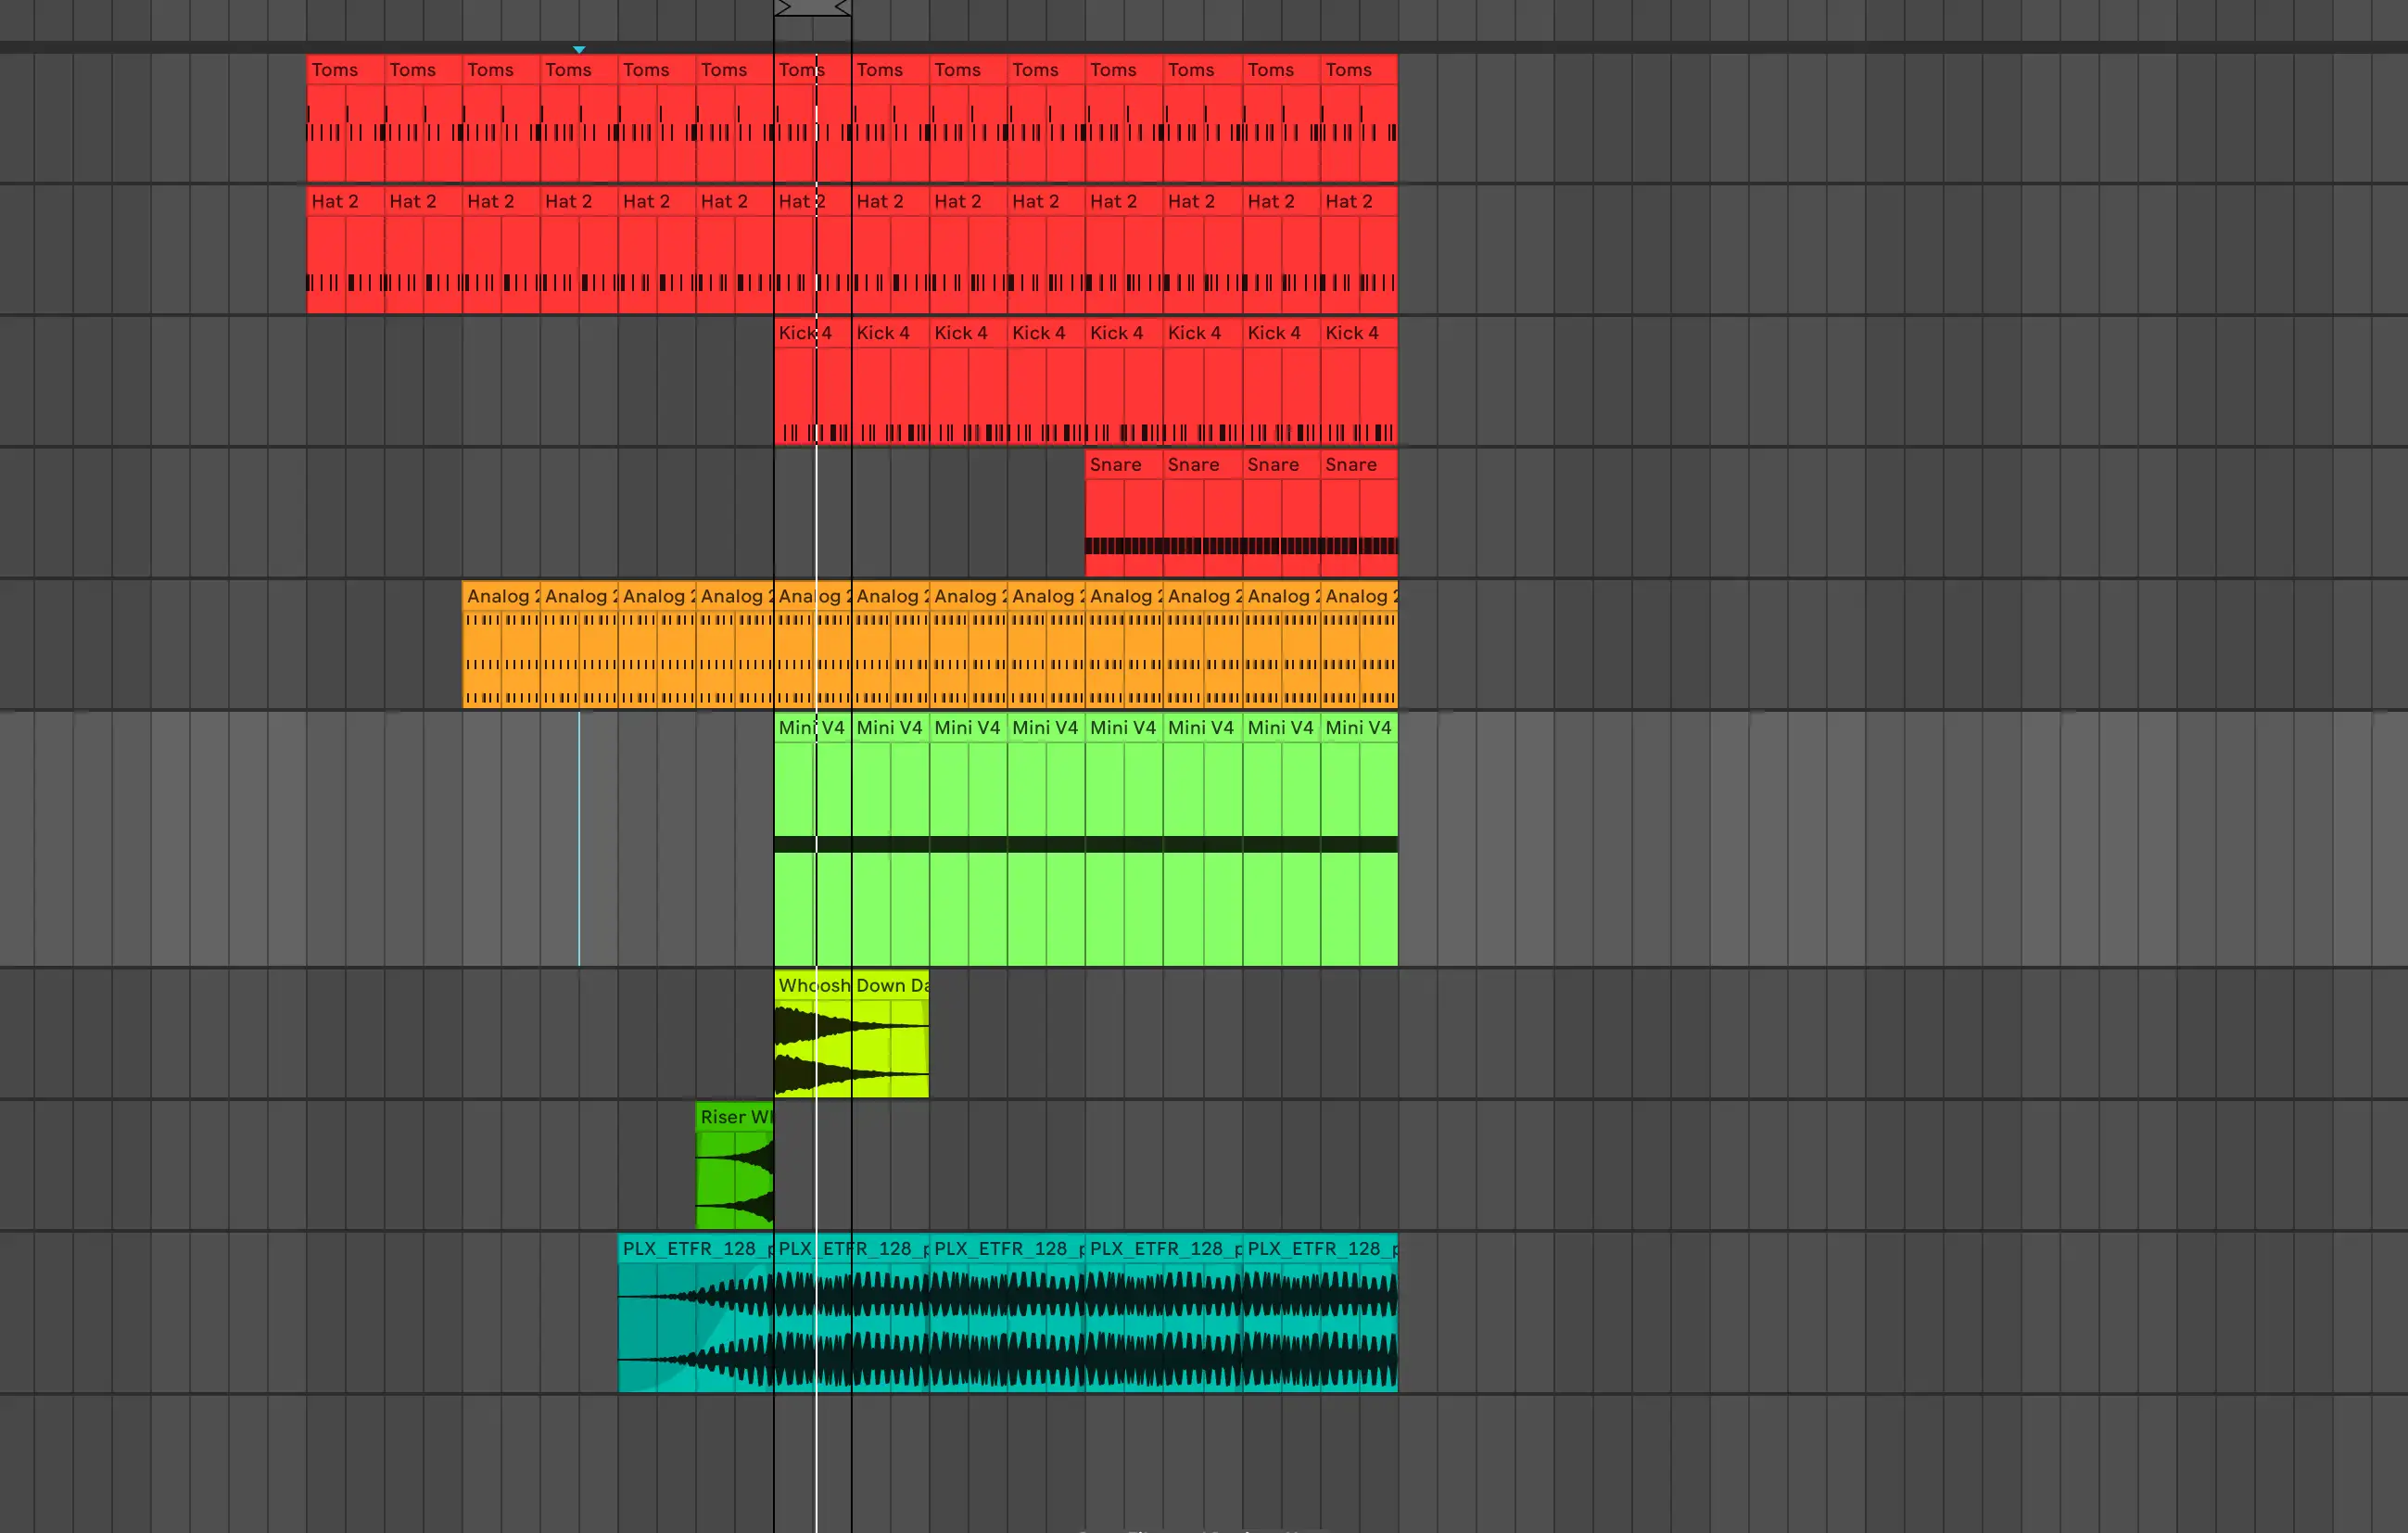
The middle or chorus section, which is 16 bars in this case, is the largest part of the track. Here, I've added all of the major elements so that this portion of the track has the most energy. You might choose to wait until this section to add the bass so that you feel the low-end come alive or hold off on adding the kick in the first 16 bars.
From there, we can add a 16-bar breakdown section, where listeners can take a breath after the high-energy middle section.
For this portion of the track, we might take out the drum elements and keep melodic elements rolling, such as our synth stabs or a pumping synth pad. This section should feel like it's in contrast to the driving middle section.
If I were making a full techno production, I'd probably extend the length of these sections.
10. Add Automation
One of the most important parts of techno music production (and electronic dance music production in general) is automation. This is how producers take a track with few elements and keep it interesting over the course of five or more minutes.
For this process, it's worth having a MIDI keyboard or controller hooked up to your digital audio workstation. This way, you can map your knobs to parameters in your samplers or VSTs and automate changes over time.
For example, you might map a knob to the release of your hi-hat sample, hit play, and tweak the release over the course of the track so that the tail of the hi-hat opens up as it nears the middle section. You could also map a knob to the filter on your synth chord stabs and roll off the high-end during the quieter sections.
Don't be too religious about how you approach automation. Again, randomness is welcome. Sometimes I find it fun to just map certain knobs on my MIDI keyboard to random parameters on my synth and record automation by just feeling it out.
The important thing is that you're taking the time to do so, as it'll make all the difference in making your track sound pro.
11. Mixing Your Track
Mixing techno music is an entirely different beast than mixing, say, an indie rock track. There are certain elements that need to stand out more than others, and the overall expectations listeners will have for your track will be different.
For example, most techno listeners expect the drums to take a front-and-center role, with all of the other elements floating in the background. They also expect a clean, tight, low-end. Now, because this isn't a tutorial on mixing techno specifically, I don't want to get too much into the weeds. However, there are a few basic approaches you can follow to get a decent mix:
- Reference Other Tracks: Continuously compare your mix to other professionally mixed techno tracks to make sure you're in the right ballpark in terms of balance. It's the ultimate way to find out if the elements in your mix are too soft, too loud, too boomy, too thin, too dynamic, etc.
- Tune Your Sounds: Check for any clashing going on because of the way your mix elements are tuned. For example, if you have your kick tuned to 60 Hz at the fundamental and your toms tuned to a 110Hz fundamental, you might consider tuning them slightly higher to 120Hz so that they're an octave above the kick. In some instances, this can help a track gel together and feel more cohesive.
- Give Instruments Their Own Space: Each element in your mix should have its own space in the frequency spectrum. For example, you might add a high-pass filter to your melodic elements to get them out of the way of your kick, or shelve off some of the higher frequencies with a low-pass filter on your bass to get it out of the way of your melodic elements.
Get Started Making Techno Music
By now, you should hopefully have a grasp on the basics of how to make techno music.
I'll reiterate again - there are infinite approaches you can take, and the best way to move forward is to experiment with my approach above, then find some tracks that you like and try to recreate them. Through that process, you'll learn numerous techniques and become a better analytical listener, which is a skill that's key for any great producer to have.
Have fun!


