


So, you’ve decided to take note from some of the best producers on Earth and download Serum?
Welcome to the club! Serum is one of the most popular VSTs in the EDM community, and for good reason. Its versatility and sheer power make it a go-to for creating everything from gut-punching basslines to stadium-shredding leads and beyond.
If you’re using Ableton Live, you’re in for a treat because there are a ton of ways to get creative with Serum.
In this guide, we’re not just going to show you how to get Serum up and running in Ableton Live, we’re also going to share some creative techniques to help you have a blast with it. Think of this as a little Serum crash course.
How to Install Serum in Ableton Live
First, let’s get Serum up and running in Ableton Live. Follow the steps below, and you’ll be creating those synth-tastic sounds in no time.
Step 1: Purchase and Download Serum
First things first, head over to the Xfer Records website and purchase Serum. Once you’ve completed the transaction, you’ll be able to download the installation files. Make sure you download the version that matches your operating system (Windows or Mac).
Step 2: Install Serum
Run the installer you downloaded. Follow the on-screen instructions to install Serum on your computer. During the installation, you’ll be prompted to choose the VST plugin directory. Make a note of this directory, as you’ll need it later.
- Windows: Typically, the VST plugin directory is something like C:\Program Files\VSTPlugins or C:\Program Files (x86)\VSTPlugins.
- Mac: The default directory is usually /Library/Audio/Plug-Ins/VST or /Library/Audio/Plug-Ins/Components for the AU version.
Step 3: Open Ableton Live
Launch Ableton Live. Once it’s open, go to the Preferences menu. You can find this under Options > Preferences on Windows or Live > Preferences on Mac.
Step 4: Set Up the VST Plugin Folder
In the Preferences window, click on the File/Folder tab. Here, you’ll see options to set up your plugin folders.
- Windows: Enable Use VST2 Plug-In Custom Folder, then click Browse and select the directory where you installed Serum.
- Mac: Enable 'Use Audio Units' if you installed the AU version. If you’re using the VST version, similar to Windows, enable Use VST2 Plug-In Custom Folder and select the directory.
Step 5: Rescan Plugins
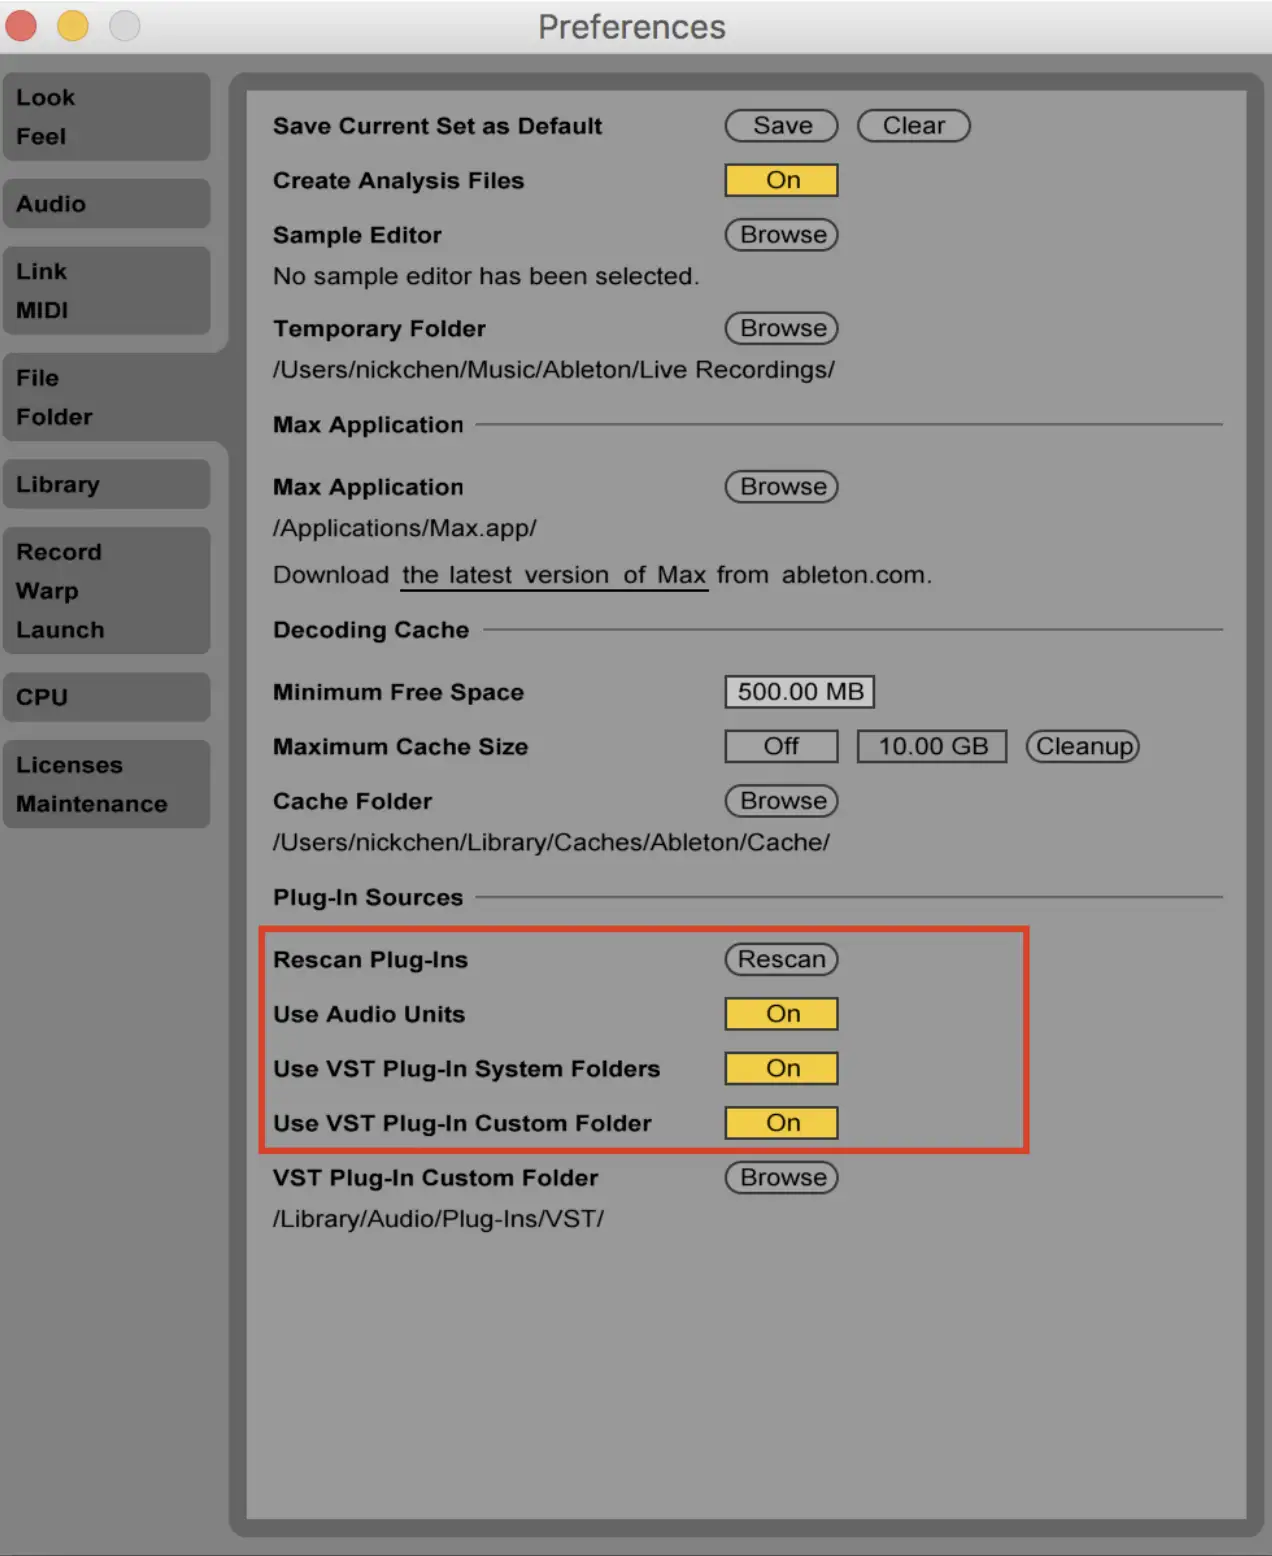
After setting up the plugin folder, hit Rescan to refresh Ableton’s list of available plugins. Ableton Live will now scan the selected directory for Serum and any other plugins you’ve installed.
Step 6: Load Serum
Once the scan is complete, navigate to the Plug-Ins section in Ableton’s Browser on the left-hand side. You should see Serum listed under VST or Audio Units depending on your setup. Simply drag and drop Serum onto a MIDI track to load it up.
Step 7: Authorize Serum
The first time you open Serum, you’ll need to authorize it using the serial number provided during your purchase. Follow the on-screen instructions to complete the authorization process.
And voila! You’re now ready to start creating with Serum in Ableton Live.
Creative Ways to Use Serum In Ableton Live
Now that you've installed Serum and have it ready to roll, let's take a look at a few ways you can get creative with it in the mix.
1. Creating Custom Wavetables
One of my favorite things about Serum is its wavetable synthesis capabilities.
You can create custom wavetables by importing your own audio files. Drag and drop any sample into Serum’s wavetable editor, and watch it transform into a unique waveform. You can then tweak this wavetable using the editor’s tools, morphing and shaping it to your liking.

This technique allows you to create sounds that are uniquely yours, giving your tracks a distinctive edge. I recommend experimenting with different types of samples - vocals, drum hits, or even environmental sounds - to see how they translate into your wavetables.
2. Layering Oscillators for Richer Sounds
Serum offers two main oscillators, but there's no need to stop there. Layer these oscillators to create richer, more complex sounds. Start by choosing complementary wavetables for each oscillator. Then, detune one oscillator slightly to create a fuller, more textured sound.
You can also use the noise oscillator to add subtle grit and texture. Layering is a fantastic way to create massive, festival-ready leads and basses that stand out in the mix.
3. Utilizing Serum’s Advanced Modulation
Take full advantage of Serum’s advanced modulation capabilities!
Assign LFOs and envelopes to multiple parameters to create dynamic sounds that evolve over time. For instance, use an LFO to modulate the wavetable position while another LFO controls the filter cutoff.
Multi-layered modulation can make your sounds come alive, adding movement and complexity. Experiment with different LFO shapes and rates, and don’t forget to use Serum’s matrix to fine-tune your modulations.
I love this approach for creating sounds that constantly evolve. It's the perfect way to keep your tracks fresh and interesting.
4. Designing Atmospheric Pads
Though it's what most people talk about, Serum isn’t just for aggressive basses and leads. It’s also fantastic for creating lush, atmospheric pads. You can start with a smooth wavetable and apply a slow-moving LFO to the wavetable position.
From there, you can add a generous amount of reverb and delay to create a sense of space. You can also use Serum’s noise oscillator to add texture, using the built-in noise samples or importing your own.
With so many different possibilities, I often find myself layering different pads together and adjusting the filter and effects to create more complex soundscapes.
5. Experimenting with FM Synthesis
Serum has some pretty incredible FM synthesis capabilities that allow for creating complex, metallic sounds perfect for modern EDM. You can use one oscillator to modulate the frequency of another or experiment with different wavetables and modulation amounts to find the sweet spot.
FM synthesis is great for sharp, cutting leads and growling basses. It’s a bit of a learning curve, but once you master it, it opens up a new world of sound design possibilities.
6. Save Your Favorite Serum Presets to an Instrument Rack
As you get more and more involved with Serum, you'll likely have a few go-to Serum presets that you rely on for various projects. Using Ableton Live’s Instrument Racks, you can save these presets along with additional processing and effects, allowing for quick recall and streamlined workflow. Here’s how to do it:
Step 1: Load Serum into an Instrument Rack
- Open Ableton Live and create a new MIDI track.
- Drag and drop Serum onto the MIDI track from the Plug-Ins section in Ableton’s Browser.
- Click on the Serum device to ensure it’s selected.
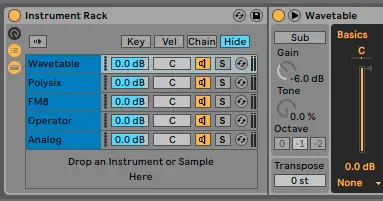
Step 2: Create an Instrument Rack
- With Serum selected, press Cmd + G (Mac) or Ctrl + G (Windows) to group Serum into an Instrument Rack. You’ll notice that Serum is now enclosed within an Instrument Rack device.
Step 3: Customize Your Preset
- Load your favorite preset in Serum. Work your way through your saved presets or design a new sound that you want to save.
- Tweak the sound to your liking, adjusting parameters within Serum until you’re satisfied with the result.
Step 4: Add Additional Processing (Optional)
- If you use specific effects with this Serum preset, you can add them to the Instrument Rack. For instance, you might want to add an EQ, Compressor, Reverb, or Delay.
- Drag and drop any desired effects after Serum within the Instrument Rack’s chain.
Step 5: Map Macro Controls
- Click the Show/Hide Macro Controls button (it looks like three horizontal lines) on the Instrument Rack.
- You’ll see eight Macro knobs that you can use to control various parameters within Serum and any added effects.
- To map a parameter, click the Map button. Then, click on a parameter within Serum or an effect, and click on one of the Macro knobs.
- Repeat this process to map any essential controls to the Macro knobs, allowing for quick adjustments without diving into the device.
Step 6: Save the Instrument Rack
- Once you’ve customized your Instrument Rack and mapped any necessary controls, it’s time to save it for future use.
- Click the Disk icon on the Instrument Rack’s title bar. This opens a Save Preset window.
- Name your Instrument Rack something descriptive, like “Favorite Bass Preset” or “Go-To Lead Sound,” and click Save .
Step 7: Access Your Saved Instrument Rack
- Your saved Instrument Rack will now appear in the User Library under Presets > Instruments > Instrument Rack .
- To load your custom Instrument Rack in future projects, simply drag and drop it from the Browser onto a MIDI track.
Final thoughts
While Ableton has plenty of good VSTs and effects plugins for producing and mixing, Serum has become a favorite plugin of mine over the years. It gives you the ability to create your own unique sounds with its in-depth wavetable features and has a huge community for support whenever you need it. Paired with Ableton, the plugin has an even greater range of use. I'd highly recommend getting a copy for yourself today!


