


Trying to suss out the differences between compressors and limiters can be a challenge if you’re completely new to mixing. Trust me, I get it. Even after more than a decade of mixing and producing, there are still things about dynamics processors that leave me baffled.
Compression and limiting can be extremely subtle compared to other, more obvious forms of processing, such as delay, reverb, or modulation. Even so, just about every popular song over the last six decades has used compression or limiting in some form or another, so it’s hard to overstate their importance.
Even though there are many similarities between these two processors, there are a few crucial differences between them that are important to be aware of, and knowing these differences can elevate the quality of your mixes.
What Is a Compressor?
Let's begin by taking a look at how a compressor functions.
A compressor reduces the dynamic range of an audio signal, which is the difference between the softest and loudest portions of a signal:
The dynamic range of an audio signal vs. the dynamic range of another can vary quite widely as well. Some signals are wildly dynamic, while others aren’t. However, even signals that aren’t very dynamic themselves can change in volume quite drastically over the course of an entire track.
Engineers will often apply compression to signals with high dynamic ranges, so they can level out the overall volume.
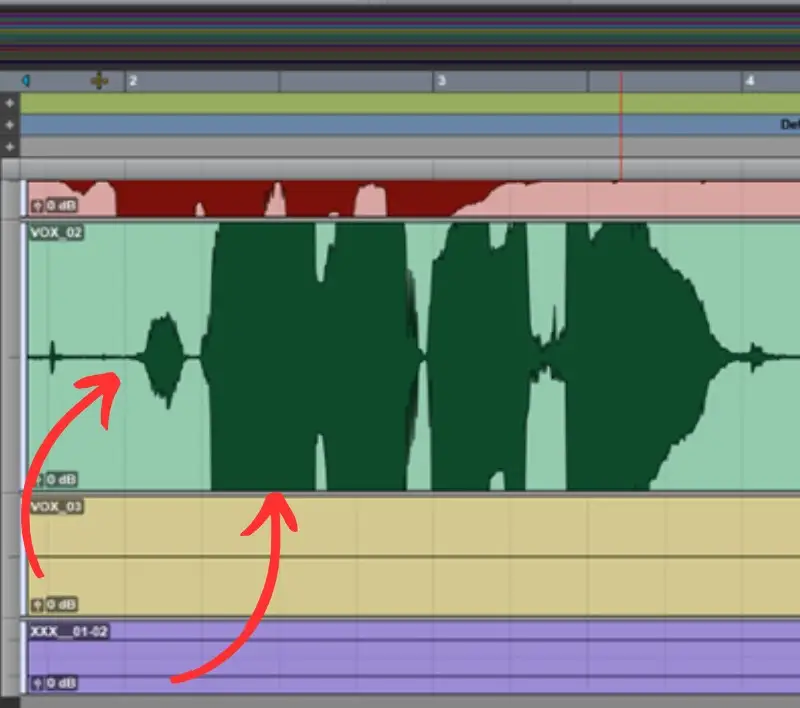
Think about a vocal track. The singer might be soft and whispery during the verses before erupting during the choruses. In this case, having a compressor can be an incredibly valuable tool.
When you compress a loud vocal, you bring the loud parts down while bringing the quiet parts up.
How Do Compressors Work?
So we now know that compressors are made to reduce the dynamic range of a signal, but what’s going on under the hood that makes this happen?
Well, most compressors will have a few different parameters, including:
- Threshold
- Attack Time
- Release Time
- Ratio
- Makeup Gain
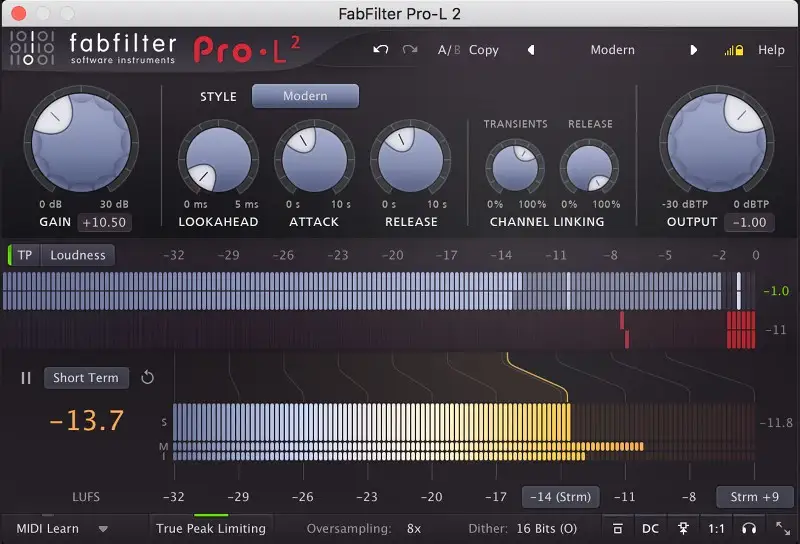
There are certain compressors, such as the famous LA-2A optical compressor, which don’t have any adjustable attack and release times, as well as modern compressor plugins, such as the FabFilter Pro-C2, which offer further controls like “lookahead” and “knee” settings.
However, for now, we’ll just pretend like we’re looking at a compressor with the five fundamental parameters above.
Threshold
The threshold is the level at which the compressor kicks in and starts compressing the signal. You can adjust the threshold level based on the incoming signal. For example, if you have a threshold of -10dB, anything below that threshold will not be compressed.
However, once the input signal gets above -10dB, the compressor will reduce the level of the signal.
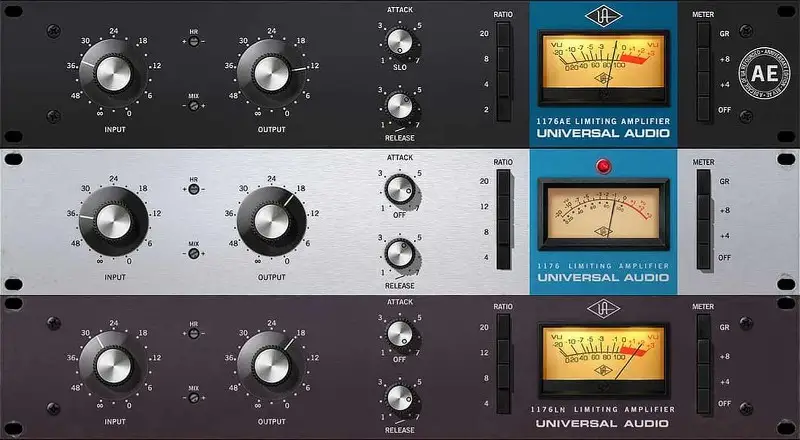
Attack and Release
The attack determines the response time of the compressor and how much of the initial transient or impact passes through the compressor without the compressor clamping down.
The slower the attack, the greater portion of the transient passes through. Slow attack settings can make signals sound punchier and more aggressive.
On the other hand, faster attack times attenuate the signal as soon as it crosses over the threshold, perfect for tightening up performances and keeping things controlled. Push a signal too hard with a fast attack time, however, and you can push it too far back in the mix.
Then, we have the release time.
The release determines how long the signal stays compressed after the compressor kicks in.
Slow release times are great for pushing instruments back in a mix and smoothing out the sustain for more dynamic control, while fast release time can increase perceived loudness and make a sound feel more aggressive and exciting.
Ratio
The ratio is basically the extent of the compression applied to the signal, measured in decibels.
Let’s say we have a ratio of 2:1. This ratio implies that when the signal surpasses the threshold by 2 dB, the level will be reduced by 1 dB. In the same way, if the signal exceeds the threshold by 10 dB with a 2:1 ratio, the level will be reduced by 4 dB, and so forth.
The higher the ratio setting, the more obvious the compression will sound.
Makeup Gain
The makeup gain is the last stage in the compression chain, which is there to compensate for the volume lost during the attenuation phase. Some compressors use meters that show you how much gain you took down in dBs, so you can make precise adjustments on the output volume side to keep the volume consistent.
What Is a Limiter?
Limiters are a lot like compressors in that they also have thresholds. However, the way in which a limiter's threshold works is a bit different.
Limiters are made to keep the signal from surpassing the set threshold. Let’s say you apply a limiter with a threshold of 0 dB to your mix bus. This limiter would prevent the mix from going over the 0 dB threshold at all.
Many people refer to this as "brick wall" limiting, which is an apt name, as the extremely high ratio makes it act like an impenetrable audio barrier. Any signal that reaches the threshold on a brick wall limiter will receive compression automatically, squashing it back down.
Though this might sound a lot like compression, the key distinction is the ratio.
Compressors use lower ratios so that only some of the volume gets knocked off when the signal surpasses the threshold. In contrast, limiters use high ratios, such as 10:1 and above.
Using a Limiter vs Compressor in Your Mix
Now that you have a decent understanding of the main difference between a limiter vs. compressor, let's take a look at when you might choose to use either of these tools in your mix.
I will usually reach for a compressor if I need to rein in the peaks of an instrument and provide more dynamic control in a mix. However, if I want to regulate the overall output of a particular instrument, bus, or the entire mix, I’ll reach for a limiter.
Of course, there are no rigid rules in mixing, but these general guidelines can help you when you’re stuck in the decision-making process.
When To Use a Compressor In a Mix
Most of the time, I’ll use compressors on individual tracks and busses in the mix, though having a slight bit of compression on the master bus isn’t uncommon either.
Beyond vocals, one of the instruments I will almost always use compression on is bass guitar.
Though some bass guitars can benefit from limiting, especially if they’re in a dense mix and need to act as a solid, low-end foundation rather than a dynamic element, for the most part, I’ll employ compression if I’m trying to rein in dynamics.
A limiter’s high ratio could overly compress the bass guitar, squashing it to death and leaving you with a flat, lifeless sound. On the other hand, a compressor’s moderate ratio allows for nuanced control over the volume of the bass, making it harder for the listener to hear.
So, should you use a compressor on every track in your mix?
Sometimes, yes. Sometimes, no.
The decision truly depends on the overall style of your mix.
More natural-sounding genres, such as classical, folk, and jazz, are meant to have dynamic range. Therefore, minimal to no compression in the mix might be the best option. Conversely, music that is meant to be more in-your-face, such as pop, metal, rock, or EDM, will often have tons of compression throughout the mix.
Heavy compression is what allows engineers to get ultra-loud mixes without peaking.
Most modern pop music that you hear on the radio is very dynamically consistent, so don’t be afraid to use heavy compression to keep your mix elements in line.
When To Use a Limiter In a Mix
In most cases, you’ll apply a limiter to the mix bus.
If you’re only producing a track or mixing it, I would suggest straying away from limiting your mix and leaving it for the mastering engineer. However, if you want to hear what your mix might sound like at full volume to compare it to professionally released tracks, or if you’re sending a mix to a client and you want them to hear what it might sound like when mastered, using a limiter on the master bus can add a bit of extra excitement.
Of course, if you’re mastering a song, placing a limiter at the very end of your chain is pretty much a give-in. I can’t think of a song I’ve mastered in my 10+ years of professional work that I haven’t used a limiter on.
The main goal with a limiter is to increase the maximum level of your mix without introducing distortion.
Note that in mastering, however, limiting should be quite subtle. I typically (though not religiously) aim for 1-3 dB of gain reduction during the loudest sections of the song I’m working on.
Some heavier mixes might call for more gain reduction, and some might call for less.
The key here is to listen carefully to see whether or not the mix is “pumping” because your limiter is too hot. Your limiter should be taming peaks as they pop up, not squeezing the life out of the entire song.
Using a Limiter on Individual Tracks
Though I mostly reserve my limiter for the mix buss or final output, there are also times when I apply it to individual instruments or instrument busses if I need extra control.
For example, if I need a bass to purely serve as the foundation of a mix without any dynamic range, I’ll throw a limiter on it. Again, be careful that you’re not introducing pumping by limiting your bass too heavily.
The same thing goes for heavy drum tracks, especially in rock and metal mixes. You may notice that the snare is too dynamic, popping out of the track every now and then. An easy way to control this would be to add a limiter and dial it in so that it’s only providing gain reduction when those unruly snares hit.
There are also times when I’ll apply limiters on vocals, especially in pop or rock mixes where I need serious consistency. I’ll use compression to control most of the dynamics and trim around 1-2 dB off the vocal at the end of the chain using a limiter.
Final Thoughts - Limiter vs Compressor
There you have it, the real difference between a limiter and a compressor.
There are so many different compression strategies out there, from glue compression to parallel compression and beyond, and everything above is really just the tip of the iceberg. However, by now, you should know when to reach for a compressor and a limiter without having to spend any more mental bandwidth on your mix than necessary.


