

The idea of processing a song on the mix bus is confusing to a lot of beginners.
However, considering the fact that most DAWs, including Pro Tools, Ableton, Logic, etc., have the option for mix bus processing, there has to be something to it, right?
We'll just go ahead and answer our own rhetorical question by saying, "yes, there is absolutely something to it!"
If you're looking for a way to gain more sonic control over your entire mix, then you've come to the right place.
Let's dive in and take a look at how you can use your mix bus to create better and more cohesive mixes!
What is a Mix Bus?
The main function of a DAW or an audio mixer is to combine multiple signals together into a single, cohesive track. All of your signals will be routed to a specific place before that final copy is sent to the output of your choosing.
We call this the mix bus . The mix bus is the place where all of your tracks, including your vocal tracks, drum tracks, effects, and everything else in your mix, are routed and combined together.
The easiest way to think of a mix bus is like a school bus. Each individual track is a student and the mix bus picks them up and takes them to a single place.
Difference Between Mix Bus and Master Bus
The mix bus goes by names, including the stereo bus, the two-bus, and the master bus. If your mix only has one bus, this one is probably it. Most DAWs will create a mix or master bus (master track) by default, routing all of the channels in your DAW.
Unless you're working in 5.1 surround, it will likely be a stereo bus with a left and right channel. Essentially, this is the spot where your mix is funneled into two channels to create the final bounce, render, or stereo export. The master bus is also the last place before your music hits your headphones or stereo monitors.
With the master bus, you can make last-minute adjustments to your mix before it leaves into the acoustic space. For example, you might choose to adjust the overall level of your mix with the master fader. On the other hand, you might use mixing tools like compression and EQ to glue your mix together or alter the tone. We'll dive deeper into those processes later in the article.
However, with all of that said, there are complex mixes where the mix bus and master bus are two different things. You might create more than one mix bus before your tracks get summed to your master. For example, you might have an instrument mix bus or a vocal mix bus.
What's the Point Of Creating a Mix Bus?
The point of a mix bus is to control the entire track with mixing tools, such as EQ, compression, and saturation. You can almost think of processing within your mix bus as a sort of pre-mastering.
It's a great way to polish your track and put the final touches on it before you send it out to get mastered.
With bus compression , you can glue your tracks together to get them to sound more cohesive. You can also use EQ to adjust the tonal balance, potentially accentuating the high frequencies for a bit of sparkle. It's a wonderful tool for adding automation as well!
For example, you can push a dB on the choruses to make them sound louder and more energetic than the verses.
Of course, just because you have the ability to alter your mix bus doesn't mean you need to. We never recommend trying to fix specific problems with your mix bus. If you notice an issue with your mix, go into the mix to fix it instead.
You might notice that your vocal tracks sound a bit harsh in the high-mids. Rather than trying to fix it by EQing that region on your mix bus, go to the harsh vocal and EQ it there.
How to Create a Mix Bus (step by step)
The way to set up a mix bus depends on the DAW you are using, so it's best to refer to your DAW's user manual if you're having trouble figuring it out. However, to give you an idea of how to create a mix bus, we'll use Pro Tools as an example.
#1 Create a New Track
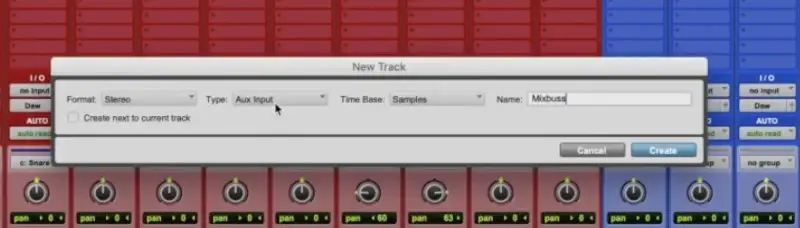
When in Pro Tools, click "New Track." When the New Track menu pops up, you want to select Aux Input and Stereo from the dropdown menu.
#2 Position, Name, and Solo
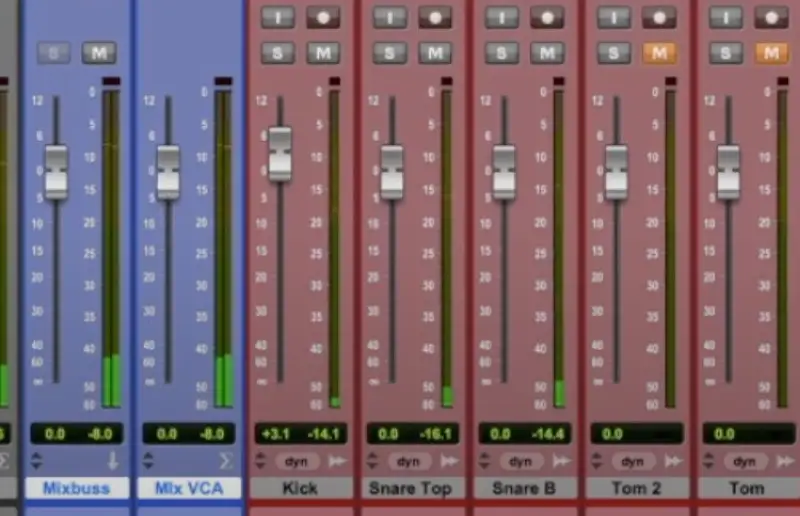
Get your new bus in the right position in your session and rename it whatever you please. To keep it simple, we'll name ours "Mix Bus." We'll also want to Command + click on the solo button to make sure it's permanently soloed. Not all DAWs will require this, though it's important to remember for this DAW.
#3 Select an Input and Output

Select two stereo channels for your input and two stereo channels for your output. The choice is up to you and how you want to route your tracks.
#4 Group Tracks and Send
Group the tracks or desired channels that you want to send to this bus. For instance, you might choose to group your music channels and send them to this bus without the vocals. Or, you might just want to send your drums!
Easy as pie! You've just created a mix bus!
How to Effectively Use a Mix Bus
EQ
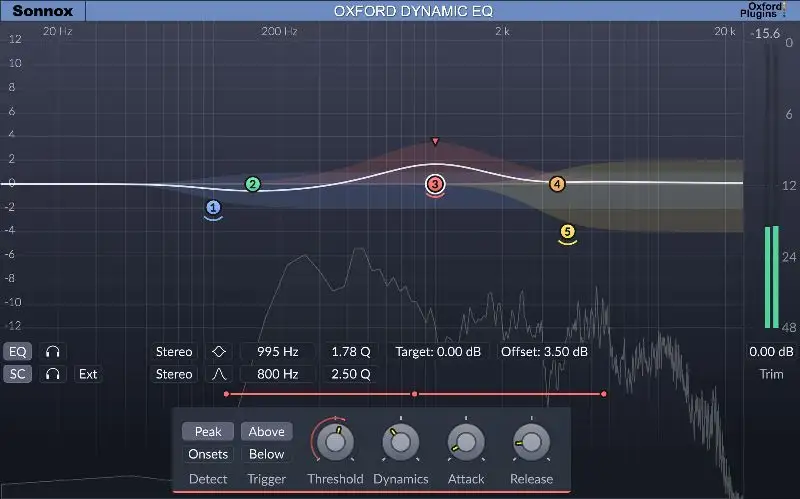
One of the most common ways mix engineers will affect the mix bus is with EQ.
While most EQing and frequency balancing should be performed during the mixing stage, there is no reason why you can't sweeten your mix and make some final adjustments on the mix bus track.
EQ is great for enhancing pleasing frequencies or taming overpowering ones. The important thing to remember here is that you should only make small tweaks with EQ on mix buses. We recommend never boosting or cutting more than 3 dB and always using gentle EQ settings to make subtle changes.
If you find yourself needing to make a surgical change, it's best to go to the problematic track instead.
Compression
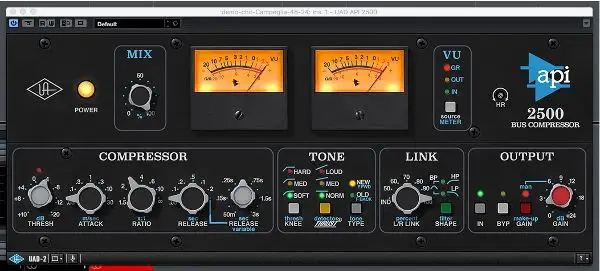
With mix bus compression, the goal is to "glue" all of your tracks together to increase excitement, prevent peaking, and maintain consistent levels. The main thing to remember when using a mix bus compressor is that you should keep the settings subtle.
Start with a ratio of 2:1, which will gently compress your entire mix, ever so slightly squeezing the individual tracks of your mix together.
It's best to use a slow attack time (somewhere around 30 MS) and a fast release time (under 50 MS). These settings will give you the best transparency, which is crucial. You shouldn't hear the compression happening, though you should feel the track lift a bit.
It's also important to refrain from applying more than 2dB of compression. If you apply more than that, you could upset the dynamic balance of your mix.
Saturation
When you're in the phase of mixing individual tracks, it's easy to go crazy with saturation.
On the mix bus track, however, you'll want to be subtle. Even adding the slightest bit of harmonic saturation can make things sound a bit more exciting. The idea here is to add the slight bit of harmonic distortion that you get from recording on physical analog equipment, including transformers, tape machines, and tubes.
To help you use these processes and a few others, let's dive in and check out some cool mix bus tips you might apply!
Pro Tips for creating amazing bus tracks
Use High-Quality EQ Plugins
Because all of the tracks will pass through your mix bus, it's important to pick the right EQ. The best EQ for a mix bus is one that is smooth and subtle, allowing you to add silky highs and powerful lows without things getting out of control.
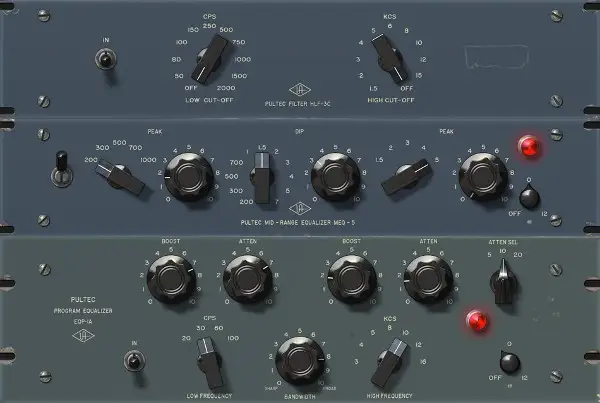
Pultec emulations are some of the best options for mix bus tracks, as they are program dependent and have very musical bands.
If you don't have a Pultec emulation in your arsenal, find another good emulation of an analog EQ. Don't be afraid to spend time testing a few different EQs out to see what sounds best. After all, this is the final touch on your mix and you should treat it with care.
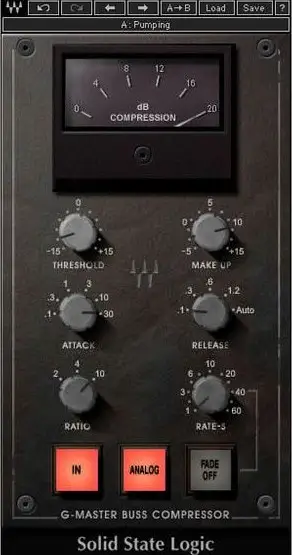
Give Your Mix Some Glue
When it comes to choosing the right bus compressor, you want something that is clean and fast-acting. A long-time favorite mix-bus compressor is the SSL Bus Compressor, which is a VCA compressor. Of course, there are some mixes that call for a slight bit of additional grit, in which other options, such as the Neve 33609 Stereo Compressor, can be helpful.
If your compressor has a side-chain filter built into it, we recommend using it. The beauty of these side-chain filters is that they ignore low-end frequencies, which could end up overwhelming your compressor and pinning the needle, attempting to take everything in the mix down with them.
So, for example, if you have a hip-hop track with a heavy 808, consider using the side-chain feature on your compressor so it glues the rest of the mix while leaving the 808 untouched. This is a great feature to have your cake and eat it too.
PRO TIP: We recommend applying bus compression before you start mixing, so you can get the compression you're looking for right off the bat. It's a great way to mix faster, use fewer plug-ins on your individual channels and busses, and enhance your overall mix efficiently.
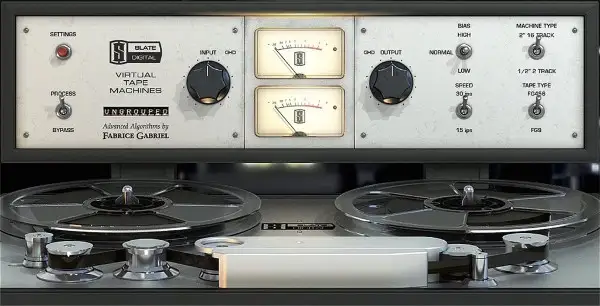
Give Your Mix An Analog Vibe
Up until the 2000s, most of the songs that you learned to love were recorded to tape. Tape saturation is a beautiful thing, as it absorbs transients in a very musical manner. There is nothing like a quality tape saturation plugin to smooth out a mix and add fullness, especially if the mix is a bit too squeaky clean.
Using tape saturation is a great idea if you're mixing in the box. Just be aware that adding too much tape saturation can present some pretty major problems if you're not careful. We generally feel that applying to the mix bus before you start mixing is a good idea. This way, you can stop your saturation from building up cumulatively from adding it to individual channels.
Essentially, while saturation can make a big difference in a positive way, too much of it can start blurring details and leave you with a mix that isn't punchy or clear.
Automate
Automation is one of the most important yet often overlooked tools for creating great mixes. Just like you automate the different channels in your mixes, you should also automate the mix bus.
You can automate your buses just like you would for each channel. Maybe add a dB of volume during the chorus or take their stereo width in during the verses so the choruses sound bigger. Of course, the idea here is to be subtle, which brings us to our next point.
Don't Make Major Adjustments
When working on your mix bus track, the idea is to adjust subtly. When making adjustments to many tracks at once, the changes will be much more obvious.
Using wide bands with no more than 3dB boosts or cuts or compressing with a light 2:1 ratio with a maximum of 1-2dB gain reduction is a great way to gain control over your mix without making changes that could destroy everything you've worked so hard to build.
This is the same approach mastering engineers take during the mastering process.
Understanding The Difference Between Pre-Fader and Post-Fader
One of the main things that people get confused by when setting up different busses is pre-fader vs. post-fader. We'll do our best to simplify it for you so you never have to think about it again!
Busses are typically post-fader (after the fader), meaning the audio signal is flowing through the fader before it goes out. That fader controls the level that you're hearing. When you set your fader to -2dB, for example, you're sending -2dB of audio signal out of your bus. So, let's say you sent all the drums to a drum bus that was post-fader. To turn all the drums up or down, you would use the fader on that one bus.
If you solo the bus, the drums would be soloed. If you muted the bus, the drums would be muted.
On the other hand, you have pre-fader, which is when you send an audio signal out to a bus before it touches the fader. Typically, when you set up an aux bus or a reverb bus, you send it to that reverb bus before the fader. You can specify how much of the signal you want to send, though the fader for that track will not impact the amount of signal sent to the reverb or aux bus. You could even tun that particular track all the way down and you'd still hear the signal going to the aux send.


