


No matter what kind of mix I'm working on, there are a few qualities I'm often chasing: breadth, depth, precision, and punch. These goals are pretty consistent, regardless of genre. From the smoothest jazz to the hardest-hitting EDM, there are a few principles I typically let guide me, such as "cleaning up the low-end and "getting sounds to glue together."
However, when mixing metal music, especially modern metal, with its blistering fast tempos and dense arrangements, the playbook changes. While I'll still use some traditional techniques as my foundation, the intensity required from each layer demands a more innovative touch.
Today, I want to present you with an in-depth guide to mixing metal music, from start to finish. I can wholeheartedly say that after you read through, you will not need another guide to get the clarity and aggression you're looking for in your metal mixes.
But first, I want to answer an important question.
Why Is Mixing Metal So Tough?
I feel like I'm consistently seeing new YouTube videos pop up with metal mixing tips. Of course, they wouldn't be as popular as they are if people weren't struggling so much to mix it.
The question is, why is it so much harder than mixing regular pop music?
Dense Arrangements
Modern metal music often uses dense, complex arrangements, with multiple guitar tracks, double bass drumming, and fast-paced, ultra-distorted riffs. This density can make it hard to ensure each instrument is heard clearly without ending up with a big ball of mush.
Plus, heavy distortion has become a hallmark of metal. We use it to get those gritty, aggressive guitar and bass tones we all know and love. One side effect of distortion, however, is that it increases harmonic content. If not done carefully, we can end up with a muddy mix and obscured definition between different layers. Finding this delicate balance is one thing many beginner engineers struggle with.
Vocal Placement
Metal vocals can vary widely.
From clean singing a-la Dio to aggressive pig squeals, growls, and screams, figuring out how you want to place your vocals in an already dense mix can be a challenge. You don't want your vocals to get covered up by a wall of guitars, but you also don't want them to sit on top of the instrumentation like they would in a pop mix.
Fatigue
Metal music has a relentless energy to it.
After a while, listening to that same blast beat and chromatic riff can be daunting. Unlike a lo-fi R&B track, the harsh characteristics of metal can make it difficult to listen to for long periods.
Beyond the physical aspects, metal often deals with aggressive themes and emotional intensity. Some songs require a serious psychological effort on the mixer's part to keep from getting exhausted early on. Listening at reasonable levels and taking frequent breaks are key.
Using Samples
Many old-school mixing engineers might tell you that using drum samples in metal mixing is heresy. If you get the right recording right off the bat and know how to use EQ and compression, you shouldn't need drum sample reinforcement, right?
Well, that's often not the case, especially when the mix you've been sent has overly dynamic drums that were recorded poorly in a bad-sounding room.
In many ways, using drum samples has become as common as using auto-tune in a pop mix. Just as our ears have become attuned to hearing perfect pitch in our favorite pop songs, they've also gotten use to the signature power and precision in modern metal mixes.
Sometimes, using drum samples is the fastest route to get there, so why not take advantage of it?
The right samples can enhance your drums' power and consistency across the track, making sure each hit delivers as much impact as the one before. This is particularly valuable in metal mixes, as you want drums that cut through dense walls of guitar and bass without losing their ferocity.
Finding a Balance
Now, I'm not telling you to go in and erase what the recording engineer worked tirelessly to create. The original recording is where the unique sound and emotion of the track lie. Completely replace that with samples, and you end up with drums that sound like everyone else's.
Finding the right balance between the original drum sounds and the added samples is the key here.
My goal is often to complement and enhance the natural drum tones rather than replace them entirely, so the kit retains its unique character while benefiting from the added punch and clarity samples can provide.
This is why I usually like to add drum samples recorded during the session rather than use third-party samples, as they give you a more cohesive sound that naturally blends with the kit's acoustic properties. Of course, if you don't have samples from the session, carefully selected third-party samples that closely match the kit's sound will do. Just keep an open ear and always err on the side of maintaining the original drum sound's integrity.
Integrating drum samples into a metal mix can be approached in a couple of ways. One method is sample replacement, where triggers from the original drum performance are used to activate the samples. This method can be particularly useful for reinforcing weak or inconsistent hits. Another approach is sample blending, where the samples are mixed alongside the original hits to add weight and body without completely overtaking the natural drum sound.
How to Integrate Samples
Luckily, this process is easier than it ever has been. We have tons of plugins at our disposal for adding drum samples. Some of the most popular choices include Slate Digital's Trigger , which offers high precision and flexibility for triggering and blending, and Toontrack's Superior Drummer , which has an extensive library of high-quality samples that you can completely customize to fit in your mix.
Just like most metal mix engineers, I've become pretty fond of Steven Slate Drums over the past few years. It's great when you want realistic drum sounds that can be easily integrated into metal productions. The editing capabilities are awesome and I always find it easy to tailor the samples to my mix perfectly.
Now that we've explored the nuanced art of using drum samples when mixing metal, let's pivot to the broader landscape of the metal mixing process.
The Metal Mixing Process
Half the battle of mixing metal music is getting the right sounds at the source, though once you feel like you have them in place, you can start on the task of getting those sounds to fit together as best as yuu can.
1. Phase and Time Alignment
The first step is making sure everything is in phase and in time.
Without taking care of this step, it's near impossible to get the power and clarity you want from your metal mix.
Kick Drum Sources
When dealing with multiple sources for kick drums, such as different microphones and added samples, you want to ensure they are phase-coherent . This involves aligning the waveforms of every kick drum source so that they complement rather than cancel each other out.
One simple method is to zoom in on the waveforms in your DAW and manually adjust the timing of the tracks until the peaks and troughs line up as closely as possible. In doing so, you'll maximize the combined sound's impact.
I also recommend selecting one kick drum source to dominate the low-end or sub frequencies to prevent frequency clashes between them. By allocating the responsibility of the sub frequencies to a single source, you get a more focused and impactful bottom end, allowing other elements of the drum kit and mix to sit more comfortably in their respective frequency ranges.
Snare Tracks, Overheads, and Room Mics
Give similar attention to your snare tracks, overheads, and room microphones.
For snares, align the close mic with any samples used. Overheads and room mics should also be checked against close mics to ensure they are in phase. You might need to flip the phase switch on your DAW's channel strip and listening for which position provides a fuller sound.
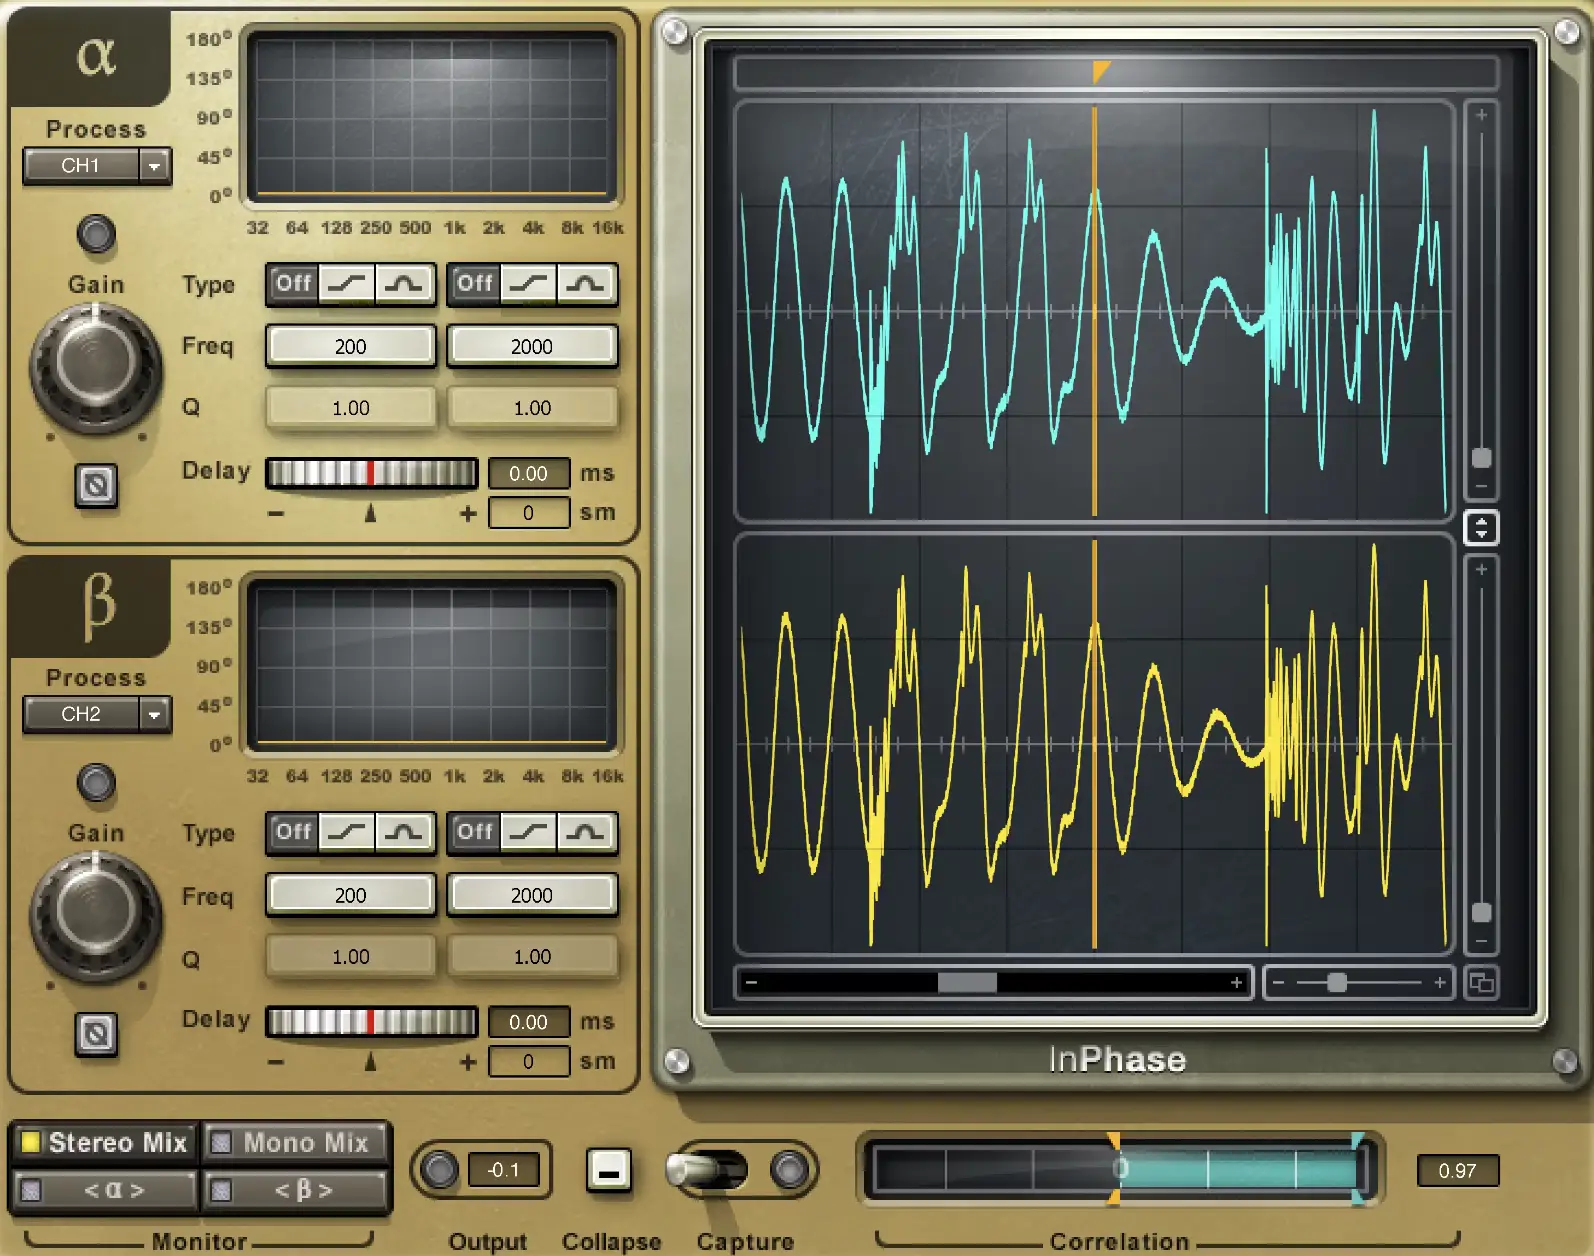
If you want to speed up the process, there are tons of automatic alignment plugins out there that can automatically adjusting the timing and phase, such as Sound Radix Auto-Align or Waves In-Phase .
Bass DI and Amp Tracks
Aligning the bass DI (direct injection) track with the mic'd bass amp (if you have one) track is the next critical step.
Since these tracks represent the same performance captured in different ways, aligning them gives you a tighter, more cohesive bass tone. Simply match the initial transient of the waveform from the DI track with that of the amp track to reinforce them.
Ensuring All Instruments Are In Time
Of course, you also want to make sure all instruments are in time with each other, without sucking the life out of the performance. Here are the steps I usually take:
- Start with the rhythm section and align the drum tracks first. They're going to be the backbone of the mix, so you'll want to make sure they're tight enough on the grid to provide consistency, though no so tight that they lose that human feel.
- Align the bass to the kick drum. The interplay between these two is key to tightening up the groove.
- Check the alignment of rhythm guitars with the drum and bass tracks and make any necessary adjustments to ensure tightness.
- Finally, align any additional instruments or vocals to make sure they sit well with the established rhythmic foundation.
2. Grouping
Next, I like to group my instruments in busses by routing multiple tracks of similar instruments, like drums, guitars, or vocals, into single bus channels.
Not only does this approach streamline the mixing workflow by allowing me to process multiple tracks simultaneously but also helps get in achieving a more cohesive sound. By applying effects, EQ, and compression to a group of instruments as a whole, you can glue them together.
Plus, using a single EQ on a wall of guitars will save you more CPU than throwing a bunch of EQ plugins on individual tracks that all have the same settings.
3. Volume Balance

Volume balance should be the main focus of any mix. If you don't get this part right, no amount of EQ, compression, or effects will help.
During the volume balance phase, you want to make sure each element of the track is heard (or felt) clearly, and contributing to the overall impact without overpowering the mix. I usually adhere to the general rule of maintaining at least 6dB of headroom during this process to preventing digital clipping and allow sufficient space for the eventual mastering process.
Balancing Drums
A tight drum sound is a staple of modern metal music, and to get that sound, it's a good idea to prioritize your drum spot mics over overheads or room mics. This approach allows for more precise control over the individual drum elements.
You might start with the kick and snare, and then carefully blending in toms and cymbals to taste. The way in which you balance your drums will depend completely upon the song, though one tip I can give you is to be careful with your overheads. So many amateur metal mixes sound harsh and abrasive because the mix engineer rode the cymbals too high.
Balancing Bass and Guitars
Balancing bass and guitars relative to the drums is the next step.
The bass should complement the kick drum, filling in the low-end frequencies without stepping on it. We'll eventually EQ and compress it, so don't be too hard on yourself if it doesn't sound perfect right off the bat.
I usually like to solo my kick and bring up the bass guitar fader until it feels locked in. You'll know it when you hear it.
As for guitars, they're often the stars of metal music. Make sure they cut through clearly without dominating the drums and bass.
Balancing Vocals
There's not much I can say when it comes to balancing vocal levels, as they'll largely be determined by the style and type of performance. Many aggressive styles require the vocals to sit prominently in the mix, while more melodic or atmospheric parts may blend more with the instrumental backdrop.
Many metal bands I've mixed like they're vocals sitting back further in the mix. Deftones always comes to mind here, as I feel like Chino consistently likes his vocals to blend in with the instrumentation, rather than stand out.
The idea here is that intelligibility may not always be paramount, especially if you want to divert attention to the guitars or drums.
4. Panning
Now, notice I haven't said anything about panning yet.
This is because I like to get my volume balance in mono. Of course, relative levels will change once I start panning things out, but for me, it's easier to hone in on making sure my rough balance sounds good in mono before I focus elsewhere.
Good panning plays a crucial role in creating a spacious mix. It's easy for things to sound congested without it, especially in dense mixes.
I usually like to start with a strong central foundation by keeping kick, snare, bass, and lead vocals up the middle, then strategically spreading guitars, keyboards, and backing vocals across the stereo field to create contrast.
Doubled guitars often go hard left and right, though I sometimes pan them slightly in and automate them outward during the chorus to make it more impactful.
It's also a good idea to consider how you want your drums to sit — drummer's perspective or audience's perspective?
Panning Mistakes to Avoid
There are a few pitfalls to avoid in panning.
For starters, over-panning instruments to the extreme left or right can leave you with an unbalanced mix, especially if you pan an element hard one way with nothing on the other side to balance it out.
Additionally, neglecting the phase relationship between miked and DI'd sources when panned apart can give you a weak or hollow sound, which is why I always recommend regularly checking your mix in mono to ensure that panned elements don't disappear or phase out.
Also, be mindful of not overcrowding certain areas of the stereo field. If you have a guitar riff and a piano part that are playing in the same range, consider panning them away from one another to create balance, rather than right on top of one another. In the end, you won't have to do as much EQ work to get the clarity you're after.
5. EQ

EQ is the next tool in the mixing process. It gives you the ability to sculpt and refine the tonal balance of each track within the mix, so that they all play nice with one another.
However, while EQ presents vast possibilities for enhancing a mix, it's just as easy to destroy your mix if you don't treat it with respect.
Many mixing engineers have the tendency to boost frequencies before attempting to cut them .
Of course, boosting is great when needed, as it can be used highlight the best characteristics of an instrument, such as the boom of a kick or the presence of a guitar solo. Excessive boosting, however, can lead to a cluttered mix where elements compete for space. In the end, you're left with mud and a lack of definition.
Instead, start by cutting unwanted frequencies to clean up the sound. It's always surprising how this approach often reveals a clearer, more balanced mix without the need for significant boosts.
Another common error is spending too much time EQing tracks in solo .
While this can help identify problematic frequencies, it doesn't provide context on how the track sits within the mix. Instruments and vocals can sound vastly different in isolation than when blended with other elements.
It's crucial to make EQ decisions within the context of the full mix, so that each adjustment contributes positively to the overall sound.
Using Filters
Getting the low-end right in a mix is one of the hardest things in mixing metal music.
The low-end carries the weight and power of the track, but when it's not managed correctly, it can lead to a muddy and undefined mix. Masking is often the biggest culprit of a poor low-end, where overlapping frequencies from different instruments clutter the same sonic space.
This is where high-pass filters (HPFs) come into play.
With a high-pass filter, you can selectively remove unnecessary low frequencies from instruments that don't need them, so that the bass and kick drum can get the punch they need. While there are no hard and fast rules, here are some high-pass filter suggestions for different instruments:
- Kick Drum : If those blast beats are feeling a little flabby on the bottom, you can start around 30 to 40 Hz to tighten your kick up without losing the fundamental thump.
- Bass Guitar : A HPF around 30-50 Hz can help remove rumble while maintaining body, and get it out of the way of the kick.
- Snare Drum : Start with a HPF around 80-100 Hz. The goal here it remove low-end rumble below the desired fundamental frequency. In metal, the most important part of the snare is the crack.
- Toms: HPF around 80-120 Hz for rack toms and 60-100 Hz for floor toms, depending on their size and tuning, usually works. For fills where the toms are playing on their own, you can even automate the HPF so that it's off, bringing back the subs for a second.
- Hi-Hats and Cymbals: Applying a HPF around 200-300 Hz is great for cleaning up any bleed or low-frequency noise. You don't need a lot of body from these elements.
- Overhead Mics: Setting a HPF up to 300 or 400 Hz isn't uncommon. The overhead mics should really focus on capturing the cymbals' shimmer and spatial image of the drums. I usually like to watch for where my ride's fundamental frequency is at, so I don't go above it and lose its character.
- Room Mics: A HPF around 80-20 Hz can eliminate unwanted low-frequency rumble and tighten up the kit's overall sound, though it really depends on what you want the room to contribute to your mix.
- Electric Guitars: Filtering below 60-100 Hz can get rid of resonant low-end rumble and cab thump, though this can change depending on how down-tuned they are.
- Vocals: Most vocals don't have usable content below 80 Hz, which is why a HPF around 80-100 Hz can be great for eliminating plosives and low-end rumble that aren't essential to its clarity. With higher male voices or female voices, you may even be able to take it higher.
Low-pass filters (LPF) , on the other hand, are often overlooked, even though they're just as crucial. I usually apply low-pass filters to electric guitars and bass guitars to get rid of top-end fizz. Metal guitars, for example, often get a "cut-off-the-crust" EQ, with a roll-off in the low and high-end to place them in the center and get them out of the way of elements that should exist in those regions.
Generally Speaking
There are endless ways to approach EQ, and before I dive into specific instruments, I want to go over a few tips that might be helpful for you.
For starters, avoid boosting or cutting the same frequency on multiple instruments. Doing so can lead to frequency build-up or excessive thinning in particular areas of the mix, causing a lack of clarity and separation between instruments. For instance, if you boost the low-mids on both the rhythm guitar and bass guitar, it may result in a muddy mix where neither instrument stands out distinctly.
Another effective strategy involves attenuating instruments that are masking others, rather than boosting the frequencies of the instrument that is masked. In doing so, you'll end up with a more natural and dynamic mix. For example, if the rhythm guitars are masking the snare drum, instead of boosting the upper mids on the snare (which can make it sound harsh or unnatural), try cutting those frequencies slightly on the guitars. This subtle adjustment can unveil the snare's presence and impact without altering its inherent tone.
Lastly, experiment with mirrored EQ choices. By that, I mean making complementary EQ adjustments on different instruments so that they fit together like pieces of a puzzle. For example, if you cut some low-mid frequencies on the bass guitar to clean up muddiness, you might boost those same frequencies slightly on the kick drum to maintain fullness in that frequency range.
EQing Different Instruments
Like I hinted at before, there is no one-size-fits-all approach to EQ, as every mix contains different elements that sound completely different. Not all distorted guitars sound the same, just as not every bass sound has the same low-end or mid-range.
As I go through these general tips, I want you to keep that in mind.
Kick Drum
It's important to note that the fundamental of most kicks lies somewhere between 60-80 Hz.
If you need extra power and weight, you can boost there. Just be careful, as large boosts in this region can end up sounding boomy, especially with fast double kicks.
I sometimes like to apply a slight boost between 3-5 kHz to enhance the beater's attack and give it that 'click' sound, which can help it articulate amidst heavily distorted guitars. If you're mixing a kick that feels too boomy and lacks definition, cutting some of the frequencies around 250-400 Hz can clean it up and get it out of the way of low-mid guitar tones.
Snare Drum
In metal music, you typically want a short, snappy snare drum. If it's not quite cutting through the mix, you can boost the upper mids around 2-4 kHz to bring out the snare's crack. On the other hand, a slight boost around 200 Hz can add body and weight, in case it's sounding a bit thin.
If your snare sound a bit harsh, I'd recommend looking around 1 kHz to see where you can make some small cuts.
Hi-Hats and Cymbals
For hi-hats and cymbals, the goal in a metal mix is a crisp, airy presence that complements the overall energy without becoming piercing or overwhelming.
After your high-pass filter, you can try boosting slightly at 6-10 kHz to bring out the natural sizzle if they're sounding dull or are getting lost in the mix. If they sound thin or harsh, you can notch out any harsh resonances around 2-4 kHz. Plus, this will get your cymbals and hats out of the way of your vocals!
Toms
Toms are often used in metal for dramatic fills and transitions. There are two things I typically want from them — low-end punch and clarity on the attack.
Boosts around 80-100 Hz (especially on the floor tom) can enrich the fundamental tone, while a slight cut around 400-600 Hz may help reduce boxiness. Boosting the attack of the toms around 3-5 kHz can help them cut through the mix.
Bass Guitar
The role of the bass in metal is to lock in with the kick drum and provide a solid foundation.
I often like to boost slightly around 80-100 Hz to reinforce the bass's fundamental tones, especially if it feels like it's lacking bottom end. I'll also usually cut some of the muddiness around 200-250 Hz, as frequencies can build up quite fast here.
If you can't hear your bass very well through the wall of guitars, a slight boost around 700 Hz to 1 kHz coupled with some top-end distortion can help articulate the bass's finger or pick sound.
Electric Guitar
The way I EQ metal guitars can vary. A solo lead is different from a distorted rhythm guitar, which is different from a sparkly clean ambient part.
For the sake of brevity, let's talk straight-up, chunky, high-gain metal guitars, like what you'd expect to hear on a Slayer record.
If I feel like my metal guitars are sounding muddy, I'll cut around 300-400 Hz, and if I feel they need a bit more definition, 800 Hz can bring them forward. If I'm dealing with lead guitars that need a bit of extra bite to poke through all the instruments in the mix, I'll make a slight boost around 3 kHz.
Vocals
Vocals in metal vary also vary widely, from guttural growls to soaring melodies.
Each requires a tailored approach to sit properly in the mix. However, compared to a pop mix, where I might want to employ a high-end boost above 10kHz to give vocals that sparkly sheen, I like to focus more on the high-mids when I mix metal or rock.
A boost around 2-5 kHz can help give a vocal more presence and energy. If a boost in that area is sounding too harsh, however, you can instead try attenuating around 200-300Hz and boosting the overall volume of the vocal.
6. Compression
Compression can be a point of contention for many new engineers, as it can be difficult to hear.
Luckily, in metal, you can be a bit more aggressive with compression, which requires less finesse than say a jazz or R&B mix.
The most important element to keep consistent is your drums .
Drum Compression
For the kick drum, a moderate to high ratio (around 4:1 to 8:1) with a slow attack can help emphasize the initial transient, giving it punch and presence, while compressing the body. The snare often requires a similar approach, with the added consideration of the release time to enhance the natural decay of the drum.
Toms can be compressed with a slightly lower ratio (3:1) and a medium attack time to preserve their dynamic fills without flattening their performance. Overheads typically require less aggressive compression (if any at all), as I like to focus more on gluing the kit together with them. On the other hand, feel free to smash the room mics to smithereens, as it's a great way to bring some life out of the kit!
Of course, you can also use parallel compression at this point, but we'll talk more about that in a bit
Bass Compression
By compressing the bass guitar, you can anchor the low end of a metal mix.
I like to use two compressors in series allows for both subtle dynamic control and the preservation of the bass's natural tone. The first compressor can be set with a high ratio (around 8:1) and a faster attack to catch peaks, while the second compressor, with a lower ratio and slower attack to even out the performance as a whole.
Vocal Compression
Vocals can have a pretty wide dynamic range, especially as vocalists move up and down in their range.
In most cases, metal vocals can benefit from a higher compression ratio (6:1 or higher) to achieve a more consistent sound. A fast attack ensures aggressive parts are immediately tamed, while a medium release time helps the compressor breathe with the performance.
7. Reverb and Delay
When using reverb in metal music, I like to approach it with restraint.
Metal's dense arrangements and fast tempos leave little room for the washiness or muddiness that excessive reverb can introduce, which is why I recommend using it sparingly to enhance, not overwhelm, the natural power of the instruments and vocals.
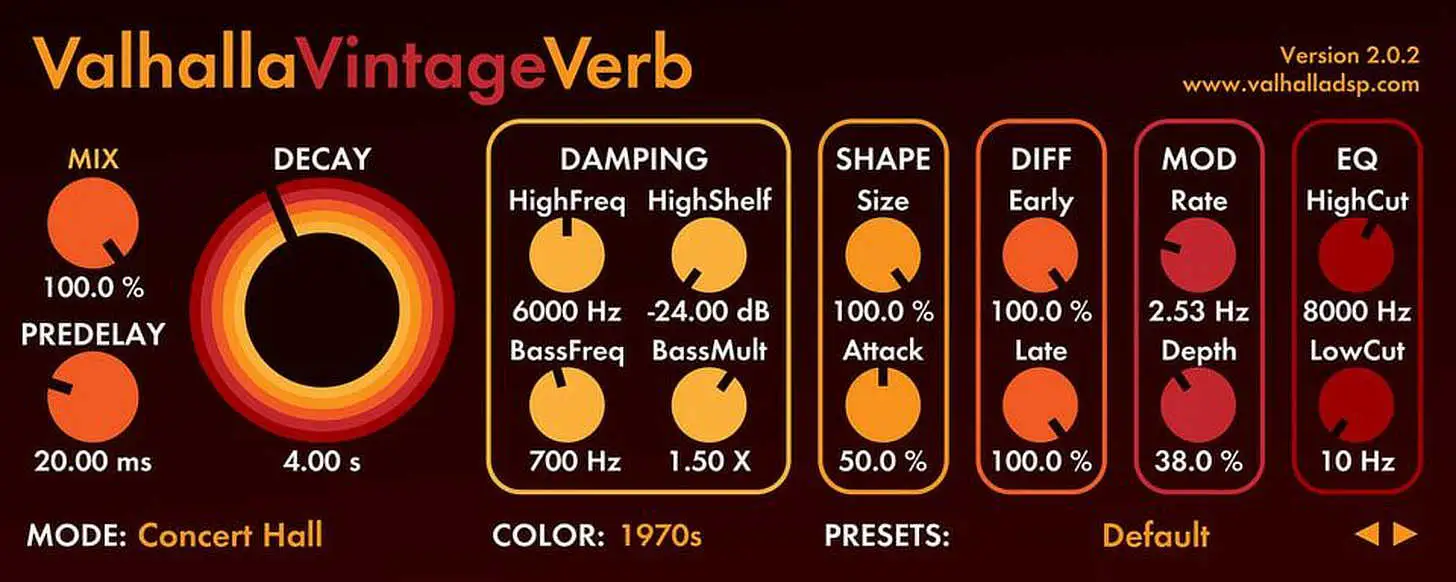
Short plates with pre-delay settings are great for snares and toms, as they provide just enough spatial enhancement to make them pop without blurring their attack. The pre-delay allows the initial drum hit to cut through the mix cleanly before the reverb effect kicks in, adding a sense of depth and dimension without sacrificing the percussive impact.
Plates are also great on vocals, if the song calls for any reverb at all (sometimes, slap delays or ping-pong delays can provide a sense of space without the denseness of a reverb). Whatever you choose, it's a good idea to use EQ on the return track to sculpt the tonal balance, getting rid of unnecessary lows and highs.
As for most other instruments, you can keep your reverb use pretty light. Some exceptions might be a larger hall reverb used sparingly on a lead guitar solo or a tighter room reverb on rhythm guitars to add cohesion.
Additional Metal Mixing Tips
Splitting Your Bass
For me, getting the right bass sound in metal music is about splitting it into separate high and low frequency channels using EQ. This is great for processing each frequency range independently.
By isolating the lows, you can preserve the bass's clean, foundational rumble and warmth, so that it solidly underpins the mix without muddiness. On the high-frequency channel, on the other hand, you can put some saturation and distortion to bring out the grit and character of the bass, making it cut through even the densest arrangements.
As for where to high and low-pass, I usually like my low bass to have a LPF cutoff around 150 to 250 Hz and the saturated bass to have a HPF around 200 to 300 Hz.
Controlling the Low-Mids on Electric Guitars
Utilizing a multi-band compressor to hone in on the low-mids of electric guitars, particularly during palm-muted sections, is a sacred technique in mixing metal.
Palm-muted riffs are a staple in heavy music. However, without careful treatment, they can sometimes sound muddy or lack definition. By specifically targeting the low-mid frequencies with a multi-band compressor, such as FabFilter MB, you can control and tighten up your guitars so that the frequency range doesn't pop out whenever the guitars hit a palm muted section.
The key here is to isolate the frequency range where the palm mutes resonate most—often between 200 to 500 Hz—and apply compression selectively to this band. The end result is metal guitars that are controlled yet clear.
Using Parallel Processing On Vocals
Lastly, I want to talk about using parallel compression and distortion on vocals to help give them aggression.
Parallel compression, otherwise known as New York compression, involves mixing a heavily compressed version of the vocal track with the original uncompressed track. This method allows the vocals to maintain their natural dynamics and nuances while the compressed signal brings out a consistent, powerful presence throughout the mix.
The result is a vocal that cuts through dense instrumentals without losing its expressive range.
Adding distortion in parallel offers similar benefits.
You get all the aggressive edge and energy of high-octane vocal track without losing the intelligibility or quality of the natural vocals.
Final Thoughts - Mixing Metal Like a Pro
Mixing metal music is a lot of fun, and there are so many awesome tips, tricks, and techniques you can use to get creative with all the elements in your mixes. Even if you're not deep into heavy or aggressive music, there's a lot you can learn from diving into a metal mix. Plus, many of the skills you pick up when mixing metal are usable in other genres, from hip-hop to reggae and beyond.
Keep it heavy!


