

Connections between digital audio effects and equipment are made automatically in your DAW. However, if you use physical hardware, whether rack compressors or reverb units, each unit must be connected with cables.
Of course, if you imagine a studio with a hundred pieces of gear, making routing changes every time you want to send a signal elsewhere would be time-consuming.
This is why we invented patchbays .
These devices are commonly used in recording studios and live sound setups, allowing audio signals to be routed and patched together flexibly and efficiently.
Of course, if you're just dipping into the world of audio production or live sound engineering, just the look of a patchbay can be daunting. The good thing is once you grasp the basics, you'll learn how invaluable these tools can be in your audio toolkit.
In this guide, we'll take a closer look at what a patchbay is, why you might want to use one, and how to set it up and use it effectively.
What Is a Patchbay?
You can think of a patchbay as the brain or central location for all audio inputs and outputs in a live or studio setup. Patchbays allow for easy signal flow changes without the need to physically unplug and reconnect cables.
They're particularly useful when working with a large number of audio sources, and you want to keep your recording studio as organized and efficient as possible.
Different Types of Patchbays
Not all patchbays are created equal, however, and there are several different types of patchbays with their own unique characteristics. Let's take a look at what you can expect to find when on the hunt for an audio patchbay:
- Analog Patchbays - These patchbays use physical connections to route audio signals.
- Digital Patchbays - These patchbays use digital connections to route audio signals, and they are often used in conjunction with digital audio workstations.
- Half-Normal Patchbays - This type of audio patchbay uses two jacks for each signal, allowing for easy signal splitting and re-routing.
- Full-Normal Patchbays - This type of audio patchbay provides a default signal routing when nothing is plugged into the jacks, but it can be easily overridden by patching cables.
- Through Patchbays - These patch bays simply pass audio signals through without any internal routing or normalization.
- Switchable Normal Patchbays - These patch bays allow you to switch between full-normal and half-normal modes, depending on your needs.
- TT Patchbays - This type of patchbay uses the smaller TT (Tiny Telephone) connectors, which allow for a higher density of connections in a smaller space.
Why Do We Use Patchbays?
There are two main reasons patch bays have become essential for professional audio setups - flexibility and convenience.
Without them, connecting different components of a complex audio system would be a time-consuming nightmare. Plus, we're pretty prone to error as humans, and there's no doubt that during the process of unplugging and reconnecting one of a hundred cables, something would go wrong.
Patch bays make it easy to quickly reroute signals with patch cables, change the order of processing equipment, or temporarily disconnect equipment for maintenance or troubleshooting.
As you continue building your studio setup, you'll come to realize the significance of streamlining your workflow, and a patch bay is a crucial component of that.
Types of Patchbay Connections
You'll find two main types of connections on a patch bay — input and output.
An input is where the audio signal enters the patchbay, while an output is where it exits the patch bay.
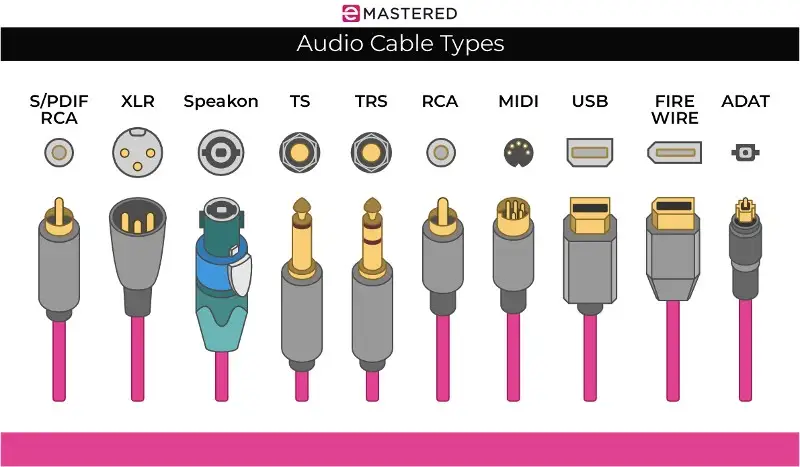
There are different connection types for inputs and outputs as well, including TRS, TS, and XLR.
- TRS Connections: These are balanced 1/4" connections that consist of a tip, ring, and sleeve. TRS connections are probably some of the widest-used patchy bay connectors.
- TS Connections: These are unbalanced 1/4" connections that differ from TRS cables in that they only have a tip and sleeve. Note that while you can certainly use TS connections in your patch bay, they are more susceptible to noise and interference than balanced connections like TRS.
- XLR Connections: These are also balanced connections commonly used for microphones. You'll often find XLR connections on the back of professional patch bays, as they provide minimal noise audio transfer and ultra-secure connections.
How to Set Up a Patchbay
By now, you have a decent idea of how a patchbay works. Now, we get to the fun part — setting it up!
At first, routing all of your outboard gear can seem daunting, but with a little bit of planning and organization, the process is relatively simple.
Here's a general rundown for setting up your personal patch bay.
Figure Out Why You Need a Patch Bay In the First Place
Okay, this might sound obvious, though it doesn't make it any less of an important step!
What kind of equipment you will be connecting, and how many inputs and outputs you will need?
Make a list of all the devices and outboard equipment that you will be using with your patchbay, including microphones, instruments, effects units, and recording equipment.
Choose the Right Patchbay
Once you have a better idea of your patch bay requirements, you can choose one that fits your needs. The first thing you'll want to focus on now is having the appropriate number of inputs and outputs for your particular setup.
Patchbays come in a wide range of sizes. Some have just a few inputs and outputs, while others have hundreds .
Then, you can consider a few other characteristics, such as:
- Connection Types : As we said before, patchbays come with a variety of connection types, so consider which type of connection you'll be using most frequently.
- Balanced or Unbalanced : If you're working in a professional setting, go with balanced connections to minimize noise and interference. However, if you need to use unbalanced connections, find a patchbay that has a switchable impedance or a built-in transformer to balance the signal.
- Normalled or Half-Normalled: As I said before, normalled patchbays automatically connect the inputs and outputs when a cable is not plugged in, while half-normalled patchbays allow you to use the input and output separately or together. I'll dive into this more in detail in a bit.
There are definitely other considerations to make, such as bus grounding options, budget, and build quality, though it mostly comes down to your specific needs and the equipment you already have.
Plan Your Cable Routing
Now, don't start connecting anything just yet!
You want to take some time to plan out your cabling.
First off, determine the location of each piece of equipment you'll be connecting to the patchbay, including your recording interface, outboard gear, and other units.
Next, map out the signal flow from each piece of equipment to the patchbay AND from the patchbay to your recording equipment or mixer. The idea here is to come up with the most efficient routing solution for your patch cables possible. In doing so, you'll have to figure out the appropriate cable lengths for each connection. Take into account the distance between each piece of equipment and the patchbay.
PRO TIP: It's always a good idea to add a little extra length to each patch cable to allow for flexibility in your setup.
Connect Your Equipment
Now it's time to start connecting your gear to the patch bay.
Your typical patchbay will have two rows of connection points on the rear end. The conventional approach is to make permanent connections between any audio sources and the top row at the back of the patchbay.
Subsequently, all inputs for audio interface channels and effects can be permanently connected to the bottom row at the back.
To get everything connected together, we have to move to the front panel , which will also have two rows of connection points.
The audio output from our sound source connected to the top row of the rear panel of the patchbay is directly connected to the same input on the front. So, when you connect a cable to the top row, it extends the connection from that sound source.
You'll connect inputs for your audio interface and outboard effects, such as a reverb unit, to the bottom row on the back panel of the patch bay. When you insert any signal into the bottom row on the front panel, it automatically routes you to the corresponding input so you can record.
Test Out Each Connection
Once your patch bay configuration is set, you'll want to test out all of your connected gear to make sure it's working properly.
During these tests, listen for any hum or noise, and adjust your cables or studio gear in your configuration as needed to minimize interference.
Label Everything Carefully
If everything sounds good, label each cable with the name of the input or output it's connected to.
Labeling your inputs, outputs, and patch cables is crucial, as it will make it easier to troubleshoot any issues that may arise in the future and make it easier to make changes to your setup.
How to Use a Patchbay
One of the main things that is important to note when you start using your patchbay is the connection types. Let's dig in a bit deeper to give you a better idea of what you can expect when you connect everything.
Full Normal Patch Bay
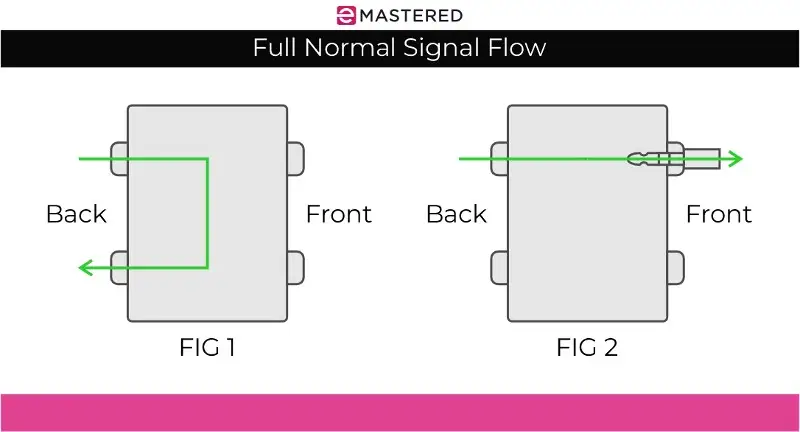
In a full normal patch bay, the signal flows from the top row to the bottom row without a patch cable present. The sound source is automatically connected to the input, while the output is automatically connected to the chosen destination.
A great example of how you might use a full normal connection would be connecting a microphone to a preamp.
You can connect the microphone to the top row of the patch bay and the preamp to the bottom row.
The beauty of normalled connections is that the patchbay automatically routes the signal, whether a microphone, a keyboard, or a synthesizer, without the need for a patch cable.
Half-Normal Patch Bay
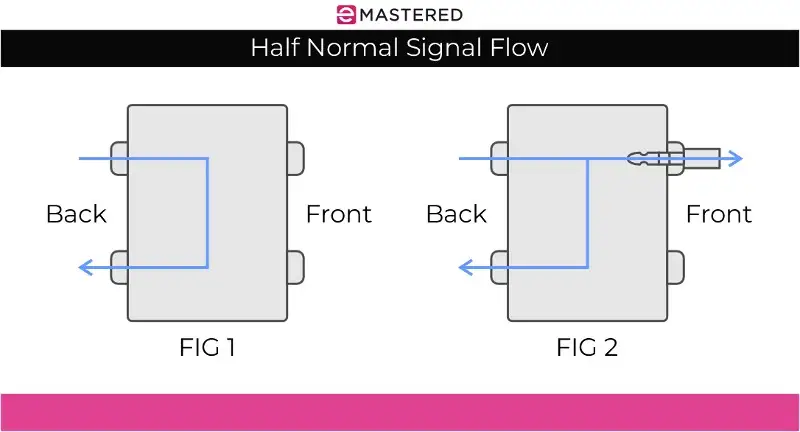
A half-normal connection is similar to a normal connection in the case that you don't have a patch cable inserted into the front. However, when a patch cable IS inserted in the bottom row, it interrupts or breaks the connection.
The advantage here is that you can route a signal to a third destination by patching the signal from the top to somewhere else.
Engineers will often use half-normal patch bays for parallel processing, multitrack recording, or running an effects unit into a mix, especially when they want the ability to bypass the signal flow as desired.
Non-Normal Patch Bay

Otherwise known as a "thru" connection, a non-normal connection doesn't provide any automatic connection between the top and bottom rows of the patch bay, meaning you have to manually patch the signal from the top row to the bottom using a patch cable.
If you ever route a guitar to a pedalboard, you can connect the guitar to the top row of the patch bay and the input of the pedalboard to the bottom. Now, if there's a chance you'll want to connect different pedals to different inputs on the pedalboard, you'll want to use non-normal connections to manually route your signals.
The same thing goes if you want to connect a mixer to a recording interface. For example, if you want to send different mixer channels to different inputs on your interface, you can use non-normal connections to manually route each channel to the desired input.
Final Thoughts
If you're consistently switching up your routing or re-connecting your gear, it might be time to invest in a patch bay to make your studio more practical, flexible, and configurable.
With a new patch-centric setup, you might even find that the added workflow efficiency unlocks your creativity.


