


If you’ve journeyed into the abyss of music production and mixing forums or YouTube videos, you’ve likely come across the phrase “reference track.”
Whether you've already incorporated reference tracks into your music-making workflow or it's something you’ve never experimented with yet, I can confidently say that using one can greatly enhance the quality of your music.
Plus, contrary to what many believe, using reference tracks doesn’t mean limiting your creative flow.
When used appropriately, a reference track can prevent your music from sounding unoriginal and keep it up to professional standards. In essence, reference tracks position your original music in the echelon of other artists you love, ensuring your mixes are up to par, providing unique ideas regarding arrangement, and helping carve a creative pathway when starting from a blank slate.
In this guide, I want to take you through all of the reasons you might use a reference track in your next production or mix.
What Is a Reference Track?
A reference track is any finished track from another artist that you can use as a model for the desired sound of your own music.
When you use a reference, the goal is to compare your track with the other artist’s track to come up with ideas for the arrangement, production, mix, or overall vibe.
I often like to let reference tracks influence my choices throughout the music-making process in ways like:
- Loudness Matching: Ensuring that the loudness of my mix aligns with that of the reference track. This is more prevalent in the mastering phase.
- Arrangement : Matching the arrangement of my song to that of the reference track.
- Mixdown: Verifying that my mix holds up against the quality of the reference, including volume balance, dynamics, EQ, and effects.
- Creative Benchmarking: Drawing inspiration to develop professional musical ideas and avoid starting from a blank canvas.
If you're getting ready to master your track, make sure to explore eMastered's reference track feature.
Why Should I Use a Reference Track?
One of the main reasons I use a reference track is to find the sound of the track I’m about to work on. Even if you’re unconscious about it, every song you make is a product of your surrounding influence.
If you're just getting your feet wet as an artist or producer and trying to find your sound, I recommend exploring artists you like and making a list of what characteristics make them special. You can then take those characteristics and blend them with one another to create your unique sound.
Plus, reference tracks alleviate the pressure to create songs from a blank canvas.
When you have sources of inspiration, you essentially have a palette to use as a jumping-off point. And no, this is not stealing. This is building off of existing techniques and creative ideas, just as artists have been doing since the beginning of time.
Think of it this way - every style of music has tried and true common arrangements.
There’s no reason to fix what ain’t broke, as they say. Rather, you can draw inspiration from songs you like, using the ideas that work and adding your own unique elements to make it distinct.
Let’s say you’re working on a ‘60s-style Motown tune. You might choose to use mono drums, an electric P-bass, a Fender Stratocaster, a Rhodes keyboard, and vocals.
However, let’s say you also have a deep love for country music and you’re a banjo player. Your unique element can be having a banjo in the track. You’d be surprised how something as simple as another added element can completely alter the vibe of a song.
Ways to Use Reference Tracks
Let's take a look at some of the core ways you might use reference tracks to achieve a high-quality sound in your music.
Arrangement Map
One of the first things I use reference tracks for in my mix is arrangement. I find that by stealing the arrangement of a song, it becomes easier to break free from the standard verse-chorus-verse-chorus-bridge-chorus arrangement.
For example, a track you like might look like this:
- Intro
- Verse
- Chorus
- Interlude
- Verse
- Breakdown
- Chorus
- Solo
- Bridge
- Chorus
- B Hook
You could take the above arrangement and implement it in a standard pop track to give it more interest.
Of course, if the goal is to get an arrangement that aligns with the style, genre, or mood you envision for your new song, I’d recommend finding a track that has a stylistic arrangement.
When I’m picking a track to reference for arrangement, I’ll start by identifying a song that I think has an exceptional structure. The song should feel captivating or energizing. I’ll then import the song into my DAW.
I’ll then analyze the arrangement, noting sections like intro, verse, chorus, bridge, and outro, and when instruments come in, drop out, change dynamically, etc.
From there, I’ll create a basic outline or map of the reference track's structure.
This could be as a written list of the different sections on a pad of paper or creating track markers in your DAW. If the song you’re using as a reference is the same BPM as the song you’re making, you can literally line it up in your DAW and place reference markers at the start of each section.
As you continue working on your song, you might find that you need to refine the arrangement based on the way your track evolves, so don’t be afraid to make adjustments if it feels right.
Chord Progression

Even though I’ve studied music and composition at a high level, I’ll often have trouble figuring out what chord progression I want to use for a track I’m working on. Sure, there are ‘standard’ progressions that people will use in certain genres, such as the I-V-vi-IV in pop music or the I-IV-V7 in blues. However, it can be nice to break out of these expectations to surprise listeners.
I like to start by picking a reference track in the same or a similar genre as my project. Of course, it should have a strong chord progression that I like and a melody that resonates with me, too.
For the sake of teaching, let’s say you like the common I–V–vi–IV pop progression. You could then experiment with adapting it to your own song's arrangement. Now, just because you’re working with a simple chord progression doesn’t mean you can’t adjust it to taste.
Beyond the actual progression itself, you might also take note of how your reference transitions between different chord progressions.
For example, let’s say you’re working with a reference track that smoothly transitions from a minor progression to a major progression in the chorus, such as “Mr. Jones” by Counting Crows. The verses in “Mr. Jones” live in A minor, though when it gets to the chorus, it moves to the relative key of C major using a I-IV-V progression.
You can try and implement that same relative major-minor relationship into your track.
Melody
Beyond the chord progression, you can also analyze the melody of your reference track and pay attention to how it complements the chord progression, both melodically and rhythmically.
See what kinds of phrasing techniques they are. Are the melodies stepwise or leaping from note to note? Is the chorus melody soaring above the verse melody, or is it softer and more subdued? Do the melodies start on downbeats, pickups, or odd measures?
The key here, however, is to only use the reference track as inspiration . Do not directly copy it, as you could end up getting in trouble.
One prime example is the lawsuit between The Hollies, Radiohead, and Lana Del Rey. Whether they stole from each other consciously or subconsciously, it’s almost impossible not to hear the similarities between these songs, and both Radiohead and Lana Del Rey had to give up some slices of the pie for it.
Sound Design and Musical Ideas

As I said before, there's no reason to reinvent the wheel when making your own songs. There are many genres that use the same musical ideas. Think of your average rock song, for example. You can probably expect to find drums, bass, and electric guitar.
If there's a combination of instruments that you really love, use them in your own productions!
Start by picking a reference track that is in the same vein as the song you’re working on, as it’ll likely have the instrumentation and sound design elements you want.
Listen closely to the reference track (ideally with a good pair of headphones) and take note of the instruments you’re hearing. For example, if I was listening to an EDM track, I might write down:
- Heavy kick
- Electronic snare
- Hi-hats
- Claps
- Live percussion
- Synth bassline
- Sub-bass
- Synth chords
- Synth arpeggios
- Risers, sweeps, impacts, general FX
- Orchestral hits
- Plucky guitars
Once I have my specific instrument palette locked down, I can choose how I want to implement those sounds in my arrangement. I don’t want all of these sounds playing during every section of the song. Instead, I want them to come in and out to make the track more dynamic.
By actively listening to a mix, you can hear how tracks are layered to create a richer, fuller sound.
Many electronic music producers will layer multiple sounds to get dense instrumentation. For example, you might use a saw wave as your main synth and support it with a square wave lead, a warm, reverberant pad, and a high-pitched, slightly detuned harmonic layer in a different octave.
Thinking About Timbre and Dynamics
You don’t necessarily have to use the same exact instruments in your song that you hear in your reference. Instead, you can use instruments with the same timbre. Let’s say the hook of the EDM track you’re referencing has a warm, sustained pad and a bright, staccato synth.
You might find instruments with the same timbral variety to create the same frequency makeup as your reference with instruments you like. For example, you might use a Rhodes keyboard in place of the warm, sustained pad and a plucky electric guitar in place of the staccato synth.
In the same way, you can observe how dynamics change throughout the reference and try to incorporate similar dynamic contrasts in your own arrangement.
"A Day in the Life" by The Beatles is a killer example of a song with dramatic dynamic shifts. The choruses are quiet and reflective before climaxing into total chaos.
Sound Design and Effects
I like to pay close attention to unique sound design elements or effects that are used in my reference track.
For starters, I’ll listen closely to how spatial effects such as reverb and delay are used in the reference track. You can ask yourself several questions as you listen:
- Is there any reverb on the track and what kind? (plate, hall, room, spring, etc.)
- How about delay? (slap, ping-pong, quarter note, etc.)
- How prevalent are those effects in the mix compared to the instruments they’re used on?
- Are they spread across the stereo spectrum or in mono?
- Are there multiple instances of effects on certain elements? For example, many pop vocals will have a combination of room reverb, plate reverb, slap delay, and stereo delay.
- How are those effects processed? Have they been EQ’d, compressed, or distorted?
I also like to ask how the elements in the mix are panned.
Most modern rock mixes, for example, share similar panning techniques - lead vocals, bass, kick, and snare in the center, overheads, electric guitars, and acoustic guitars panned hard left and right, and keys, percussion, hi-hats, toms, and other mix elements panned somewhere off to the left or right in their own space.
Of course, there’s no reason you can’t get creative with panning either and some tracks can be great references on how to do so.
Consider “Altered Beast III” by King Gizzard and the Lizard Wizard. If you listen with headphones, you can hear the two recorded drum sets panned hard left and hard right, a very unusual choice that gives this track its unique sound.
Lastly, listen for any sound design techniques in your reference that you can employ.
Let’s take Flume, for example. When he came on the electronic music scene back in 2012, it became the start of the Future Bass scene.
He used a unique mix of granular synthesis for texture, time-stretched and modulated vocal effects, and stereo modulation on delays and reverbs to create immersive listening experiences. The result was nothing short of phenomenal, and to this day, those sound design techniques remain a critical part of his sound.
Mixing
Once I'm finished with the music production process, I'll choose reference tracks for the mixing process. I find that it's always helpful to use professionally mixed reference tracks for mixing, as it provides a frame of reference for how your mix should sound.
Different listening environments have their own quirks. If you're mixing in a poorly treated bedroom studio, for example, it's easy to add too much or too little low-end. Some rooms have modes in the low-mids as well, which can cause you to think you need to scoop a bunch of 'mud' out of all the elements.
However, once you take that mix out to your car, you might find that your mix decisions were skewed by the sound of the room you were working in. By using reference tracks, you become more confident in your tonal balance at the mixing stage, ensuring that your track sounds like it should on various playback systems.
When choosing a reference for the mixing stage, you should find one that aligns with the genre and style of your own song. This can be the same song you were using as your production reference if it makes sense sonically.
The important thing is to make sure that the track you’re referencing is well-mixed and mastered.
I have a few select reference tracks in different genres that I’ve collected over the years, each of which has sonic characteristics that I like. I recommend doing the same thing!
Once you have your reference, load it into your DAW on a separate track from the rest of your mix, so it isn’t running through any processing, especially bus processing.
Volume Balance
The key when mix referencing is making sure your reference matches the perceived loudness of your mix. The track you’re referencing will have likely been mastered. However, you don’t want to mix to the same volume as a mastered track, as you won’t leave any headroom for mastering.
I typically like to drop my reference tracks by around -6dB and start adjusting the volume of my mix elements from there, as I find that typically gives me the headroom I need.
Though the process changes depending on the song, it’s a good idea to begin with the main elements of the song, including the vocals, kick, snare, and bass. Pay attention to how they’re sitting in the mix and try and match the volume and tonal characteristics of those elements in your track. Then, bring in the rest of the instrumentation around it, and A/B test the reference for balance as you move forward.
Evaluating Tonal Balance, Dynamic Range, and Stereo Imaging
The next part of the process is ensuring the frequency balance of your mix is similar to that of the reference. Are there areas where your mix is lacking? You might need to make adjustments.
Start by listening to both tracks as wholes and compare the different overall frequency ranges of your mix to the reference mix.
Do you have too much or too little low-end? How about high-end? Mids? Low-mids?
Once you’ve dialed in a decent frequency balance that sounds good to you, you can start honing in on different instruments.
Maybe the vocal in your reference mix has a nice, crispy high-end that your vocals don’t have. To remedy the issue, you might give your vocals a 10kHz high-shelf boost. Maybe your kick and bass sound boomy and undefined compared to your reference. In that case, you might try to puzzle-piece EQ them so they’re playing nice with one another.
Once the frequency balance sounds right, I like to listen for the dynamic range and compression used in my reference. As an amateur mix engineer, compression is one of the hardest things to get right, as it can be one of the most difficult things to hear. However, with practice, you’ll be able to determine a lot about the style of compression you need to use to stand up to professionally mixed tracks.
For example, it’s not uncommon to use 10-20dB of compression on a vocal in a pop mix to lock it down. Analyze just about any top-40 pop track on the radio these days, and I guarantee you’ll be able to hear how compressed the vocals are.
Lastly, do a final pass while listening to the stereo width of the reference. See how your mix stacks up. Are elements placed appropriately in the stereo field? Maybe the reference is narrow in the verses and opens up wide in the choruses. Maybe the vocal reverb is in mono to make room for the dense stereo arrangement. Maybe some instruments have auto-pan on them to give them more interest.
By listening to how each element is panned, you can make more confident decisions in your stereo mix.
Mastering

I usually approach reference tracks in mastering the same way I approach them in mixing.
Pick a well-mastered reference track that’s in the same style as your track.
Load it into your mastering session on a separate track, free from additional processing, and analyze how your track stands up to it in terms of loudness, frequency balance, stereo width, dynamics, and tonal characteristics.
I usually like to use a spectrum analyzer to compare the frequency balance of my master with the difference, as it helps me see where there are differences in the low, mid, and high-frequency ranges.
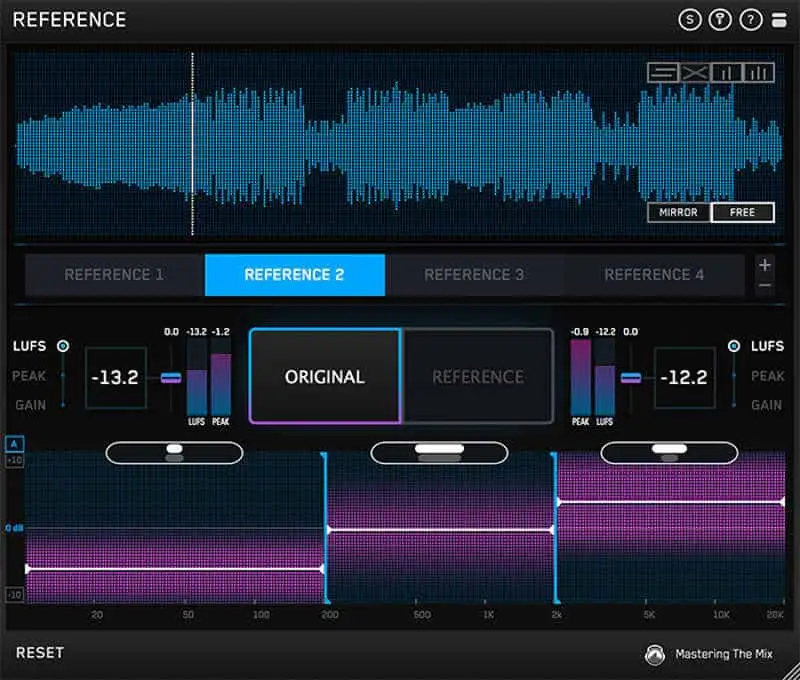
Similarly, you can use tools like REFERENCE, which I wrote about above, to get information on all three key sound characteristics - frequency balance, dynamics, and stereo width.
We also have a Reference feature in our AI mastering algorithm here at eMastered, allowing you to upload your own reference and get a crisp, clean master that aligns with songs you like.
Try it out for free !
Final Thoughts - Using Reference Tracks for Professional Sounding Music
Whether for arrangements, chord progressions, music production, mixing, mastering, or a combination of all of the above, there's no reason not to use reference tracks for your original music.
When you choose reference tracks, look for those that are in the same genre as the track you're working on. It'll make a massive difference in your creative workflow and optimize the efficiency with which you mix and master.


