

There’s something magical about nailing the perfect snare sound during the recording process. However, most of the time, especially if you're recording in home studios or receiving drum tracks from other artists, the magic doesn’t happen so easily. In fact, you may have been handed a snare track that sounds like someone slapped a damp cardboard box.
Other times, you may actually get that perfect snare sound, but once you get done layering walls of guitars or a choir of harmonies, suddenly, your snare drum starts feeling like it's not fitting in.
That’s why knowing how to use snare EQ is so important and why I wanted to put together a proper guide to help you get a snare drum that fits like a glove, no matter where it started.
But before we jump into specifics, let me share something I’ve learned over the years: all those “ultimate EQ guides” you see for specific instruments are not the gospel truth. You’ve got to take them with a grain of salt because every track, every mix, and every snare drum is different.
What works for one session might completely tank in another. Think of EQ tips as tools in a toolbox, not step-by-step instructions.
For this guide, I’ll be using FabFilter Pro-Q3 because it’s my go-to EQ in the box. That said, you don’t need this EQ to get great results. Any decent EQ can do the job. It’s the numbers and how you use them that matter.
By the end of this, you should have a solid understanding of how to use EQ to make your snare drum punch, snap, and sit right in the mix.
EQ Your Snare from Top to Bottom
High-Pass to Remove Unwanted Frequencies
A high-pass filter is the most basic component of any EQ, though it's also one of the most important.
As a general rule of thumb, if your snare drum isn’t a low-end element in your mix (and it’s not - unless you’re doing something super experimental), you should high-pass it. This goes for most of the non-bassy elements in your session, including vocals, guitars, synths, etc. In doing so, you get rid of the junk that doesn’t belong, so the important stuff, like your kick drum, has room to breathe.
This is especially crucial when you’re working with a live snare drum, as live snares don’t live in isolation. In the same microphone that picked up your snare, you'll hear kick bleed, tom rumble, and whatever else managed to sneak into the mic.
By high-passing, you get rid of all that unwanted low-end gunk.
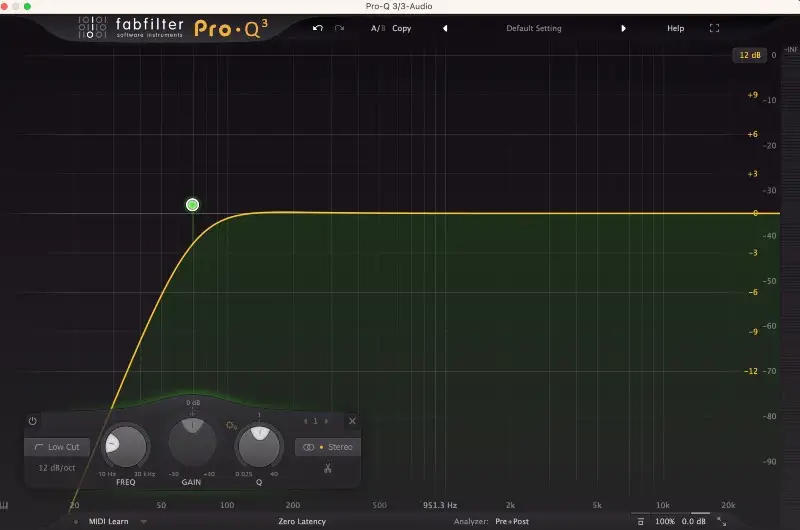
I’ll typically start by throwing on a high-pass filter with a slope of around 12-24dB/octave. The slope choice depends on how "natural" I want it to sound. A gentler slope keeps it more organic, while a steeper slope will sound a bit more aggressive, perfect if you really need to clean house.
Next, I’ll start sweeping the cutoff frequency upwards, usually landing somewhere between 60 and 80Hz. The trick is to go until you start losing the body of the snare drum, and then pull it back just a bit.
When we get it right, we take advantage of two big wins: carving out space for our kick drum to breathe and getting more headroom in the mix. Less unnecessary low-end clutter means a tighter, punchier sound overall.
Boost or Cut for Body or Clarity
Next is the meat or "body" of the snare drum. It's the satisfying “thump” you feel when a drummer hits a snare.
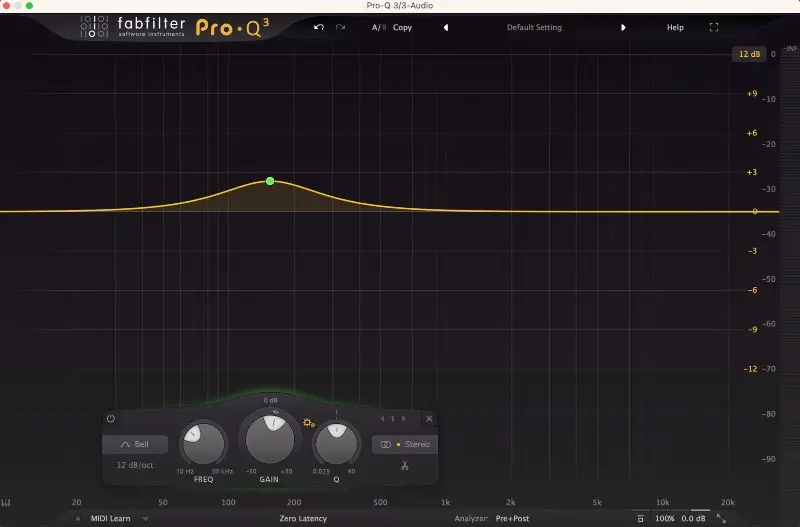
This part of the snare drum usually sits somewhere around 150-200 Hz .
Knowing this sweet spot gives you a lot of power. If your snare drum is sounding thin, you can boost this area with a wide Q to give it some heft. A gentle, broad boost usually does the trick.
On the flip side, if your mix is feeling muddy, this same area might be the culprit. A snare sound that’s too heavy in the low mids can cloud up the whole track and make everything sound wooly. In that case, a slight cut in this frequency range can help clear things up. Just don’t overdo it!
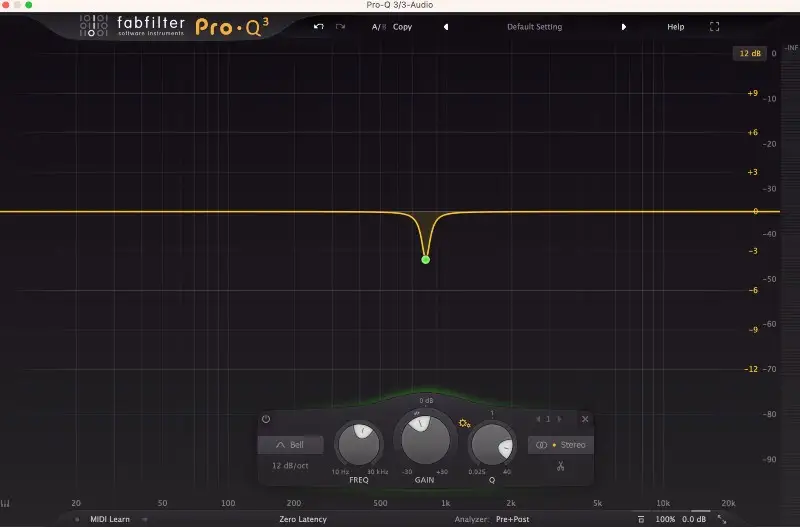
Get Rid of Boxiness
Boxiness is kind of the sworn enemy of a great snare sound. The best way to describe it is as a dull, hollow, “knocking on a piece of cheap wood” vibe.
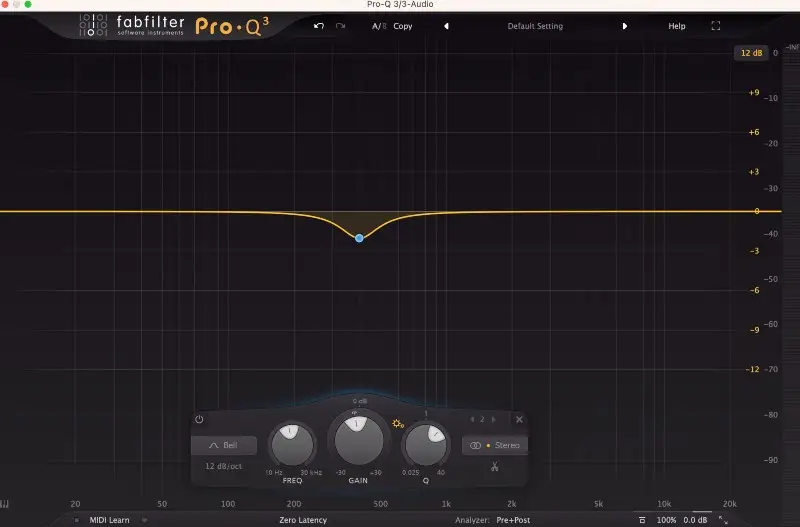
This sound usually sits around 400 Hz . It’s not always super obvious when you’re listening to the snare in isolation, but in the context of a mix, it can make your snare feel…well, kinda cheap. And nobody wants that.
The solution is pretty straightforward: grab an EQ, zero in on or around the 400 Hz area, and cut it. A small dip will usually do the trick. Start with a narrow Q, sweep around to find the exact spot where the boxiness is living, and then carve it out.
Boost or Cut for Fullness or Ring
In the 800 Hz zone , I often find that there's either an annoying ring or a hollowed-out space. This range has been my best friend and worst enemy during many mixes.
If your snare has that annoying “ping” or “ring” (kind of like a steel drum resonance), you can usually cut it here. Use a narrow Q to hone in on that offending frequency and give it the boot.
On the flip side, if your snare is feeling hollow and lacking midrange 'oomph,' you can actually boost this same area. In this case, I'll go for a smaller, gentler boost.
It’s all about the source material here, so trust your ears and adjust accordingly.
Eliminate Buzz
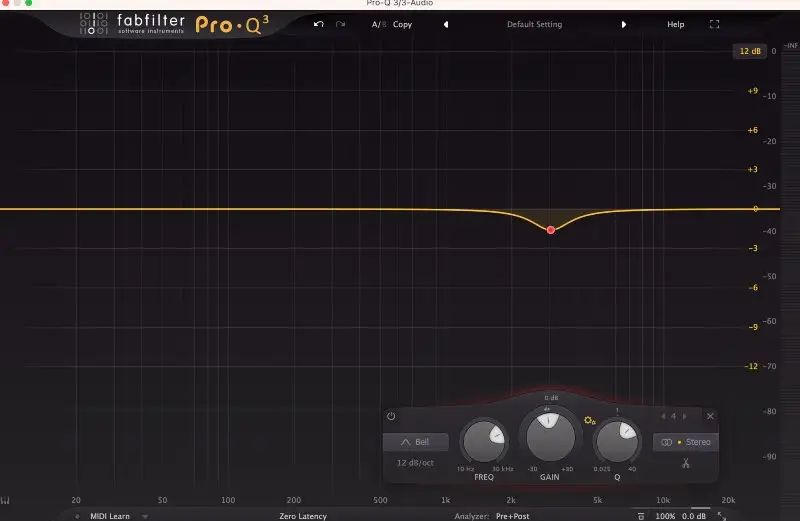
This buzz is not the good kind you get from a great mix or a strong cup of coffee, but that annoying, harsh buzz that you usually get from the snares themselves. You'll usually find it around 3-5 kHz , and if it’s left unchecked, it can make your snare feel more irritating than impactful.
A small cut in this area can usually smooth things out. However, if the buzz isn’t constant (maybe it only pops up on certain hits), a dynamic EQ might be a better choice. This will make it so the EQ only kicks in when those harsh frequencies appear, leaving the rest of your snare untouched.
Also, it's generally a good idea to not go overboard. A lot of the snare’s crispness and snap live in this zone, and cutting too much can make it sound dull or lifeless.
Add Crispness and Crack
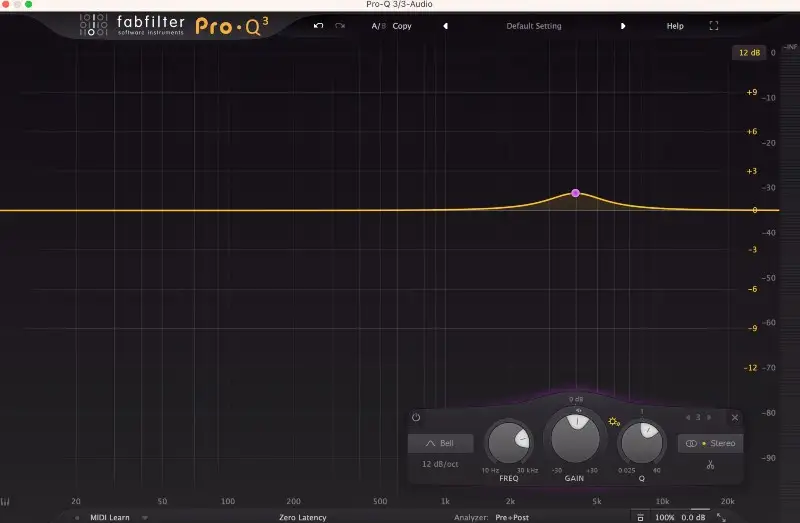
Crispness and crack are the two words I often use to best describe the "stand out" sound of a snare. This usually lives right around 5 kHz . It's the sound of the stick hitting the skin.
When you boost this range, you get a lot more transients, which will make your snare more apparent in the mix and give it some extra edge. If your mix has walls of guitars or other mid-range instruments competing for space, having a little boost here keeps it from feeling buried.
Low-Pass for Headroom
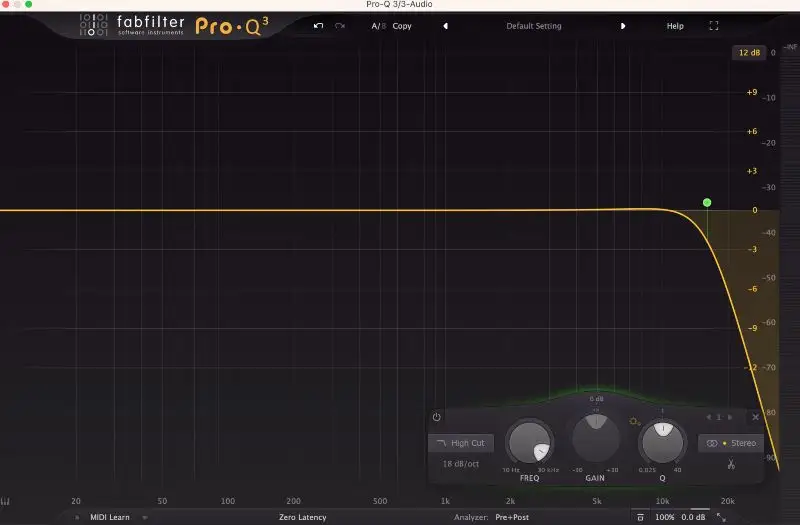
Lastly, we'll attack the top end of your snare to keep it under control without losing high-end sparkle. I like to use a low-pass filter around 15 kHz to focus the snare and free up some headroom for other high-end elements in the mix, like cymbals, shakers, and airy vocals.
The beauty of working this high up in the frequency range is that you’re not touching the important crispness and snap we just talked about around 5 kHz. Instead, you’re just trimming off the ultra-high stuff that doesn’t really add much to the snare but can stack up and eat into your mix’s clarity.
Snare EQ Pro Tips
Get the Right Snare Sound to Begin With
Before you even think about reaching for the EQ, let’s take a step back and talk big picture.
The context of your song and the role you want your snare drum to play matter way more than the curves on your EQ plugin.
Is your snare the bold, arena-filling centerpiece of your track, or is it just being wispy and subtle in the background? Knowing this upfront will save you a ton of time and frustration.
I always recommend having a reference for what you want your snare drum to sound like. Are you going for a massive, gated Phil Collins snare? Or something tighter and more understated, like something you'd hear on an Erykah Badu record? These are completely different snares, and the approach you take should match the sound you’re after.
The best thing you can do is to listen to tons of music . Build a mental library of snare sounds so you can pull up the right vibe in your head instantly. The more you internalize your references, the easier it’ll be to hear a snare and know, “Yep, this one’s perfect,” or, “I know exactly what moves to make to get this snare where it needs to be.”
Boosts are Easier to Hear
Boosts are way easier to hear than cuts. This makes it a lot easier to pinpoint problem areas or figure out exactly what’s working (or not working) in your snare drum.
I'll usually start with a parametric EQ and pick a frequency range I suspect might be causing issues (or that I want to highlight). I'll set my Q for a narrow boost, crank the gain up, and sweep it across the spectrum. When I hit an area that makes me cringe, bingo. I’ve found an offending frequency.
Once I’ve located the trouble spot, I'll pull the boost back down and decide how much I need to cut (or whether I even need to cut at all). The same method works in reverse if you’re looking to enhance a particular characteristic of your snare, like finding that sweet spot for more body or crack.
Don't Make Changes in Solo
Here’s the single best piece of advice I can give you: don’t make EQ changes in solo.
No matter how tempting it is to obsess over getting the snare drum sounding amazing on its own, what really matters is how it works in the context of the track. You could spend hours crafting the perfect solo’d snare sound, only to drop it back into the mix and realize it doesn’t fit. At all.
This is especially true for live drums, which are often recorded with a whole mess of mics. Tweaking just one frequency on the snare mic can shift the entire balance of the kit when you hear it all together.
For example, boosting the highs on your hi-hat EQ might suddenly make your snare feel darker, or vice versa. Everything’s connected, so you’ve got to think holistically.
The point is that your snare drum doesn’t exist in a vacuum. EQ it while listening to the entire kit and, better yet, the whole mix. Focus on how the snare sits with the kick, the cymbals, the hi-hat - everything. It’s all about perspective.
Get Your Snare EQ Right
As I said before, every snare EQ is going to be different. Don't take any of the things I said above as gospel, but rather use them as a guide to give yourself a good starting point when you feel like you need to make changes but you're not sure where to start.
You may even find that you don't need to end up using the same frequencies at all, depending on the sound of your snare drum or your entire mix.
Trust your ears with your snare EQ, and you'll go much further!


