

The term "Subtractive synthesis" may appear as a lofty and theoretical notion. Nevertheless, if you've ever dabbled in music production using a synthesizer, odds are that you're already familiar with it.
Subtractive synthesis has long reigned as the prevailing type of synthesis, stemming from the analog synth era but enduring in countless digital hardware synths and synth VSTs. Grasping the concepts of subtractive synthesis may prove daunting, especially when you're just getting your feet wet in the world of synths, but fear not, as it's actually not as intimidating as it might seem.
In this guide, we'll provide a comprehensive breakdown of subtractive synthesis so you can write, play, and produce with synths more confidently.
What is Subtractive Synthesis?
The art of subtractive synthesis entails crafting musical sounds, starting with a harmonically dense waveform and subsequently refining it via filters and other forms of processing.
By "harmonically dense" waveforms, I'm referring to the lush harmonic waveforms generated by elementary shapes like square or saw waves. While electronic oscillators can produce these fundamental waves effortlessly, they fail to captivate listeners on their own.
If you want to create more musical allure, you must manipulate the textures, frequency distribution, and dynamics of these waveforms.
To do so, we use subtractive synthesis .
How is Subtractive Synthesis Unique?
There are many other types of synthesis that exist, from additive synthesis to wavetable synthesis to FM synthesis and beyond. Let's look at a few of the most popular types of synthesis and how they differ from subtractive synthesis.
In recent years, wavetable synthesis has emerged as a crucial tool in the music production world. With the ability to generate unique sounds by morphing oscillator waves sourced from audio samples, this technique is often referred to as sample-based synthesis.
Unlike subtractive synthesis, which relies on a fundamental waveform, wavetable synthesis utilizes a collection of wavetable frames that can be scrolled through, giving you a sense of dynamic motion.
In contrast, another popular type of synthesis, frequency modulation synthesis, also known as FM synthesis, involves the modulation of the frequency of the original waveform to generate a new frequency spectrum.
FM synthesis is renowned for producing sounds that are characterized as brash and metallic. If you're struggling to conjure an auditory example, consider the growly mid-basses that were prevalent in the bro step genre during the early 2010s.
The Intricacies of Signal Flow in Subtractive Synthesizers
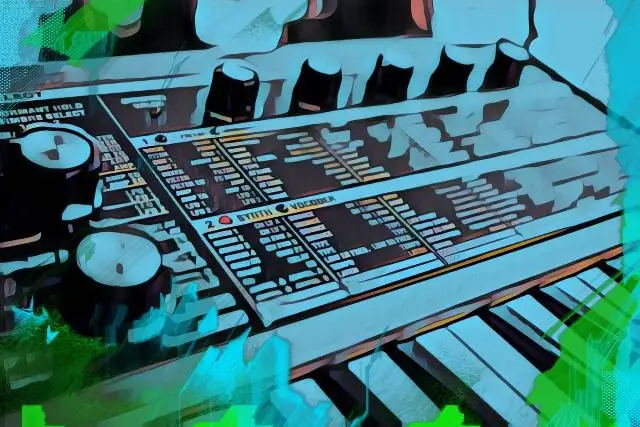
Now before you start tweaking knobs like a mad scientist (which I highly recommend doing anyway), let's get familiar with each component in the signal path and how they contribute to the overall sound.
First things first, you probably know or at least have heard that the oscillator is the brain behind the operation. Without an oscillator, your subtractive synth would have no way of producing a rich waveform to set the foundation of your patch.
Then, you have some of the other parameters that make the oscillated sound more interesting, including the amplifier, the filter, the LFO, and the envelope generator. These modules are the building blocks of a typical subtractive synth, and each one has a unique role to play.
Don't worry, we'll go through each of them in detail. And to make things even more fun, we've put together a small diagram that visually demonstrates how each of these modules work in succession:
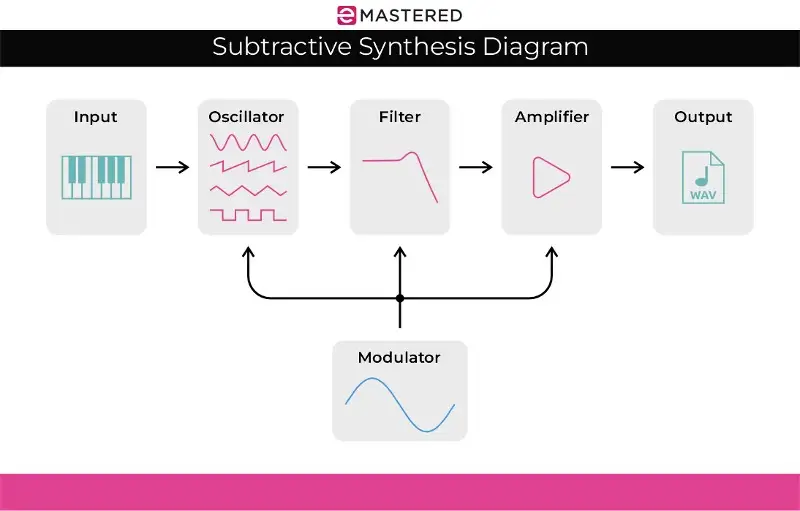
Looking at the photo above, the first thing you'll notice is the modulator section. It's important to understand that modulators can either be LFOs or envelope generators, though we'll expand on that a bit later.
What's most important to note is that the majority of subtractive synths follow this layout However, synth history buffs know it wasn't always like this.
Back in the day, the OG synths were made up of patchworks of separate modules, each one connected with cables, which the user had to manually plug in.
That, my friends, is what we refer to as modular synthesis .
This wild and wooly method is still popular today among Eurorack fans.
The great thing about modern modular synths is that they still follow the same subtractive architecture as their predecessors.
Sure, you'll get the most flexibility from patching individual modules, though there were many synth designers who realized that most musicians tend to be creatures of habit, setting their signal flows up in the same way every time.
One of the consequences of this thought process gave birth to one of the industry's first all-in-one synths, the legendary Minimoog. From that point forward, if you were to look at most of today's subtractive synths, you'd find that they pretty much have the same flow.
Of course, this is only the tip of the iceberg! Let's dig a little bit deeper into each element of the signal chain to get a better grasp on what they all do.
The Different Elements in Synthesis
Oscillators
When you're finally ready to dial in some sweet synth sounds, the first thing that you'll start with is the oscillator! As we said before, this is the brain of the operation.
And even though it's just the beginning of the signal flow, the settings you choose for your oscillator will have a significant impact on the way that your final patch sounds.
Now, the majority of synth oscillators out there will present you with a choice of different waveforms you can use as jumping-off points. These are like the different flavors of ice cream - you've got your classics and more exotic choices.
Some of the most standard waveforms you can expect to find on a synth include the square wave, the sawtooth wave, and the triangle wave.
Let's begin with the one that starts you off with a ton of harmonic content — the square wave . Play a square wave on a synthesizer, and even at its foundation, it sounds like a buzzing bee.
Beyond their bright, buzzing tonality, square waves have some other interesting tricks up their sleeves.
For example, some square wave oscillators have the ability to alter the shape of the square pattern itself, which is then called a pulse wave. By adjusting the pulse width modulation, you can get all sorts of wild and wacky tonal results.
Values of pulse waves can be a bit confusing at the moment, so let's circle back.
Instead, right now, we'll discuss the next up on the harmonic hierarchy - the saw wave , otherwise known as the sawtooth wave. Sawtooth waves are characterized by sharp points and sudden changes, which give them that distinct buzzing sound.
But here's the really cool part – those sharp points and changes create a pattern of harmonic frequencies that get quieter and quieter as they go. This is what gives the sawtooth wave its full, rich sound that's perfect for crafting lead synth melodies.
Finally, we've got the mellowest of the harmonic waveforms - the triangle wave .
Like square waves, triangle waves utilize the odd harmonics of the starting frequency. The main difference is that the volume of these harmonics fades away faster, which is why triangle waves sound closer to a sine wave.
Of course, you still get that touch of buzzing that makes it a great choice for certain key, pad, or lead sounds.
While you won't find them in all synths, some subtractive synthesizers have sneaky little sine wave oscillators.
Imagine a calm and peaceful lake on a beautiful day, with gentle ripples spreading out smoothly in all directions. That's a sine wave, one of the purest and most foundational waveforms in synthesis.
Because sine waves do not have any sharp shape changes, they create smooth and mellow sounds that are perfect for recreating the warm and breathy tones of woodwind instruments like organs and flutes. Sine waves are equally great for creating lush, evolving pads that fill up sonic spaces with soothing harmonies.
However, if the synth that you have doesn't have a sine wave, you can always filter a triangle wave using a low pass filter.
Now, stay with me for a second here, as things are about to get a bit more convoluted. This is because many subtractive synths rock multiple oscillators .
What's wonderful about this often dual oscillator architecture is that the possibilities are endless. You can tweak the frequency, shape, and detuning amount of each oscillator to your heart's content.
And here's where the real fun begins, because blending two oscillators that use different frequencies and shapes is how you start building richer, fuller, and more complex sounds in the subtractive synthesis format.
At the very end of the oscillator section, you'll usually find a mixer section, which allows you to you blend your oscillator signals with the other sound sources found in your synth, such as a noise source (which is great for adding attack to shorter sounds), an external audio input, or a sub-oscillator that plays an octave lower than your main oscillator.
Filters
Next, let's move on to the filter section.
Think of it like a fancy cheese grater for your overall sound, in which you run your signal through a Voltage Controlled Filter (VCF) to grate away any unpleasant frequency chunks.
While there are numerous types of filters you can expect to find in the world of synthesizers, most synths rely on two key ones — a High Pass Filter (HPF) and a Low Pass Filter (LPF).
Your low-pass filter only allows low frequencies to come through by cutting out all of the high-frequency content.
This is the way in which people create low-frequency bass sounds.
On the other hand, high-pass filters give the boot to all the low and mid-range frequencies, allowing the higher frequencies to shine through.
When you turn the cutoff knob on your synth, you're adjusting the point at which the filter kicks in.
It's worth noting that the filters found on most synths don't simply hard-cut the sound. Instead, they utilize gentle slopes that gradually lower the volume of the filtered frequencies.
We measure these slopes in decibels per octave (dB/oct). The higher the dB number, the steeper the slope and the more intense the filter. For example, you might find a -12 or -24dB/oct filter cutoff on your synth, which is right up the middle in terms of slope steepness.
In addition to the cutoff parameter, another essential element of a filter is the resonance parameter .
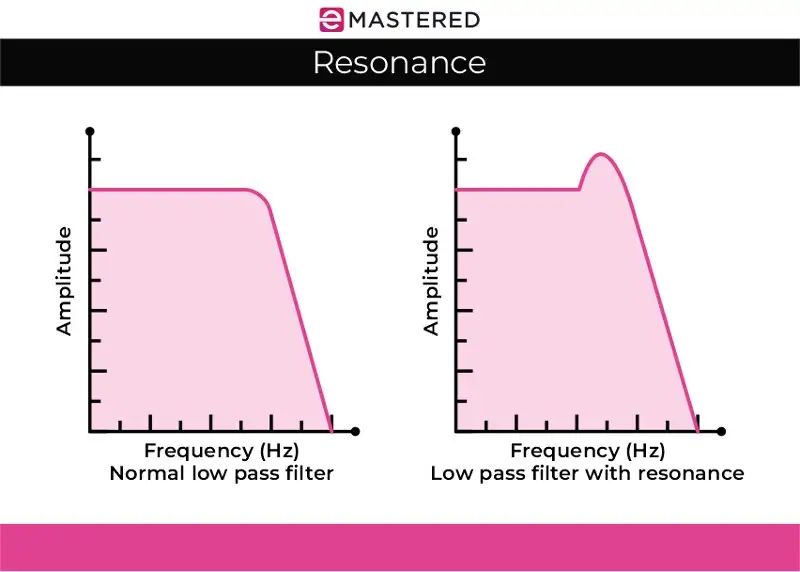
Typically, a resonance knob, otherwise known as a 'Q' knob is present on most filters. Feedback is created by sending the audio within the same frequency range as the cutoff back to the filter, resulting in a resonance effect.
When the feedback level reaches extremely high values, it can induce filter self-oscillation, which, in turn, produces a sine wave. By increasing the Resonance, the sounds around the cutoff frequency become more present, offering a range of creative applications such as traditional wah-wah effects or synth "squeals."
Amplification
Following the oscillator and filter, the amplifier is the next crucial building block in a subtractive synthesizer. It serves the purpose of elevating the audio signal to an amplitude that can be effectively interfaced with other equipment, such as an audio interface or mixer.
When you talk about it out of context, the amplifier, in itself, may not seem like the most thrilling feature. However, it's the ability to regulate and manipulate it that makes it a potent sound design tool.
This is where the envelope generators come into play.
Envelope Generators
In subtractive synthesis, envelope generators are a vital means of achieving time-based alterations in your synth patch. They are indispensable for those looking to create captivating sounds.
While there may be multiple envelope generators in a synth, the most prevalent arrangement involves one envelope generator affecting the filter and another controlling the amplifier.
Let's begin with the amplifier's envelope generator, which is relatively easy to comprehend.
The envelope generator's impact on the synth's amplifier results in the overall volume of the sound being transformed based on the envelope's shape.
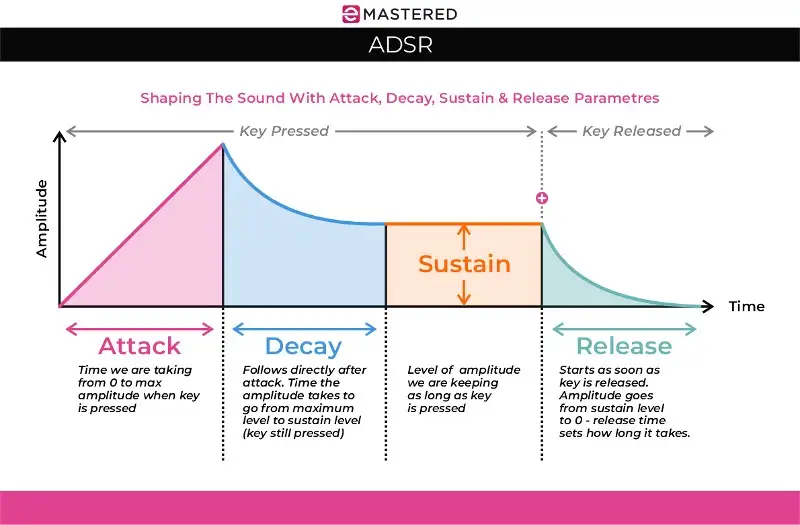
Whenever you press a key on your synthesizer, the envelope generator initiates a sequence that encompasses four distinct stages:
- Attack
- Decay
- Sustain
- Release.
You'll often see these stages abbreviated as ADSR.
Let's go through each of these stages to get a close look at how they impact your sound.
Attack
The attack parameter dictates the initial phase of your synth's volume, determining whether it has a more gradual fade-in or a snappy, sudden onset.
Attack time is commonly measured in milliseconds and regulates how rapidly a sound attains its maximum intensity.
For sharp and percussive sounds, the minimum attack time is ideal, whereas, for ethereal pads and soundscapes, lengthier attack settings are more suitable.
Decay
The decay parameter governs the amount of time it takes for your sound to stabilize at its sustained level until the key is released. Similar to the attack, decay time is also often measured in milliseconds.
When the decay time is set to a minimum, the sound you get is a more abrupt volume reduction from its peak level. This is a common technique for generating highly dynamic sounds, such as snares or plucks, where a quick drop-off in volume is necessary for the desired effect.
Sustain
The sustain parameter governs the general level at which the sound plays once the attack and decay phases have been completed. This parameter is measured in decibels (dB).
Lower sustain values introduce a more significant contrast between the sound's initial attack and its sustained "body," resulting in a more pronounced articulation.
Release
The release parameter governs how long it takes for the sound to decrease from its sustained level to silence once the key has been released.
Longer release times introduce a trailing, atmospheric tail to the notes, whereas shorter release times produce a more abrupt volume drop-off immediately after releasing the keys.
Filter Envelopes
In addition to amplifiers, envelopes can modify any other parameter, similar to low-frequency oscillators (LFOs). Filters frequently feature envelopes that control the modulation of the cutoff frequency over time.
Although the ADSR parameters function similarly in this context, their impact on the sound is distinct. By experimenting with the envelope controls on your filter, you can explore how varying the settings affects the synth sound's character.
LFOs
The final critical component of the subtractive synthesis signal flow is the low-frequency oscillator (LFO). While similar to a traditional oscillator, a low-frequency oscillator has a unique feature.
Like the oscillators in your primary signal generators, LFOs have waveform shapes. However, they operate at much lower frequencies, to the point that their output would not produce a recognizable musical tone if you listened to it directly.
Rather than generating an audible tone, LFOs produce cyclic modulation in your synth sound, creating repeating patterns.
Think of it as having an extra hand that turns a knob on your synth back and forth at a steady rate every time.
There are numerous parameters in your synth that can be modulated by LFOs. To give you an idea of the possibilities, here are some popular routing options that are known to produce interesting effects:
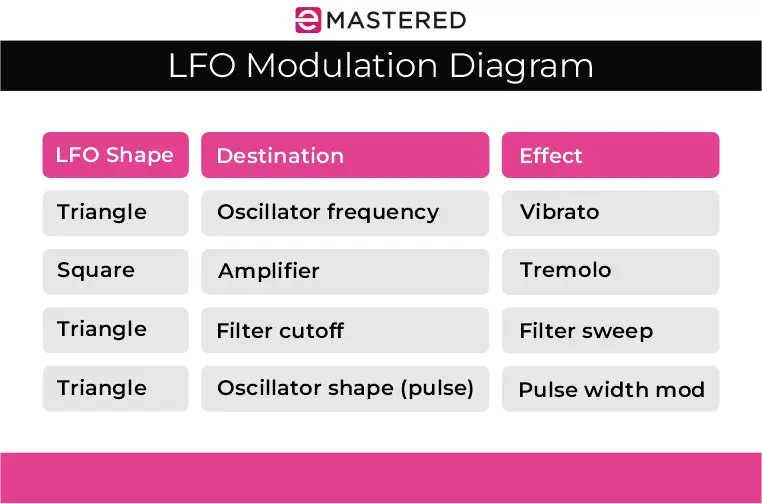
Exploring the Creative Possibilities of Subtractive Synthesis
Despite the number of components involved, creating sounds with subtractive synthesis can be an enjoyable and instinctive process.
Let's recap the fundamental steps to creating a subtractive synth sound:
Firstly, choose the oscillator to generate the initial sound, then adjust the frequency balance with the filter.
Secondly, modulate the sound with LFOs to add movement.
Finally, shape the sound's envelope with ADSR.
That's the gist of it! Once you become familiar with this workflow, creating amazing synth sounds will be a breeze.
Now that you have a good grasp of the basics of subtractive synthesis, hop back in your DAW and start designing some custom patches!


