


When we listen to raw vocal recordings, we often get harsh, high-frequency sibilant sounds from certain letters and sounds, including S, Sh, X, and F.
To get rid of excessive sibilance during the mixing phase, we often use de-essing. Of course, it's not always as easy as slapping on a de-esser plugin and calling it a day.
The human voice is one of the most dynamic instruments around, meaning one voice can have a vastly different type of sibilance than another. This is one of the things that makes mixing vocal tracks so difficult.
Beyond that, there are so many different parameters to consider when using a de-esser that it can get a bit overwhelming, especially for beginners.
To make things easier for you, we wanted to develop a small de-essing guide with some best practices to follow. In this article, we'll discuss everything you need to know about de-essing, how to use a de-esser in your mixes, and a few tips to help you craft clear, present, and sibilance-free vocal mixes.
What Is A De-Esser?
A de-esser is a common mixing tool that is used to compress or attenuate sibilance in a vocal. You can think of it as a frequency-dependent compressor.
Sibilance often comes in the form of harshness in vocal recordings. 'S,' 'T,' and 'Sh' sounds often seem to be the biggest culprits. What's truly annoying about sibilance is that the majority of the track can sound amazing, though certain sounds or syllables can pop out and distract from the good recording.
De-essers are made for reducing sibilance by isolating the frequency range that is the cause of the sibilant frequencies. Essentially, when that particular frequency range starts to get out of control, your de-esser will turn it down.
To simplify it, a de-esser is a fancy term for a compressor that works specifically with high frequencies.
By using a de-esser correctly, it shouldn't be noticeable to your listeners. However, your vocal should sound much smoother and easier to listen to with proper de-essing in place.
Of course, the last thing you want is to take your de-essing too far so that you turn your 'S' and 'T' sounds down completely, as this can sound unnatural.
When Should I Use A De-Esser?
Not sure if you need a de-esser?
Listen to your vocal.
Do you hear high-frequency peaks throughout the performance on certain syllables like 'S,' 'T,' or 'Sh?'
Is the sound of that sibilance harsh or does it distract from the other parts of your recording?
If so, you could probably use a de-esser for more control!
Different Types Of De-Essing
We like to divide de-essing into two main categories:
- Wide-band de-essing
- Split-band de-essing
Wide-band de-essing is where the de-esser pulls the entirety of the signal down when sibilance is detected. This is very similar to manually drawn automation that turns the volume of a vocal down in full.
On the other hand, split-band de-essing is when the de-esser only focuses on a specific range of frequencies and pulls them down when the sibilance rises above the threshold and triggers the compressor.
Now that you understand these two types of de-essing, let's dive in and learn how to use a de-esser.
How To Use A De-Esser
Note that you don't need to spend tons of money on de-esser plugins to get a professional sound. However, with that said, there are plenty of de-esser plugins available on the market, both paid and free plugins .
These plugins often have unique functionalities that can speed up the de-essing process or allow you to approach sibilance in a more surgical manner.
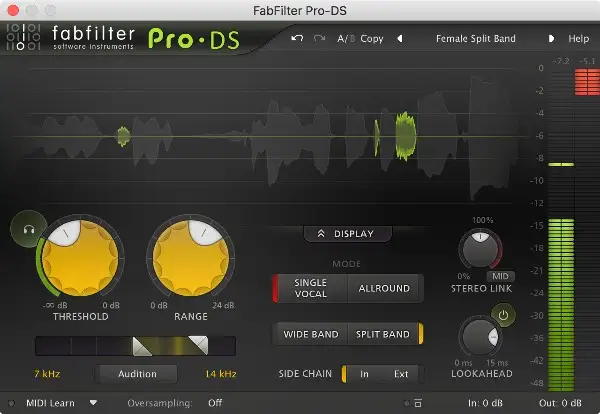
For this example, we'll be using one of my favorite de-essers: FabFilter Pro-DS .
Of course, if you're following along, you can use the de-esser that comes stock in your DAW, as it'll likely have most of the same parameters.
Note that you will most likely need to utilize a de-esser plugin in 90% of your mixes , especially if you boost the higher frequency bands in your vocal.
To start, find a portion of your vocal recording that has the most sibilance and loop it . For example, if a line in one of your verses has a lot of 'S' sounds, this would be a good place to set the loop.
#1 Finding the Most Sibilant Frequency
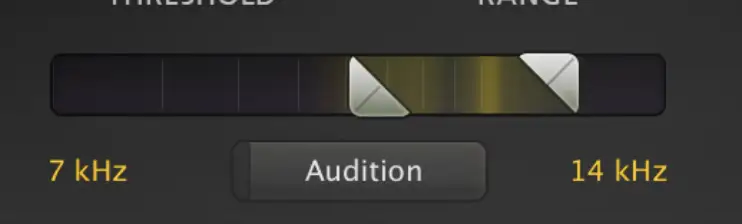
In just about all de-esser plugins, you will have the ability to choose the center frequency to focus on. This frequency is the one that has the most sibilance. You'll often find this somewhere between 5 and 9kHz , though it can often extend up to 11kHz.
In male voices, sibilance is often lower, somewhere between 5-6kHz . On female voices, sibilance often lies between 7 and 8kHz .
Of course, where the sibilance lies not only depends on the singer, but several other variables as well, including mic placement, type of microphone, and recording environment.
There are a few ways you can determine where the majority of your sibilance lies.
For starters, the majority of de-esser plugins have 'Listen' or 'Audition' buttons that allow you to solo your center frequency . This way, you can move your center frequency around while it is soloed, stopping in the place where you hear the most sibilance.
If you're really having trouble finding the most sibilant frequencies, you can also use an EQ plugin with a real-time waveform display. While your vocal is looped and playing, watch your waveform display and look for peaks when sibilance occurs.
FabFilter Pro-DS is slightly different than the majority of de-essers out there. To start, you use the Range knob to pick the desired range in which you want your gain reduction to occur. You can then use the Threshold knob to determine how loud the sibilance has to be before gain reduction occurs.
The 'Audition' button is at the top left of the Threshold button and is super helpful for hearing which parts of your audio your de-esser is working on. It's a helpful tool to make sure you're only catching the necessary sibilant peaks without triggering any other parts of the vocals.
Perhaps 6kHz isn't actually as problematic as you thought it was, though when you slide your range closer to 8kHz, you realize that is where most of the unbearable sibilance sits.
#2 Set Your Threshold
The Threshold control is there to make sure you only turn down the sibilant sounds that are giving you problems.
Not all de-essers label this control as "Threshold," which can make things a bit confusing. For example, in Logic, the Threshold control is called "Sensitivity," though it does the exact same thing!
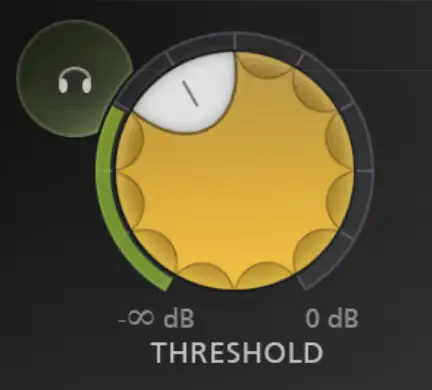
Similar to the way a compressor's threshold works, a de-esser's threshold parameter determines the amount of amplitude your signal needs before it reduces the gain. The lower your threshold is, the more your de-esser will respond. If it's set too high, however, it won't react at all, or not enough to turn the sibilant frequencies down.
The idea here is to set your de-esser in that sweet spot that sits in the middle of "too much compression" and "no compression at all."
There are often meters on de-essers that provide you with a reading of how much of your signal you're turning down in terms of dB when the signal passes above the threshold.
#3 Set The Range Control
Some de-essers come with a 'Range' control that determines how aggressively your de-esser will turn sibilance down. You want to use the Range control to turn your sibilance down in a way that it sits nicely with the rest of your vocal track and feels balanced.
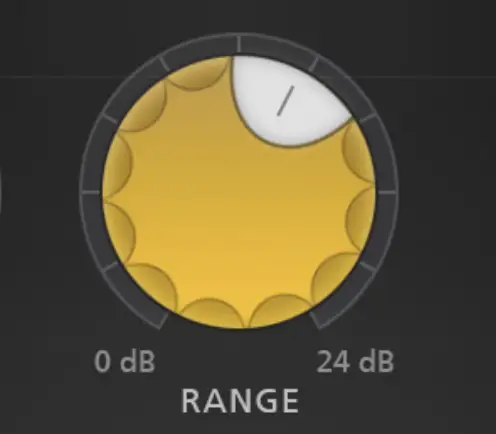
If you set your 'Range' control too high, you can easily give your vocalist a "lispy" sound.
#4 De-Ess In Context
One major mistake many engineers make is de-essing without listening to the vocal track in the context of the rest of the mix.
You might think the sibilance gain reduction you're applying is too heavy in solo, though when you put it in context with the rest of your mix, it's not enough.

If you have a mix with tons of high frequencies, such as acoustic guitars, cymbals, or high-end percussion, you might want to leave a bit more high-frequency content or sibilance in your vocals. On the other hand, if you're dealing with dull and dark instrumentation, dipping the sibilance out to match can be helpful.
Additional De-Essing Tips
Make Use of Wide-Band De-Essing
Split Band Example :
Wide Band Example:
As we said before, wide-band de-essing is where your plugin pulls the entirety of the signal down when the it detects sibilance. Split-band de-essing is much more momentary, EQing the signal and impacting the timbre for just a second before the frequencies come back into place instead of reducing the overall level.
Of course, there is a chance that you'll want to equalize your vocals with other processors, which can feel muddled when using a split-band de-esser. Essentially, it can make it difficult to know what to do when your split-band de-esser is constantly changing as different consonants pop up.
Even if I use them as the first processors in the chain, I often enjoy using wide-band de-essing over split-band.
Now, that's not to say that I rule out split-band de-essing completely. If you're heavily boosting high frequencies on vocals, for example, split-band de-essing can be helpful before or after your EQ plug-in. In my experience, using a split-band de-esser as a secondary form of EQ that works dynamically.
Don't Hit Your De-Essers Too Hard
Don't be the person that rushes through your mix, sledgehammering your sibilance into oblivion with heavy-handed de-essing. The last thing you want is to give your vocalist a lisp.
If one de-esser isn't doing the job without slamming your vocals, use another one! We live in an age of mixing in the box where you can use several instances of processing in series to create a cumulative effect for a more natural sound. This approach is far better than heavy-handedly using one de-esser and smashing your vocal to smithereens.
For example, you might use one de-esser plug-in to attack the 6kHz sound in your vocal and another de-esser plug-in to work in the 9kHz region.
Don't Use The Set It And Forget It Approach
As we said at the beginning of this article, the human voice is incredibly dynamic. Even a single voice can change drastically from syllable to syllable. With this in mind, it's silly to think that your de-esser would act in a consistent manner throughout the performance.
Your singers may have moved closer to the microphone during some phrases or used a different mouth position on one phrase vs. another. No matter what the case is, you will likely notice a difference in the quality of 'S' sounds as the music moves forward.
As a mixing engineer, automation is one of your most important tools, far more important than any of your dynamics processors.
You might consider bypassing one de-esser during a certain portion of your vocal while engaging another, or changing the parameters on your de-esser when the singer gets to certain phrases.
No matter what method form of automation you choose to employ, we recommend using it in some way or another to get the most natural sound.
De-Ess Your Saturation, Delays, and Reverb Plugins
Reverb With De-essing :
Reverb without De-essing :
You might choose to send your vocal to a saturation, distortion, reverb, or delay plug-in. If so, you might also choose to de-ess the vocal once more on the send before it hits your reverb.
In many cases, bright vocals can prove too much for a reverb plug-in or distortion plug-in. A highly sibilant sound might call too much attention to itself after hitting one of these audio processors.
To get rid of these consonants before they hit your audio processors, consider using a de-esser.
As you can hear, the reverb example with de-essing below almost gets rid of all the sibilance, allowing the lead to take over in that range.
De-Ess Your Instruments
De-essing techniques certainly shouldn't be limited to vocal tracks. Harshness presents itself in many forms in audio production. Some de-essers are great for instrumental content.
For example, you can utilize a de-esser to get rid of harshness in your guitar tracks, drum tracks, or overheads.
If I have a guitar track that I recorded through an amp simulator, de-essing it can be super helpful to get rid of harshness or unnecessary high-end frequency content. No matter how great your amp simulator is, you'll likely notice a fake quality about it, which usually sits around 4kHz.
To mitigate this fake quality, you can make use of a de-esser to attenuate the 4kHz region on the track.
The same thing goes for harshness in overheads, which can often pierce your ears if the audio is too bright. Instead of using a static EQ to get rid of high-end, which can suck the life out of your cymbals, you might instead choose to de-ess them.
Alternatives To De-Essing
Manual De-Essing
While you'll probably find yourself using de-essers more often than not, there are times when you'll deal with pesky sibilant sounds that even your de-esser can't seem to tame properly.
This is where manual de-essing comes into play.
With manual de-essing, you use gain automation or clip gain to get rid of harshness by hand.
Essentially, you grab each sibilant part of your signal and attenuate it manually. You can do this by drawing in gain automation by hand or taking a piece of the clip and lowering the clip gain.
While this process is certainly more time-consuming, the end is a sound that feels more natural, as you can approach each varying sibilant sound like its own thing.
Simply look for 'S' sounds in your waveform, which are pretty easy to spot once you get an eye for specific sounds in waveforms. Then, separate it from the rest of the clip so that it is its own region before turning it down.
Some engineers like to place all of their sibilant sounds on a separate track so they can treat them separately from the rest of the vocal.
The beauty of this approach is that you can determine how hard you want your sibilance to appear in your mix or hit any additional processing you have downstream. For example, you might have a compressor on your vocal bus that doesn't agree with your sibilance, though sounds great on the rest of your vocal recording. In this instance, you can have the majority of your vocal signal feeding into the plugins you want without having to deal with a small portion of it that isn't playing nicely with your plugins.
Dynamic EQ
While many people group dynamic EQ and de-essing in the same category, we like to think of them as different things. A de-esser is a frequency-dependent attenuator that is often set up to attenuate the entirety of the signal when the sidechain is triggered.
On the other hand, a dynamic EQ is only impacted when the specific frequency signal exceeds the set threshold. You can then choose how your signal is impacted by switching between different filter types, including bell filters or shelving filters.
Dynamic EQ plugins with multiple bands can also be helpful, as they allow you to attenuate sibilance in different frequency bands. For example, you might have tons of sibilance in the 6kHz region in some parts of your vocal, though excessive sibilance in the 10kHz region on some syllables.
With a dynamic EQ, you can attack these different frequency bands with a single plugin. Overall, a dynamic equalizer can provide you with a bit more flexibility than most de-esser plugins.
Recording With Sibilance In Mind
High-frequency content is very directional .
If you're in control of the recording process, one way to save yourself some time in the post-processing phase is to get rid of sibilance during recording.

You can do this by angling the mic away from the singer just slightly so it is not in line with their mouth. Thus, you'll limit the level of sibilant audio that hits the microphone directly.
Beyond that, one added benefit to this approach is you can also reduce plosive sounds.
Final Thoughts
De-essing audio is a technique that requires care and attention. It is an extremely important tool in the mixing engineer toolbelt, though it can easily destroy performance if we're not careful with it.
I often find myself de-essing a track too much, especially if I've been listening to it for a long time. When mixing for prolonged periods, your ears start to become overly sensitive, especially in that high-frequency range. Recognize this sensitivity as a sign you need to take a break and continuously reference a professionally mixed and mastered track of your choice so you can stay on the right track.
In the end, if you're just starting your mix and you realize your vocal sounds awesome against your chosen reference track without a de-esser, you might not need to de-ess your vocals at all!


