


One of the foundations of any great mix is a static mix.
Many engineers will hop into a mix and begin trying to fix things with plugins and automation, never taking the time to get the balance right from the start.
A static mix helps by giving you a better perspective from the start and offers a more focused approach to starting a mix, which will give you the best results in the end.
Let's dive in and break down the crucial characteristics of a static mix!
Understanding the Static Mix Process
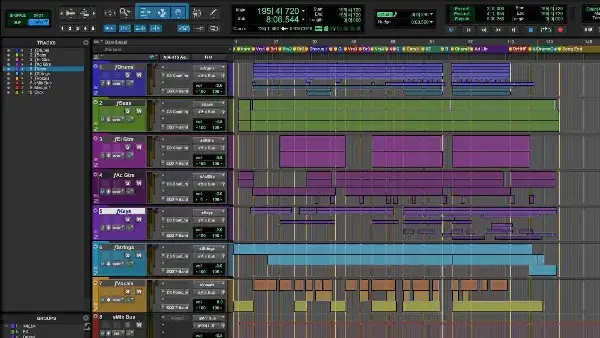
You can think of a static mix like the rough draft. The idea is to use the basic tools in your DAW, including faders, pan pots, and aux sends.
The goal here is to make sure all the tracks are balanced in your session and have a general position within the mix before you start adding EQ, compression, reverb, or other types of processing.
The beauty of a static mix is that it gives you a foundational idea as to how elements interact with one another so you can have a better starting point for further processing.
How To Build a Static Mix

As the first part of the standard mixing process, building a static mix is pretty simple. However, you have to approach with a "limitation" mindset.
Rather than using plugins to fix any issues you hear in your mix, you limit yourself to the basic functions in your DAW to make things sound as good as possible without plugins.
Let's dive in and look at the basic building blocks of a static mix.
Start with the Most Important Elements
I often like to start with the most important elements when building my static mix. Sometimes this is the vocals, and other times it's the drums.
What you choose will be subjective, as many mixers have their own approach, though it's up to you to determine the focal point of the mix.
However, I often find myself gravitating toward the kick, snare, and vocals, especially in modern mixes.
Begin your static mix by lifting these faders up and listening to how they interact with one another. Make sure you're leaving a decent amount of headroom in your mix.
While the standard for headroom is -6dB, you don't need to be too holy about it as long as your mix bus isn't clipping. Once you fit these together and they're interacting well with one another, you can begin moving on to the other instruments.
Construct the Stereo Space
Continue adding other instruments to the session mix and use the pan position knobs to adjust the stereo space.
Let the feeling guide you here. There are no hard and fast rules.
Of course, with that said, I think having the most important elements (kick, snare, bass, vocals) front and center is a great way to build a solid foundation.
You might consider bouncing stereo tracks down to mono if you want to create a bit more space in your mix and pan your mono tracks across the stereo field according to taste.
The important thing here is to ensure you aren't neglecting the hard left and hard right pan positions.
Why? You ask.
Put your headphones on and listen to some of your favorite modern mixes. You'll likely notice material pushed to the far edges to create a better sense of width.
Many mixers try to employ the LCR mixing method when creating a static mix. The logic here is to limit your panning to the hard left, center, and hard right. This technique can help mixers simplify their panning decisions, providing their song with width right off the bat.
As you get deeper into the mix, you can determine whether or not you want to fill in the gaps with any instruments.
For example, you may want to pan your hi-hat 50% to the left or right instead of the center.
Balance the Faders

When each element is in its own place, you'll have a better idea of how loud each track needs to be.
The important thing here is to make sure you retain focus on the most important elements while ensuring the others are loud or soft enough for their purpose.
There are no right or wrong ways to approach this, though it's often a good idea to make multiple passes to get the best level balance. I'll often loop the loudest section of the song and let quick decisions guide the balance.
If something feels like it is taking up too much room or "swallowing" up other elements of the mix, you can reduce the volume fader or pan it away from the elements with which it's conflicting.
It might be difficult to lock in a complete sense of clarity without EQ and compression, though you'll be much closer, creating this static balance before you go down the plugin route.
Process with Plugins
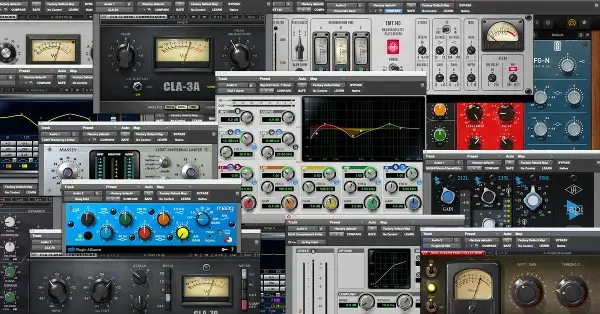
Once you have a decent static mix from front to back, you can begin adding plugins. If you were able to build a solid mix using only the basic features in your DAW, the rest of the mixing process will be much easier.
You'll be able to determine whether or not each element in your static track needs EQ, compression, saturation, reverb, etc.
Take a Few Automation Passes
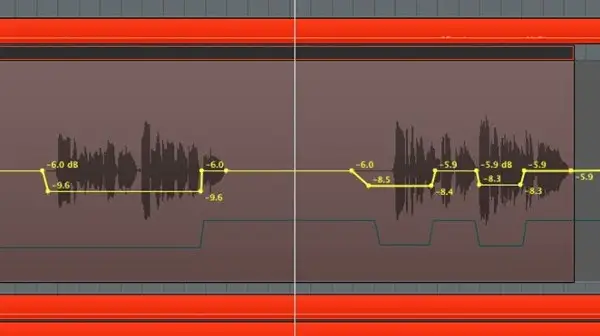
Any successful mixers will tell you that the key to any great mix is automation .
It can be incredibly helpful when processing isn't able to get your mix all the way there. You can use it to control the level of each element at specific points within the track or manipulate the parameters of various plugins to give your track a more dynamic feel.
I'd highly recommend getting a physical control surface if you can, as it gives the automation process a more human feel. Having the ability to make volume passes manually can give your song a greater dynamic range.
Coming Out of the Static
While the idea of building a static mix might seem mundane, it is one of the best tips for creating a more efficient workflow and giving yourself perspective at the beginning of each session.
Start implementing the static approach in each mixing session, and I guarantee you'll craft higher-quality tracks!


