

Automation is one of those techniques that, once you master it, can revolutionize your workflow and sound. Whether you use it for mixing or as a creative tool, automation can drastically streamline your workflow and make your tracks sound more engaging and professional.
While every DAW works differently, they all offer similar automation tools that can help you sculpt your tune. Today we’ll take a look at what automation is; how and when to use it, and how artists and audio engineers use it to achieve a unique sound.
What Is Automation?
Simply put, automation refers to the process of controlling one or more parameters of the music production process over time without manual intervention during playback or recording.
This technique allows you to make precise adjustments in volume, pan, effects, and other elements, and can be applied across both the mixing and creative aspects of music production.
It all started in the analog era when early forms of automation were as simple as manually adjusting mixing console faders during a live mixdown to tape.
However, digital automation revolutionized the concept of automation by controlling virtually every aspect of the music production process, from simple volume and pan adjustments to complex effect parameter changes over time.
As a result, automation became faster and more efficient by reducing the need for repetitive manual adjustments.
As digital technology continued to evolve, so did the sophistication of automation. Modern DAWs offer a wide array of advanced automation features, including automation curves, real-time automation recording, and a separate automation line for every plugin parameter, greatly broadening the creative horizons for musicians and producers.
What Can Be Automated?
The beauty of automation lies in its ability to bring a mix to life by adding variety to it, making it dynamic and expressive.
Here are some of the most popular parameters you can automate:
Volume: Adjusting the loudness of individual tracks over time can emphasize certain parts of your track, making them cut through the mix at the right time.
Panning: Automating the stereo position of a sound can create a sense of movement and space in a mix that captivates the listener.
Equalization (EQ): Automating EQ settings can change the tone and presence of an instrument or voice at different points in a song.
Reverb and Delay: The best way to create a feeling of expansiveness and depth is to change the settings of your reverb and delay over time.
Other Plugin Parameters : Virtually any parameter of a plugin effect or virtual instrument can be automated, from distortion to flanger effects and more. Automating those settings is what allows you to create unique soundscapes.
Send Levels: Automation of send levels to effects like reverb or delay buses can help you build intensity over time, with crescendos and diminuendos that'll push your song forward.
All in all, everything can be automated; whether you're working with acoustic or virtual instruments, loops, or field recordings, you can apply automation to every part of your track, regardless of the digital audio workstation you use. Professional DAWs like Pro Tools, Logic Pro, and Ableton offer powerful automation that empowers a music producer with a plethora of features to create unique compositions.
The Purpose of Automation
Automation is critical in the recording room just as much as it is in the mixing room.
In mixing, automation fine-tunes levels, pans, and effects and ensures each element blends perfectly in the mix. Creatively, it can breathe life into tracks, allowing for dynamic changes that evolve organically, such as swelling volumes or shifting tones.
Both aspects of music production are greatly simplified by automation techniques, which give the opportunity to artists and music producers to explore multiple options to make their songs unforgettable and professional-sounding.
Automation As a Mixing Technique
Mix Automation provides precise control over the balance and dynamics of a mix.
In a track, static settings for volume, pan, EQ, and effects can result in a mix that feels flat or lacks movement. Luckily, automation can transform this static soundscape into a responsive and ever-changing environment where each element can be sculpted over time.
For instance, volume automation provides you with real-time adjustments to ensure that every lyric, note, and beat is heard clearly, without manual intervention during playback. You can use it to duck the background music when you want the vocal track to stand out or to gradually increase the overall volume during a build-up to enhance its impact.
On the other hand, Panning automation moves the sound across the stereo field, creating a more engaging and immersive listening experience. It can be used to mimic the movement of instruments across a stage, providing a realistic feel, or to create mesmerizing stereo effects.
Finally, parameter automation , such as adjusting the depth and rate of a chorus effect on a melody, can introduce variation and maintain the listener's interest.
These are just a few examples of what you can accomplish. With mix automation, the only limit is your imagination!
Automation As a Creative Tool
In the recording room, automation can turn a raw recording into an evolving sonic experience while ensuring that every element of a track is balanced and present. This is especially true when it comes to EQ, an effect you’ll use extensively to refine your recordings.
For example, automating the cutoff frequency of a synthesizer filter can transform a static pad sound into a rhythmic element that adds momentum and interest to a track. Or automating the decay time of its reverb can transform a tight and controlled melody into a vast and expansive piece.
You can also use automation to create dynamic transitions between sections of a song, using sweeps, builds, and fades to guide the listener through the musical journey.
Once again, carefully crafted automation transforms raw recordings into professional-sounding tracks, thanks to detailed adjustments that involve every frequency and element of your song.
The Different Automation Modes
Automation modes determine how automation data is handled on a track within a DAW. Each track within your audio workstation can be set to operate in one of several automation modes. Here are the most common automation modes.
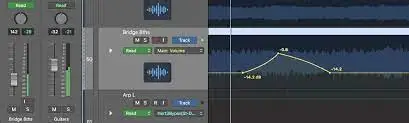
Read Mode
In Read mode, the DAW plays back any pre-existing automation data on the track. This means that if there's automation data for volume, the volume fader on the mixing console will move automatically during playback to match the recorded automation. Any manual adjustments made during playback in this mode are temporary and won't be saved. Essentially, Read mode is for reviewing the automation that has already been applied without making permanent changes.
Touch Mode
Touch mode functions similarly to Read mode in that it plays back existing automation. The main difference is the ability to momentarily override automation by manually adjusting a control (such as a fader or knob on the mixing console, in a plugin, or on a MIDI controller) during playback. Once the control is released, the automation returns to following the pre-recorded path.
Latch Mode
Latch mode is one step forward from touch mode, as it retains the last manual adjustment made to a parameter even after the control is released. From the point of release forward, the automation will overwrite the existing data with this new value until another adjustment is made.
Write Mode
Write mode is designed to create new automation data from scratch. As the track plays back, any movement of controls is recorded as new automation, erasing and replacing any existing automation data in its path. This mode is best used when you want to completely redo automation on a track.
Each automation mode has a defined purpose in the creative process, so my recommendation is to familiarize yourself with all of them and then define which mode best suits your needs for certain tasks. Remember that every DAW works differently, even though they share many similar features.
For instance, when I switched from Ableton to Studio One, I struggled to understand how each automation mode worked, but once I got a grip on it, things got much easier.
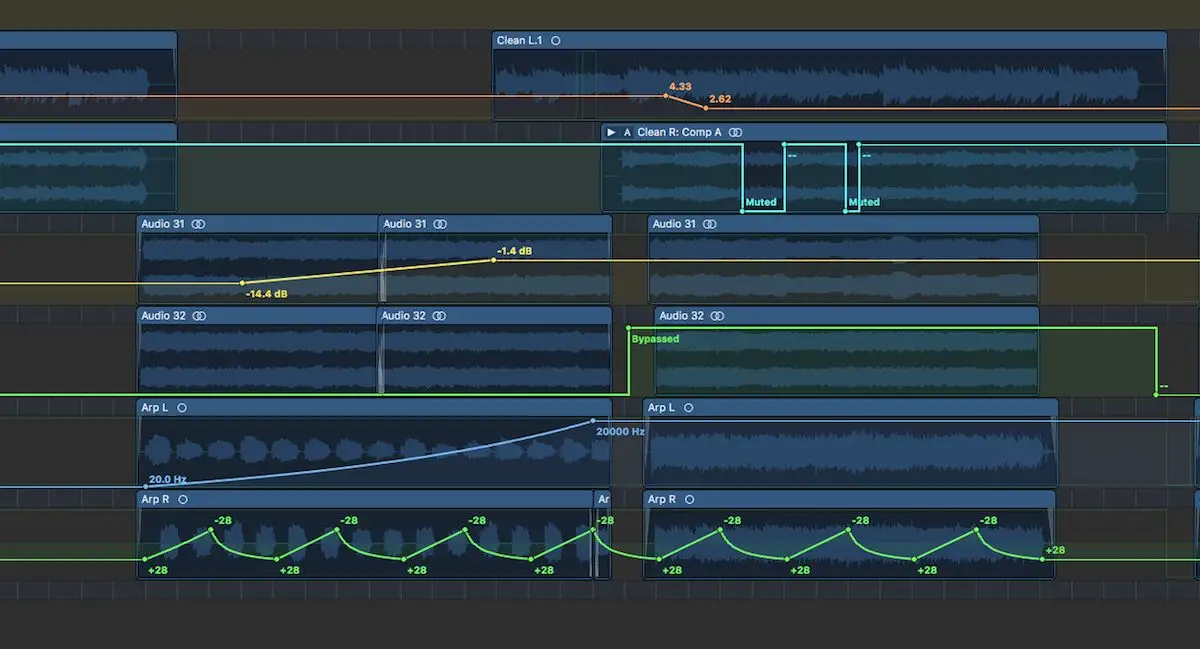
Automating Multiple Settings on A Single Track
Automating multiple parameters allows you to experiment with sound in ways that would be difficult, if not impossible, to replicate manually in real time.
Why automate multiple settings? For instance, imagine a situation where you want a track to not only grow louder but also to become more ethereal with increased reverb and a slight delay. By automating the volume to increase, making the reverb more pronounced, and introducing a delay effect simultaneously, you can elevate the emotional intensity of your track and bring to life an unforgettable build-up.
This technique can also be used to transition between different sections of a song seamlessly. For example, automating a gradual decrease in the EQ's low-end on a drum track while simultaneously increasing a synth pad's volume and spatial effects can make your track way more expansive at the right time.
Exploring how different elements of a track can interact and change over time is the secret formula to create a unique sound palette.
Audio Buses for Automation
Think of audio buses as virtual channels that amalgamate multiple audio tracks into a unified stream. This unified stream can be affected and changed collectively, which is incredibly useful for mixing and automating complex projects.
In practice, an audio bus receives audio signals from multiple tracks, which are then routed through this single channel, where you can make collective adjustments and effects application to all the routed tracks at once.
For instance, applying reverb to a group of vocal tracks (lead vocal + choir or backing vocalist) through a single bus will give you a cohesive sound, preserve CPU resources and maintain a uniform effect across all vocals.
Imagine mixing a drum kit recorded on separate tracks: routing these tracks to a drum bus allows you to create a cohesive and natural sound without making time-consuming adjustments to every single track.
In electronic music, automating the effect parameters on the audio bus can simultaneously alter the ambiance of all routed tracks, creating a unified transition that enhances the song's emotional depth. The volume of an entire group of tracks (vocals, synth, drums, strings) can be automated, creating engaging swells and fades that will define the song's dynamic expression.
Recording Automations
One of the most straightforward methods of recording automation is by making adjustments in real-time as the track plays. Recording automation involves moving faders, twisting knobs, or adjusting parameters via a MIDI controller, and the DAW captures these movements as automation data.
This approach is great for capturing the natural flow of performances, such as gradually increasing the volume of a guitar solo or modulating the parameters of a synthesizer during a transition.
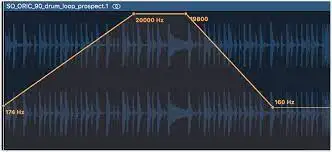
Many DAWs also offer tools to draw an automation curve directly onto a track via the pencil tool, which provides a more fine-tuned programming of parameter changes at specific points in time. Step automation is ideal when you want to have precise fader automation, create filter sweeps, or effect parameter changes that need to occur at precise moments, thanks to automation breakpoints that define the duration of the effect.
DAWs also feature automation lanes, separate tracks that run parallel to audio or MIDI tracks, dedicated solely to automation data, which you can use to display and control automation for different parameters. Another option widely available is clip-based automation, which attaches automation data directly to audio or MIDI clips, making it easier to move or copy the automation along with the clip itself. This is useful when you have repetitive sections of music where the same automation needs to apply to multiple instances of a clip.
Final Thoughts
And that's all I know about audio automation!
In short, automation is the not-so-secret sauce that can take your music production game to the next level. It's a powerful and versatile tool that can breathe life into your tracks and make them sound dynamic and expressive. Start by automating parameters like volume, panning, EQ, and your favorite plugin effects to create a sonic landscape that's as unique as your artistic vision. Sure, it may take some practice and experimentation, but the rewards are well worth it.
With automation, you'll be able to create tracks that are professional and unforgettable. You'll streamline your creative and mixing processes and enhance your imagination. So what are you waiting for? Give it a try and unleash your creativity!


