


Over the past three decades, the reality of how we consume music has completely shifted. With the advent of DSPs or digital streaming services like Spotify and Apple Music, audio normalization has become an essential part of the process.
But what does it mean to normalize audio? And how can you normalize your own digital audio files? Below, we'll share exactly how to normalize audio and why it's a key step in modern music-making.
What Is Audio Normalization?
When you normalize audio, you're applying a certain amount of gain to a digital audio file. This brings your audio file to a target perceived amplitude or volume level while preserving the dynamic range of the tracks.
Audio normalization is used to achieve the maximum volume from a selected audio clip. It can also be used to create more consistency across multiple audio clips. For instance, you might have multiple tracks within an album or EP.
It's worth noting that songs with a larger dynamic range can be more challenging to normalize effectively. For instance, a peak amplitude might become squashed or distorted through the process of normalization.
Therefore, every single audio clip should be approached differently when it comes to the normalization process. Audio normalization is essential for any digital recording, but there isn't a one-size-fits-all approach.
Why Should You Normalize Audio?
So why is it important to normalize your audio files? Here are a few scenarios in which loudness normalization is a must:
Preparation for Streaming Services
Streaming services set a standard normalization level across songs hosted on their music libraries. This way, listeners won't have to drastically turn the volume up or down when switching from one song to another. Every platform has a different target level, so it's not uncommon to have different masters for various streaming platforms.
The LUFs Loudness targets for the most popular streaming services are as follows:
Spotify: -14 LUFS
Apple Music: -16 LUFS
Amazon Music: -9 to -13 LUFS
Youtube: -13 to -15 LUFS
Deezer: -14 to -16 LUFS
CD: -9 LUFS
Soundcloud: -8 to -13 LUFS
Each engineer has their own philosophy when it comes to determining the target level for each master, but these standardizations should be taken into account.

Achieving Maximum Volume
Audio normalization can be used to achieve the maximum gain of each audio file. This can be incredibly useful while importing tracks into audio editing software or to make an individual audio file louder.
Create A Consistent Level Between Several Audio Files
You can also normalize audio to set multiple audio files at the same relative level. This is particularly essential in processes like gain staging, where you set audio levels in preparation for the next stage of processing.
You might also normalize and edit audio files upon completing a music project like an album or EP. The entire recording atmosphere and sound should be fairly consistent throughout, so you might have to go back and adjust gain within the context of all songs.
The Two Types of Audio Normalization
There are different types of audio normalization for various audio recording use cases. Most of the time, normalizing audio boils down to peak normalization and loudness normalization.
Peak Normalization
Peak normalization is a linear process where the same amount of gain is applied across an audio signal to create a level consistent with the peak amplitude of the audio track. The dynamic range remains the same, and the new audio file sounds more or less the same outside of the track transforming into a more loud or quiet audio file.
This process finds the highest PCM value or pulse-code modulation value of an audio file. Basically, the peak normalization processes audio based on the upper limit of a digital audio system, which usually equates to normalizing max peak at 0 DBs.
The normalize effect through peak normalization is strictly based on peak levels, rather than the perceived volume of the track.
Loudness Normalization
The loudness normalization process is more complex since it takes into account the human perception of hearing. Human hearing accounts for different volumes and amplitude separately since the human ear has certain subjective flaws when it comes to perception. You might hear this processing referred to as EBU R 128 volume detection.
For instance, sounds that are sustained at the same audio level as sounds that are played transiently or briefly automatically sound louder. You can put out these sounds at the same volume level, and human hearing would still perceive the sustained sound as louder. Hence, loudness normalization has to account for these perceptual offsets.
Some also believe that louder music tends to sound better. This is what gave birth to the loudness wars before streaming services existed, where musicians would try to maximize peak volume to produce a more sonically pleasing art piece. Thankfully, audio normalization has effectively ended the loudness war, so that you don't constantly hear different volumes when skipping from one track to the next.
Loudness normalization is measured in LUFs, which is more true to the human ear and serves as the audio standards in applications like film, TV, radio, and streaming services. Just like peak normalization, 0 dBs remain the standard.
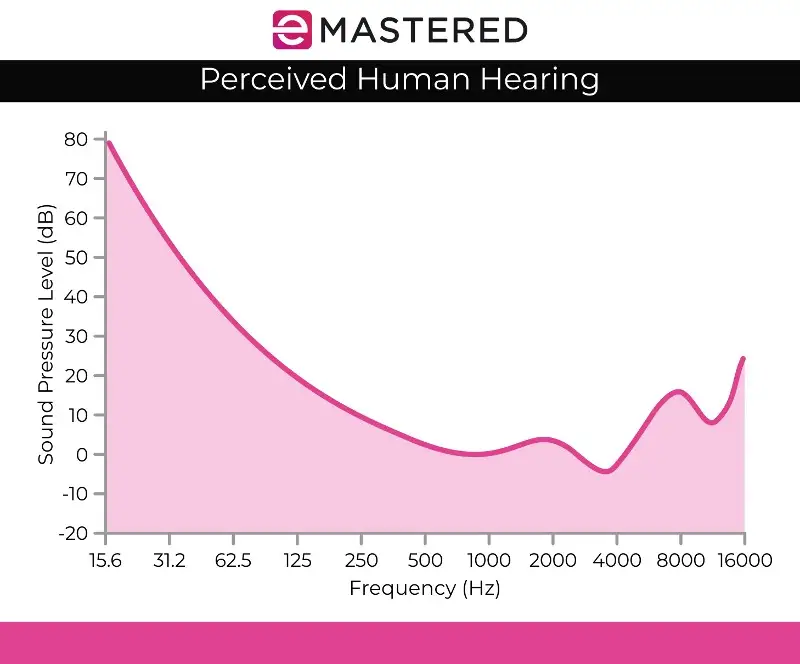
The Fletcher Munson curve, as depicted above, can help describe the discrepancies taken into account with LUFS loudness normalization.
RMS Volume Detection
If you're not going to normalize stereo channels with peak level normalization, you're likely to use loudness normalization, but it's still worth mentioning the other method of loudness processing, which is RMS volume detection.
The process of normalization is similar to LUFs loudness normalization but it uses RMS levels instead. Root Mean Square or RMS measures the average volume of a section or the entire duration of a clip.
However, just like normalizing based on the highest peak, RMS normalization does not account for human earing. This is why mastering engineers typically work with LUFs loudness units and normalization processes as a standard. Mastering isn't just about creating matching volumes throughout a project. It's also key to step back and consider dynamics, human perception, and balance between each track.
Normalization Vs. Compression: What's The Difference?
Many times, normalization and compression are thought to be the same thing, but this is a common misconception. Compression is designed to bring up the lowest volume of a track and lower the peaks of a track, creating more overall consistent volume levels. In contrast, normalization sets the loudest set point as the ceiling in your audio track.
From there, a proportionate amount of clip gain is applied to the rest of the audio, preserving the dynamics (the distance between the loudest and softest sounds), effectively bringing up the perceived volume depending on the peak level.
The Downsides of Audio Normalization
It's worth noting that there are some downsides to audio normalization. Most of the time, you are only normalizing audio during the final stages of the creation process. This is because normalization often brings audio up to the peak amplitude within a digital ceiling, so you don't have much editing power after a piece of audio has been normalized.
You wouldn't want to normalize individual audio tracks that still need to be mixed within the context of a multitrack recording. If all individual components are already normalized to your digital audio ceiling, they are most certainly going to clip when played together.
Audio normalization is also destructive by nature. When you normalize audio, the digital processing is baked into the audio track. Therefore, audio normalization has a clear time and place. This process is mostly used after your audio files have been processed to taste.
How To Normalize Audio
Every DAW has its own way of normalizing digital audio. We'll showcase how you can normalize audio in Ableton Live, but all audio editing software has this capability baked into its controls:
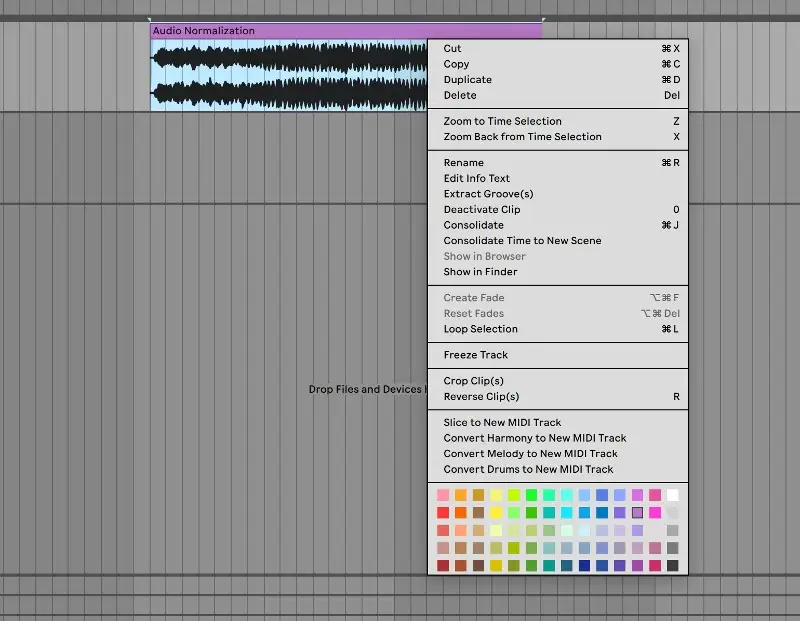
1. Consolidate Your Track
To start, bring your audio file to a clean audio track. Select the audio track, right-click and select "consolidate" on the menu. You can also use the keyboard shortcut CTRL/CMND + J to quickly consolidate a highlighted track.
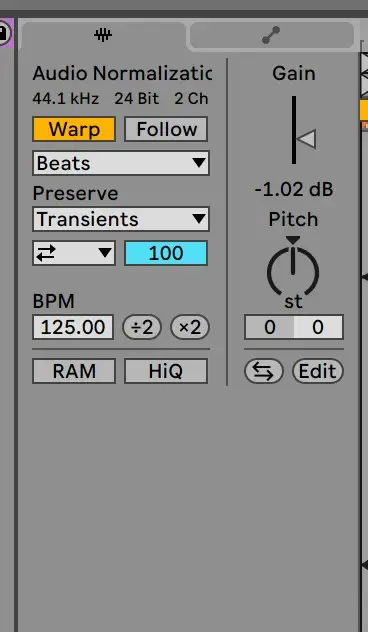
2. Disable Warp and Reset Gain To 0 dB
From there, go to the sample clip to disable warp and reset gain to 0 DB. You can do this by double-clicking on the gain arrow:

3. Check Against The Original File
From there, your clip should be normalized! You can check your clip's levels against the original audio file to make sure it was processed correctly.
Normalizing audio is an essential skill for any producer. Hopefully, this guide makes it easier for you to understand exactly how to normalize your tracks and the importance of this process.


