

When it comes to electric guitars, the range of sounds you can get is huge. A heavy djent-style electric guitar tone, with heavy distortion and chunky mids, will require a completely different approach than a clean, airy jazz tone with soft spring reverb. The processing needed for those two sounds is worlds apart.
However, no matter what tone you’re after, you’ll likely need to use electric guitar EQ at some point. Whether it's to get rid of some mud or to give the guitar more presence in the mix, EQ is one of the most fundamental tools in mixing.
In this guide, I’m going to walk you through some of my favorite electric guitar EQ tips to help you dial in your sound.
Electric Guitar EQ Range
Before we dive into the specifics, here's a quick rundown of the key frequency ranges you'll be working with when EQing electric guitars.
- 80-120Hz (Low End) : This is where you get the body and fullness of the guitar.
- 120-250Hz (Low Mids) : This range gives the guitar its "meat" and fundamental lows.
- 250-500Hz (Mids) : This is the magic zone for most of the guitar’s character. It's pretty much where the core sound of the electric guitar lives.
- 500Hz-1kHz (Upper Mids) : This area is where you'll find sharpness and clarity, though also harshness with some tones.
- 1-3kHz (Presence) : This is where you start to get the “bite” and clarity that lets your guitar stand out, especially in busy mixes.
- 3-5kHz (Attack) : The sweet spot for the guitar’s attack, though it can also be harsh depending on the original tone.
- 5-10kHz (Air/Top End) : This range gives your guitar that sparkle and shimmer.
- Above 10kHz (Super Highs) : Anything above 10kHz is where the really high-frequency stuff lives, such as finger slides, pick noise, and any “air” in the sound.
Get the Sound Right First
Before you even think about electric guitar EQ, it’s crucial to get the tone right from the start. I can’t stress this enough:
Starting with a good base tone makes the EQ process so much easier later on.
If your guitar sounds great during the recording phase, you won’t need to rely on EQ to fix problems that could’ve been avoided.
If you have control over the recording phase, there are a few things you can do to make sure you’re setting yourself up for success. First, make sure you’re using the right guitar and amp combination for the sound you’re going for. A crunchy distortion sound with a Les Paul and a Marshall stack is going to need different EQ settings than a clean hollowbody jazz tone with a Fender Twin, so pick your gear wisely.
Next, don’t forget about mic placement. Where you position your mic relative to the speaker can have a big impact on the tone. A mic placed close to the center of the speaker cone will pick up more high frequencies and bite, while a mic placed off-center will give you a warmer, smoother sound.
That being said, even the best recorded guitar tone might still need a little EQ love, especially once it's in the context of a full mix. A guitar might sound perfect soloed but could get lost when you add in the drums, bass, and other elements. That’s where EQ comes in.
Electric Guitar EQ Tips
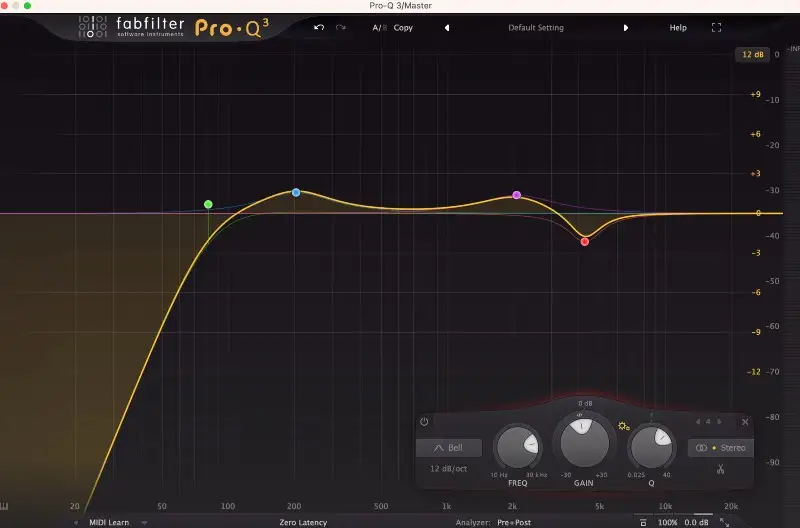
High-Pass Filter
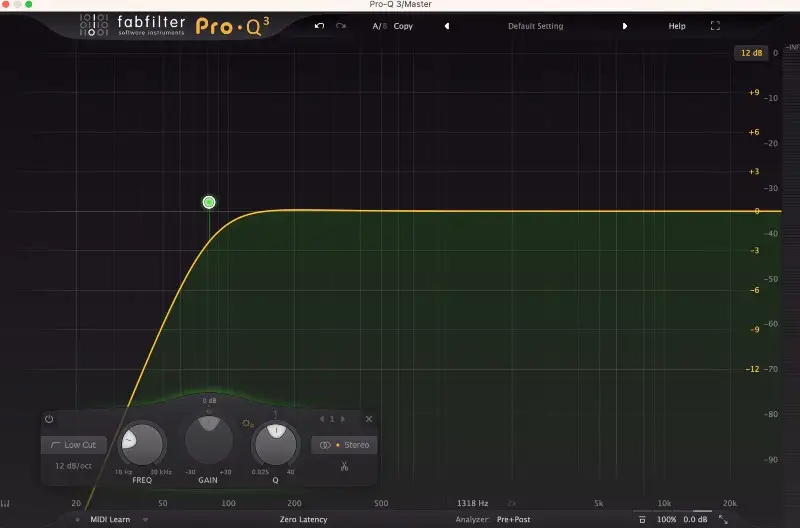
Let’s start with a high-pass filter.
It might sound basic, but it’s one of the most effective ways to clean up your electric guitar’s tone and make room for the rest of the mix. The lowest note on a standard-tuned electric guitar is 82Hz (the low E string). Below that, you'll often find a lot of unnecessary low-end rumble that doesn’t contribute to the musicality of the guitar and can just take up space in the mix.
Generally, you can high-pass your electric guitar up to around 80Hz without losing any of its core sound. This simple move gets rid of all the sub-bass rumble that can muddy up your mix, giving you a cleaner, tighter sound with more headroom. It also frees up space for other instruments, like bass and kick, which live in the low-end range.
Some guitars, especially those with little low-end content (like solo guitars or stacked octave layers) might need to be high-passed a bit higher to keep them from sounding too heavy or boomy. To find the perfect cutoff point, you’ll want to experiment by gradually moving the high-pass filter up and listening carefully for when they start to lose body.
As for the settings, I typically use a slope of 12dB or 18dB per octave for a nice, gentle roll-off.
Thickness and Body
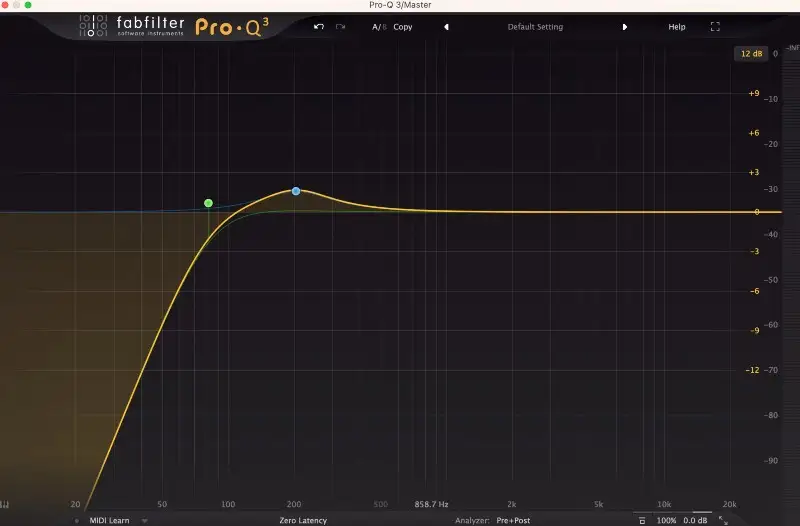
When it comes to the thickness and body of an electric guitar, this is where you’re dealing with the fundamental weight of the sound. These are the low mids, usually somewhere in the 150-300Hz range . This is the spot that gives the guitar that "meaty" feel and helps it sit solidly in the mix. If your guitar is sounding a little thin, a small boost in this range can really help fill things out and give it some depth.
However, if there’s too much prominence in this area, especially with bass guitar also in the mix, it can quickly become muddy. A gentle dip can help separate the two and keep both instruments in distinct frequency ranges.
Interestingly, many modern rock and metal tracks tend to have what’s known as a "scooped" midrange, meaning they cut a bit of the low mids and boost the higher mids and treble frequencies. This technique helps emphasize the clarity and brightness of the guitar while keeping the low end tight and controlled. It’s super common in styles like nu-metal and modern rock.
Presence
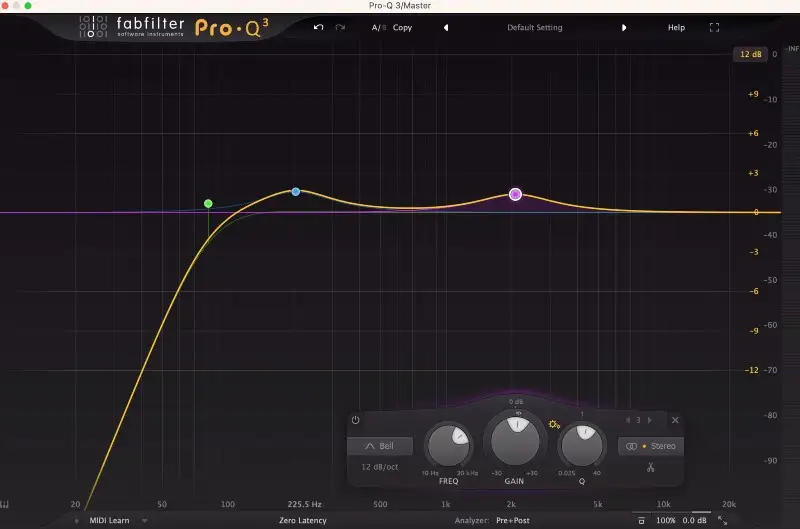
The 2kHz area is magical for electric guitars. It's where a lot of the guitar’s "cut" and clarity come from, and it’s perfect for making the guitar stand out in a mix. If you’re working with rhythm guitars and they’re getting lost or aren’t cutting through as much as you’d like, a small boost in this area can make all the difference.
For electric guitar solos, this area is especially useful.
Hiss and Harshness
The 4-5kHz frequency range is often where things go south, especially with distorted electric guitars. This frequency range can bring out a nasty, overly sharp quality that’s not the most pleasant to the ears.
If you’re dealing with harshness in this range, a little cut in this range can really help.
Low-Pass Filter
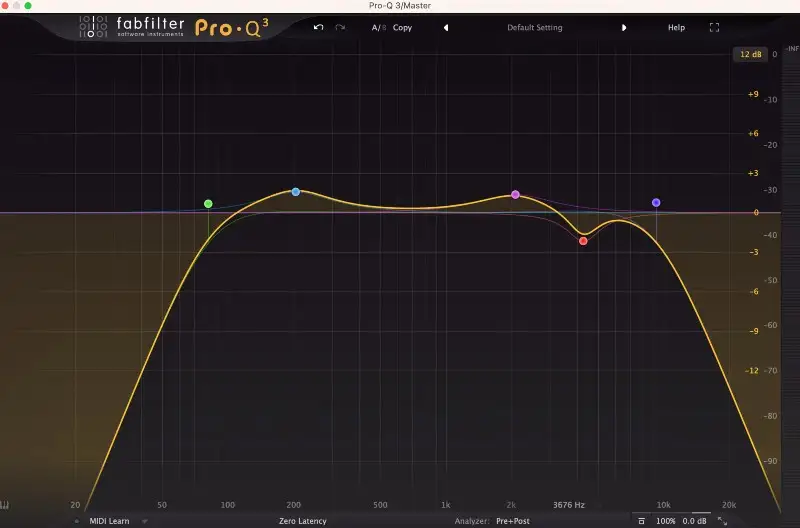
Finally, we come to low-pass filters.
Low-passing your electric guitar is an important step in making sure your mix stays clean and focused. By cutting off the super high frequencies above a certain point outside the guitar's sweet spot, we can get rid of brittleness and harshness that get in the way of other instruments and take up space.
Now, the big question is:
Where do you put your low-pass filter?
It all depends on the sound you're after and the context of the mix. If you’re working with a distorted guitar, you might want to cut off some of the extra high frequencies that can make the tone sound brittle. On the other hand, if you're working with a clean guitar, you might want to keep a little more of the top end for that bright, open sound.
I usually like to start around 8-10kHz . For heavier or distorted tones, I'll sometimes bring it down closer to 6-8kHz , just to keep things smooth and avoid any unpleasant fizz.
Additional EQ Tips
Using Dynamic EQ
Dynamic EQ is an incredibly useful tool compared to traditional electric guitar EQ. Unlike regular EQ, dynamic EQ only acts when a certain frequency becomes too pronounced, kind of like having an EQ that reacts to the performance in real-time. This makes it perfect for situations where you don’t want to make permanent cuts or boosts but need a little more control over certain problem areas as they pop up.
A great example of when dynamic EQ comes in handy is with palm-muted guitars.
These parts often have a lot of low mids (around 150-300Hz) that pop up on certain notes, mostly due to the overtones of the guitar, the mic, or the cabinet of the amp. With dynamic EQ, you can target these low mids and compress them only when they get too loud, so they're nice and even without sacrificing the body of the guitar.
Mid-Side Processing for Width
Mid-side EQ is a powerful technique that can help you add width to your guitar sounds and generally clean up the mix.
When you’re working with guitar busses, mid-side processing allows you to EQ the "mid" (the center of the mix) and the "side" (the stereo spread) independently. This is super helpful when you want to get the low-end information out of the center, away from the kick drum and bass, while making the guitar sound wider in the stereo field.
Meanwhile, you can boost the sides of the guitar to make it sound wider, which is perfect for rhythm guitars that you want to fill out the stereo field with while not competing with the center.
FabFilter Pro-Q 3 is a fantastic tool for mid-side EQ because it makes the whole process incredibly intuitive.
Notch Ringing Frequencies
Sometimes, when EQing electric guitars, a regular cut just won’t do. That’s when a notch filter comes in handy.
A notch is a more extreme way of isolating and getting rid of problem frequencies. They're perfect for when you’ve got a frequency that’s really sticking out in a way that no subtle EQ cut can fix, like a ringing or resonating note.
You’ll often find these offending frequencies living in the 800Hz-2kHz range , which is right around where the guitar’s mids tend to get a little ugly. If you have a certain frequency that's causing a "ringing" sound that’s bothering you, you can use a notch filter to surgically remove it without affecting the rest of the guitar’s tone. The cool thing about notches is that they’re narrow, so they’ll focus on just the offending frequency, leaving the surrounding tones untouched.
Just make sure to always do it in the context of the full arrangement. Sometimes, a frequency might stick out when the guitar is soloed, but when you bring everything else in, it might actually sound fine. Be sure to listen to how the guitar interacts with other instruments to see how much you can realistically take away.
Final Thoughts
If you ever need a bit more perspective to get your electric guitar EQ right, I always recommend using reference tracks . It’s a great way to get a clear sense of where your guitar should sit in the mix.
You can compare your electric guitar tone to professionally mixed tracks and make sure your EQ choices are in line with the sound you're aiming for. You can even use a frequency analyzer to see where on the frequency spectrum many professionally mixed electric guitar stems sit. This is a great method to help you find your way, especially when you're just getting started.
That said, once you’ve spent enough time with EQing, your ears will be your best tool. The more you practice, the more you’ll develop a natural feel for what works and what doesn’t. This is true for all aspects of music production.
And while I don’t recommend using everything in this guitar EQ guide above as a strict rulebook, I hope it gives you a solid starting point each time you prep to EQ electric guitar in your mixes. EQing is an art, and there’s always room to experiment and make it your own. So, take these tips, put them to use, and feel free to experiment with them as you go.


