


When talking about tools that are crucial for mixing and music production, EQ is usually the first to come up. And though it might seem like a pretty simple mixing tool, it's a HUGE subject that is surprisingly complex when you break it down.
To help you get a grasp on this fundamental mixing process, we're going to take you through everything you need to know about EQs and EQ plugins!
What Is An Equalizer?

Equalization, or 'EQ' for short, is a basic form of audio processing that allows us to adjust the volume level of a single frequency or a frequency range of a specific sound or audio signal. In essence, EQ allows you to manipulate the tone or timbre of a sound, curing its imperfections and accentuating its good sides.
The process of EQing starts with cutting unwanted frequencies and boosting those that sound good, all to balance sounds so that they mesh well with each other in the mix.
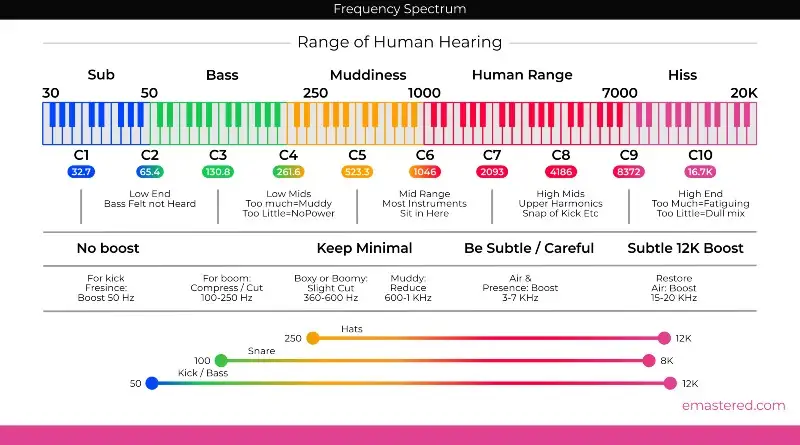
When working with EQ, we work in the range of human hearing. The human ear can hear from around 20 Hz to 20 kHz . Typically, engineers will break these frequencies up into different ranges of the audio spectrum when working with EQ.
Here's a small breakdown of the division of the frequency spectrum:
- Sub Bass (20-60Hz) - These super low frequencies are the lowest frequencies in the range of human hearing. You might hear these present in sub-bass or super low-pitched bass drums. Sub-bass frequencies are very powerful and require tons of care. It's very difficult for our ears to pick out sub-bass frequencies on speakers that don't have subwoofers, so make sure if you choose to EQ them on your system that you can actually hear them.
- Low-Mids (60-250Hz) - The low-mids provide warmth and fullness in a mix. Here you'll find the bass and kick, as well as the lower frequencies in guitars, vocals, synths, and keyboards. This range is necessary to make mixes sound big, though it requires care to get rid of the mud.
- Mids (250Hz-1.5kHz) - This specific frequency range is at the center of human hearing. Boosting an instrument in this range of frequencies can provide presence. However, too much boosting in the mids can feel overwhelming to the listener.
- Upper Mids (1.5-6.6kHz) - You can give your instruments presence and clarity in the upper range of frequencies. However, as with the mids, you must be very cautious when heavily boosting the upper mids. Too much of this range of frequencies can make your track difficult to listen to.
- Highs (6.6-20kHz) - The high frequencies are where you'll find brilliance and air. Boosting these treble frequencies can help acoustic guitar shimmer or vocals sit atop the mix. However, you'll also find tons of high-frequency noise in this range. Electric guitars often have lots of hisses up here, which can sound harsh when boosted.
How Does An Equalizer Work?
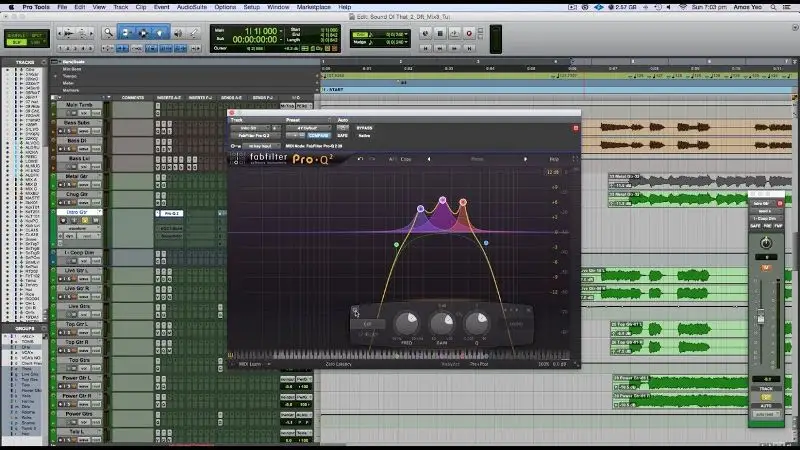
While there are thousands of different EQ plugins out there, all with unique buttons and knobs, the fundamental way that EQ works is pretty much the same across the board. Let's look at a stock parametric equalizer, which has more controls than a graphic equalizer .
You'll find a few major controls on a parametric equalizer:
- Filters
- Slope
- Q Value
- Frequency
- Gain
Filters
The most fundamental tools found on an equalizer are filters . You can alter the way your EQ works based on the type of filter you use.
Here is a short breakdown of the most common types of filters:
High-Pass Filter
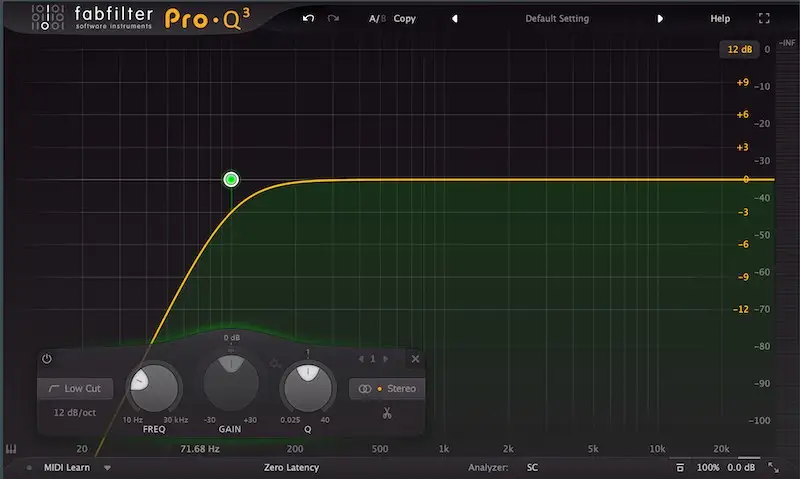
A high-pass filter, otherwise known as a low-cut filter, filters out low-end frequencies while leaving the high frequencies unaffected. High-pass filters are great for getting rid of unnecessary or unwanted low-end.
Low-Pass Filter
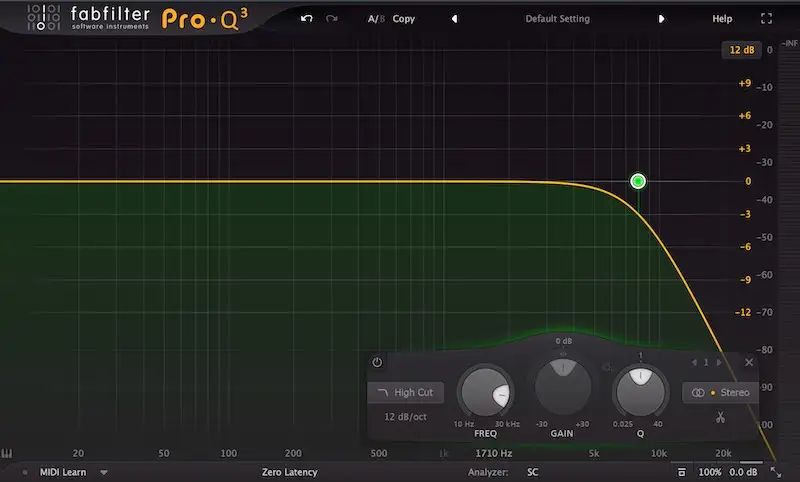
A low-pass filter, otherwise known as a high-cut filter, is the polar opposite of a high-pass filter, filtering out the high-end frequencies while leaving the low-end unaffected. Low-pass filters are great for pushing sounds back in a mix or getting rid of unwanted high-end.
Bell
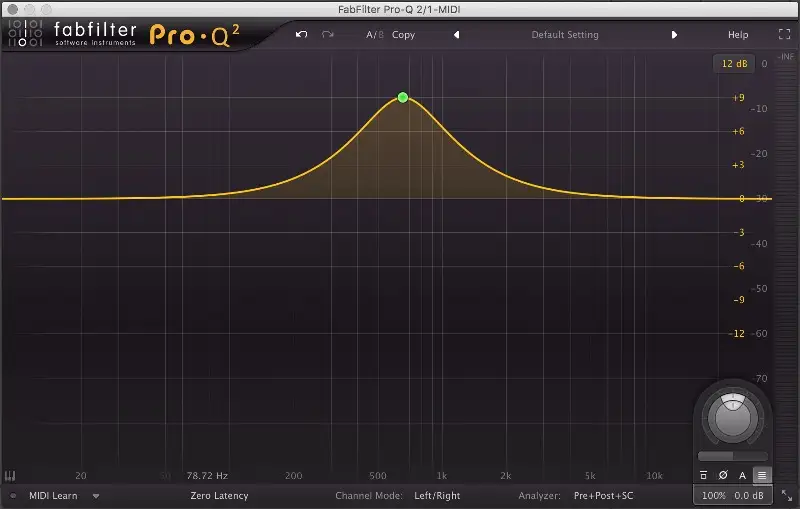
A bell filter is a standard tool for boosting or cutting frequencies. You can adjust the number of frequencies bell filters affect using the 'Q' control, which we'll get into in a bit.
A bell filter will be your go-to for shaping your tone and sculpting your sounds.
Shelf
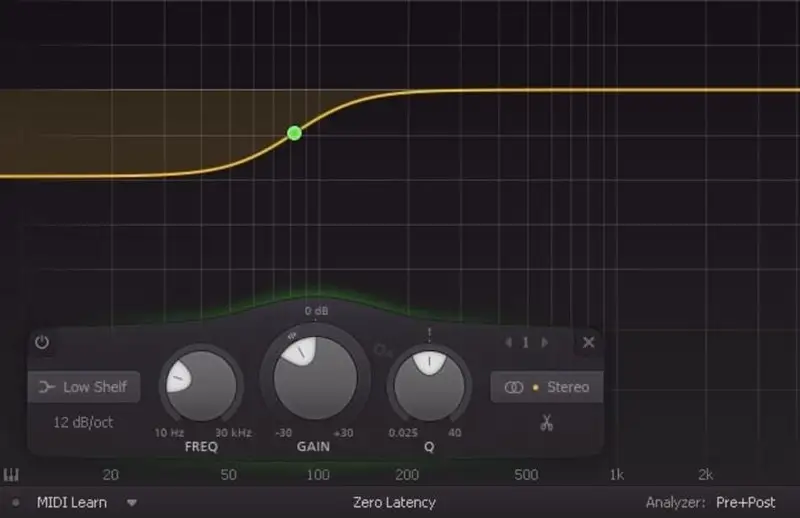
A shelf filter or shelving filter can boost or cut all of the frequencies above or below a chosen point. A shelf filter is a great choice if you want to manipulate your tone in the broadest way possible! For example, engineers often use high-shelf boosts to give vocals shimmer and air.
Notch
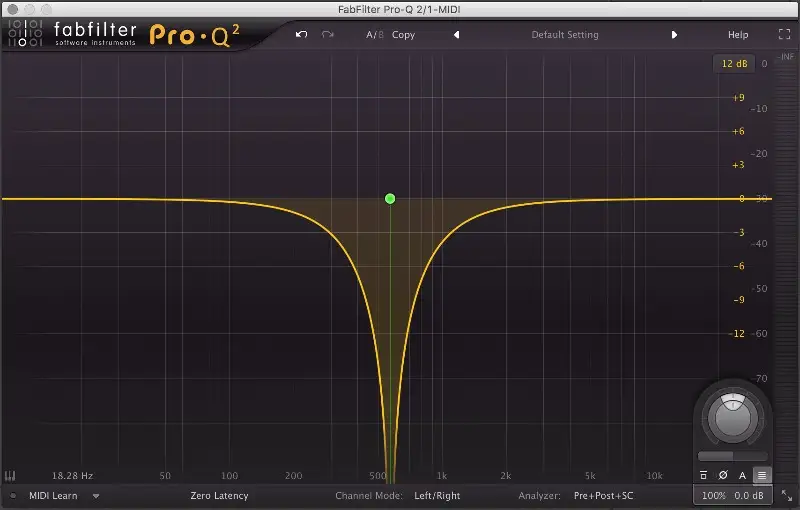
Notch filters, otherwise known as EQ band-stop filters, surgically remove frequencies in a very narrow frequency range.
Engineers will often use notch filters to get rid of unwanted room resonances that come from recording in untreated environments.
Slope
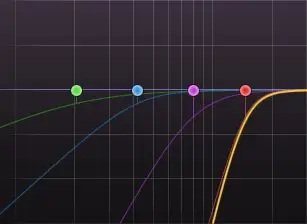
Some filter types, such as high-pass filters, low-pass filters, and shelves, use slope controls to tell the EQ how aggressively to impact a sound above or below its corner frequency. We measure slope using 'dB per octave.' A high dB number will create a steeper slope.
For example, 6 dB or 12 dB slopes are great for mellow, transparent roll-offs. However, if you need to completely remove everything above or below a certain point, a steeper slope, such as a 24 dB per octave or 96 dB per octave slope is best.
Q Value
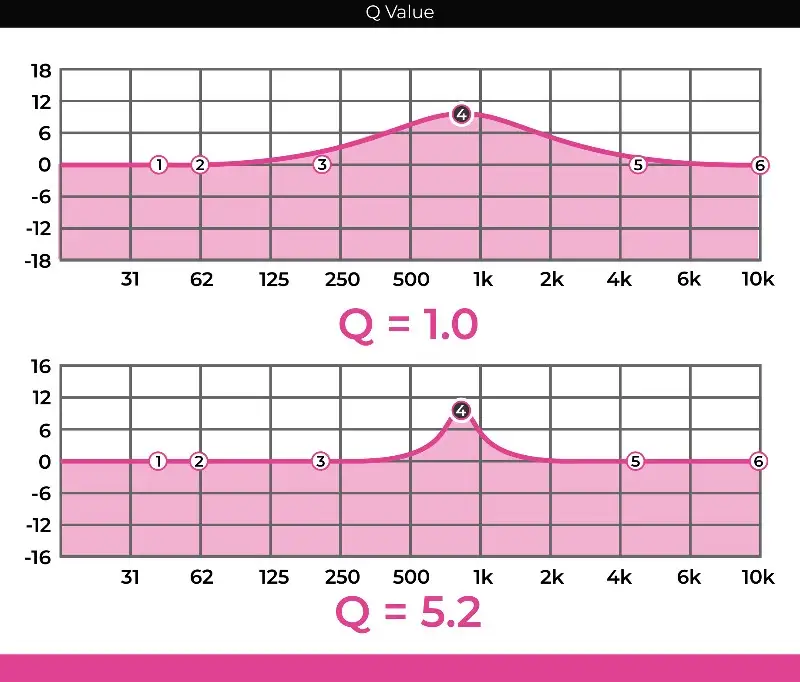
The 'Q' value, which stands for 'quality factor,' is an EQ band's bandwidth.
A Q value greater than 1 will give you a much tighter bandwidth, allowing you to be selective with your boosts and cuts. On the other hand, a Q value less than 1 will give you a much broader and more musical bandwidth.
PRO TIP: It's better to use a narrow bandwidth for cutting and a broader bandwidth for boosting.
Frequency
The main focus of your EQ band is controlled using frequency control. By choosing a frequency, such as 1kHz, you can determine where you want to make boosts and cuts.
Filters are not perfect, however.
Even if you chose 1kHz for your frequency and used a narrow Q value, an EQ will always impact surrounding frequencies to some extent. This is very important to keep in mind when EQing different signals or your track as a whole.
Gain
With the gain control, you can determine how much volume your cut or boost using your band or filter. We measure gain with ' dB.'
A positive dB value will indicate a boost , while a negative dB value will indicate a cut .
Additive and Subtractive EQ
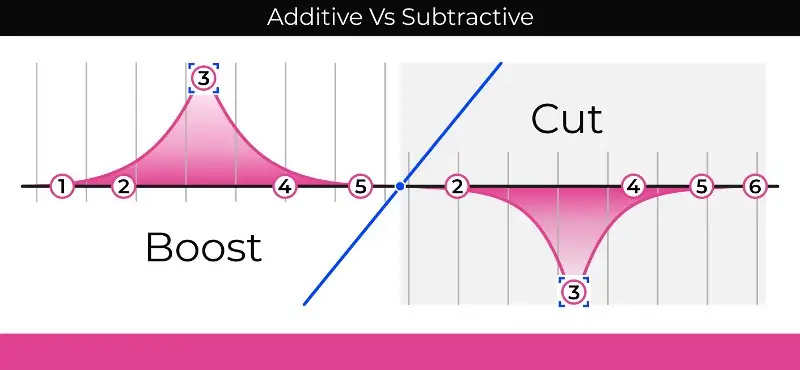
There has long been a debate in the mixing community surrounding which of these approaches to EQ is better. Here's a small breakdown of what you can expect from either of these EQ approaches:
- Additive EQ is the process of boosting an audio source's frequencies to accentuate certain bands that you want to make more prominent.
- Subtractive EQ is the process of attenuating an audio source's frequencies to clean up or get rid of unnecessary frequency ranges.
Additive EQ
Additive EQ is wonderful for creative applications , as it can help us make an audio signal more interesting to the listener. You can use additive EQ to accentuate the frequency components of a signal to give it fat, distinct, or present sounds. Most sounds have a sweet spot , such as 100 Hz on bass guitar or 3kHz on a snare.
If you want to enhance a sound that you feel is lacking in some way, then additive EQ is a good approach.
Subtractive EQ
When you remove certain frequencies using subtractive EQ, you bring more headroom into your mix. Essentially, you increase the ceiling for how loud your songs can be. By taking out unnecessary frequencies from individual instruments and adding gain to each signal, you can give listeners the impression that your song is louder.
Plus, when mixing, the ultimate goal is to make each element mesh with the next, so they fit together as a single, cohesive unit. For example, trying to make a bass guitar and an acoustic guitar fit well together might mean removing low frequencies in the acoustic guitar to make room for the fundamental frequency range of the bass or removing the upper-mids in the bass to allow the acoustic guitar to cut through.
When And How To Use EQ In Mixing
There are a few reasons you might use EQ in mixing:
- Remove unwanted or unnecessary frequencies from different sounds
- Reduce the effect of frequency masking in a mix so that each instrument can be heard
- Enhance or accentuate the frequencies you like
- Create an "effected" sound
Removing the Bad Stuff
The best way to start with EQ is by removing the nasty stuff.
I often like to use narrow bands to remove unwanted frequencies. There are sometimes when I'm absolutely sure I don't want a specific frequency range in a particular signal in my mix before I even get to mixing. To get rid of this content, I'll use surgical EQ .
In the process of removing room resonances or unnecessary frequencies, you'll allow the better parts of the signal to shine through. Many engineers and I refer to this as "surgical EQ" because it uses very narrow cuts.
If you know that there is something you don't like about a certain sound in your mix, though you're having trouble figuring out what frequency is troubling you, you can use the boost and sweep technique .
Simply boost a band using a narrow Q value and sweep around the frequency spectrum until you find the frequency that was bothering you. It's good to listen for sudden increases in volume, as this means that there was probably a lot of resonant build-up in the room it was recorded in. You might also find that a signal sounds consistently nasty at a certain frequency that you can afford to notch out.
Once you find the offending frequency, you can cut it out.
DISCLAIMER: There are SO many producers and engineers out there promoting this technique without taking care to explain when to use it. So much of that advice says to use this technique on every track as part of the "prep" process before going into the mixing phase. Unfortunately, if you just start notching out frequencies willy nilly, you'll lose a lot of the good parts of your signal before you ever hear what it could've sounded like in your mix naturally.
Plus, many people will make massive narrow boosts and sweep around the frequency range in hunt of frequencies that sound bad. Let me tell you that all frequencies will sound bad when boosted 20dB+ using a narrow band, meaning you might end up cutting TONS of necessary content out of your sounds. Instead, have an intention before using this technique. Listen carefully to your sound and ask yourself why you're deciding to use this technique before doing so.
Using Filters
While removing unnecessary frequency content in your signal, you should start with filters. Filters are fundamental to frequencies.
For example, many engineers will clean up vocals by high-passing anywhere between 80Hz and 100Hz . In doing so, they get rid of unnecessary mic rumble and low-end noise that eats up headroom without contributing to the vocal.
In the same way, many engineers will low-pass distorted electric guitars to get rid of harsh, fizzy top-end that can give listeners fatigue.
PRO TIP: Some engineers and producers will tell you to high-pass EVERYTHING in your mix. It's a great tip if you want to end up with a thin, lifeless mix. I say only use high-pass filters if you notice unnecessary low-end frequencies eating up headroom in your mix or getting in the way of instruments that need low frequencies.
Reduce Frequency Masking
While it's an old-school approach, I've always loved using the range allocation approach to limit frequency masking in my mixes and make more space for specific instruments.
The idea with range allocation is to give every important element in your mix a place to sit. For example, your synth bass might sound great from 80 to 200Hz , so cutting frequencies in other instruments to give it room to breathe is a good idea! You might also love how present and upfront your vocals sound from 1 to 3kHz , so cutting other instruments in that range to give your vocals a frequency pocket to sit in can be a nice approach to create clarity.
Accentuating the Good Stuff
Once you've gotten rid of the unwanted frequencies and made some room, you can start enhancing the pleasing frequencies in your various signals. I usually like to use analog-style EQs for accentuating frequencies, as they tend to add color and warmth that I like in my mixes.
Before you start boosting without reason, ask yourself what you want to enhance .
For example, let's say you have a vocal that sounds clean and present, though you want to give it a bit more air and shimmer to make it sound like an upfront pop vocal. In that case, you could use a shelving boost of around 10kHz and get more high frequencies.
PRO TIP: You can't introduce new frequencies with additive EQ. You can only enhance what is already there. This is why getting a good sound during the recording phase is so important. To add frequency content during the mixing phase, you can use other types of processing like saturation and modulation, which we discuss in our " How To Mix Music " guide.
Using EQ As An Effect
With EQ, you can make things sound different. For example, you can filter out all of the lows and highs in a vocal and leave the mid-range intact to get that telephone filter effect.
You may even consider taking out all the top-end with a low-pass filter to give your signal a "party next door" sound or filter out the low-end of a signal during the verse before bringing it back in during the chorus to give your chorus more impact.
There are SO many ways to have fun with EQ that can add interest to your mixes.
5 Tips For Using EQ Like a Pro
#1 Being Intentional
Being intentional is important with every part of your mix. The last thing you should do is boost and cut frequencies just because someone told you to. Every mix is different. Some mixes might require TONS of EQ work, while others require none at all. There are also no "best equalizer settings" for any instrument.
It's up to YOU to determine what you want to achieve before you reach for EQ.
For example, I might be mixing an acoustic guitar and think, "wow, this guitar sounds super muddy and unclear. It feels like it's clogging up the low-mids and getting in the way of my bass."
Now that I have a goal in mind, I can reach for an EQ to attenuate the low-mids. I might boost a band and sweep around 200 to 400Hz, looking for the mud that I want to get rid of. Once I cut that out, all of a sudden, the acoustic guitar completely opens up and sounds great in the mix!
I understand that being intentional requires a lot of mental energy, though if you trust your instincts and listen for what sounds good, you'll be able to make the best mix decisions.
#2 Prioritize Cuts Over Boosts
Now, I'm not suggesting you should never make boosts with EQ, though it's best to abide by the practice of prioritizing cuts over boosts, as you can often get the same outcome you're looking for without eating up headroom and making your instruments sound unnatural (unless you're using EQ as an effect).
When mixing a song, your main goal is to get all of the elements to fit with one another. By cutting frequencies out of instruments to make room for others, you'll end up with a clearer mix. Once you have the clarity and cohesiveness you're looking for, you can use boosts to add excitement to your mix.
#3 Apply EQ In the Context Of a Mix
When I was first starting out on my mixing engineer journey, I had a hard time grasping the idea of applying EQ in the context of a mix rather than in a solo.
I always had a difficult time hearing what I was doing, so I would often take the easy route and solo the sound source I was working on to EQ it that way. As a result, I often made EQ decisions that sounded awesome when the sound source was by itself, though it didn't quite fit right in the mix. I would then spend hours backtracking, trying to figure out where I went wrong.
DON'T MAKE THOSE SAME MISTAKES.
Apply EQ changes in the context of your mix to get things to sound good together. You might find that you need to take a lot of low-mids out of those electric guitars to get them to fit with everything else. While they might sound thin and weak in solo, they'll act as the perfect top-end addition to your girthy bass in your mix.
No one will ever sit and listen to your guitars in solo, so why in the world would you spend so much time EQing them in solo?
If you're having a hard time hearing those small boosts or cuts you're making in the context of your mix, turn the instrument in question up a few dB so you can decipher the changes. Once you have your equalizer settings right, turn it back down.
#4 EQ Your Sounds In Mono
One of the best ways to get clarity in your mix using EQ is by mixing in mono. EQing and range allocating in mono forces you to create the necessary space for each instrument without the distraction of stereo panning .
Trust me when I say that it makes a HUGE difference.
#5 Use Automation
EQ is NOT a set-it-and-forget-it tool.
Sometimes, particular EQ settings will be great for a specific section of the song, though they sound bad in other sections. This is where automation comes in handy.
For example, I was recently working on a rock mix where the bass sounded awesome during the verses. However, when the wall of guitars came in during the chorus, the bass got a bit lost. To remedy this, I automated my EQ to give my bass an 800Hz boost during the chorus.
Essentially, I was able to get a hard-hitting bass sound during the chorus without messing up the bass mix in the verses that I had worked so hard to craft.
Final Thoughts
EQ is such an important and powerful tool that you'll likely use in every mix. All audio engineers use it to make their music POP. Because it's so important, having a solid foundation on which to use it is crucial .
We hope that this guide was helpful in taking your music production to the next level!


