


In the world of music production, there are many skills you can employ to take your craft to the next level.
One such skill that has gained popularity in recent years is finger drumming .
Notable artists like American hip-hop producer, AraabMuzik, who is known for his impressive finger drumming skills and live performances, and lesser-known artists like Mark Guiliana, a jazz drummer who became known for his unique approach to finger drumming, blending electronic and acoustic elements in his music, have solidified finger drumming technique as a legitimate musical art form.
As a result, more producers want to know how they can go about incorporating finger drumming into their performances.
In this guide, we'll explore the basics of finger drumming, techniques for improving your skills, and tips for incorporating finger drumming into your music production!
Let's roll!
What Is Finger Drumming?
Finger drumming is an unusual drumming technique that involves triggering samples on a groove box with only your hands.
The technique gained popularity with the rise of equipment such as the Akai MPC.
In the 2000s, major hip-hop producers like J Dilla began using finger drumming on the MPC to record realistic drum sounds, while others, like Araab Muzik, built their entire style and sound around the practice of finger drumming.
In modern music, you'll hear many DJs and producers incorporate finger drumming into their sets using pre-programmed samples as a way to add an element of live performance.
How to Finger Drum
Learning how to finger drum is no easy feat, as it requires a combination of drumming skills and music production know-how.
From selecting the right equipment to developing proper hand techniques, there are many factors to consider when learning how to finger drum.
However, we have a handful of tips and tricks you can use to get you started with finger drumming!
Get a Groove Box or Sampler
Investing in a groove box or sampler is a crucial first step.
You can also pick up a MIDI controller if you want something more budget-friendly.
These pieces of equipment allow you to trigger sounds and create beats using your fingers. However, there are a few factors to consider when trying to find the right one.
First off, you'll want to choose a device that offers a high level of sensitivity and responsiveness, allowing you to accurately trigger samples and create complex rhythms with your fingers.
Depending on your needs, you might also consider portability, connectivity options, and the number and type of pads available.
Here are a few of my personal favorite MIDI controller options for finger drumming:
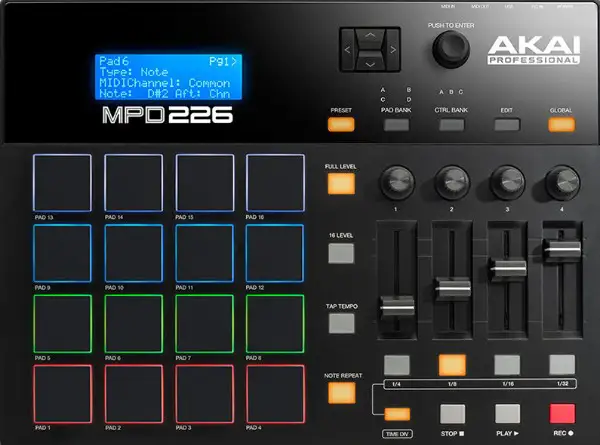
- Akai Professional MPD226 - This legendary MIDI controller features 16 RGB backlit MPC-style pads, four faders, four knobs, and four buttons, giving you a wide range of control options for your finger drumming performances.
- Native Instruments Maschine MK3 - Similar to the Akai model, the MK3 is touted as an "all-in-one groove production studio," and includes 16 touch-sensitive pads, two high-resolution color displays, and super intuitive software.
- Ableton Push 2 - This MIDI controller is specifically designed for integration with Ableton Live, offering 64 RGB backlit pads, a touch strip, and a range of dynamic control options.
Once you have your controller, you'll need to gather your samples into a "drum set."
Crafting Your Kit
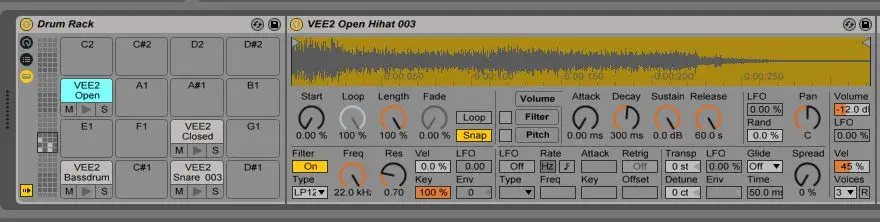
The collection of sounds you choose is what will make up your drum rack or drum kit. This will often include a minimum of 16 sounds mapped to your MIDI controller's sample pads.
When assembling your drum rack, it's important to consider your drum instrumentation and choose the right types of sounds to create the sound of a drum set.
Typically, you will want at least one kick, one snare, one closed and open hi-hat, and a few other sounds, like toms, claves, rimshots, bongos, congas, and auxiliary percussion.
When selecting drum samples, you need to consider the genre of music you're producing, the tone you're trying to achieve, and the specific sound you want each drum hit to have.
For example, if you're producing a hip-hop track, you'll likely want to choose samples that have a punchy, hard-hitting sound.
Customize the Feel
Every drum pad has a different sensitivity level , which affects how hard you need to hit the pad to trigger a sound. It's essential to adjust the sensitivity of each pad to match your style.
To adjust the sensitivity of your pads, you'll need to access the settings menu on your drum sampler. Most samplers have a sensitivity or velocity curve option, allowing you to adjust the threshold at which each pad triggers your sample.
Once you've adjusted the sensitivity of your pads, spend time practicing and experimenting with different playing techniques to find your feel.
Try playing with different levels of force, using different parts of your fingers, and experimenting with different rhythms to see how the pads respond.
The more you play around and experiment with your pads, the better the feel you'll develop on your drum sampler.
Arrange Your Drums Logically
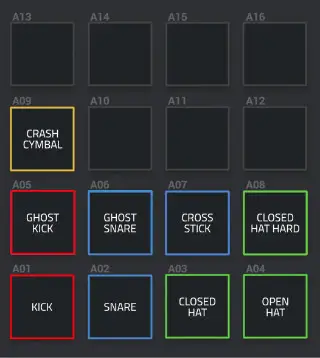
Your drum pad configuration can make or break your performance capabilities. If you're unsure how to approach your pad layout, consider these few things:
- Group Your Sounds Logically: Grouping your sounds logically on your drum pads can make it easier for you to play and improvise. For example, place your hi-hats and cymbals on one side of the drum pads, and your kicks and snares on the other, so you can play drums with alternating hands.
- Use Color Coding : Many drum pads allow you to assign different colors to different sounds, making it easier to identify them during a performance.
- Experiment with Different Layouts: There's no one-size-fits-all solution to drum pad configuration, so don't be afraid to experiment with different layouts! Try arranging your sounds in different ways and see how it affects your playing style and performance.
Once you have everything in place, the fun truly starts.
Practice Makes Perfect
The only way you'll ever improve your finger drumming is if you practice.
Similar to playing an instrument, having a consistent pad drumming practice routine will help build muscle memory, increase dexterity, and improve your overall technique.
Start with simple grooves.
Drum out beats that are easy to play. This will help you develop your timing, coordination, and muscle memory. Don't stress about perfect too much at this point. Focus on getting comfortable with basic drum patterns before moving on to more complex grooves.
Once you feel more comfortable, start incorporating drum rudiments.
Drum rudiments are basic patterns drummers use to develop their speed and technique. The best finger drummers incorporate drum rudiments into their finger drumming practice to improve their precision and control.
You can start with basic rudiments such single and double strokes, and work your way up to more complex drum patterns.
I also highly recommend playing along with music, as it's a super fun and effective way to practice finger drumming.
Pick a track with a simple beat and try to play along with it using your pad controller. Not only will it help you develop your timing, groove, and sense of rhythm, but you'll also get a feel for how other professional music producers approach their drums.
While we're on this note, I also recommend practicing different genres.
Even if you're a music producer who only makes hip-hop, practicing finger drumming with different genres of music can make you a more versatile player and expand your production capabilities. Plus, it'll help you make better beats.
Try experimenting with different styles of music like hip hop, jazz, rock, and electronic music.
With every practice session, you should record yourself if possible.
Nothing can help you identify areas where you need to improve quite like it.
Listen back to your recordings and take notes on what you did well and what you need to work on. This will help you develop a more objective perspective on your playing and track your progress over time.
Generate Fast Hi-Hats with Ratchets
Ratchets are a SUPER useful technique for creating fast hi-hats in finger drumming.
And, unless you're a finger drumming virtuoso like Araab Muzik, you probably won't be able to churn out ultra-fast hats.
A ratchet is a quick burst of sound that can be achieved by rapidly triggering a sample on a pad. In the context of hi-hats, ratchets can be used to create that rapid, stuttering effect that all trap fans know and love.
Some MIDI controllers offer ratchet settings, and some don't , so you'll have to check your sampler's manual to see.
If it does, start by setting the sampler to play your hi-hat sample multiple times within a single beat. You'll want to use specific note subdivisions, such as eighth notes, sixteenth notes, or even sixteenth-note triplets.
To add even more variation to the hi-hat pattern, try adjusting the velocities when triggering the sample if possible. This can create a far more natural and dynamic sound, while adding a sense of groove to your beat.
Beat It: Mastering the Art of Finger Drumming
Finger drumming has become such an expressive and dynamic part of the music making process in recent years, and with the right equipment, practice routine, and creative approach to pad configuration and sample selection, anyone can incorporate it into their music production and performance.
Whether you're creating beats in the studio or performing live on stage, finger drumming offers a unique opportunity to infuse your music with the energy and excitement of live drumming.
So go ahead, grab a groove box or sampler, find the right samples, and start practicing those finger drumming techniques today!


