If you're working as a producer or engineer, you already know that EQ is one of the most important tools in your arsenal. With it, we can shape the frequency balance of our audio, mix multiple tracks together, and get the most out of the sounds we sample or record.
One of the EQ filters you’ll come across often is the High Shelf EQ , which is arguably one of the most important shelving filters.
With a high shelf, you can adjust the frequencies above a certain point. Most engineers and producers will use this shelving filter in the higher range of the spectrum, either boosting or cutting frequencies above a certain cutoff frequency.
Best of all, engineers named it after the thing it looks like!
Think of it like a shelf. Everything above a set frequency (like 2kHz or 10kHz) is either lifted or lowered, while everything below that stays the same. It's a fantastic way to add top-end brilliance to a mix or tame harsh high-end, especially in vocals, cymbals, and guitars.
In this guide, I want to take you through all you could possibly need to know about this shelving EQ, including how it differs from other types of EQ and how you can use it in your mixes in the most practical way.
The Basics of EQ and Other Types of Filters
EQ gives us control over our mixes in so many ways. We can use it to mix multiple tracks, master a song or album, or bring the most life out of our individual recordings. Most beginners, however, tend to overcomplicate EQ. The easiest way to think about it is as a bunch of volume knobs for different frequency ranges within your sound.
Do you need a track to sound brighter? Boost the high frequencies. Maybe it's sounding too boomy? If so, cut the low frequencies.
To do so, we can use different filter types, and each has its own unique benefits and use cases.
Let's look at the most common ones:
Low Shelf EQ
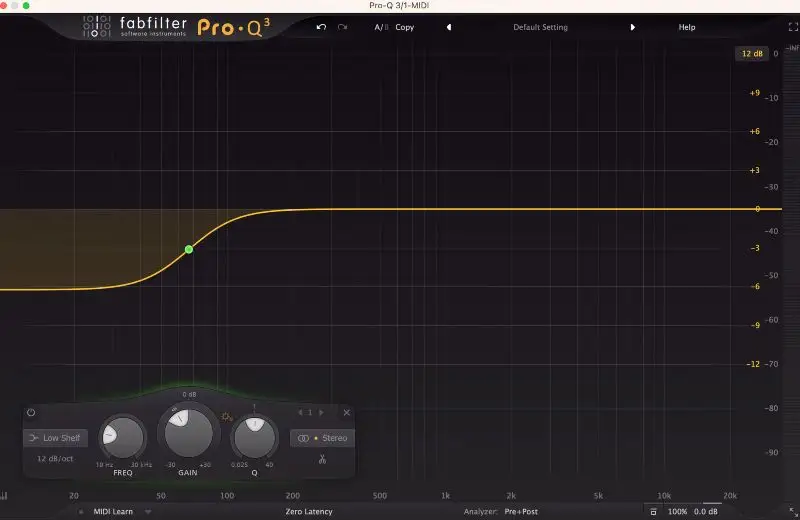
The Low Shelf EQ works on the lower end of the frequency spectrum. If you boost the low shelf, you're adding warmth or fullness to your sound. Most producers will use low shelf filters on low-end instruments, such as bass guitars or kick drums.
If you cut using a low shelf, you remove some of the heavy low-end rumble, which is great for tracks or mixes that feel too muddy. It’s kind of like adjusting the bass on your car stereo. In fact, most car stereos and consumer devices use shelving filters for bass and treble.
Bell EQ
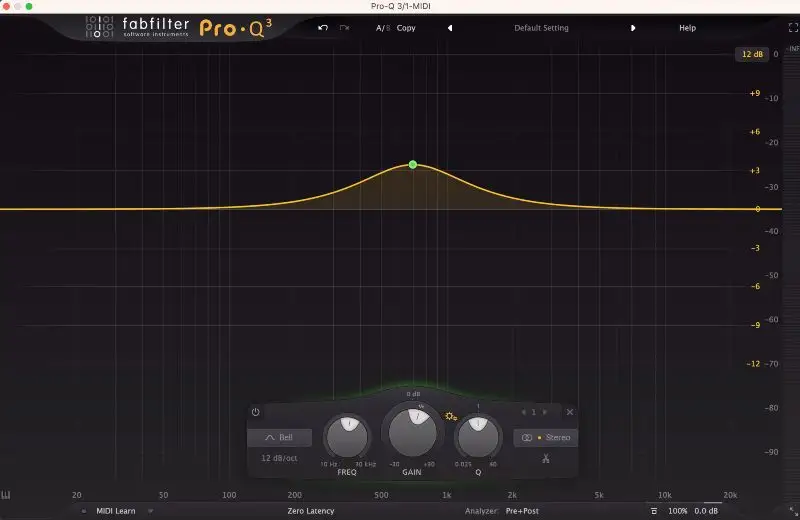
A Bell EQ is more precise and focused. Producers and engineers will use these to shape smaller frequency ranges.
You can boost or cut a specific frequency with a Bell EQ, and it has a natural curve, kind of like the bell shape it’s named after. It’s great for dialing in specific frequencies that you want to stand out (or get rid of) without affecting the rest of the sound.
For example, you might use a Bell EQ to boost the warmth of a vocal around 200Hz or cut the midrange around 500Hz to get rid of boxiness in a kick drum.
High-Pass Filters
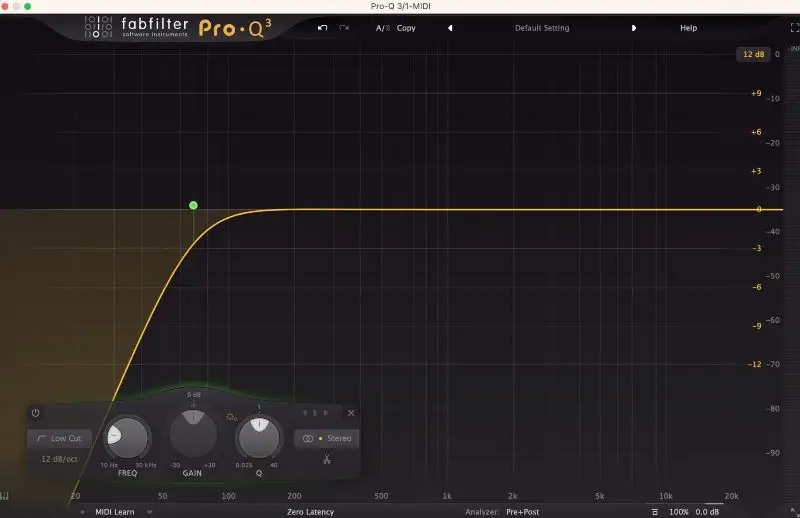
With a high-pass filter, only frequencies above a certain threshold can pass through, cutting out everything below that point. It’s fantastic for getting rid of low-end rumble or unwanted noise in your recording, like mic handling noise or wind. A high-pass filter is more extreme than a low-shelf filter, as it cuts out ALL of the frequencies below a point instead of just reducing them.
In practical terms, you'll often use a high-pass filter on vocals or acoustic instruments that don't need a ton of low-end, so they don't muddy up your mix and get in the way of elements that really need them.
Low-Pass Filters
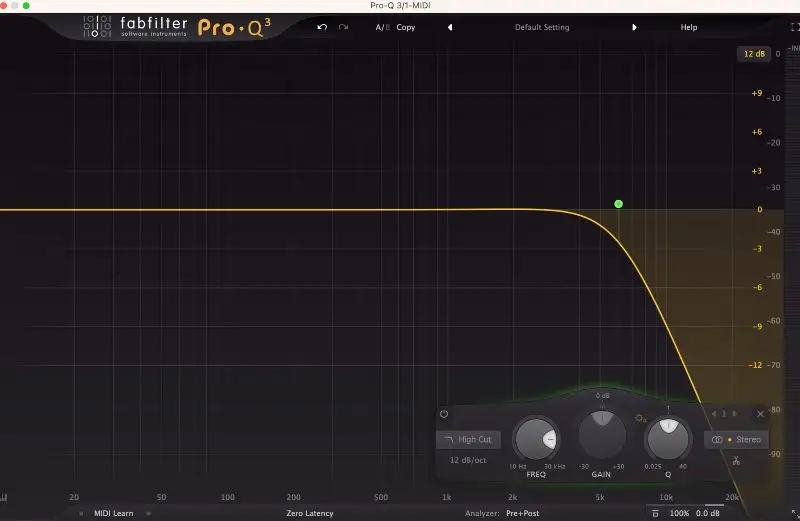
A low-pass filter does the opposite of the high-pass filter, letting only the frequencies below a certain threshold pass through and cutting out the high-end. Similar to cutting with a high-shelf filter, you can use a low-pass filter to remove harshness or cutting out unnecessary high frequencies that can cause distortion or fatigue in a mix.
A low-pass filter is a great choice for low-end elements like kick drums, which don't need tons of high-end, though can also be great to shave off the fizz that often sits on top of distorted electric guitar recordings.
Band-Pass EQ
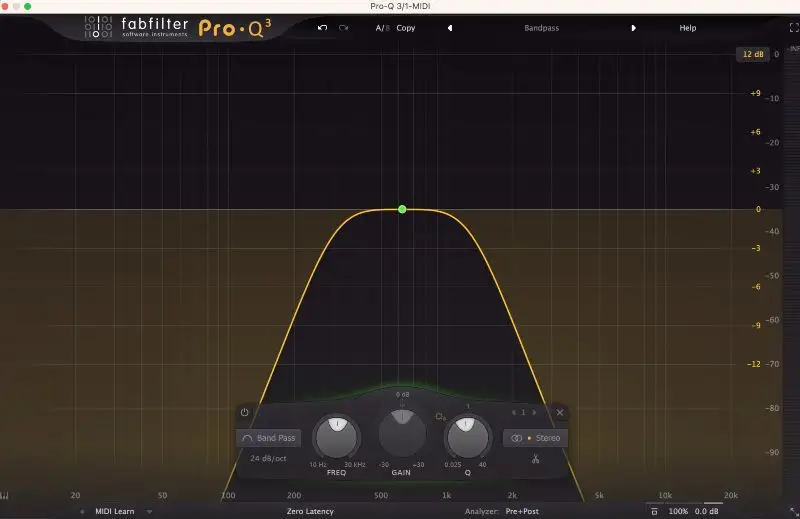
This one's more specialized. It allows you to adjust a narrow band of frequencies, cutting everything above and below the set range. It’s often used for effects or to isolate a particular frequency range, though it’s not as common in everyday mixing. I might use a band-pass EQ if I want to get a telephonic sound from a vocal!
Notch EQ
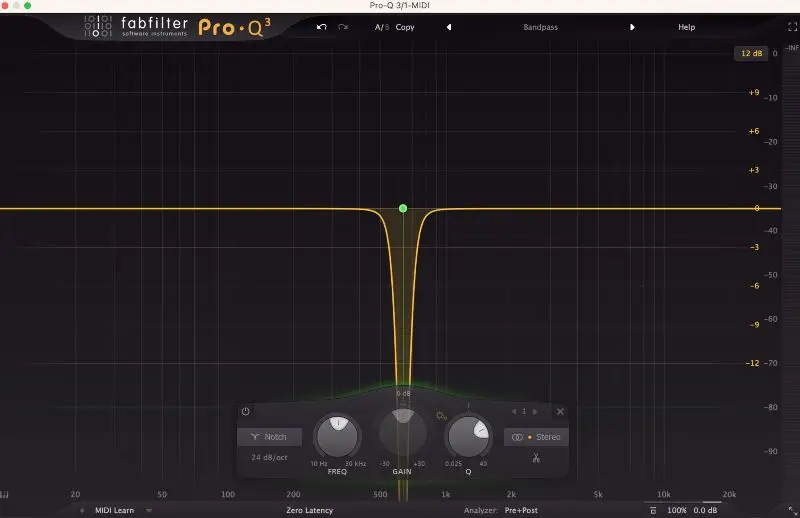
Finally, we come to the notch EQ, which is a super precise tool for cutting out a very narrow band of frequencies. You can use it to remove unwanted sounds without affecting everything else around them, unlike other filter types.
Notch EQs are often used to eliminate specific problem frequencies, like those annoying resonances in vocals or instruments. If you've ever had to deal with a weird ringing sound that doesn’t seem to go away no matter how much you EQ, that's when you'd use a notch EQ.
What is High Shelf EQ?
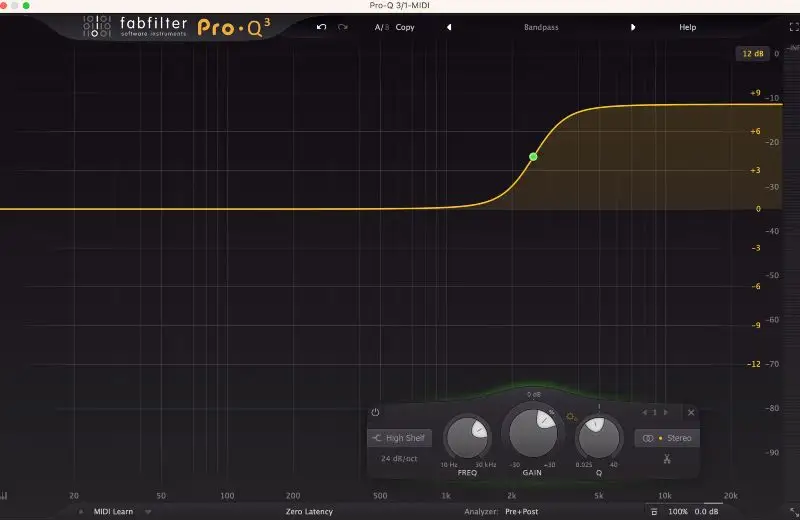
Now, let's get to the meat of this guide - the high shelf.
Well often use this filter type on the highs, between 2kHz and 20kHz . This is the frequency range where you'll find most of your sparkle, air, and brightness. I like a high-shelf filter here if I want to get a bit more luxurious sound from my vocals, cymbals, or acoustic guitars.
However, too much high-end can sound harsh or tinny, so you always need to treat this area with caution and have a good monitoring system to make sure you can hear what you're boosting or cutting.
The Frequency Range for a High Shelf EQ
The beauty of high-shelf filters is that they are very flexible. You can adjust the frequency threshold to whatever fits your track best, such as:
- 2kHz - 5kHz: This range is where you'll find a lot of the "presence" and clarity of your mix. If you boost here with a high-shelf filter, you can make vocals, guitars, and other high mid-range elements stand out more clearly in the mix.
- 5kHz - 10kHz: This is where a lot of the “air” and “sparkle” live. If you want your track to feel more open and bright, you can boost with a high-shelf filter in this range to get a more polished top-end. This range is also where a lot of harshness lives, so again, you have to exercise caution.
- 10kHz - 20kHz: This is the super high-end, which is where you'll hear the sizzle of cymbals, the crisp, whispery top-end of high-pitched vocals, and the sheen on any instrument that has a high-frequency presence. It's an excellent frequency range to give your mix elements a glossy feel, though it's also where harshness lives if there's too much in this range.
The Parts of a High Shelf
To really make the most of your high shelving EQ, you have to understand the different parts that make it work.
In most EQ plugins or hardware, you'll see a few key parameters that you can adjust your shelving filter with, including:
- Frequency
- Gain
- Q factor
- Slope
Frequency
The frequency is the starting point for your high shelf. This is the point in the frequency spectrum where the "shelf" begins. In other words, it’s the threshold at which frequencies will either be boosted or cut.
For example, if you set the frequency to 5kHz, everything above 5kHz will be affected by your adjustments.
If you’re looking to add some sparkle or air to your track, you might set the frequency around 5kHz to 10kHz. If you want a more subtle lift in the higher frequencies, a lower frequency like 3kHz might be better.
Gain
The gain controls how much you boost or cut the selected frequencies above the frequency point. Essentially, this is how much “more” or “less” of that frequency range you want in your track.
A positive gain (boost) will make the highs in the track more prominent, while negative gain (cut) will reduce harshness or unnecessary high-end and make the sound smoother. I always like to start with extreme adjustments so I can hear exactly what I'm doing, then dial it back a bit until I feel like I'm in the right place with the rest of my mix.
Q Factor
The Q factor is the width of the shelf you're creating. It controls how wide or narrow the frequency range is around your selected frequency. With a high Q value, the shelf will affect a narrower band of frequencies around the frequency point, while a low Q value will make the shelf affect a wider range of frequencies.
For a more focused and subtle effect, use a higher Q factor to target a smaller range of frequencies around your set frequency. For a broader effect, use a lower Q factor to spread the adjustment over a wider range. For example, if you want to add presence to vocals around 3kHz, you might use a narrow Q factor, but if you’re brightening up the entire mix, a wider Q factor is better.
How to Use a High Shelf in Music Production
Now, the question becomes, when do we actually use a high-shelving EQ?
Boosting the Highs: When and Why?
Sometimes, all a track needs is a little extra “shine” on the high end.
When we boost the highs using a high shelf, we can bring out certain elements of our mixes and make them more present and detailed.
For example, we might boost higher frequencies to clarify certain elements that might otherwise get buried in a mix, such as a vocal.
I often like a slight 10kHz boost in the high end on a pop vocal, as it helps it sound more luxurious. I'll usually do this in conjunction with a de-esser, as bringing up the high-end like this can also bring up unwanted sibilance.
The same goes for cymbals and hi-hats, which live in the higher frequency range. With a slight high-shelf boost up around 5kHz, you can get your cymbals to sound more "alive" and vibrant. This can be especially helpful for naturally darker cymbals used on a modern pop or rock record.
If your overall mix is feeling dull or flat, you can add a high-shelf boost with an analog-style EQ, such as Pultec-style EQ, to help it come to life. Having a bright, well-balanced high-end is one of the key elements of a polished and professional mix.
Oftentimes, when you're working with an entire mix, you don't want to add a huge amount of brightness but rather the right amount of air to lift the track without overdoing it. A few dB at most should do the job!
Cutting the Highs: When and Why?
While boosting the high end is useful for bringing things forward in the mix, sometimes it’s better to cut the highs to achieve a smoother, more controlled sound.
One of the most common reasons to cut the highs is to deal with harshness or sibilance, especially in vocals. If you’ve ever recorded or mixed vocals with heavy sibilance, you can cut some of the frequencies above 5kHz to smooth out the harshness.
With a high shelf instead of a low-pass filter, you can target that specific area without affecting the overall clarity of the track.
If you’re mixing a track that’s already bright, adding more high-end could make it fatiguing to listen to. Instead, you could try cutting the highs to make the track more comfortable without losing the clarity.
I sometimes find myself doing this in rock mixes, especially with gritty, fuzzy electric guitars and ultra-compressed overheads. By cutting back a bit on the high end, you can make the track feel more balanced and less tiring to listen to.
Advanced Techniques and Tips
Once you’ve got the basics of your high-shelving filters down, you can start exploring some more advanced techniques that can take your mixes to the next level.
Dynamic High Shelf
A standard high-shelf filter lets you boost or cut frequencies above a certain point, but what if you want that boost or cut to only happen when certain conditions are met? That’s where dynamic EQ comes into play.
Dynamic EQ combines the power of traditional EQ with compression, giving you the best of both worlds.
Like compression, dynamic EQ only applies the EQ effect when the signal exceeds a set threshold. This means you can set up a high shelf boost to only activate when the higher frequencies above the cutoff frequency get too quiet and leave them alone when they’re already loud enough.
I'd recommend using a dynamic high-shelf when you're mixing a track with fluctuating high frequencies.
For instance, a vocal track might be mostly clear but occasionally become too sharp when the singer hits certain notes. With a dynamic EQ, you can boost the high frequencies during the quieter parts of the vocal and gently reduce them when they start to become too bright or harsh. This helps keep your track feeling consistent while avoiding that “on/off” effect that static EQ can sometimes create.
Similarly, you can use dynamic EQ on a snare drum or cymbals that might have sharp moments but otherwise don’t need constant adjustment. This way, you can avoid over-processing the sound while still having the flexibility to react to those problem spots.
FabFilter Pro-Q 3 is one of my absolute favorite plugins for dynamic EQ, and I'd highly recommend checking it out!
Using a High-Shelf in Parallel
Parallel processing is one of the most powerful advanced mixing techniques. It works by blending an unprocessed signal with a heavily processed one. The idea is to keep the natural tone of the original sound while adding the benefits of processing.
In this case, you'd get all of the brightness of a high shelving filter on your audio signal, which you could then process independently of your raw track.
For example, you can create a parallel track with a boosted high shelf to brighten up vocals or cymbals, compress it heavily to keep it locked in place, then blend it back with the original track. This gives you the effect of more presence and air without sacrificing the natural tone of the sound. It’s also a great way to achieve clarity without over-processing.
For instance, if you’re mixing a vocal that’s sitting too far back in the mix, applying a parallel high shelf boost can bring it forward without changing the entire vocal tone.
To set this up, simply duplicate your track and apply a high-shelf to the duplicate. Boost the highs by a fair amount (sometimes as high as 10dB, depending on how much brightness you want), and then blend the duplicate track with the original using a mix or volume fader. Adjust the blend until you get the perfect balance between the original tone and the added brightness.
Using a Mid-Side High-Shelf for Widening
Using a mid-side (M/S) high-shelf is one of the best ways to make mixes or certain elements in your mixes sound wider. The M/S EQ technique splits the stereo signal into two components: Mid (the center) and Side (the stereo width).
By applying EQ to these components separately, you can manipulate how the sound is distributed in the stereo field.
The id is the center of the stereo image, which represents everything that is common to both the left and right channels. It's usually mono information (e.g., vocals, bass, kick drum, snare). The Side, on the other hand, is the difference between the left and right channels, which represents everything that is panned to the left or right. It's responsible for stereo width and spatial movement (e.g., reverb, stereo instruments, wide pads, guitars).
In the context of widening a mix, you're primarily going to focus on boosting high frequencies in the Side channel to add width and air to the elements that are panned to the sides. Conversely, you might leave the Mid relatively unaltered or apply a cut to remove unnecessary high-end content in the center.
Conclusion
All in all, high shelving filters or EQs are powerful tools, whether you're mixing or mastering. The next time you need to make a track sound brighter or darker, maybe reach for a high shelving filter rather than a bell filter or low-pass filter, and see how it impacts the sound.


