

If you're recording music, the chances are high that somewhere along the way an audio interface will be involved.
And while these clever little boxes are relatively simple to use (at least compared to a giant analog console), it's only easy when you know how.
So if you're new to the home recording scene and haven't got the foggiest idea where to start, let us ease your tech woes with this in-depth guide on how to use an audio interface.
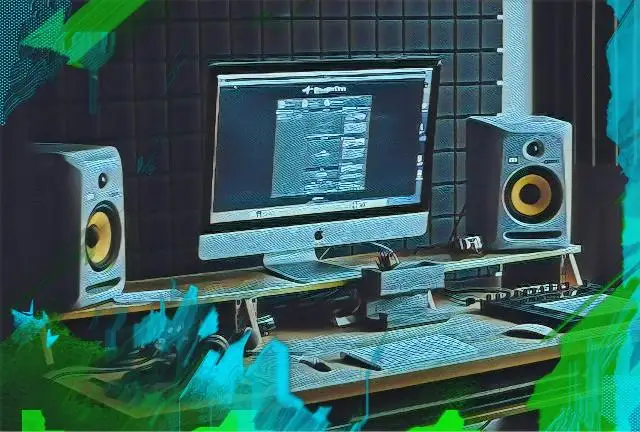
We're going to dive straight in with steps to get you up and running, and follow that up with a chaser of Q&A's to satisfy even the most curious of minds. I'm using Logic Pro and a Universal Audio Volt 4 audio interface for a lot of the examples, but the basics will work for any interface.
Ready? Let's go!
Setting Up Your Audio Interface
Step 1: Install Drivers
Not all audio interfaces are made equal. Some are class compliant - meaning they rely on generic drivers that are already built-in to the host computer (or tablet) to function properly.
Others, like the Komplete Audio series from Native Instruments, require a specific driver to work, and it's important to install these drivers before connecting your audio interface to your PC or Mac.
Check the installation instructions that come with your audio interface to see if you need to install drivers or not. Many audio interfaces will do it automatically for you. When in doubt, a quick Google search will be your ally.
Step 2: Connect your interface
Most interfaces nowadays use either a USB or Thunderbolt cable to connect to the host computer (Firewire is fast becoming lost to the mists of time). Use the cable that came with the interface. The manufacturers know what they're doing when it comes to large amounts of data transfer, so trust them to supply a cable sturdy enough to do the job.
The important thing to note here is to connect the interface to a port directly into your computer, not via a hub. Some peripheral devices will work fine when plugged into a multi-port hub, but make sure to save a port on your computer for your audio interface.
Some audio interfaces, especially larger ones, will require their own power supply to work. Most audio interfaces, though, are USB powered, meaning they draw the power they need to function from the host device via the USB cable.
Step 3: Check for firmware updates
Often a manufacturer will tweak an interface to fix bugs and improve performance and send these improvements out via a firmware update.
Check the manufacturer's website to see if there are any downloadable firmware updates to apply. Often the interface will do this for you when it's first plugged in.
This isn't a strictly necessary step, but it can mean avoiding annoying buggy glitches further down the line.
Step 4: Connect headphones and/or studio monitors
The whole point of an interface is not just to send an audio signal into your computer, but also to be able to hear what's coming out.
Most audio interfaces come with outputs for studio monitor speakers and at least one headphone output. Some have additional outputs for connecting to outboard gear.
If you're using monitor speakers now's the time to connect them to the audio output. Make sure they're powered off before you do!
If you're only going to be using studio headphones to monitor your work then plug them in now.
Depending on the swankiness of your interface it may have multiple outputs. You'll be able to adjust the routing from inside your digital audio workstation (DAW) once you get to that stage.
Step 5: Select your audio device
Next, your computer needs to be told where the audio signals are coming from, and where they're going.
There's a couple of ways to do this; either from within your DAW; or, if you plan to use your audio interface for universal listening across your system (for when you're watching dog videos on YouTube), from your operating system.
Operating System
Windows
I'm a Mac user, but if my dusty memory serves me well the sound settings in Windows are under Start > Control Panel > Hardware & Sound > Sound.
From there, select your audio interface in both the playback and recording tabs.
Mac
On a Mac OS head to System Preferences > Sound, and select your interface in the Output and Input tabs.
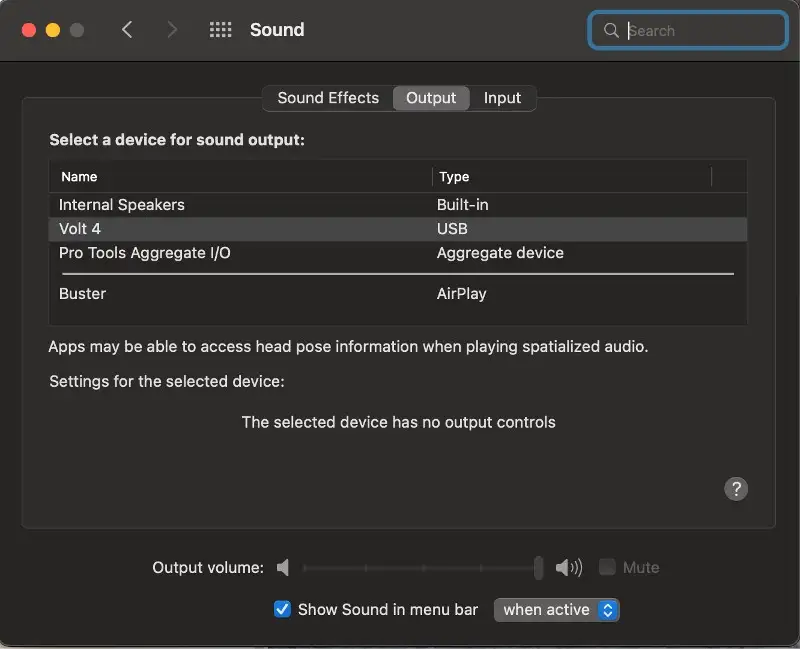
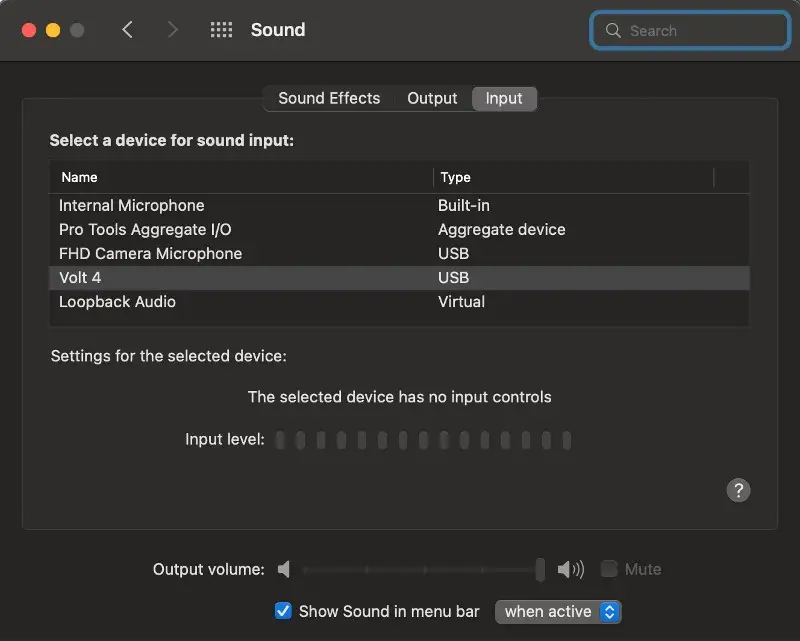
You'll notice on the input tab there's a few options to choose from. This makes it easy to switch between recording sound from the microphone inputs on your audio interface, to using the mic on your webcam for those inevitable Zoom calls.
DAW
Note that if you've already gone through the steps above you shouldn't need to do this again from your DAW.
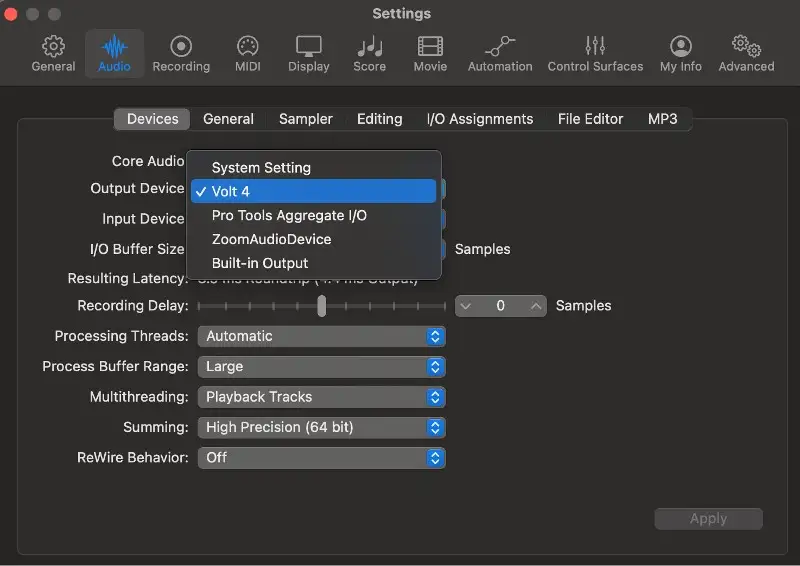
In this example I'm using Logic to route the audio through my Volt 4 audio interface, but the process will be similar for any DAW. If in doubt, RTFM consult the manual.
In Logic, go to Logic Pro > Settings > Audio (or hit Command-Comma to bring up the settings menu, and click on the Audio tab).
From there you can select your audio interface from the drop down menus for both the output and input device options. Setting the output to your interface will automatically change the input to the same. If you want to record from a different source than your output device simply change the input device setting. The output device will stay the same.
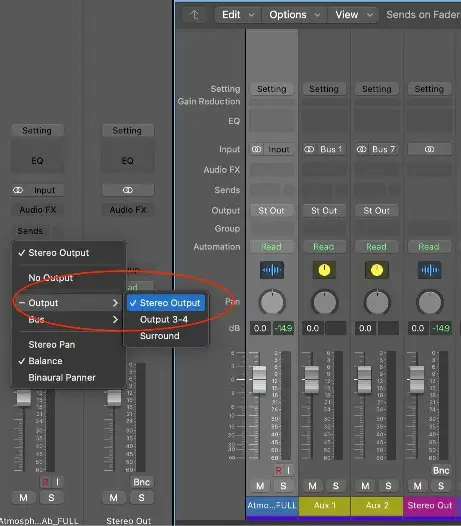
Step 6: Set up your outputs
If your interface has multiple outputs you can pick and choose which tracks get sent to which output from within your DAW.
Unless you're doing fancy routing shenanigans (in which case why are you reading this?), you'll want to make sure your master output is the same as the one your monitor speakers are connected to. In this case it's the main output of Volt 4.
Step 7: Connect your inputs
Almost there! It's time to plug in your gear candy.
Connect microphones to the XLR inputs, and be sure to engage phantom power if you're using condenser microphones.
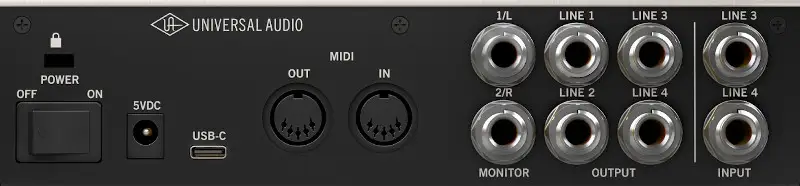
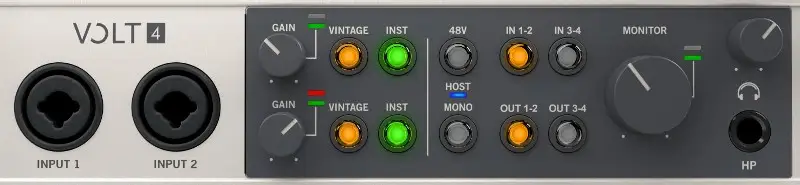
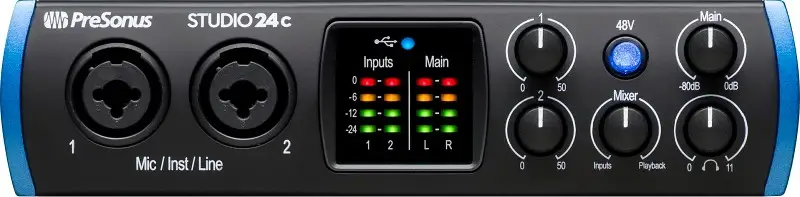
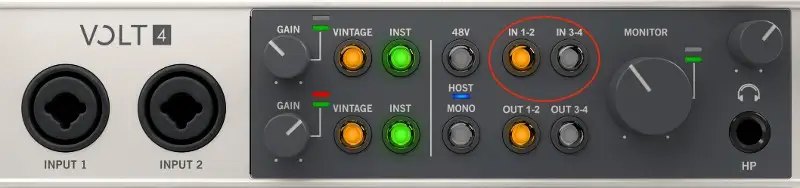
Line level sources like synths, drum machines and mixers can make use of regular 1/4" jack inputs, or XLR-TRS combo inputs. On the Volt 4 the two inputs on the front are mic-line combo inputs, with a further 2 line inputs around the back.
If you work with high impedance instruments like an electric guitar use a Hi-Z input. Some audio interfaces have dedicated inputs for Hi-Z instruments, like the M-Audio Air. Others have a switchable setting, like on the Volt 4's first two inputs.
Step 8: Test the inputs and outputs
Before you go nuts recording everything you've ever written, do some due diligence and make sure everything's going in and coming out as it should be.
Testing the output is easy enough; simply throw an audio file onto a track in your DAW and press play. Start with the output volume on your audio interface at a sensibly low level your mother would approve of to prevent blowing speakers, or worse, ear drums.
Then it's time to test the inputs. Create an audio track and set the input to match where your sound source is plugged in. In this example, I've got a mic plugged in to Input 1 on the Volt 4, so that's what I've selected.
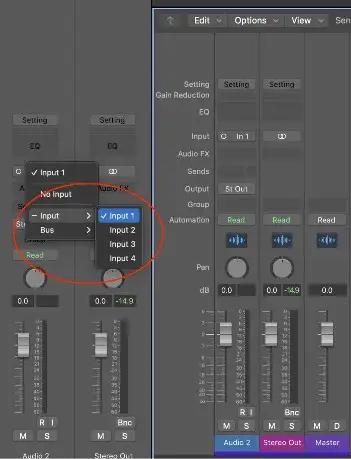
Then record arm your track, and turn the input monitoring on. In Logic Pro, it's the little 'I' button next to the record arm button.
Now start making some noise, and gradually increase the gain on your input signal until it's ready to party (but not party like it's hot. No one records hot any more).
Et voila! You're ready to rock!
Note: If you wanted to be really thorough you could go through and test each input on your audio interface. Multiple inputs are essential when it comes to simultaneous multi-track recording. With the Volt 4 you can record up to 4 different instruments on separate tracks.
Huzzah! I'm Done. Right?
Technically yes, but depending on what other features your audio interface has, there may be some other things to set up. Let's take a quick look at them all...
MIDI inputs and outputs
While a lot of people use USB Midi controllers for inputting notes and other CC data an audio interface with MIDI connections is a must have if you use outboard synths, sound modules, or similar.
Likewise, if you have a lush digital piano or other MIDI keyboard that has a dream action to play but doesn't have a USB connection, you can hook it up to your DAW and send the MIDI input signal through your audio interface.
Once you've told your DAW that your shiny new audio interface is the boss now it will automatically receive any incoming MIDI signal sent through it. So as long as your MIDI device is connected to the MIDI input on your audio interface, you're golden.
Sending MIDI back out through your audio interface involves creating an external MIDI track, and telling your DAW where to send the information.
In Logic Pro, select Track > New Tracks. On the option page that opens up choose 'Use an external MIDI or USB Device' and set the MIDI destination to the MIDI output of your audio interface, selecting the correct channel if you're using a multi-timbral device.
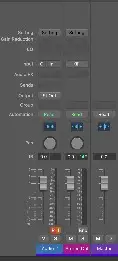
In the example below I've created an external MIDI track to play through MIDI channel 1 on the Volt 4.

Direct monitoring
Latency. The bane of every modern musicians life. To keep it short and sweet, latency is the time it takes for the audio signal to travel from your interface, into your computer, and back to your speaker outputs.
When there's a lag between you plucking a string on your guitar and hearing the sound coming out of the speakers, you've got latency issues.
This problem is solved in two ways, the first of which is by adjusting the buffer settings on your DAW.
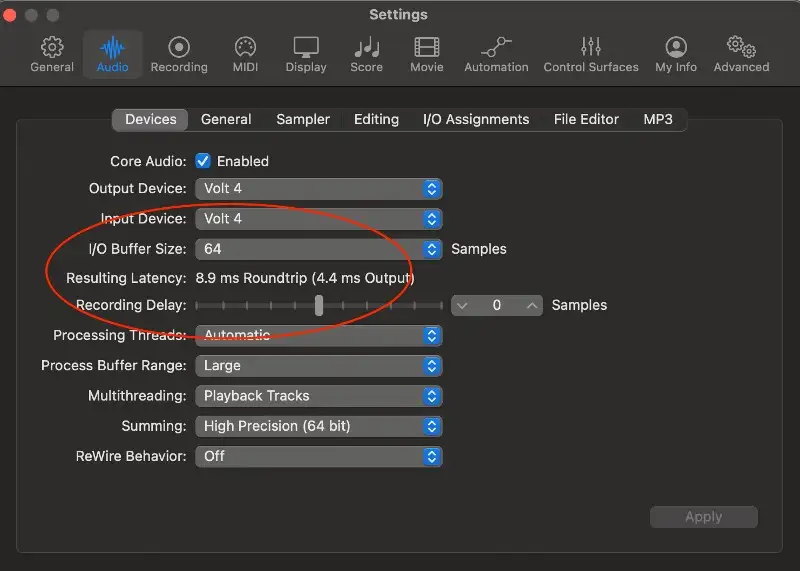
On the screenshot below you'll see my buffer settings in Logic Pro are set pretty low, which results in a workable latency of around 9ms. However, the more virtual instruments and effects you throw on a project, the more your computer processing power is used up. With a buffer setting like this you'll eventually end up experiencing crackles and dropouts. Worse, you could suffer from dreadly pops and clicks on the signal from your audio inputs.
Enter the Direct Monitor. This essentially routes a portion of the incoming signal from your audio interface directly to the output, bypassing the journey to and from your computer.
Many audio interfaces have a dial that blends the signal from your DAW with the direct signal, thus allowing you to control how much of the direct signal you hear.
Other audio interfaces, including the Volt 4 have a button to switch on direct monitoring.
Love it or hate it, using the option to monitor your incoming signal directly helps overcome many of the issues you'd otherwise encounter if you recorded with latency present. Learn how to use it, and save up for a computer with humongous amounts of processing power in the meantime.
Audio Interface Controls
Every audio interface is different. Some have snazzy features that jazz up your sound, like the Focusrite Scarlett 2i2, with its lush 'Air' button. Some are blue; some are built to resemble a military device.
But they all have some basic controls that you should know how to work, and some come with additional features.
Gain
The microphone input on your audio interface will have some sort of mic preamp built in to boost weak signals coming from your mic. The gain knob can be used to attenuate the signal further to get it to a comfortable recording level, depending on the performer.
Monitor/Main/Output
No prizes for guessing what this one does. Be aware that some audio interfaces don't feature a dedicated headphone output volume control, so the main volume knob will also control the headphone jack volume.
48V/Phantom Power
To put it technically, some microphones need a bit of juice to get them to work . Engage this button (or switch) when you use condenser mics and everything will run tickety-boo. It's wise to switch it off when plugging or unplugging cables, to avoid any speaker damage.
Some larger audio interfaces have independent phantom power for each channel, or groups of channels.
Level Meters
From colorful LED ladder displays to a simple light that flickers on or off as the input levels and output signals vary, every audio interface will show some kind of indication of input and output.
Control Apps
Some audio interfaces come with an app that allows the user to control the settings on the audio interface remotely, often allowing access to more features and routing options.
If your audio interface doesn't come with a control app, don't stress. And look on the bright side; it's one less bit of software you have to download and update every fourth Tuesday.
OK, now you're ready!
If you've followed all the steps in this guide you should be up and running with sound going into, and sound coming out of your audio interface. Always read the manual if you get in a pickle, and then do a quick search for answers if you're still stuck.
If you've got more questions about audio interfaces, take a gander at the list below!
Frequently Asked Questions
What does an audio interface actually do?
An audio interface is (more or less) an analog to digital converter. It takes the analog signal from your synth, or guitar, or microphone, and turns it into zeros and ones - a digital signal - that your DAW will happily capture for later manipulation.
It also performs digital to analog conversion, taking the digital signals from your DAW (or YouTube), and converting it back to analog waveforms for your ears to enjoy.
How many inputs and outputs do I need?
Only you can answer that question, based on what kind of music production you do.
If you work primarily in electronic music you'll probably only ever need one or two XLR inputs to record vocalists, or one instrument input to capture an outboard synth.
On the other hand, if you need to record multiple microphone signals at once, from a drum kit for instance, you'll need more inputs (and XLR cables) to handle that.
What kind of audio interface should I choose?
Again, this depends on the type of music you make, and to some extent where you are on your music production journey.
I'm confused about sample rate and bit rate
If you've been shopping around for an audio interface you'll have undoubtedly come across terms like 24bit/192kHz, or some variation on those numbers.
The sample rate (in kHz) is the number of times per second that the audio signal is sampled. While some audio interfaces boast a sample rate of up to 192kHz, anything 48kHz or above is a good starting point.
The bit rate refers to the number of bits (zeros and ones) used to represent each sample. The higher the number, the greater the depth, and therefore the more accurately the analogue signal is represented.
Higher sample rates result in more information being captured, although whether people can actually hear the difference in the final commercially available product is up for discussion. What is a fact is that audio files get exponentially larger as you increase the sample rate, as does the workload on your computer.
Even though by the time your music reaches a listener's ears it will be crushed down to something akin to 16 bit/44kHz it's smart to record at a bit depth and sample rate of 24/48 to make sure your music is faithfully represented.
What’s the difference between an audio interface and a soundcard?
About $100.
Just kidding. A major difference is that an audio interface requires a physical port on the exterior of the computer to connect, whereas a soundcard is hard-wired to the guts. Audio interfaces are like external soundcards on steroids.
While the internal soundcards that ship with computers are fine for everyday use, the sound quality isn't great and therefore not suitable for recording with. Soundcards also don't (generally) supply phantom power, or provide Hi-Z options.
Can’t I just use a USB mic instead?
You Shure can! (Sorry) . Some USB mics actually have really good audio quality, but what you're missing out on is the sound quality of the output signal from an audio interface.
If you just need a mic to make you sound sexy on your Zoom calls, or for recording the podcast your mum listens to then a USB mic will be fine. Otherwise, crack open your wallet a bit further and get an audio interface and a decent mic.
What's the best audio interface?
With so many audio interfaces to choose from it's easy to get caught up in all the specs trying to work out which one is the actual bestest.
Here's the thing; there is no single right answer. The best audio interface will be the one that suits your needs and your budget at that time.


