

Gain staging is one of those concepts that's tossed around regularly in the audio engineering community, that not enough musicians take the time to understand. Fortunately, we've put together a comprehensive guide on the matter, so that you can confidently understand gain structure while making music.
We'll decode some of the more confusing terms around proper gain staging like headroom, noise floor, and dynamic range below. In this guide, we'll also provide a glimpse on how to conduct proper gain staging so that you can make the most out of every mix. Let's take a look!
What is Gain Staging?
Throughout the music production process, there are several separate stages that all come with their own set of considerations. From recording, to producing, to mixing, and finally mastering, each set of files must be prepared accordingly for the next stage in the process since every step builds on top of the prior one.
Gain staging is a set of techniques that ensures that the volume level control of individual tracks as well as the master fader is programmed at the appropriate level. Essentially, gain staging equates to adjusting volume levels in order to create a clear signal chain, minimize noise, and maximize headroom across the course of a mix.
What Are the Benefits of Gain Staging?
Music production is a process. The way in which you route your signals and set up your projects matter, since every layer builds on top of the foundation you laid before. Gain staging ensures that you avoid unnecessary noise, clipping, or distortion on your signal path thus preserving your audio throughout any stage of music production.
Gain staging is particularly useful when working with multiple parties. For instance, knowing how to properly gain stage as a mixing engineer ensures that you leave enough headroom for your mastering engineer. With a couple of technical considerations, you'll preserve the quality of your song, enhance mix clarity, and make the process more efficient by considering gain levels.
Note that gain staging has different definitions based on the auditory context. While we'll primarily be focusing on gain staging for digital audio production, gain stages will understandably vary when prepping for a mix of live audio.
Here is a basic overview on how to get that sweet spot of 6 decibels of headroom in a digital recording environment:
Gain Staging Glossary: Key Terms to Understand
To gain stage properly, you'll want to have a working understanding of the following key terms:
Gain
Gain simply refers to the strength of an audio signal, measured in decibels (dB). Increasing gain increases the signal level, which can also include some level of noise. More gain leads to higher amplitude of sound.
Noise Floor
The noise floor describes the minimum level at which the audio signal can be heard over the background noise of a sound source. A low noise floor leads to a cleaner, stronger sound.
Signal to Noise Ratio
This value (SNR) describes the relationship between a signal relative to the amount of noise from a sound source. A higher signal to noise ratio brings clear, crisp sound.
Clipping or Distortion
Clipping occurs when an amplified signal exceeds the capacity of its current system environment, creating a harsh sound. Distortion and clipping can be avoided with the help of proper gain staging.
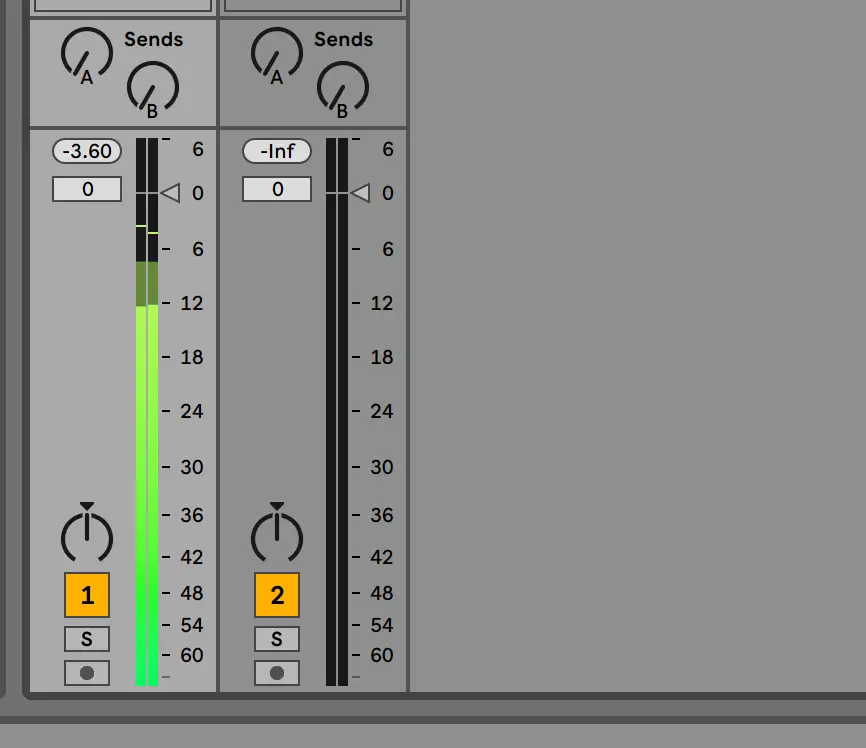
RMS Loudness and Peak Volume
These are values you'll often find on meters used throughout the gain staging process. Peak volume measures the highest amplitude within a signal, while RMS loudness measures the average level over time. In Ableton Live, these values are showcased on each fader, with light green and dark green bars displaying both, respectively:
Dynamic Range
Dynamic range is the distance between the loudest peaks and quietest parts of a signal's overall level.
Headroom
This is the amount of space between the peaks of a signal and the amount a particular system can handle without clipping. Leaving headroom is essential to preserving quality throughout the music production process.
Unity Gain
This is the point at which the output level and input level are equal by way of the gain staging process. For instance, if tracks coming into a DAW at 0 dB come out at a 0 dB output.
Signal Flow
Signal flow refers to the path of an audio signal source to output. For instance, you might sing into a microphone that goes through an audio interface, through a chain of effects, and then out through the master fader of your DAW to your headphones or monitor.
Analog Gear vs Digital Gain Staging Considerations
It's important to note that gain staging within the digital domain is generally a bit more flexible, since linear processing and precise leveling make it easier to control your sound. With analog gear, there is an inherent higher noise floor as well as more variation with how any particular sound behaves. Whereas nearly all clipping is an unwanted noise with digital gear, for instance, analog distortion (within reason) could add attractive character to a mix.
There is no one-size-fits-all approach to gain staging, but it's important to note that your considerations will vary greatly based on your recording tools and playback environment.
How to Execute Proper Gain Staging
Gain staging will vary from one environment to another, since every project will have its own set of appropriate levels depending on the intended output and circumstances. That being said, here are some tips to help you execute gain staging properly:
1. Start With A Clean Audio Signal
Remember that proper gain staging starts with clean recording. Optimize your signal to noise ratio as much as possible, keeping your sound clean and clear while recording into your audio interface. If you need to hear what you're recording at a higher volume, adjust your monitor mix rather than the gain levels of your sound source. Record at an audible, clear level, but make sure to leave headroom for the other components in your mix.
2. Gain Staging Virtual Instruments and Samples
Virtual instruments, samples, and plugins can all come in at radically different levels so you'll want to check your meters carefully. Some plugins have gain knobs and other volume adjustments built into the interface. Don't forget to check the gain of your audio tracks before and after signal processing with effects or other plugins as the gain is likely to be affected.
3. Leave Enough Headroom for Mastering
It's generally recommended that you leave between 4-6 decibels of headroom , or at least 3 decibels of headroom before sending it off to a mastering engineer. Alternatively, you can use a service like eMastered to master your track using an algorithm built by Grammy-winning audio engineers.
4. Use Metering Tools to Your Advantage
Metering tools, even something as simple as the fader levels, are your friend! Keep an eye on both peak and RMS meters to ensure that you're creating enough space for future stages in production.
Gain Staging FAQs
Here are some commonly asked questions and answers surrounding gain staging to help you make the most of both your digital and analog equipment:
What is a good gain staging level?
In the digital world, starting all track levels around a peaking point of -12 dBs is generally a good rule of thumb. The most important thing is to remember that you want to prevent clipping and provide enough headroom for the next stage of processing.
What is the gain stage on a mixer?
On a mixer, you can use a fader to control the incoming signal level. You might also use other tools like a gain utility or output levels on processing plugins to shift the gain settings on individual or grouped tracks.
What is gain staging live sound?
Much like gain staging with digital systems, gain staging in the world of live sounds is essentially setting levels for instruments, microphones, and monitors with the goal of preventing clipping, distortion, and feedback that can come from a live environment. Meters are particularly important in a live setting since the dynamics of a live environment can change so rapidly.
What is the gain staging technique?
Gain staging shifts from one application to the next. Generally speaking, you'll want to use tools like a channel fader and meter to monitor gain levels. The level of headroom you aim for will depend on your specific application. For instance, it's recommended to have at least three decibels full scale of headroom before proceeding to the mastering process.
Should I gain stage everything?
Yes! Preparing your mix bus or audio system for the next chain in your process is always a good practice. Gain staging helps you prevent clipping or unwanted distortion and keep your sound quality top-notch when moving from one stage to the next.
What is the difference between volume and gain staging?
Volume simply refers to a loudness value. Gain staging is a process in which you adjust gain or the volume of a signal level in order to properly prepare your audio tracks for the next stage of processing.
Taking the time to understand gain staging and its importance will help you prevent physical and digital distortion, and preserve your files throughout the production process. Hopefully, this guide gave you a stronger foundation for both digital and analog recording so that you can seamlessly move from the first recording to the final master. Enjoy putting your new gain staging knowledge to good use!


