One of the most important aspects of any home studio is acoustic treatment .
Without proper home studio acoustic treatment, it doesn't matter how much money you spend on monitors or gear. Poor acoustics mean misinformed mixing decisions, meaning you won't get mixes that will translate well to other systems.
Of course, many of us are mixing in untreated home studios, most of which were built in rooms that aren't made for mixing. This forces a lot of producers and engineers to work exclusively in headphones, which can be equally detrimental.
Luckily for you, we've made this easy-to-follow guide to help you achieve a more optimal listening environment, no matter what kind of room you're working in or what kind of budget you have.
Understanding Acoustic Treatment
Before we dive in, it's crucial that you have a foundational understanding of acoustics.
Contrary to what you might believe, you don't need to be a rocket scientist to understand sound!
How Does Sound Move Around The Room?
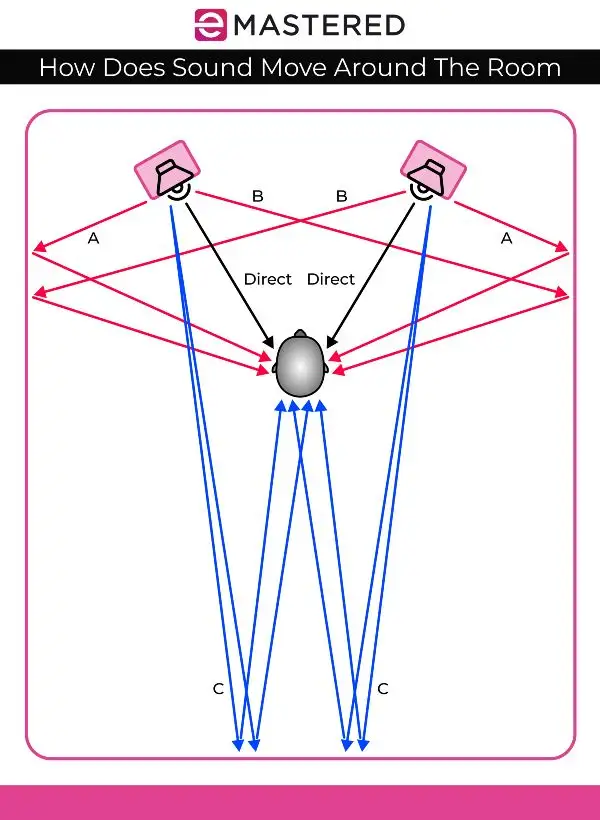
When you make a sound in a room, no matter how loud or soft, there are a few things that happen:
- From the sound source, the waves will project outward and travel in every direction
- The direct sound (a smaller portion of the sound) will travel in a straight line from the sound source to the preferred source (e.g., a vocalist singing directly into a microphone).
- The reflected sound (the other portion of the sound source) will bounce around the room at random.
- A few milliseconds later (depending on the size of the room), that sound will bounce off of the various sources and back to the initial point of the direct sound (e.g., the sound of the vocal will come to bounce off the back wall and back into the microphone).
So, what does this all mean?
Well, the direct sound is something you don't have to worry about, as this portion of the sound does not interact with the rest of the room. The frequency balance from the source is the same frequency balance you get in your recording (or in your ears if you're talking about the sound coming from the monitors).
However, reflected sound has the potential to be altered in various ways depending on the size of the room and the types of reflective surfaces in it. For example, the sound of a church is much different than the sound of your bedroom, and a room that is 20 feet deep will sound much larger than one that is eight feet deep.
How To Know If My Home Studio Needs Acoustic Treatment
The answer to this question is quite simple. Check for one of these few things if you're trying to determine whether or not you truly need acoustic treatment:
- Is it a room? If so, you probably need acoustic treatment. We know that a response like that might not sound sincere, though the point is that just about any room that a person is using as a studio can benefit from acoustic treatment!
- The room doesn't sound good.
- Your mixes don't translate well (a.k.a the sound is great in your home studio but sounds off anywhere else).
If we were going to get a bit more detailed with the answer, one thing to look for would be if the sound changes drastically depending on your position in the room.
For instance, you may hear an obvious build-up of low frequencies when you're standing in the back corner.
You may also try and clap your hands.
Did you hear a quick, ripple-like echo?
That's called flutter echo , and it is a surefire sign you need acoustic treatment!
Overall, unless your home is a structural anomaly, you most likely need some form of acoustic treatment to get a near-flat frequency response with limited reflections.
Using Artificial Room Reverb In Your Mix
Mixing is more sophisticated now than it has ever been.
There's no need to record in a million-dollar studio with access to an echo chamber to simulate the sound of external room reverb.
Nowadays, we have digital reverb plugins that can simulate the sound of just about any room you can imagine!
The beauty of these reverb plugins is that you can record in dead spaces and add the sound of your reverb later down the line.
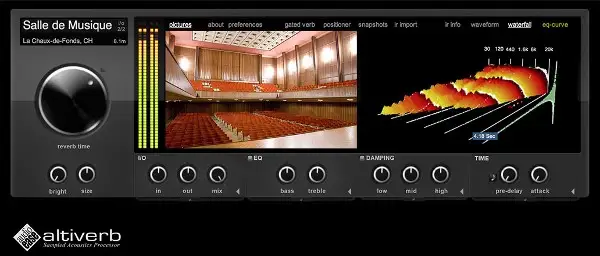
Of course, adding fake room reverb doesn't really make sense if you have the sound of your lousy, untreated room reverb lingering in the background.
To truly make use of artificial room verb, you need to remove your room reflections first.
How To Remove Reverb In A Room
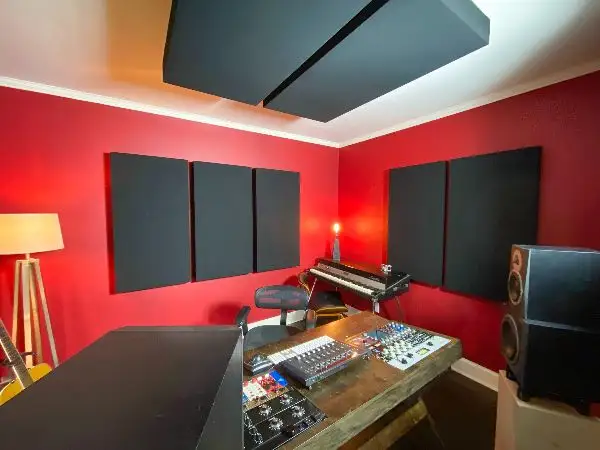
If you've ever been to any professional recording studios or have seen photos or videos of people working in real studios online, you've most likely seen panel-covered walls in the background.
The purpose of these big blocks of foam, you ask?
They are there to absorb sound reflections .
People often refer to these as acoustic panels or foam panels.
The idea here is to absorb the reflected sound that we talked about earlier so that the only thing left is the direct sound .
Of course, you can't just toss up a bunch of foam panels on your wall and call it a day. This is only one element of studio acoustic treatment.
Many people believe that absorption only really works when used in conjunction with diffusion , another important type of acoustic treatment.
The Role Of Diffusion

If you were to fill an entire room with sound-absorbing foam, you would get a room that one might describe as "intolerably dead."
Instead of squeezing the reflections out of our room and into oblivion, it's a good idea to scatter additional post-absorption reflections with diffusion .
When reflections are untreated, they often get trapped in a single spot. For example, if you stand in the back corner of your home studio, you might notice a build-up of around 200Hz. You might also notice that some frequencies are almost difficult to discern, as they may have been canceled out in the buildup.
Even with plenty of absorption in the room, this piling-up of frequencies can still destroy your balance.
This is where diffusion comes in.
A diffusion panel works to limit trapped reflections by scattering them around the room, preserving the natural tone.
Look in just about any world-class studio and we guarantee you'll find some instance of diffusion. A combination of diffusion and absorption creates the perfect mixture of dry and balanced, helping to turn any space into a capable recording studio.
Common Acoustic Issues
No matter what kind of room you're working in, you will most likely face one of these few acoustic issues. Some of these issues include:
- Comb filter
- Flutter echo
- Room modes
- Decay time
Working in any room presents problems, as you have to worry about how the sound is reflecting off of the surfaces and impacting the way you perceive it.
Of course, setting up your gear in an open field isn't a practical choice either .
For this reason, it's important that we understand these acoustic issues so we know how to fix them.
Comb Filtering
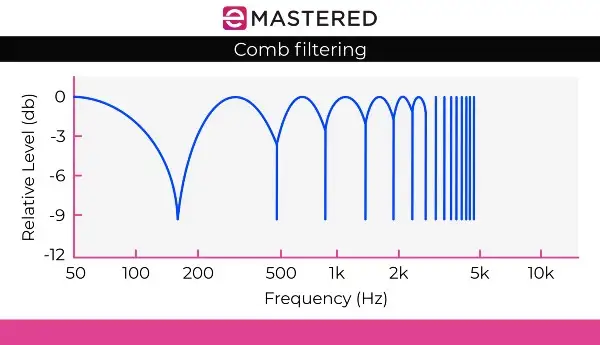
Comb filtering occurs when a direct sound combines with its reflections.
It's called comb filtering due to the slight notches it creates in the frequency spectrum, which looks a lot like a fine-tooth comb.
Where the notches sit wholly depends on the amount of time between the direct sound and reflection. This sound is easy to differentiate from other acoustic issues due to its flanger-like characteristic.
Flutter Echo
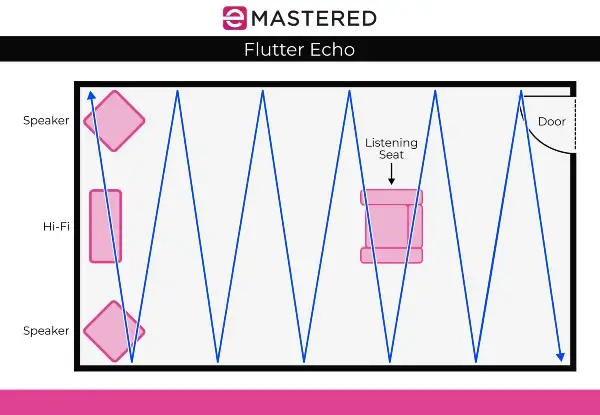
Flutter echo occurs when sound quickly bounces back and forth between two parallel walls. You can hear these echoes as a series of distinct echoes , which are typically around 30-50ms apart. They are often comparable in loudness to the original sound.
For example, if you stand in a small untreated room and clap, you'll likely hear multiple echoes of your clap in rapid succession.
What's important to note is that a flutter echo is different from a long-delayed echo or reverberation.
Room Modes
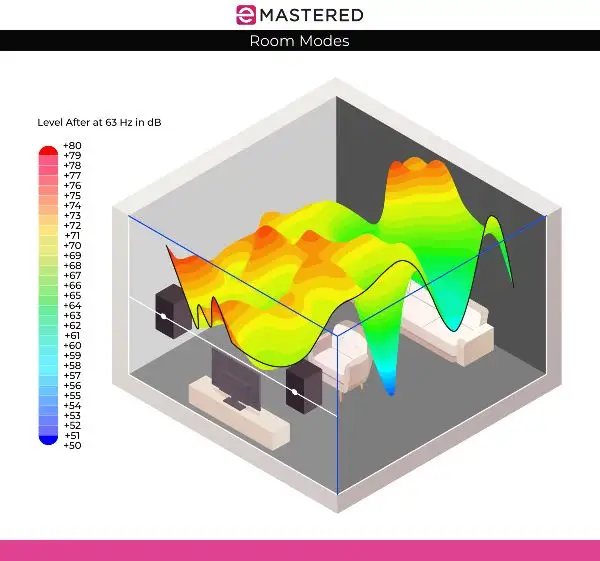
When sound waves travel between two boundaries opposite to one another, such as the front wall to the back wall or the floor to the ceiling, you get room modes .
Room modes are impacted by the varying levels of sound pressure in your room created by standing waves . Essentially, certain spots within your room will sound more resonant than others in different parts of the frequency spectrum, causing unusual resonances.
People who have excessive room modes often have trouble setting their low-end properly.
For example, if your mixing position is set up in a place where you have standing waves, you will likely get an over-abundance of low frequencies, causing you to make level adjustments to try and compensate for mix perception. In all actuality, you'll only make your low-end suffer more by trying to make level adjustments without treating the culprit itself.
Decay Time
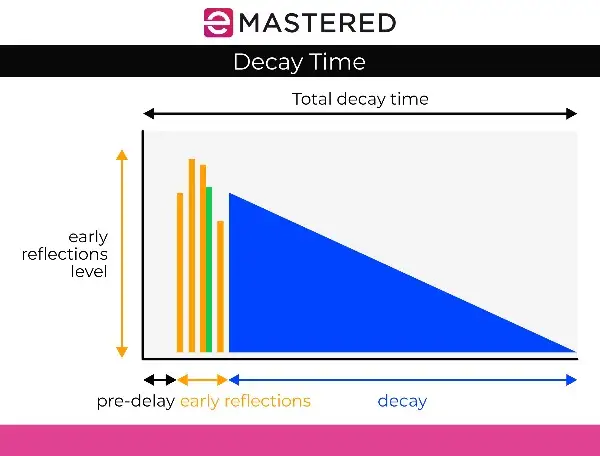
Decay time is probably the easiest of these issues to understand, as we've been thinking about it since we were kids.
If you ever went to church and heard a pastor speak or sat in gym class and listened to the coach holler, you likely heard an audible "tail" after the initial sound that slowly decayed over time.
Now, compare those scenarios to getting into your closet full of clothes and yelling. That sound probably has a very little tail (unless your closet is the same size as Kim Kardashian's).
Essentially, decay time differs depending on the size of the room.
Music venues like having a live room sound with longer decays, as it makes the band feel bigger. However, in a recording environment, a room that sounds too lively will interfere with the direct sound coming from your speakers.
You don't want an exciting, live room feel in a home studio. You want a room that gives you the true sound of what is coming out of your monitors.
Of course, you don't want a room that is so quiet you can hear your own heartbeat in it either.
The sound coming from your studio monitors should interact with your room to a certain degree. However, it's up to you to be in control of how they interact.
In essence, acoustic treatment is about controlling auditory chaos.
Different Types of Acoustic Treatment
Before you start bashing nails into your walls to hang acoustic panels or spending hundreds of dollars on hand-crafted diffusers, it is important to get your mixing position right.
Optimizing your mixing position means getting your head at the right point between your speakers to minimize acoustic problems. You might be surprised as to how many issues you can combat without any acoustic treatment by simply locking in your mix position.
We talked a bit about getting the optimal listening position in our Home Recording Studio Setup article.
Now, onto the different forms of acoustic treatment!
Absorption
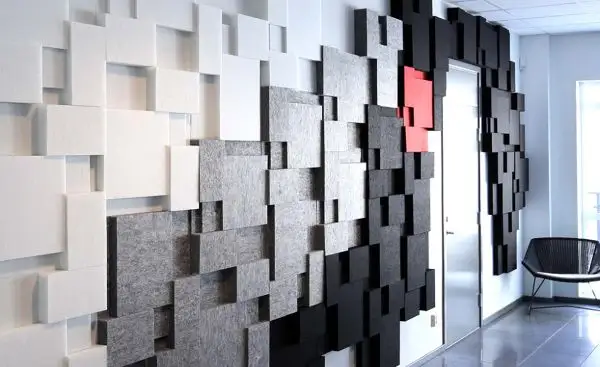
When hanging absorption panels, we're not trying to destroy the sound energy in the room. In fact, according to the law of conservation of energy , we couldn't destroy that energy even if we tried!
Absorption is instead meant to convert the sound waves into heat .
Don't worry. There's no fire involved!
Think about it this way:
When sound waves come in contact with an absorptive piece of material, that material will reduce the sound waves' energy. While a portion of the reflected sound will continue propagating around the listening environment, the absorbers will stop a portion of it in its tracks.
You can think of absorption panels as roadblocks . They tell the sound waves where to stop. It's best to use dense and porous absorber panels, as your sound waves will bounce into the pores before getting trapped inside and converted into heat .
You'll often see absorption panels in the form of acoustic foam.
Porous foam is much better for high frequencies , while denser, more impermeable panels are better for low frequencies .
Coupling/Decoupling
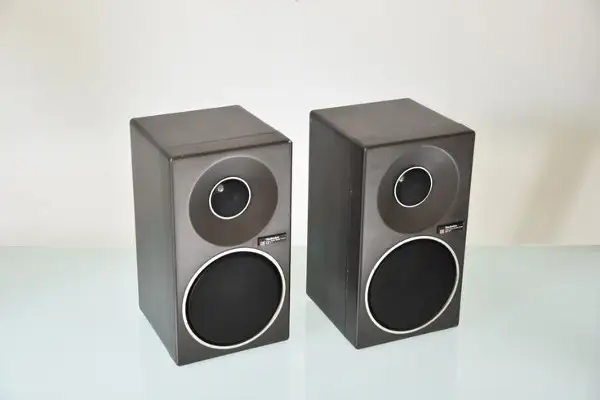
If you were to break your speaker down, you'd see a large membrane at the center that vibrates back and forth to create the sound you hear. Unfortunately, many speakers also have enclosures that vibrate along with this membrane, causing sonic inaccuracies.
There are two methods of reducing these vibrations that you can apply, including coupling and decoupling .
With coupling , the idea is to join your studio monitors to the floor of your studio. Engineers will often use speaker spikes to do so. It's important that you only couple your speakers if you have ultra-dense, high-mass flooring.
Concrete floors are GREAT for coupling, as they can help vibrations dissipate from your studio monitors.
On the other hand, decoupling works by reducing the level of vibrations moving between your speakers and your floor. To combat these vibrations, engineers will often use dampening devices , such as pads or feet.
You can think of these dampening devices as absorbers, converting vibration energy into heat. It's a good idea to decouple your speakers as much as possible, putting dampening devices between your speakers and speaker stands and between your speaker stands and your floor.
Reflection/Diffusion

Sound energy redirects itself when it comes in contact with a reflective surface.
While a portion of this direct sound energy will get absorbed by the material it comes in contact with, a majority of the sound will get reflected back into the environment.
Wood is a great example of a dense, organic material that reflects sound, which is why people often make reflection elements out of them.
Reflections are part of our natural world. They help us determine the type of space we are in. While we certainly can't echolocate in the same way as bats or whales, we can gather a sense of our surroundings using sound. For example, you could tell the difference between clapping in a church or a bedroom right away.
In some instances, well-practiced audio professionals could even tell you what kind of materials the room was made out of based on the reflections.
The point that we want to drive home is that it is okay to have a room that sounds like a room .
You shouldn't have an unnatural dead space, as no one will ever listen to your music in an anechoic chamber. The goal here is to use absorbers to stop some of the sound from reflecting while using reflection and diffusion tools to maintain some semblance of liveliness.
Acoustic Treatment Zones
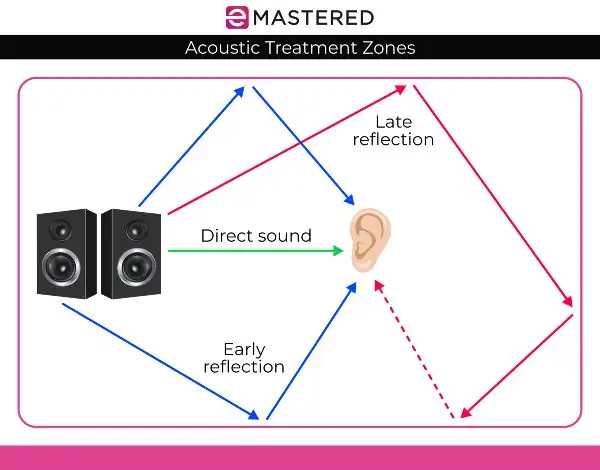
There are distinct stages in which you perceive the sound that comes from your monitors.
The first stage, as we talked about earlier, is the direct sound , which is the unaltered sound that comes straight out of your speaker. Next, we get early reflections , which is the point after which your sound bounces off of any boundaries, such as your walls, your floor, or your desk.
Lastly, you'll get the sound of the reverberant field, which is where your sound interacts with the confines of your room in a complex manner. The most important or problematic areas in this regard are your back walls, side or parallel walls, and corners.
It's important to apply proper acoustic treatment in order to combat problems in your room acoustics that arise from these areas.
Direct Sound
Before the sound bounces around your room, you will hear the direct sound from your listening position. This portion of the sound is the most unaltered portion.
The goal is to make the direct sound the most prevalent portion of the sound so that you do not hear tons of reflections while sitting in your listening position.
Early Reflections
Soon after the direct sound hits your listening position, you'll hear sound reflections called early reflections. These are the reflected sounds that bounce off of the walls next to your desk, the ceiling above your listening position, and the desk itself, depending on how you orient your speakers.
After those early reflections, you get reflections that arise in the form of a complex network of reverberation from around the room.
To find where these early reflections are in your room, you can use a mirror in your listening position. While sitting in your listening position, have someone else slide a small mirror gently along each side until the speaker's acoustic axis comes into view.
This is the spot where you want to hang your panel to dampen early reflections. For treating early reflections on the other side, perform the same process once more on the other side wall.
Back Walls
If you're working in an average room, your back wall is likely parallel with the front wall. As you know from before, parallel walls can cause flutter echo. Beyond that, this parallel orientation can also cause standing waves.
Engineers will often use a hybrid of diffusion and acoustic panels to combat these issues.
Side Walls
Side walls can be concerning as well, especially those near the rear wall where your speakers are pointed. People will often install absorbers in these near-rear wall positions to prevent flutter echo.
Corners
One of the biggest culprits of room modes is the corners of home studios. People will often place bass traps in corners to convert that energy buildup into heat, getting rid of excessive low frequencies.
We recommend placing them in the high corners near the rear wall to start.
The Essential Forms Of Acoustic Treatment
People often overcomplicate things when it comes to applying acoustic treatment. However, if you can gain an understanding of the three main types of acoustic treatment, then you can create a room with higher sound quality.
Let's take a look at each of these unique forms of acoustic treatment:
Bass Traps
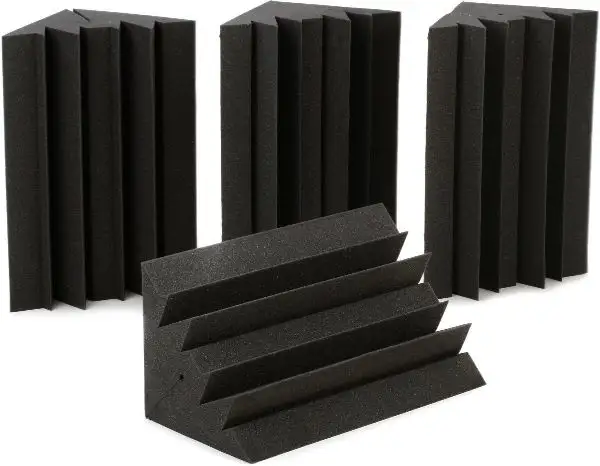
Bass traps are the most important element of acoustic treatment in any studio.
If you're only able to purchase a single type of acoustic treatment, get yourself some bass traps.
Many people think bass traps are only there to absorb low frequencies. However, these bass-trapping devices are broadband absorbers , taming mid and high frequencies too.
In essence, installing bass traps might be more than enough for many home studios. If you work in a small room, having bass traps is essential.
The best place to set up a bass trap is in the trihedral corners . Your trihedral corners are on the upper and lower corners of your room and are attached to three walls.
Acoustic Panels
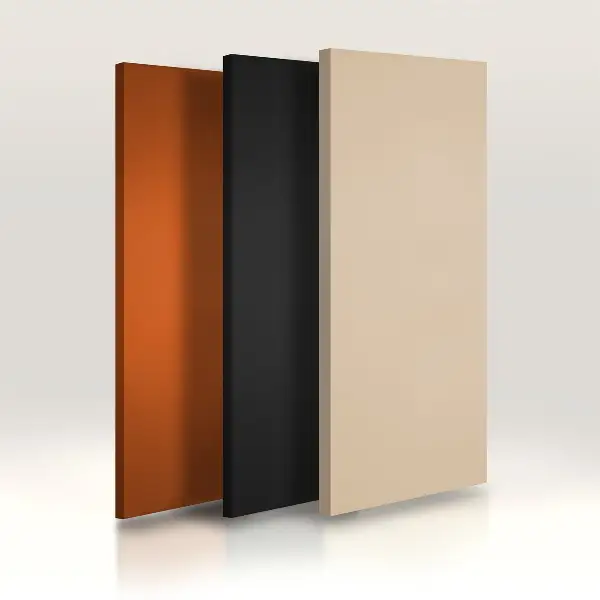
Acoustic panels are often the first things that come to mind when people think of proper acoustic treatment. However, acoustic panels aren't very effective when it comes to bass trapping or treating bass frequencies.
For this reason, we like to think of acoustic panels as a supplemental treatment.
However, that doesn't mean acoustic panels don't have unique characteristics that can outperform bass traps in some ways.
For starters, acoustic panels are thinner than bass traps, meaning they use less material. Less material means more wall coverage for a lower cost.
You can place these around your walls in varied positions to kill standing waves. Unlike bass traps, which sit in the corners of home studios, acoustic panels can sit on the front wall, back wall, and either sidewall.
While many people set up panels on their wall space to catch early reflections, we also recommend setting them up in your dihedral corners. Your dihedral corners work with two dimensions of your walls. To cover your dihedral corners, you will need to use special corner brackets.
PRO TIP: Make sure to leave a small gap behind your corner panel, as this will allow the energy to reflect back into the panel, allowing for more absorption.
Diffusers
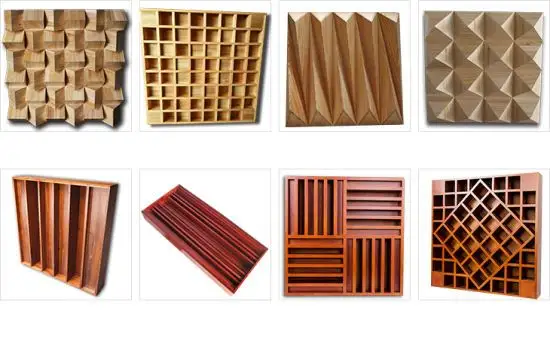
In most home studios, you won't find diffusers. This is often because they can be expensive. Also, many people believe that smaller rooms don't need diffusion. Of course, talk to a group of engineers, and someone will likely disagree.
If you can afford to utilize diffusion or make your own diffuser panels, then you absolutely should.
Sound diffusers work best at the primary reflective point in your room (a.k.a, the first point of reflection for your sound). Most of the time, you'll want to place diffusers on each side wall and the back wall, as these are the areas where your speakers are likely facing and where your direct sound will reflect.
Vocal Reflection Filters
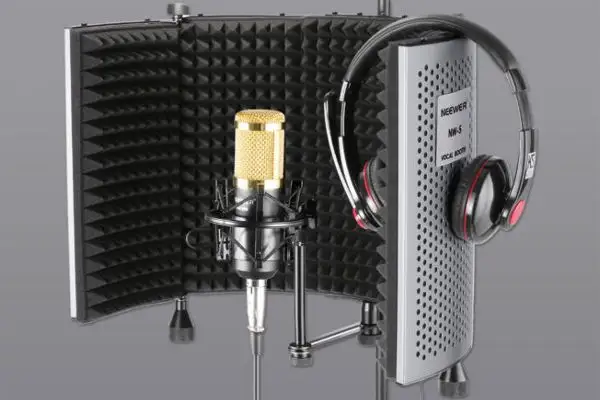
Vocal reflection filters can be extremely helpful home recording tools in most home studios, even if you already have some form of treatment. Those with untreated rooms might find it completely necessary to kill unwanted reflections that might bounce back into the microphone during the recording process.
The point of these filters is to minimize reflections and natural reverb that occurs in your room to make your recordings crisp and clear.
Misconceptions About Acoustic Treatment
Unfortunately, the Internet is filled with misconceptions regarding acoustic treatment. Let's take a look at some of the most common myths we hear regarding room acoustics.
Curtains, Carpets, and Other Soft Materials Can Work In Place of Acoustic Treatment
While having soft materials like these in your home studio can help address unwanted reflections, they don't act as a complete acoustic treatment solution. Not only do they not address bass frequencies, but they also don't tackle the issue of speaker boundary interference.
I Can Use 'Tweaks' To Get Rid Of Bass Boom
Bass frequencies have such long wavelengths that using 'tweaks,' such as changing your listening position or positioning your speakers in a different way will only alter the balance of your mids and highs.
While this might help you perceive fewer boomy bass frequencies, it won't actually fix the problem.
Acoustic Treatment Will Make My Room Sound Lifeless
This is one common misconception that we hear a lot.
Go into any professional studio, and you'll notice that it sounds like a natural living space.
The problem is when people begin overusing or misusing thin acoustic material, which can absorb too many high frequencies and make the room feel dead. For example, we often see people hanging up cheap egg crate foam to deaden ooms, which oftentimes just makes them sound much worse.
Instead, acoustic treatment should create flat diffusion and absorption inside the space without deadening the overall frequency response.
You must also ask yourself what the point of your acoustic treatment is. Are you creating a control room or a live room ?
Control rooms should deliver accuracy, a clear stereo image from your speakers, and surfaces that don't reflect. On the other hand, live rooms are meant to reflect from the front wall to the ceiling to the rear walls and beyond.
Acoustic Treatment Is Expensive
Acoustic treatment can certainly be expensive. However, that's not to say that you can't find something within your price range if you step into the shoes of a savvy shopper. You might even look into building your own sound panels.
It can be much cheaper than purchasing acoustic foam from a popular manufacturer. Plus, you can fit them in with the aesthetic of your studio.
Acoustic Treatment Vs. Soundproofing
Many times, musicians will mistake acoustic treatment for soundproofing.
The thing is, both of these terms mean very different things .
With acoustic treatment , the goal is to control the sound reflections in the room. Ultimately, this will make your acoustics better, leading to better recordings.
Soundproofing, on the other hand, is meant to limit the level of sound coming out of your room. To do so, one might seal an air gap coming from the control room to the rest of the studio or use heavy building materials in the walls so they can crank the sound in one room without it pouring out into another.
It's important to understand that these are both incredibly valuable practices. However, neither one of them is a substitute for the other.
Acoustic Treatment Alternatives
Amateur producers and mix engineers often spend way too much money on studio gear without ever considering the acoustics of their space. Unfortunately, it's not until they flip on their pair of thousand-dollar speakers that they realize the acoustics are a major issue.
At that point, their budgets are shot.
If this seems like you or you simply don't have the money on hand to purchase potentially expensive bass trap panels or ceiling clouds, we have a few alternatives that can help.
DIY Sound Treatment
Household Absorption
While savvy marketers might be able to trick some people into thinking their acoustic treatment is the only material that works for getting a room sounding good, it's not the case.
In actuality, you probably have some soft, porous objects or materials in your house that could do the job, including pillows, blankets, clothing, or couches. The beauty is that you don't have to spend a dime to get the best results with any of these things either!
Sure, they won't give untreated rooms that professional recording studio look, though they can provide a much better alternative than sinking your money into hundreds of dollars worth of bass traps and sound panels.
The important thing here is to make sure you're using thick materials. We highly recommend packing blankets, as they are thick yet lightweight enough to hang around the room. Plus, they're very inexpensive and can be purchased in huge sizes to cover the walls in most rooms.
Room Treatment Software
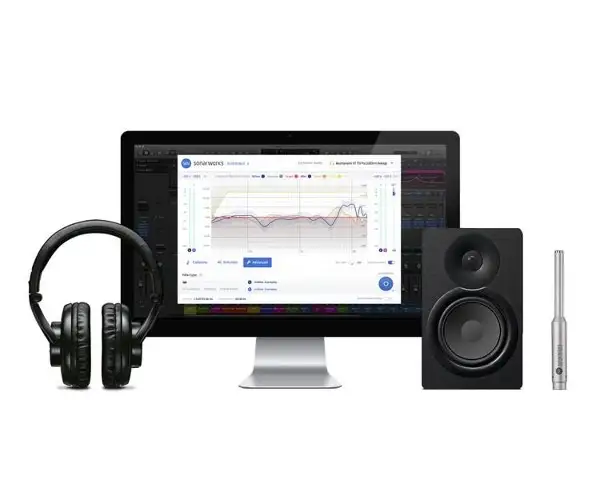
Room treatment software became majorly popular for small project studios over the past decade or so. Companies like Sonarworks use a combination of room-reading software with flat frequency response microphones to get a specific frequency read from the given room based on the sound pressure level.
While it would take an entirely different article to discuss the pros and cons of this approach, know this:
While room calibration software can certainly diagnose your acoustic problems and present you with a slight, software-based tweak, it cannot actually treat them.
Frequently Asked Questions
What Does Pink Noise Sound Like?
Pink noise uses a consistent pitch or frequency to help engineers create a flat and even sound. To many ears, it can sound a lot like a high-pitched vacuum or fan.
How Can We Reduce Reverberation Time In A Room?
One of the best solutions for stopping reverberation in a room is absorbing the unwanted sound using soft furnishings. Project studios can often benefit from pillows, couches, blankets, rugs, as well as professional acoustic treatments like bass trap panels and acoustic panels.
Do Acoustic Panels Really Work?
Most rooms can benefit from proper acoustics. As long as you place them correctly with relevance to the listening position, acoustic panels can be extremely helpful. They can reduce the number of early reflections in your sound with regards to the listening position, helping you make better mixing decisions.
How Effective Is Acoustic Foam?
Acoustic foam can absorb sound in a space and keep it from echoing, though it should be the last choice for any serious acoustic treatment plan. For example, it isn't very good at blocking out high or mid-range frequencies. For that, you might consider installing a bass trap.
How Do I Block Out My Neighbor's Noise?
One of the best ways to block out noise from your neighbor is by adding soft, absorptive furnishings in your home. Think of things like large pieces of furniture, sound-reducing curtains, or fluffy carpets. You may even consider installing different types of insulation in your walls to combat noise from your neighbors or install door and window seals to get rid of any air gaps.


