


You press record on your DAW, play a jangly chord on your guitar, or belt your pipes out into a microphone and, like magic, it shows up on screen ready to be manipulated to your sonic whims.
But what really happened?
If you've ever wondered how an analog signal gets turned into a digital signal, this article is for you - we're going into deep nerd mode to understand fully how analog to digital converters work.
And if you've not really paid much attention to the process, this article is for you! Understanding how an analog signal becomes binary digits is fundamentally important for any musician.
Why Every Musician Needs to Understand Analog to Digital Converters
Every time you record an analog signal - or even use samples sourced from real-world sounds - you're making use of analog to digital converters.
Let's say you've recorded a searing guitar solo, or sampled your dog snoring - it matters not.
Behind the scenes, a crucial nugget of technology has been working overtime to transform your analog input signal - the natural flow of electricity coming from your microphone or instrument - into a digital representation that Ableton or Logic (or whatever DAW you're rocking at the moment) can actually understand.
The unsung hero in all of this? The analog to digital converter, or ADC for short.
Whether you're recording in a bedroom studio , or mixing at a pro facility, you're always using ADCs. They live inside your audio interface, on your sound card, and even inside your phone's mic.
Every time a form of analog voltage enters the system in question (like your voice into a microphone), it's immediately sampled, sliced, measured, and turned into digital data.
So - how does an adc work, and why does it matter to musicians? Chances are, you're already thinking in ADC terms - whether you realize it or not. This guide will walk you through the conversion process in plain English, using real world musical examples to explain what's happening at every step.
Let's pull back the curtain on the most important piece of tech you didn't know you use every day.
Analog vs Digital: What Are We Converting Anyway?
Before we get into the nuts and bolts of how analog to digital converters work, let's first understand what they're converting - analog signals into digital signals.
The Analog Signal: Music in its Natural Habitat
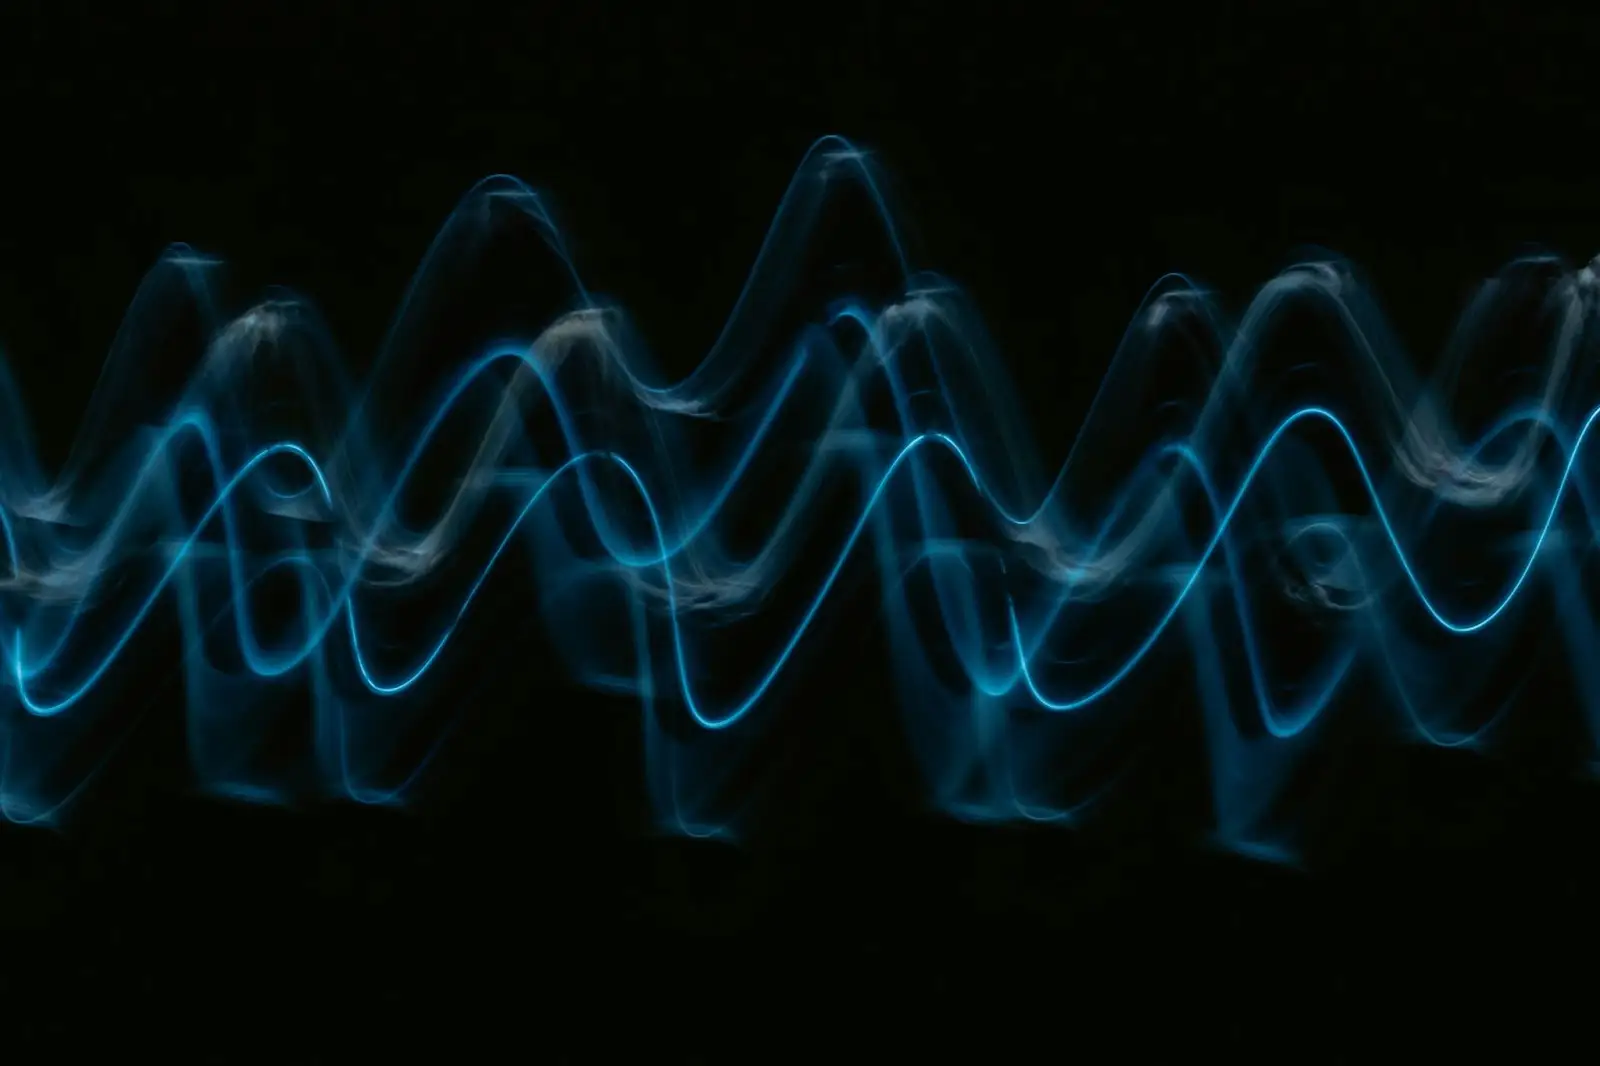
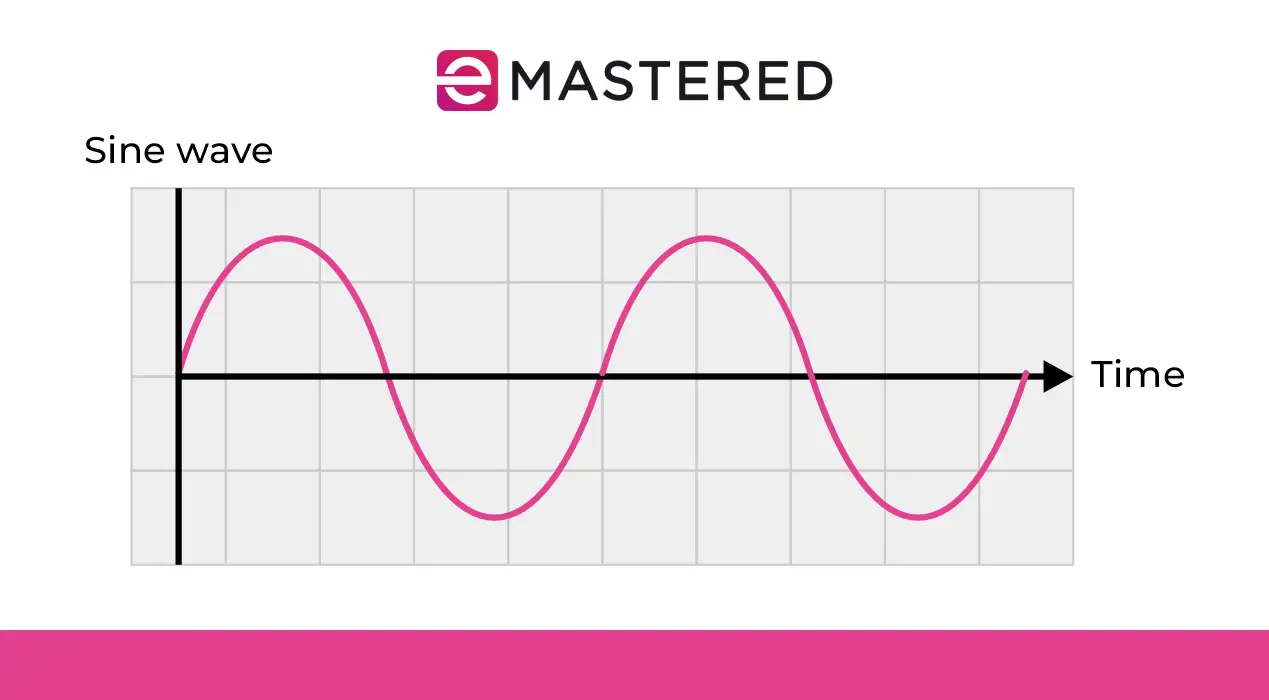
In the real world, any sound - your voice, the pluck of an acoustic guitar, or the thud of a kick drum - is always analog. That means it moves continuously, like a smooth wave. When they're pure tones we call them sine waves, and they represent signal amplitude (loudness, to simple folk like me) measured over time.
When you speak or play an instrument, the sound waves you create cause the surrounding air to move, which in turn moves against the clever bits inside your ears; that's how we hear sound.
When you record the same thing, a microphone captures the air vibrations and turns them into a tiny electrical current. This current is known as the analog input signal, and the voltage it carries is called the analog input voltage (or sometimes just analog voltage).
This voltage varies continuously; every breath, every string pluck, every nuance of a physical performance exists in that flowing signal. The voltage range of an analog signal reflects the varying loudness of the sound. The job of analog to digital converters is to take this analog quantity and translate it into something a digital system (like your computer, or your phone) can work with.
The Digital Signal: Binary in a Box
Unlike human ears, computers don't understand smooth, continuous waves. Their method of communication is binary output - a signal that represents information using only two states; typically zeroes and ones. That's how we get a digital signal. It's a set of tiny, tiny steps that tries to mimic the original signal using a series of fixed values.
In order to store, display, or manipulate music in digital form, we need to convert the smooth analog signal into a digital representation - a string of numbers that a DAW, plugins, and hard drives can understand.
And that my friends, is precisely what analog to digital conversion is all about.
Chances are you've already seen this process in action; when you're recording an analog input signal through your audio interface and watch the pretty waveform appear like magic on the arrange page of your DAW. This digital display of the sampled signal is cool and all that, but behind that graphic is a long string of binary code representing the output signal from your interface's ADC.
Real World Analogy: Vinyl vs. Spotify
Think of an analog signal like a vinyl record: a continuous groove that the needle follows physically until the end of the record. A digital signal, on the other hand, is like a streaming music file - chopped into pieces, measured, stored, and sent out to your speakers using only numbers.
The vinyl is beautifully detailed, but fragile, and not easy to share. You need the vinyl itself, plus something to play it on, and they both need to be in the same room as the person you want to share it with. On top of all that, it can't be edited.
The digital binary code version may miss some nuance but it's editable, and ready for use in your DAW. And if you have a producing partner on the other side of the world you can send them the file to work on lickety split.
That's the power of analog-digital converters. Ka-pow!
The Job of Analog to Digital Converters (Explained for Musicians)
It's worth noting here that analog to digital converters are not solely used for audio. Lots of things in the physical world have an analog value. In fact anything that can be measured - be it sound, light, temperature, or even motion - has an analog signal that can be converted to a digital one.
The principal is the same; taking the original analog signal with its fluctuating voltage levels, and turning it into a digital output code that can be stored and edited easily.
But we're all musicians here (even you, Nickelback) so let's break down exactly what analog to digital converters do with your music.
Any time you plug in a mic or an instrument, an analog input enters your audio interface. That signal is an electrical waveform - basically a moving voltage value that mirrors the sound in real time. The job of the ADC is to sample that input voltage and assign it a number that your computer will understand .
That's how we go from an analog signal to a digital output. The process happens in three major steps: sampling, quantization, and encoding.
Step 1: Sampling - Slicing Time
In the first step, sampling, the ADC takes a measurement of the signal amplitude (voltage) at regular intervals. This happens many thousands of times per second - how often it happens is known as the sampling rate (or sampling frequency).
CD-quality audio uses a sampling rate of 44,100 samples per second - or 44.1kHz. Higher sample rates (like 48kHz, or 96kHz ) give more detail, and record higher frequencies. That's due to a concept called the Nyquist Theorem, which states that you can only capture frequencies up to half the sampling rate.
So in theory, if your music is made up entirely of tones in the 5-10kHz range (what on earth are you thinking?) , you'd need a sample rate of at least 20kHz to record it accurately.
Step 2: Quantization - Measuring Voltage
Once the sample has been taken, the ADC compares the input voltage to a reference voltage level. The range from zero volts to the reference voltage is divided into fixed steps. Each one of these steps represents a specific digital number.
And here, we encounter a tiny mismatch - known as a quantization error. This happens because an analog signal can fall between two digital steps, as illustrated below.
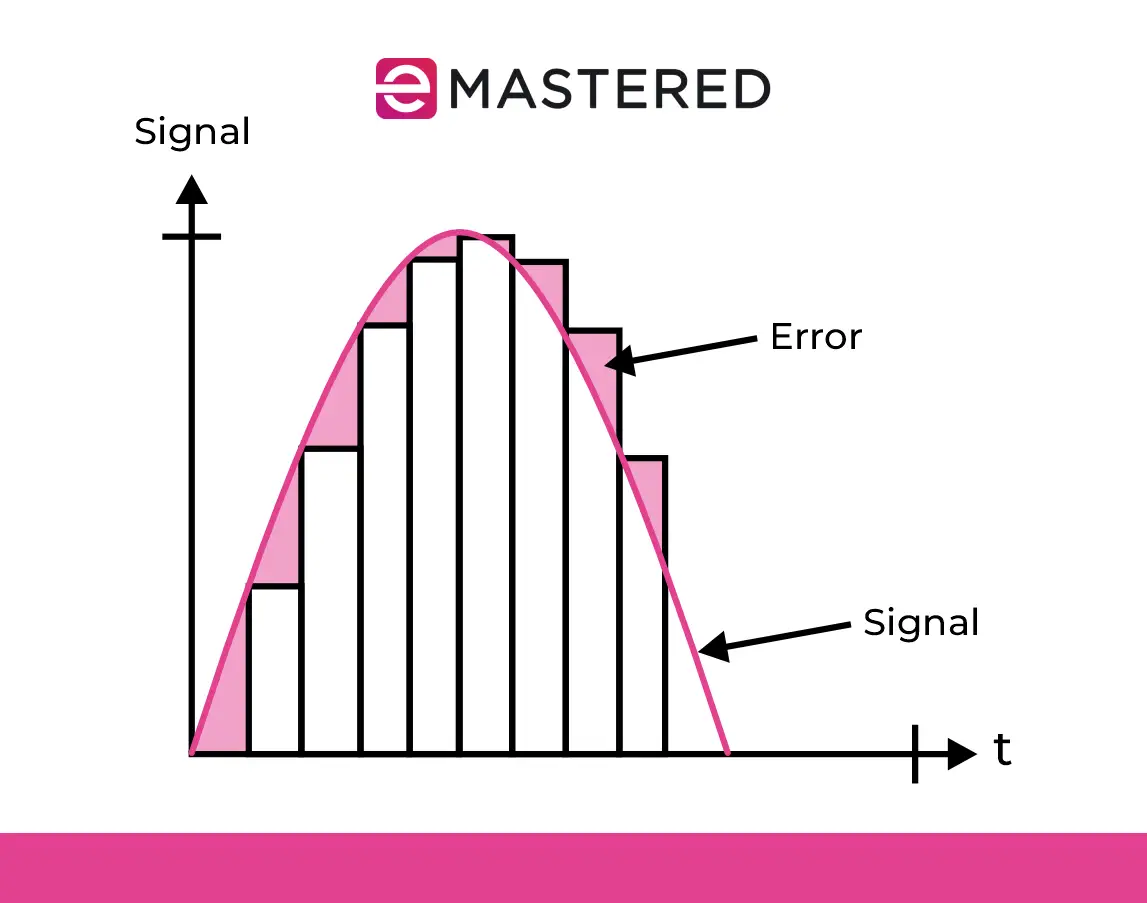
This is where bit depth becomes important. A 16-bit ADC provides 65, 536 steps, whereas a 24-bit ADC gives over 16 million. Clearly (in this case, at least) more is more. The more steps you have, the more accurate the conversion process.
For musicians, this equates to better detail in softer passages, and more headroom in louder ones.
Step 3: Encoding - Binary Output
Once the ADC has worked out which step the signal falls into, it converts that level into digital binary code - a string of zeroes and ones that represent the output code.
This is the final digital data that your DAW receives. From there, the original analog signal is preserved as closely as possible in digital form.
Putting it Together: A Vocal Take in Motion
As an example, let's say you're recording vocals. You want as much detail as possible without going nuts on storage space, so you set your sampling rate to 48kHz, and your bit depth to 24.
Your mic captures the analog input - the subtle changes in air pressure over the mic's capsule as analog voltage - in other words, the analog signal is measured as voltage.
That analog input voltage is sampled 48,000 times per second, with each slice (sample) being measured against a reference voltage, converted into a digital number, and sent to your DAW as binary digits.
You now have a digital signal that looks and sounds like a smooth, continuous waveform, but is actually a stream of code.
All this because your trusty ADC translated the analog value into something your computer can process.
Inside Analog to Digital Converters - The Components and Process
So far we've been looking at the big picture - what goes in and what comes out. But how do analog to digital converters actually pull all of this off?
Inside every ADC is a super-smart electronic circuit that handles all the magic. It transforms the continuously changing analog signal into the digital realm, one snapshot at a time. Let's take a closer look at what happens.
The Comparator: Voltage Decision Maker
At the heart of the ADC is something called a comparator . A comparator compares your input voltage with a reference voltage, asking the simple question: "Is this input higher or lower than the reference?"
This comparison is how the ADC starts figuring out what digital value to assign to each analog sample. Each time your mic or instrument produces a voltage (i.e. a sound), the comparator checks it against a steadily changing internal voltage. When the capacitor voltage matches that of the input, the system locks in the corresponding digital code.
The Capacitor and Voltage Staircase
Depending on the type of ADC, different methods are used to generate that comparison voltage. A common one is the Successive Approximation Register (SAR).
In a successive approximation ADC, the converter uses a tiny capacitor to hold a voltage charge. It compares your input signal to a series of voltage levels, working like a guessing game:
- It starts by guessing the middle of the voltage range.
- If your analog value is higher, it adjusts the guess upwards.
- If lower, it adjusts downward.
- This continues until it finds the closest match.
The rather smart back-and-forth is driven by clock pulses - tiny time markers that ensure everything stays in sync. Every clock pulse brings the ADC one step closer to the final digital output.
Reading about the process doesn't really do it justice. It happens at an incredibly fast rate - millions of times per second - and results in a very accurate digital representation of your music.
Ramp and Dual Slope ADCs
There are other ways to generate the comparison voltage, including the ramp voltage method, and dual slope ADCs. These are more often used in electrical engineering - testing equipment, controlling processes, digital voltmeters, and the like - but the idea is the same: compare an input voltage to a changing reference until a match is found.
For example, in a dual slope converter, the input signal charges a capacitor over a fixed period, and then a reference voltage discharges it. The time it takes to return to zero gives the final digital number - kind of like a stopwatch for your sound, or whatever it is you're measuring.
While these aren't the types of comparators you'll find in your average audio interface , it helps show that there are many paths to the same goal: converting the continuous into the countable .
ADCs in Audio Interfaces
So how does an ADC work in an audio interface? The ADC chip receives the voltage input from your preamp stage. It (quickly) compares the signal amplitude to reference values, assigns a digital code, and hands it off to your DAW. All this happens so fast that your system records it all in real time with almost no noticeable delay.
When folks talk about ADC performance or an ADC's resolution, they're talking about how fast and how precisely this process works. A better-quality ADC captures your original signal more faithfully, with less quantization errors, and a wider voltage range.
What Happens Next? Playback Explained
OK, you've recorded that vintage synth line, vocal take, or tight bass groove. The analog to digital converter captured each analog input signal, sliced it up in time, and spit it out as a digital signal in a stream of 1s and 0s. So, what now?
To play that sound back into your lugholes, we need to reverse the process. Enter the digital to analog converter (DAC).
From Digital to Analog - the DACs Job
If you think of the ADC as a translator for your microphone or instrument, the DAC is an interpreter for your analog devices. It takes the string of binary code (digital data) and reconstructs a voltage signal that approximates the original performance. This recreated analog output is what comes out of your studio monitors and headphones .
Just like ADCs, DACs operate with a discrete time signal, outputting a new output voltage level at each clock tick, based on the incoming digital code. This staircase of voltages forms the output signal that, when smoothed, becomes continuous again.
Smoothness Matters - Filtering and Interpolation
Here's the thing; when a DAC recreates the original analog signal, the result is a stepped waveform and not a smooth analog curve like the one you originally played. It's more like a jagged outline than a fluid brushstroke.
To fix this, the digital to analog converter sends the signal through a low pass filter to remove any high-frequency artifacts caused by the 'abrupt' steps. This filter smooths the rough edges to produce an analog signal that your ears will accept as more natural sounding.
Some systems also use interpolation to estimate what the waveform should look like, in between the sampled snapshot, improving the result even more.
And that's why the output of your audio interface sounds fluid and musical rather than robotic and pixelated. High quality DACs can get extremely close to reproducing the original analog signal, especially if it's been recorded at a high sampling frequency and bit depth.
The Round Trip: ADC + DAC in Music Production

So let's recap what a full round trip for your music looks like.
- A mic or instrument sends an analog input into your audio interface.
- The ADC samples it, assigning digital values based on reference voltage levels.
- The resulting digital signal is sent to your DAW.
- Your DAW processes the digital representation in real time as you add effects, edit, or arrange it.
- When you hit play the DAC converts the digital information back to an analog output.
This loop happens constantly in embedded systems, mixing consoles, and live rigs. Every time the signal passes from analog to digital and back, the ADC and DAC work their magic in tandem.
Why This Matters for Musicians
It's all very well knowing how the sausage is made and all that, but what are the practical impacts for musicians?
- Low latency matters when tracking live vocals or instruments
- An ADC's resolution can impact quiet performances or those with subtle dynamics
- Accurate DACs ensure your mixes sound great on all playback systems
If your ADC or DAC isn't up to the job you'll lose detail, introduce noise or artifacts, or make poor mix decisions based on inaccurate playback. That's why professional interfaces - and even analog devices with built-in converters - often advertise their ADC resolution, voltage range and reference voltage accuracy.
DAC ≠ ADC
It's worth noting that when converting a digital signal back to analog, you're not undoing the work initially done by the ADC. Once the analog signal has been converted, there's a certain amount of quantization error, and potentially data loss, that is irreversible. The DAC simply rebuilds the best possible analog version of the digital system's output.
It's like taking a photo; no matter how advanced the tech, it can't recreate every molecule in the original scene. But with enough resolution and care it can get very close. Or close enough for jazz anyway.
What Determines ADC Quality and Accuracy?
Just like guitarists, not all analog to digital converters are created equal. The quality of your recordings - from the crispness of your snare drum, to the breathy quality of a vocal - hinges on how accurately your ADC captures the analog signal and translates it for a digital system.
Here's what matters most:
Resolution: Bits & Details
ADC resolution is typically measured in bits - which tells you how many digital values are available to represent the input signal.
- An 8-bit ADC can produce 256 values.
- A 16-bit ADC gives 65,536 values.
- A 24-bit ADC can handle over 16 million discrete steps.
Each bit added doubles the number of possible digital codes. More codes = greater accuracy and a lower quantization error - that unavoidable difference between the actual analog voltage and the nearest digital value.
In music, a larger resolution means:
- Quieter details are preserved
- Soft reverbs and tails don't get lost
- You can mix louder signals without distorting or clipping.
For highly dynamic music, like jazz and orchestral music, a higher bit depth gives you more headroom and finesse.
Sampling Frequency: Time Slicing
Your ADC doesn't just measure the input voltage; it also knows when to measure it. That's the sampling frequency, or sampling rate, measured in kHz.
Standard values used in music are:
- 44.1kHz (CD quality)
- 48kHz (video & broadcast standard)
- 96kHz (hi-res audio, especially among sound designers)
The sampling rate determines how often the ADC takes a snapshot of the incoming signal per second. As previously mentioned, the sampling frequency must be at least twice the highest frequency of the signal in order to accurately reproduce it.
Since human hearing generally tops out around 20kHz, the minimum sampling rate you'd need to capture anything we could hear is 2 x 20kHz, or 40kHz. Add in some headroom for quantization error and you get 44.1kHz - the gold standard when CDs first came out and ADCs were the new kids on the block.
If you record at a higher sampling rate, you capture more slices of the waveform; in effect generating more detail about the incoming signal. This is especially useful for:
- Sharp transients (like snare hits, or plucked strings)
- Instruments with lots of high frequency content, like cymbals
- Time-stretching or pitch-shifting in post production - especially useful in sound design
However, higher sampling rates increase file sizes and CPU load, so you have to find a balance between quality and practicality.
Reference Voltage and Voltage Range
An ADC works by comparing your input voltage to a reference voltage. This sets the upper limit of what the converter can actually measure.
Imagine you've got a voltage range of 0-5V:
- Any input signal in that range can be assigned a digital number.
- Anything above the reference voltage clips or distorts.
- Anything too low might not register clearly.
For music gubbins, voltages are typically low - often in the millivolt to volt range - and the ADC is calibrated accordingly.
Good design matches your ADC's range to your gear's output level. That's why audio interfaces have switchable input ranges - like a Hi-Z switch, or gain stages; they keep your signal safely within the known reference voltage level.
Quantization Error: The Inevitable Trade-Off
Because ADCs round each analog quantity to the nearest digital step, a small amount of error is always going to happen. That's quantization error, and it shows up as low-level distortion or noise.
Good quality ADCs:
- Use dithering to randomize and smooth out the error.
- Offer higher resolution to minimize its audibility.
- Have optimized electronic circuits that reduce internal noise.
In high-end gear, this is part of what makes recordings sound smoother, or more 'expensive'.
ADCs in the Real World - Beyond the Specs
And that's not all! When discussing the virtues of various ADCs you may hear terms such as:
- Signal-to-Noise Ratio (SNR) - how clean the signal is.
- Total Harmonic Distortion (THD) - how faithfully the data converter avoids adding color.
- Linearity - how evenly analog voltage levels map to the digital realm.
- Clock Jitter - timing errors that cause smearing in transients.
All of these can influence how close your digitized representation is to the original analog signal.
For example, a low-end interface might have a decent bit-depth and sampling rate, but poor clocking or noisy preamps. The result? Your soulful acoustic guitar riff might lose nuance before it even hits your DAW.
TL:DR - A Quick ADC Summary for Musicians
If all the above has made porridge of your brain, don't worry. Here's a quick check-list for what makes an ADC 'good' for music:
- High resolution - at least 24-bit
- Adequate sampling rate - 44.1kHz is fine for streaming, but if you plan on entering the sync licensing market , you'll need to deliver at 48kHz. If you dabble in sound design , 96kHz will give you more sampling headroom to play with.
- Low quantization error, jitter, or distortion
If you care about clarity, transients, dynamics, or just making sure your music sounds the way it did when you played it the first time, the ADC is not a place you want to cut corners.
Analog to Digital Converters in the Music World
Analog to digital converters are everywhere in music production and performance. Here's where they show up:
Audio Interfaces
Every audio interface has an ADC. Every time you plug a mic, synth, or guitar into your trusty Focusrite (other brands are available) the ADC kicks in.
Samplers & FX
Plenty of electronic instruments and processors contain their own ADC, often alongside a DAC for playing back.
- Digital samplers use ADCs to record external sounds.
- Digital effects pedals convert incoming signals into a digital version for processing, before converting back to analog.
Resampling, Reamping, Printing
Some less obvious music production workflows rely heavily on ADCs too:
- Resampling a track out of a DAW, through analog devices, and back into a new digital system.
- Reamping a guitar involves sending the dry signal out of your DAW, through a real amp, and capturing the result back in your DAW.
- Printing hardware effects to a DAW track.
In all these cases, analog-digital converters are quietly working behind the scenes.
Why All This Matters to You
This has been a wild ride of technical trivia, but for music creators it's important shizzle to understand. The performance of an ADC shapes the raw material of your tracks. You can have the best mics, the tightest performance, and the cleanest, most acoustically treated room, but if your ADC isn't up to scratch, your original signal won't make it through to your DAW intact.
That's why understanding ADCs matters when it comes to:
- Choosing an audio interface
- Setting gain levels (i.e. staying within the voltage range)
- Resampling and printing external hardware and effects
- Choosing what sample rates to work with
The ADC is the gatekeeper between the analog world of music and the digital world of production. Whether you're recording vocals, sampling vinyl, or running synths through outboard gear, the ADC is always there, giving your creative ideas a reliable digital home.
So next time you hit record, remember: you're not just capturing sound - you're converting energy into code, through one of the most powerful little tools in music production!


