

It started with a fill. Phil Collins, to be precise. Unless you've been hiding in a hole on the side of a mountain all your life, you'll have heard the classic drum fill in his seminal hit 'In The Air Tonight', and whether you realize it or not, you've been exposed to Gated Reverb.
Don't panic though; this doesn't mean you have to clad yourself in spandex and use predominantly minor seventh chords in your music. While gated reverb is a nostalgic music production technique from the era that gave us Back To The Future and The Goonies, it's also a versatile trick to have in your production arsenal.
But what is gated reverb exactly? Read on, and you'll discover what it is, and how to create the distinctive sound for your own music.
What Is Gated Reverb?
It's important to understand how reverb works in order to understand how to use it in conjunction with a noise gate to get the gated ambience sound so beloved by the 80s.
If you're new to all things 'verby check out this article to get the low down. But if you're in a hurry, you need to know 'regular' reverb has a decay that rings out smoothly, gradually reducing in volume until it decays into silence.
Normally reverb is intended to sound natural, emulating spaces you might hear in real life. By applying a noise gate to the reverb effect the tail is cut short, or gated. It produces an unnatural but distinctive sound.
History Today: Who Invented This Sorcery?
While this article is predominantly about how to set up a gated reverb for use in your music, it would be remiss not to acknowledge the folks who invented the sound. More accurately, the folks who accidentally stumbled on it.
While recording Peter Gabriel's self-titled third album at Townhouse Studios engineer Hugh Padgham and producer Steve Lillywhite were using a talkback microphone to communicate between the control room and musicians in the instrument rooms. Traditionally, talkback mics were compressed and gated to cut through the noise as musicians carried on playing long after the tape stopped rolling.
At one point during a session, Phil Collins was playing drums in the studio while the talkback mic was still active, and Hugh Padgham heard the natural ambience of the drum room come through the monitors heavily compressed and gated. And thus was born the gated reverb effect.
When Do I Use Gated Reverb?
Typically gated reverb is used on drums to help them punch through the mix, providing space without the muddiness of a long reverb tail. It works particularly well on snare drums and toms, but can also be used on a kick.
In live situations, a gated reverb can be used to make the drum sound powerful and punchy while maintaining clarity and transparency to the overall mix.
The effect can also be used to create unusual textures and ambience on other instruments, for instance, vocals.
Since it's such an unusual and unnatural sounding effect it's always best to go with the less-is-more approach. Experiment away, but use your judgment to decide if it's adding to the song or not.
How To Set Up A Gated Reverb
And now to the hands on practical section!
There's two ways to go about doing it: the DIY method where you create the effects chain needed yourself; and using a dedicated gated reverb plugin.
DIY: Creating a gated reverb chain
In this example I'll demonstrate how to set up a gated reverb sound on a snare drum channel, but the process can be replicated for any track in your DAW . While it's totally possible to route the audio from your workstation to an outboard hardware reverb unit, it's more common to drop in a plugin on the track. Besides, I'm all out of patch cables.
Set up an auxiliary bus and send the original drum track to it
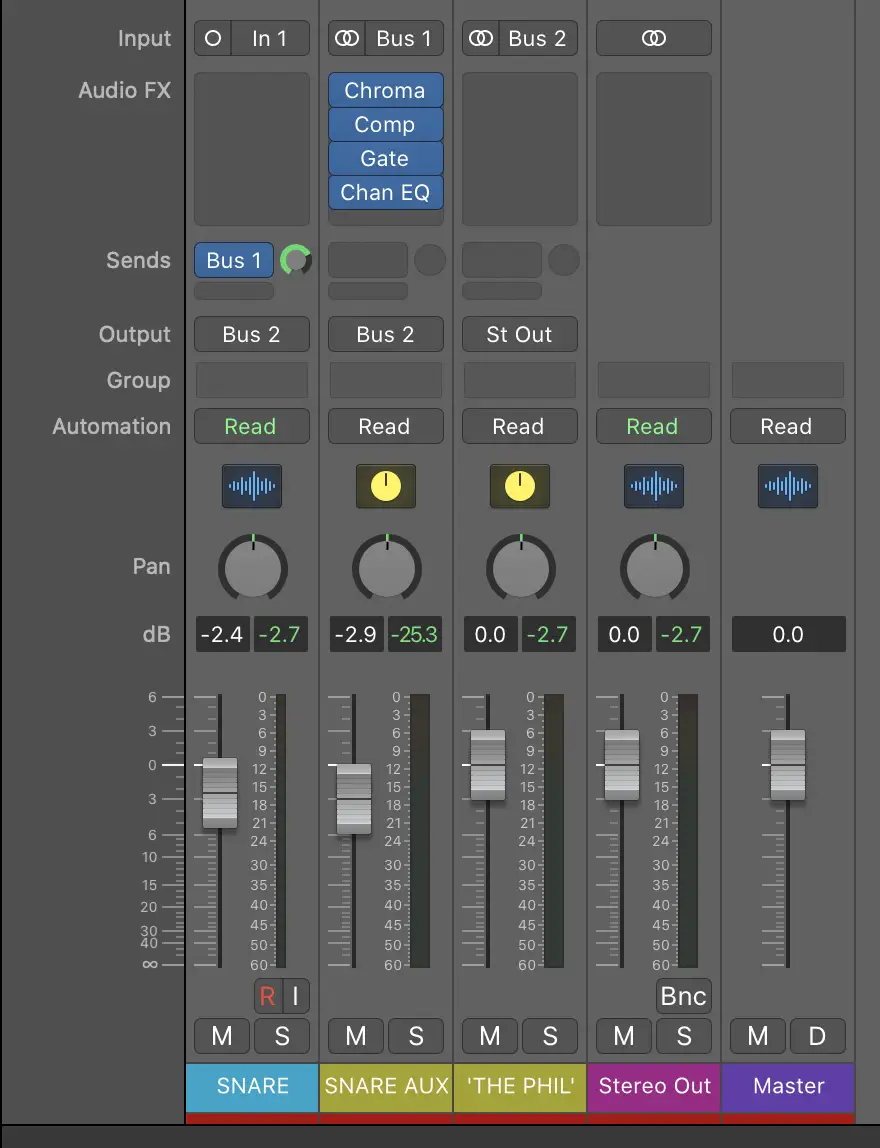
Isolate the snare drum by using a dedicated output, and route a send from this track to a new aux bus. In the above example I have the original snare signal output routed to Bus 2, and the aux send to Bus 1. This aux bus is also routed to the output Bus 2.
On the aux bus is where you'll insert the following effects:
- Reverb
- Compressor
- Noise gate
- EQ
You won't need the EQ until the mixing stage , but if you insert it now you can save the auxiliary strip as a new 'gated reverb' setting for future use.
Here's my snare drum without any processing.
Choose a reverb and compress it
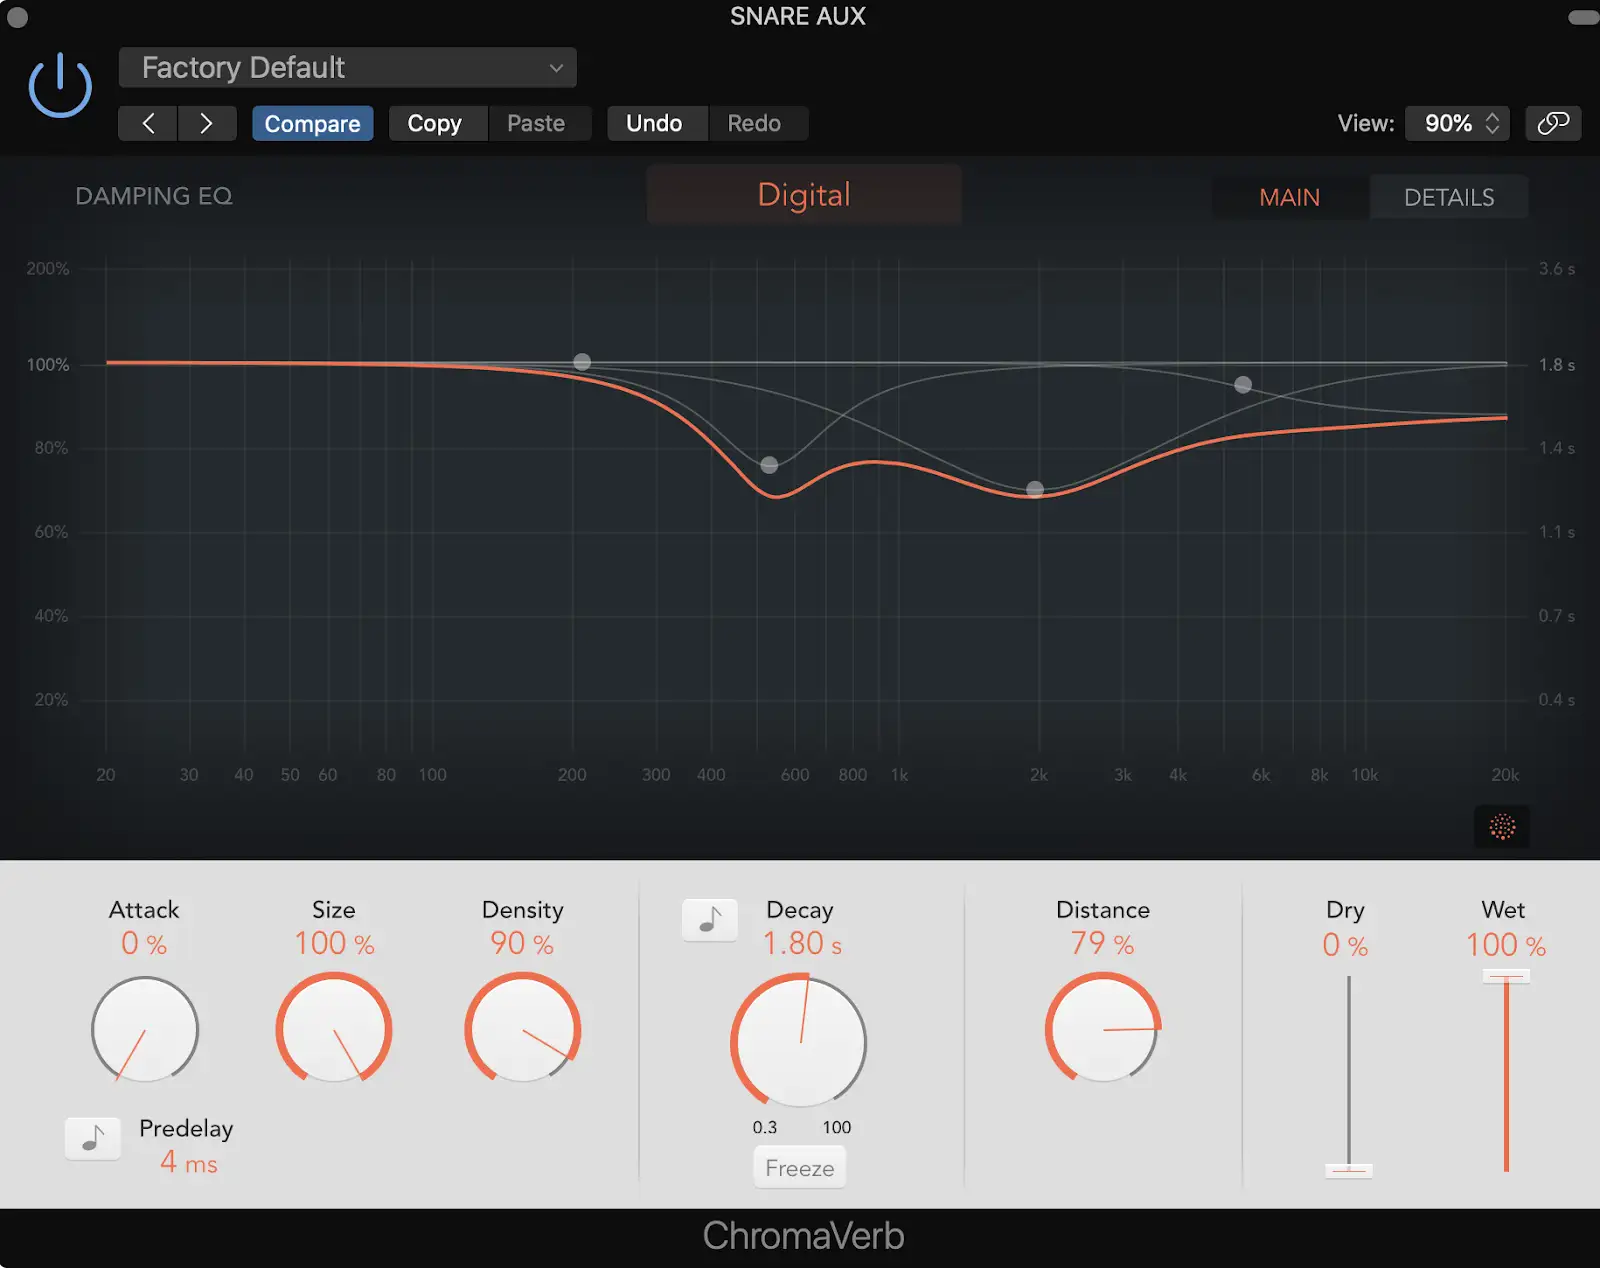
This is where you get to experiment to find out what reverb sound best suits your tastes. You may also find certain types of reverb work better with one song than another, so play around.
Make sure the wet output is set to 100%, and the dry signal is at 0%. Set the sustain and tail long enough that the volume doesn't wobble about. 1-2 seconds should be enough, but again - experiment!
Here's my snare with reverb.
Next, open up your compressor and lean into it. Start with the threshold at around -20dB, with a ratio of 5:1, and a fast attack and long release. No two sounds will be the same, so play around with these settings until it feels right for you.
Chain up your noise gate
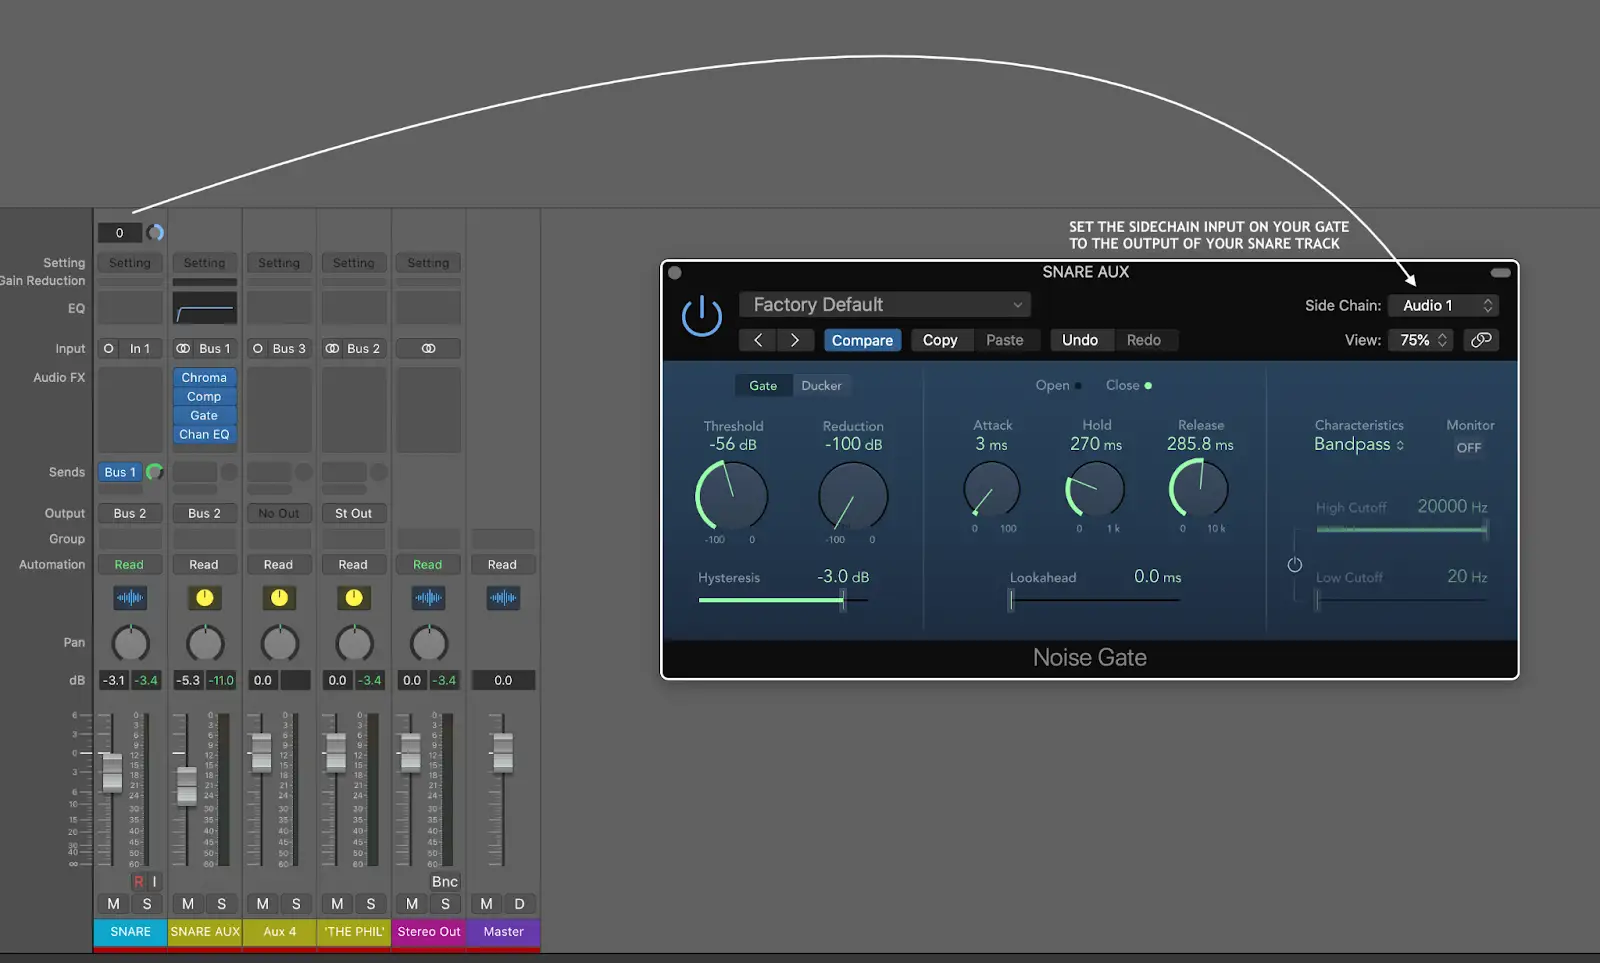
In order to create the distinctive gated sound you'll need something to trigger the noise gate. Obviously the aux channel isn't going to do this by itself because it's compressed unvarying level.
Instead, you'll need to use a sidechain trigger from the original drum sound. When the snare drum plays the noise gate will open up and your new effect will be heard in all its glory.
On the noise gate set the hold to 0.5 - 1 second, with a fast release. These settings will vary depending on the tempo of the song, but this is a good place to start. The hold tells the gate how long to stay open for, and the release tells it how fast to close. What you're aiming for here is for the hold to be long enough to hear the reverb sound, with an abrupt shut off that's slow enough to make a smooth transition.
At this point you should be hearing the gated reverb coming out behind the original track. Use the hold on the gate and the auxiliary fader to balance the levels of the effect and the original snare.
Here's my snare with the noise gate and compression added.
For more nuggets of knowledge on sidechaining check out this complete guide to sidechain compression .
Clean up the mess
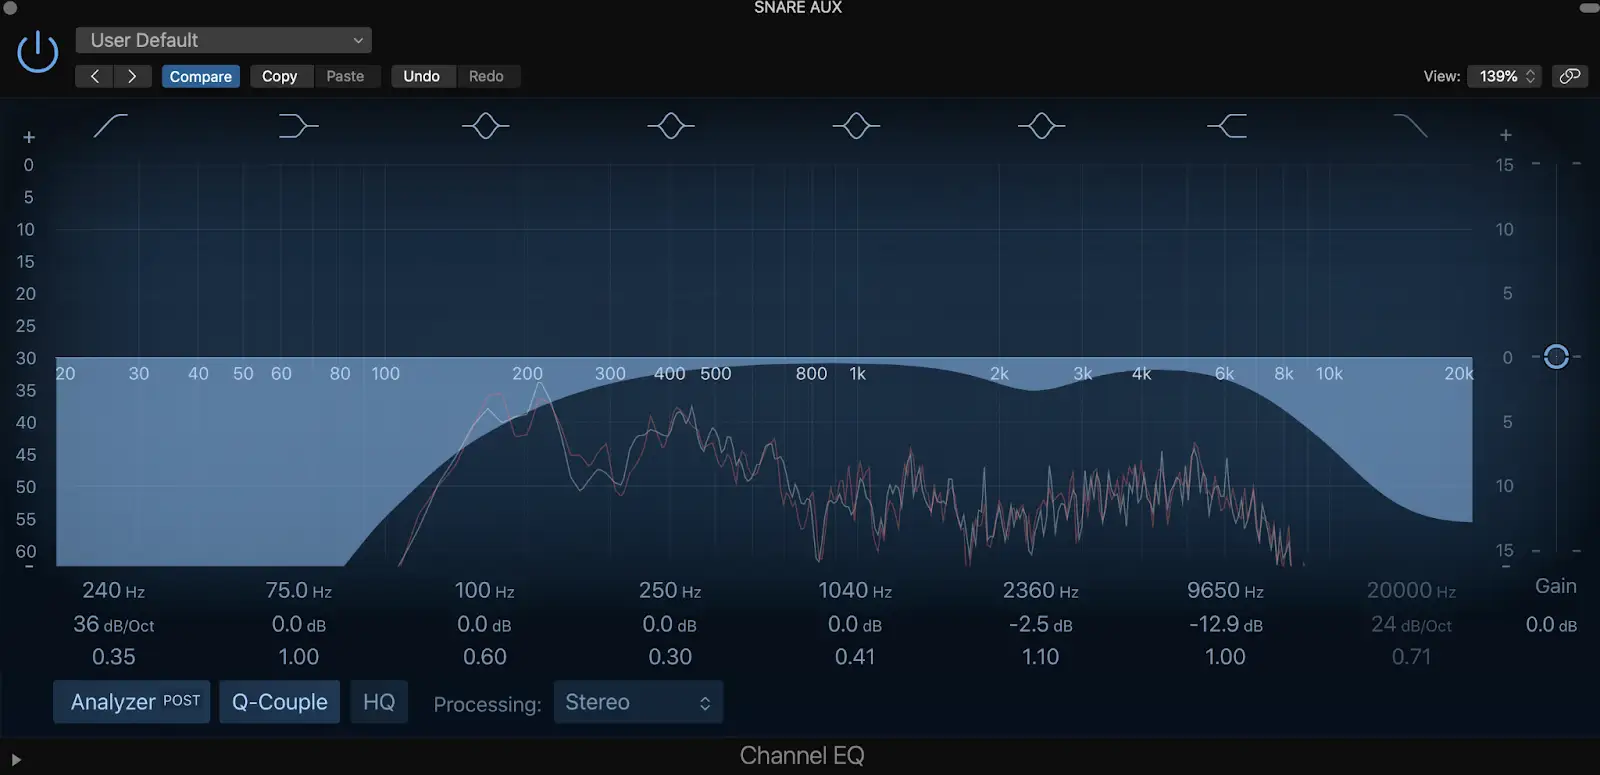
The reverb track may sound great in isolation, but in the context of a full mix it could muddy things up. Use a parametric EQ to clean up the signal. Start by using a low cut on anything below 500hZ, and drop anything above 7-8000hZ, and adjust to suit
Mix and match
Obviously you don't want just the gated reverb in the mix, so it's worth sending both the original snare drum and the gated reverb to a unique bus. In my example above it's lovingly called 'The Phil'. The output of both the original snare drum, and the aux send channel with the effects chain is set to Bus 2, where The Phil receives its input from.
This way you can adjust the overall balance of the snare drum in your mix whilst preserving the blend of the original and gated sounds.
Finally, here's the gated snare with EQ added to clean it up.
Dedicated gated reverb plugin
As mentioned there's the option of using a dedicated plugin that creates a gated reverb without manually setting it up yourself.
While these are handy, some would argue that they just don't sound as good, lacking the subtlety you get from a manual set up.
It's so simple to set up a gated reverb aux (and save it!) that it's worth doing to get an in-depth understanding of the process. But for those of you interested, read on to find a list of plugins that will do the job for you.
Best Plugins For Gated Reverb
Goodhertz Megaverb
A new take on an old classic, this plugin emulates the iconic digital reverb of the 80s but without the tiny screens and fiddly buttons. But it goes far beyond recreating a sound of yesteryear, and can be used to create unusual and interesting ambience for your music. A smooth and clean interface makes this effect easy to use and for the price, it is competitive.
Valhalla Vintage Verb
Another plugin you can pick up without breaking the bank! Valhalla DSP is well-known for developing excellent reverb plugins at the friendliest of prices, and Vintage Verb is no exception. Recreating a variety of reverberation types from the 70s to the present day it includes a non-linear reverb mode that includes gated and reverse reverb.
UA AMS RMX16
This is an emulation of the grandaddy of all digital reverb units. The original AMS RMX16 was the first mirco-processor controlled digital reverb and was heard all over the 80s, and continues to be used on many a recording today. Producers still seek out the the unique sound of this unit, and Universal Audio responded by developing a plugin version. The price is a little steep for budget-friendly musicians, but this effect is used by top studios and producers around the world, so you'll be joining a worthy family if you fork out for it.
Omniverb
Omniverb is a free reverb plug in that can includes a gate control on the interface. Unfortunately it's only available for Windows users. Sorry all you Mac users!
Saltline Lisc-Verb
Also another freebie, and also only available for Windows, Lisc-Verb has a multitude of controls to manipulate the ambience it creates. Most importantly (for this article at least) is the three reverb modes, which includes a gated setting.
Smart Electronix Ambience
Finally, a free reverb plugin that's available for both Mac and Windows users! As well being a versatile tool for adding regular lush reverb to your recordings, it also features a gate control allowing you to recreate the classic gated reverb sound within one plug in.
Never Let It Fade Away
Having grown up in the 80s I have a soft spot for music of that era. Others hate it. But life is nothing if not cyclical, and once again the 80s are influencing how we make music.
Gated reverb is like any other effect - learn to use it wisely and it will serve you well. You can go in with all guns blazing and sound like Peter Gabriel on Sledgehammer. Or you can use it in more subtle ways to help your drums pop.
Experiment with it. Play around. Just have fun. And who knows, maybe you will be the next person to accidentally create the next mind-blowing effect that will shape future generations of music makers.


