

While they might not be the most exciting tools for mixing, noise gates are significant for cleaning up a mix. However, if you don't understand how to use a noise gate properly, it'll be instantly noticeable in your mix.
To learn how to use a noise gate while mixing , come dive in with us as we explore what they are and how to use them properly.
What Is A Noise Gate?
The first thing you might ask is, What the heck IS a noise gate?
Noise gates are unique audio processors that control excess or unwanted noise present in an audio signal. In laymen's terms, noise gates get rid of noise you probably don't want in your mix in the first place while letting the sound that you DO want through.
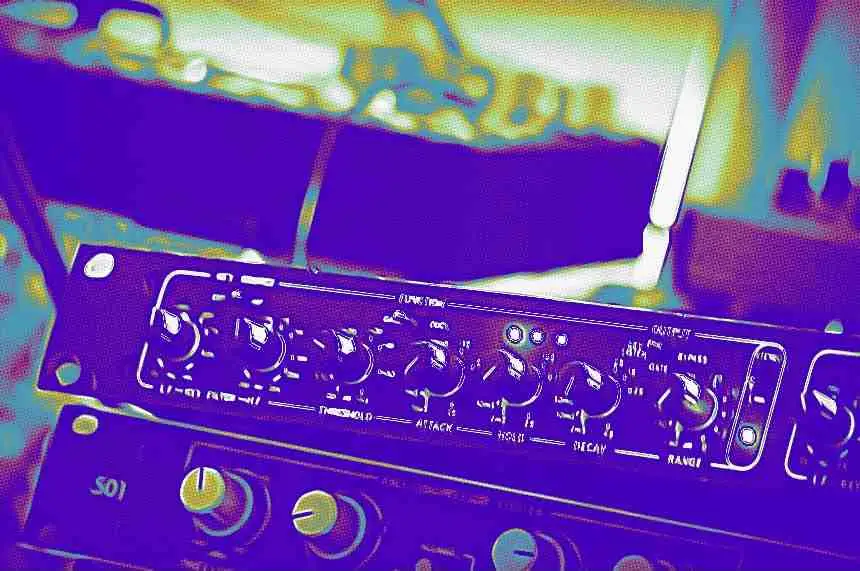
Today, you can find hardware and software noise gates, which come in the form of plugins , pedals, and hardware racks for live use.
We use noise gates because external or environmental noise often accumulates during the recording phase, building up and negatively impacting the integrity of a mix. For example, let's say you're recording vocals at home . You might capture the perfect vocal take, though you can hear your air conditioner humming in the background.
Instead of re-recording your vocal take, you could stick a noise gate on it instead to get rid of the unwanted A/C noise.
Noise gates are very similar to compressors and limiters in that they lower the volume when an audio signal passes above a certain threshold. Essentially, they regulate the amplitude of an audio signal.
There are many types of unwanted noise you might want to get rid of, including:
- Ambient or background noise
- Outside noise
- Room reverb
- Electrical (60Hz) hum
- Headphone bleed
- Fret buzz
- Movement in the recording room
To simplify it,
- When a noise gate opens , the sound comes through
- When a noise gate closes , the sound is muted
How Do Noise Gates Work?
Now you know what a noise gate is, the question becomes,
How do these things work?
Well, let's say you have an audio signal with a noise floor that is 60 Hz electrical hum from a microphone cable, the microphone's self-generated noise, and mic stand rumble. Pair that with the background sounds of the air conditioner and distant ambiance from outside, and you have a constant noise floor of about 10dB .
Now, of course, the last thing you want to do is have that amplified with the rest of your mix, so you add a noise gate that has an 11dB threshold, 1dB above the noise floor. At this point, any time that the audio signal volume falls below the 11dB threshold, your noise gate will mute it.
This explanation is the MOST basic, and the way a noise gate works is actually more complex. So let's hop in and explore how to use a noise gate in a mix.
How To Use A Noise Gate
- Place Your Noise Gate Plugin As An Insert
- Set The Threshold
- Set The Attack
- Set The Hold
- Set The Release
- Set the Range
- Set The Filters
- Set the Lookahead
- Set the Sidechain
There is no formula or secret trick for setting noise gates, as every performance and sound is different from the next. In essence, your parameters will change every time. However, there are some basics that you can remember when setting your gate.
Place Your Noise Gate Plugin as an Insert
Whether you're noise gating your snare drum, vocal, or guitar, you will place it as an insert on your track rather than creating a send or return track. It's as simple as dragging and dropping it to the audio track in question.
Set The Threshold
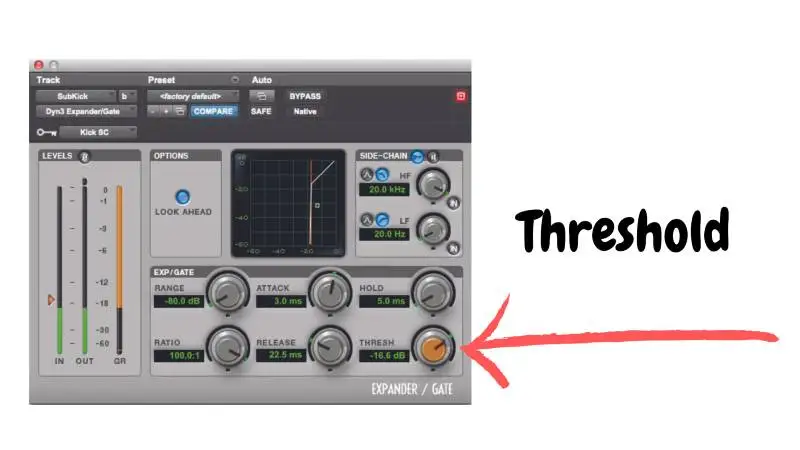
With all other noise gate settings set to default, you will begin by setting the threshold.
The threshold on a noise gate is very similar to that of a compressor in that the threshold determines the amplitude a signal must reach before it turns on.
However, the main difference is that unlike a compressor, which reduces the level of a loud signal, a noise gate allows louder parts of a signal to come through .
Essentially, once your signal is of louder or equal volume in relativity to the threshold, you'll hear it. All other parts of the signal below the threshold get turned down.
One of the easiest ways to determine how to set your threshold is by checking the volume of your signal using your meters .
Your meters can tell you how loud your unwanted background noise is.
Let's say you have a vocal track that sits around -10dB for the most part. However, the bleed from the air conditioner is around -20dB . You would set the threshold to -19dB to get rid of the air conditioner bleed without impacting the vocal.
Set The Attack
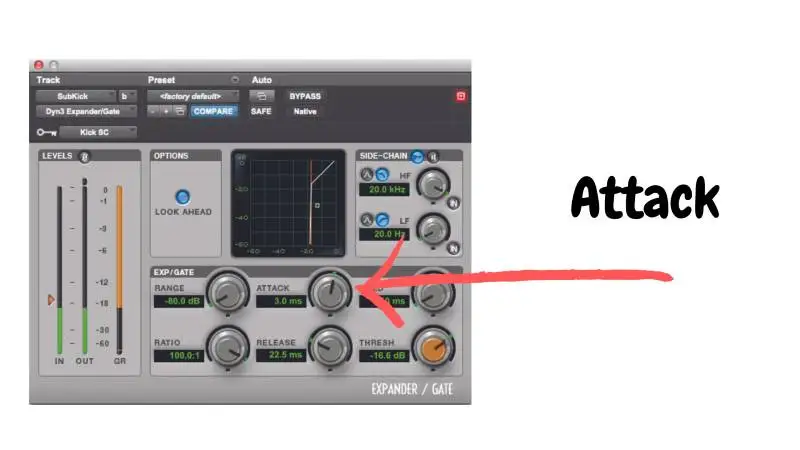
Attack controls the amount of time it will take for the noise gate to open up.
More often than not, you're going to want a fast attack rather than a slow attack. The only reason you would want to use a slower attack setting is if you want the initial transient of the instrument to pop through, such as a snare drum.
However, we recommend using a compressor for a job like that instead.
You should set the attack fast, so the entire audio signal comes through after exceeding the threshold level. If you feel that the sound of the gate is too abrupt, you can dial it back slightly to smooth it out.
Set The Hold
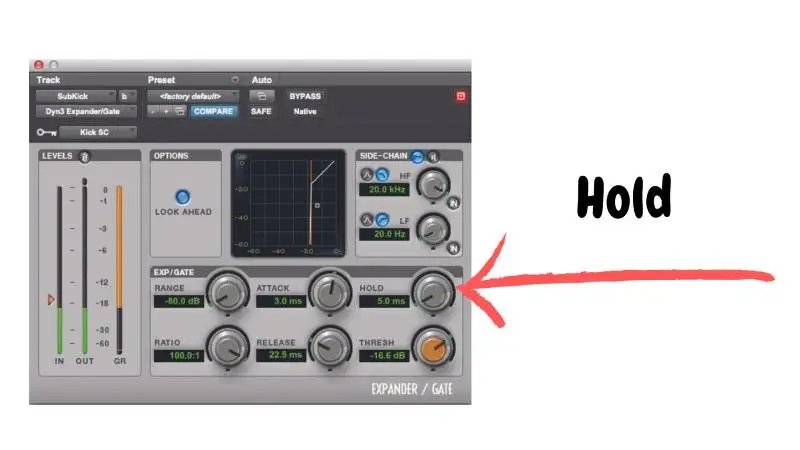
As you might have guessed, the Hold setting holds your gate open.
At this point, you'll want to slowly increase the hold so that the gate isn't activating between the notes your instrument is playing or words your vocalist is singing. You can think of the Hold parameter as a preliminary release .
If your signal sounds choppy when the gate closes down on it, adjust the hold control, so the gate remains open for a longer period.
Set The Release
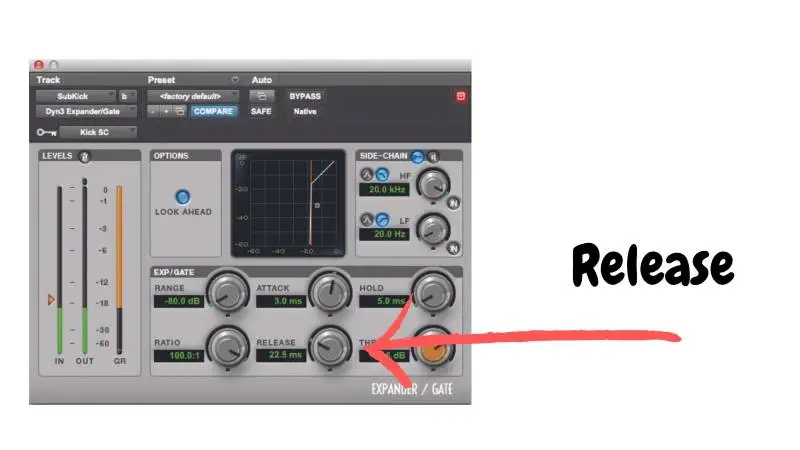
The release is the time that it takes for your gate to close in full after the signal falls below the set threshold. You can think of it as the fade-out duration .
To set the release time properly, you'll want to listen to where musical phrases end, so you know where the gate kicks in. Then, adjust the release slowly until the decay of your vocalist or instrument decays out long enough before dipping below the threshold level.
If you are using your noise gate on a snare drum, for example, you might want to let the snare ring out long enough to get the full body of it, though not so long that you introduce noise.
A fast release time could end up chopping off the end of your signal, and more often than not, you'll want it to decay naturally.
Set The Range
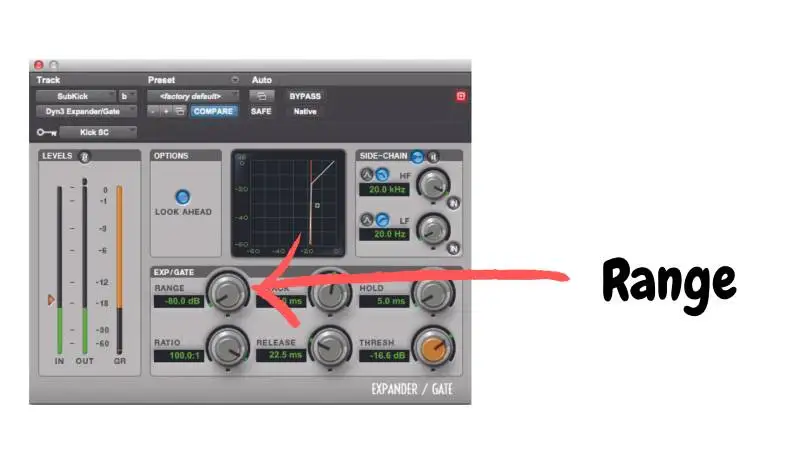
By default, you probably have your Range control set so that it is muting the background noise when the gate closes. However, depending on your signal and settings, this could be cutting off the decay of your signal abruptly. If you want a subtler gate sound, you might choose to raise the reduction, so it's around -10dB or -20dB .
These settings provide a much more natural gated sound instead of muting the signal completely when it falls below the threshold.
Set The Filters
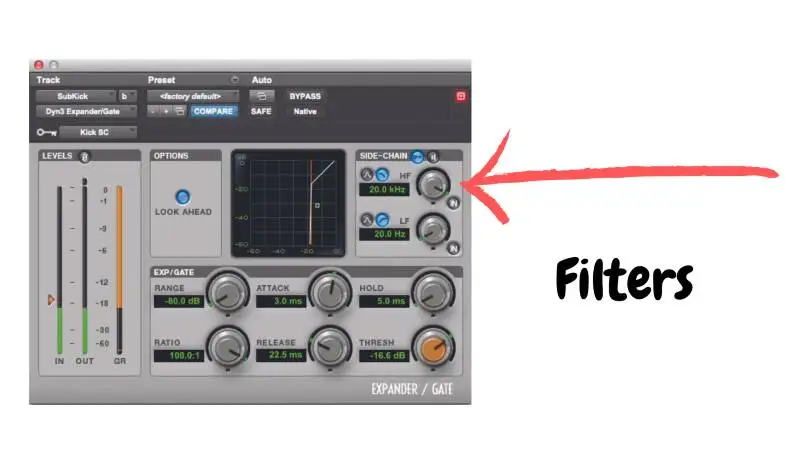
When it comes to noise gates, filters work a bit differently. You can think of the filters as the frequency band settings in which the gate works.
However, rather than using these filters to get rid of frequency content, these filters talk to your gate, telling it to ignore this frequency content.
Essentially, any frequencies that you filter out won't open the noise gate.
These filters can be helpful in a variety of situations, though they are especially useful on drums. For example, let's say that you've put a noise gate on your snare track to get rid of kick drum bleed. You can add a high-pass filter to your snare's noise gate so that it does not open when the kick plays.
Even when the noise gate opens, you won't hear the kick because of the high-pass.
Do note that noise gate filters DO NOT impact the tonal qualities of an instrument. They only affect the accuracy of the noise gate.
Set The Lookahead
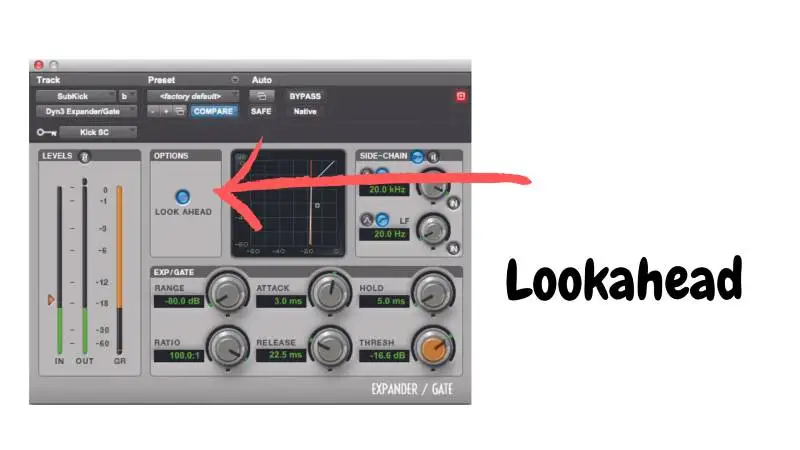
Some digital noise gates come with "Lookahead" parameters, which can help in looking ahead to see how soft or loud the instrument will be in the future. The beauty of this setting is it provides the gate with a warning that it will need to open up, making it less likely that the beginning of the signal gets chopped off.
The Lookahead setting can be especially useful for drums and vocals. While some noise gates only have Lookahead buttons without movable settings, some allow you to adjust the Lookahead in milliseconds .
In my experience, you only need a few milliseconds for your Lookahead time to get it right.
The main downside to the Lookahead feature is that it often eats up CPU, so try not to use a million noise gates with Lookahead on at once.
Set The Sidechain
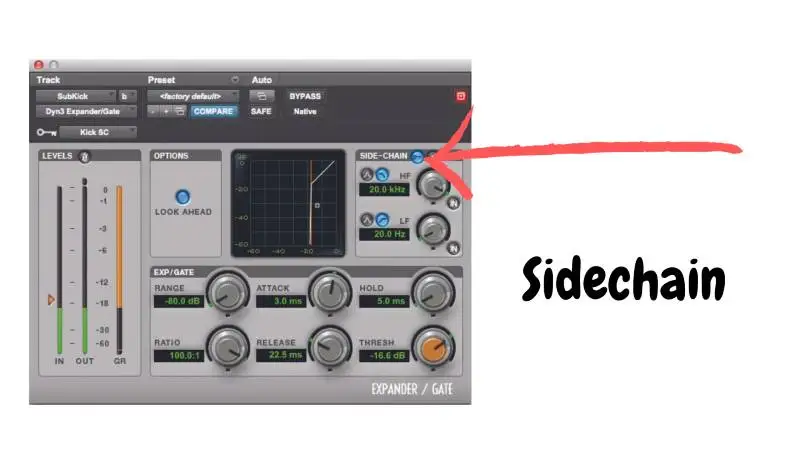
In many cases, you'll find yourself using the sidechain setting on your noise gate.
Sidechaining is great, as it allows another instrument to trigger the noise gate on the instrument you have it inserted on. Thus, you can think of the sidechain as an additional input on which the noise gate will act.
Let's say you have a gate on a bass synth, though you've set the sidechain setting to your kick. When the kick gets louder than the set threshold, the gate opens up. In essence, it makes it, so the bass synth quiets down whenever the kick hits, making your kick sound much punchier.
Best Uses For Noise Gates
Vocals

We often recommend placing a gate after everything else in the mixing signal chain when it comes to vocals, as EQ , compression, saturation, and modulation effects often bring out noises that aren't otherwise audible. For best practice, we recommend placing your gate just before you send your vocals out to any delay or reverb .
PRO TIP: Make sure you're careful when using a noise gate on your vocals so that you don't cut out the sound of the breaths in between your vocals.
Guitars
If you're working with heavily distorted guitars, chances are there is a lot of noise in the signal. Because distortion applies quite a bit of compression, it often brings out unwanted finger noises and hand movements. To keep your riffs and licks sounding pristine while getting riff these non-musical sounds, you can employ a gate.
It is best to place your gate at the start of the signal chain before your EQ and compression. However, if you plan on using more saturation or distortion, place your gate after those plugins.
Drums

Another incredibly popular place where we often see noise gates employed is with drums.
For example, let's say you've recorded an entire drum set in a live room with every piece of the kit playing simultaneously. Even if you're using directional microphones, you'll still pick up noise from the other drums, as well as noise in the room.
While this isn't necessarily a bad thing, it can limit the way you process individual drums. For example, let's say you want to add reverb to your snare without adding it to your kick drum and hi-hat. The only way to do it is to isolate your snare sound with a gate so you can manipulate it in the mix without affecting your other drums.
In this instance, the beginning is the best place to put your gate in your signal chain.
Effects
Music producers will often use gates in creative ways to enhance their tracks in unnatural ways. Here are a few creative ways to use noise gates:
Gated Reverb
Gated reverb was very popular in the 1980s. You can hear it on tracks like "In the Air Tonight" by Phil Collins, where the reverb pops off the top of the snare and decays in an instant. However, we're starting to see this effect pop up more and more in modern genres, such as synth-wave.
Trance Gating
EDM producers often use this technique to tighten up performances and create unique pumping effects that they can time to the rhythm of the song. Organic music producers will use a similar method known as multi-latch gating , in which they record the signal from several microphones, increasing the distance between the source and the capture with each microphone.
Noise Gate FAQs
Where Do You Use a Noise Gate?
You can use a noise gate in any situation where you want to cut out unwanted noise or unwanted sounds from your recording. If you're putting a noise gate in your signal chain, your best bet is to place it directly after the place where unwanted noise is coming from.
Is a Noise Gate Cheating?
No, using a noise gate is not cheating. In fact, using one can be very helpful in getting your desired sound, especially if you're working with low-quality audio recordings made in lousy recording environments.
Do I Really Need a Noise Gate?
While you don't necessarily need a noise gate, it can make the editing and mixing process a whole lot easier. But, of course, if you're going for a completely natural sound, you might want to consider editing any noise out of your audio tracks by hand instead, as it'll allow you to retain more of the human performance.
Do I Need a Noise Gate For Recording?
If you want to eliminate sounds present during the recording process, then using a noise gate for recording can be extremely helpful. For example, a recording studio you're recording vocals in might have an air conditioner running in the background that you want to cut out before committing to audio tape or computer memory.
What Is The Difference Between a Noise Gate and a Compressor?
A noise gate is made to remove noise and other unwanted sounds from your recorded signal, while a compressor evens out the dynamic range of a signal by lowering the loud parts and bringing up the quiet parts.
What Is The Difference Between a Noise Gate and a Noise Suppressor?
A noise gate is made to block out the entirety of the signal until the level rises above the threshold. On the other hand, a noise suppressor is only made to remove hiss and hum, never truly closing all the way.
Will a Noise Gate Stop Feedback?
A noise gate can stop feedback up to a certain point. However, because feedback continually increases in volume, getting louder the longer you allow it to, it will eventually reach a point where it's louder than the signal.
Should a Noise Gate Go In The Effects Loop?
Many noise gates come with a send/return loop , meaning you can place your noise gate after your noisy pedals, such as your distortion, fuzz, or overdrive pedals in the loop, instead of having it sit at the very front of your chain at all times.
Are Noise Gate Pedals Worth It?
A noise gate pedal is a great investment if you have a noisy signal chain. Metal guitarists often use these pedals, especially if they're using high-gain amplifiers with tons of distortion and other noisy effects pedals.


