Mid Side Compression is a powerful tool for building stereo width and taming your track's overall stereo mix. However, this tool is largely misunderstood throughout the world of audio production.
We'll break down everything you need to know about mid-side compression below so that you can take ownership over your song's stereo image. We'll also explain a couple of key tips for using mid-side processing as a whole. Let's jump into it!
How Does A Compressor Work?
To start, it's important to understand how a basic compressor works since mid-side compression is a subset of traditional compression. Compressors are used to reign in the dynamic range , or distance between the quietest and loudest sections of an audio signal.
A compressor can reduce the loudest sections of a signal and bring up the amplitude of the lowest sections of a signal. The result is a more dynamically consistent track. The processed signal can be more pleasant for listeners since there aren't any jarring volume peaks or valleys while listening.

However, it's important to note that compression can have its downsides too if overused. An overly compressed sound can be completely devoid of energy and dynamics that give a track its character. Like any other audio tool, you need to be mindful when using these digital processors.
There are several types of compression including side chain compression , parallel compression , and multiband compression . Compression is unique in that its used throughout the recording, producing, mixing, and mastering processes. It just goes to show you that you shouldn't pass up the opportunity to implement compression throughout your audio production workflow.
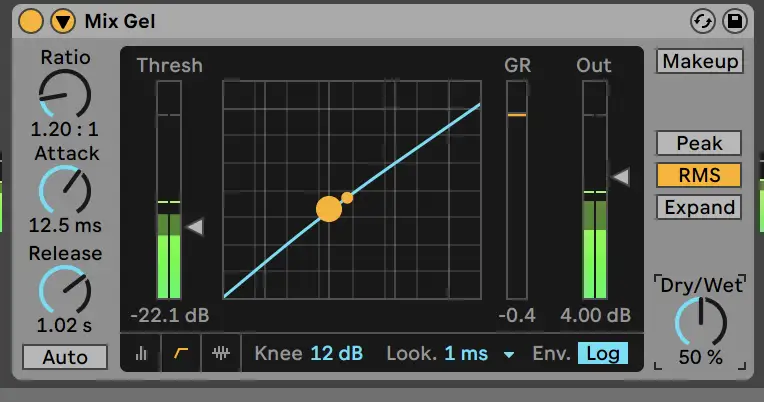
While there are different types of compressors, many digital processors share all the elements of a basic compressor, they just utilize these tools differently. Attack and release times determine how fast a compressor works, the threshold determines at what point a compressor starts working in regards to amplitude. You'll also find a gain reduction meter on most compressors.
The gain reduction value can serve as an indicator of how hard a compressor is working. The higher the gain reduction level, the more intense the compression will be. Since compression can sometimes squash perceived volume, there's also a value called makeup gain. Makeup gain will essentially raise the amplitude of the compressed track after it's processed to make up for any lost volume.
What Is Mid-Side Compression?
Now that you understand how a basic compressor works, we can dive into the world of mid-side processing. Essentially, mid-side processing separates the stereo signal in such a way that you're able to control the mid and side signals independently across an entire stereo mix or processed track.
This is unlike traditional mono or stereo processing which affects the entire signal. Mid-side processing, as the name suggests, separates the mix into mid and side channels. So where does compression come in?
Essentially, mid-side compression is just a subset of mid-side processing where your compressor is targeting mid and side channels as opposed to left and right channels you'll find in a more traditional stereo imaging session.
Plenty of compressors and other plugins have a mid-side mode that allows you to process stereo signals in this way. However, it's important to note that mid and side channels aren't fully separated. Just like a multiband compressor , mid-side compression has crossover points across the stereo field where the mid and side channels overlap one another. Therefore, it's important to check for phasing issues and fully grasp the concept of mid-side processing before incorporating this technique into your mix.
Generally speaking, you'd want to use mid-side processing or compression when you want more control over your stereo mix. This approach gives you more flexibility in terms of dynamics and shaping your sound in reference to the frequencies covered in your track.
Visualizing The Mid Side Stereo Image
Since mid-side processing requires a different interpretation of the traditional stereo image, it can be helpful to visualize what exactly a mid or side channel refers to.

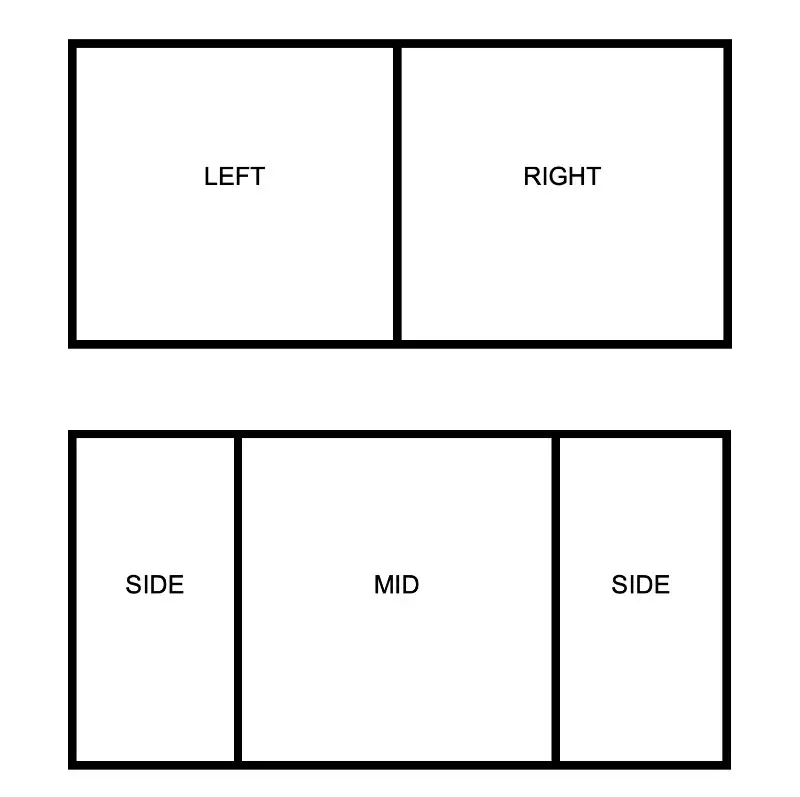
Above, you'll see the traditional stereo image, which is separated by the left and right channels. While this is a totally valid way to visualize sound, it may lack some nuance that might be picked up in mid-side mode.
As shown, mid-side processing separates the stereo image into the mid channel and two side channel sections of the stereo signal. So, what makes this stereo width interpretation helpful?
Simply put, some sounds are more accustomed to rest in the mid channel for an optimal listening experience. Mid channel sounds are often the backbone behind a track. For instance, an engineer may aim to place the lead vocal, drums, or bass line directly on the mid channel. If these tracks are otherwise spread out across the stereo image, they could lose some of their presence, especially with a lower frequency-range track like a bass.
While you can still create this distinction between key track elements and the rest of the mix with traditional stereo imaging, you might not have as much control as you would with mid channel and side channel processing. The mid-side compressor gives you more power over the placement of your sound depending on the design of your mix.
Just note that with nuance, comes greater responsibility. You'll need to think more about phase relationships with mid-side compression and take care not to overdo it. A song processed with mid-side compression or mid-side EQ should still sound like a single, cohesive song.

How To Use Mid Side Compression
So, what exactly do you use mid side compression for? Here are a couple of scenarios in which it makes sense to try out this technique.
Shaping Transients
Mid-side processing and compression can help you shape transients on individual tracks, but also on a full mix. This powerful shaping tool gives you more accuracy than a traditional compressor and is well suited for mixing music that may have a lot of lower frequencies that could mud up the entire track with a traditional stereo mix.
Adding Clarity
Mid-side processing can transform a dense mix into a clear one through more precise stereo imaging. For example, bass or kick drum sounds can easily dominate and cloud the rest of your mix, since low frequency sounds typically perform best in mono or spread to a minimal degree. Mid side processing makes keeping these sounds directly in the center a breeze and will clear up your mix as a result.
Controlling Dynamics
Since mid-side processing gives you more control over the stereo field, you're able to have a better reign on the dynamics of your song. Also, a mid-side compressor is still a compressor, so it will create more consistent dynamics throughout your mix by nature, all while providing you with that extra element of flexibility.
Widening Your Master
One of the most effective ways to use mid-side compression is to create a wider stereo image. Since you're able to separate the stereo channel into different sections, those high, side frequencies have a boosted effect without picking up some of the low frequencies that are likely placed in the middle of your stereo field. This will make your music feel bigger, even if you aren't using more compression relative to a traditional mix.

5 Tips For Using Mid Side Compression
Mid-side processing is undoubtedly powerful, but it takes a skilled engineer to thoroughly understand when and where to use this technique. With that in mind, here are a few key pointers to consider when integrating mid-side compressors into your workflow.
1. Don't Forget To EQ
Before you use mid-side compression, make sure that you clean up any unwanted frequencies with an EQ. For instance, you can help tame low frequencies by placing them on the mid channel, but a compressor will only amplify what is already there. Your sound should be as clean as possible before amplifying it through processing. Also, consider other tools in your toolbox as well.
You could use something like multiband compression or parallel processing to help gain control over your dynamics. These methods are all similar but different, so it's worth playing around with them to find out what pairs best with your stereo effects.
2. Check For Phasing Issues
Any time you're processing two or more similar pieces of audio, you run the risk of ruining phase relationships between the different parts. This is why it's so important to be particularly vigilant with mid-side processing: Since you're compartmentalizing the stereo field, differences in stereo effects across each channel can lead to a problematic mix. Make sure you take the time to properly test your music on various playback devices and pay extra care when applying compression to the entire mix.
3. Automate Your Compression
A great way to keep your dynamics lively while still retaining consistency is to utilize the power of automation. Remember, your stereo imaging representation shouldn't stay static. The way your music moves should hold differently when moving from say, a verse to a chorus . For instance, you may want to experiment with creating a wider stereo image during the chorus of your mix.
4. Remember That There's Overlap
Don't forget that just like multiband compression, there is frequency overlap with mid-side processing. That means that one channel isn't totally independent of the other, and you'll probably have some cross-over between the side left channel, mid channel, and side right channel. While many mid-side processing tools allow you to solo out each of these sections independently, you'll want to make sure you test the whole sound of your full mix just as carefully.
5. Don't Overdo It
Don't forget that mid-side compressors are still compressors at the end of the day. Therefore, you can easily squash dynamics completely and suck the life out of your song by applying too much of this processing type to your full mix. Use this processing method carefully. It can certainly bring out the best in your mix, but it can also destroy a song if it isn't used with nuance.
Hence, mid-side compression is an incredibly powerful tool that can take a mix from good to great. You might not use mid-side processing on every mix, but it's certainly worth understanding as you grow throughout your music career. Enjoy incorporating this powerful technique into your mixing workflow.


