

Parallel compression is popular amongst most mixing engineers, and with good reason. This audio processing method is more specialized than traditional compression and gives modern mixes a fuller dynamic range.
But what does that mean anyway? We'll break down exactly how to use parallel compression and share a couple of ways it can benefit your entire mix. By the end of this article, you'll be able to use this processing method using the tools you already have in your DAW . Let's dive into it!
What Is Compression?
Before we explain how parallel compression works, it's essential to understand the broader category of compression as a whole. Essentially, a compressor works by reducing the dynamic range of an audio signal . Compressors create a more consistent listening experience by bringing down the loudest amplitude peaks and turning up the lowest ones.
This way, listeners aren't perceiving drastic volume changes while listening to a track, even if it was recorded that way. One of the easiest ways to visualize this concept is to think about recording a vocalist : A singer can naturally have huge volume leaps when singing soft parts of the track verses belting.
While you want to preserve the original energy of the lead vocal, a compressor can help even out the source material so that you're not straining to listen to different parts of the vocal performance. Within the world of compressors, there are several different types of compression including parallel compression, mid-side compression , multiband compression , and side-chain compression .
It's important to note that most compressors process a sound utilizing downward compression. Downward compression works by lowering the amplitude of sounds above the threshold or set ceiling. The opposite of downward compression is upward compression. Upward compression works by boosting the volume of any sound lower than the set threshold or ceiling.
While upward and downward compression both reduce dynamic range, there are subtle differences between the two types. Some mixing engineers prefer to use upward-based compressors when processing something like vocals since it keeps the loudest parts of the signal largely untouched and sounding natural.
However, it makes more sense to use downward compression for shaping a specific sound. For instance, de-essing tools are downward compressors since they work by attenuating the harsh "S", "P" and "T" sounds. You might also opt for a downward compressor while shaping drums.
The Different Parts of The Compressor
Dynamic range compression is one of the most important audio shaping tools that's uniquely used throughout the recording, producing, mixing, and mastering process. While each compressor might have its own set of additional controls, the core parts of the compressor are more or less the same as discussed below.
Attack
The attack determines how fast the compressor will clamp down on an audio signal. A fast attack will tame the dynamic range of an audio signal quicker than a slow attack. Altering the attack and release controls and listening to produce the desired effect is one of the best ways to create the compression sound you're looking for.
Release
Attack and release controls dictate the desired amount of processing on an audio signal. The release tells the compressor how long it should process a sound before releasing its processing.
Threshold
The threshold or ceiling determines at what point a compressor starts processing a sound. In the case of downward compressors, any sound at or above the threshold will be attenuated. With upward compression, any sound at or below the threshold will be brought up. Notice that each method still effectively reduces the dynamic range of the processed signal.
Ratio
The ratio determines how strong the processing is. A great ratio equates to a more processed signal with less dynamic range.
Knee
While not all compressors have a knee, the knee is defined as the slope of your compression processing. A hard knee makes for more jarring, precise processing whereas a soft knee makes for a more subtle effect.
Makeup Gain
Sometimes, you can lose overall gain from compressing a signal with downward compression since the compressor is designed to clamp down on the peaks in a piece of audio. Make-up gain helps boost the overall amplitude of the processed audio signal after it's been compressed.
Gain Reduction Meter
A gain reduction meter showcases how hard the compressor is working to attenuate a piece of audio. The amount of gain reduction is equal to the amount of amplitude your compressor is squashing when a portion of the signal exceeds the threshold. Gain reduction is also an integral part of mastering, so you'll definitely want to keep tabs on this value throughout the creation process.
What Is Parallel Compression?
Parallel compression, otherwise known as New York Compression, is a form of processing in which audio engineers blend a dry, unprocessed signal with a compressed version of the signal. Parallel compressors aren't necessarily a special type of compressors on their own. Instead, parallel compressors are compressors that are placed on an auxiliary send track.
What this means is that you're only sending a portion of the audio to be processed. Your send amount conveniently determines how much of your signal is being "sent" to the aux track. The remaining amount is left dry, or processed according to what you have on your audio signal's channel strip. Don't worry if you're confused. We'll outline exactly how to set up parallel compression below.
Parallel compression is well-loved by producers and audio engineers alike since it hits the sweet spot between consistent and dynamic that can be challenging to recreate with a signal compressor. By blending the compressed signal with the dry signal, you have more control over the overall dynamics and feel of the signal.
The vast majority of modern music uses parallel processing based on this principle alone. Note that many plug-ins have dry and wet knobs allowing you to process a portion of the original track through an effect chain.
While in theory parallel processing acts in the same way, you won't have the same controls over dry and wet signals since they are still processed within the same track. The dry track and wet track are still compressed in the same space if blended with a dry and wet mix knob.
A parallel setup makes it so you can EQ and process the wet and dry signals independently, which makes a lot of sense since processing like compressing can certainly change more than the original dynamics. Therefore, parallel processing and using a dry and wet mix knob are similar but ultimately different.
A parallel setup gives you two paths for processing a single audio track. By blending the heavily compressed signal with a parallel compressor with the dry signal, you get the best of both worlds.
Note that you can process different audio tracks at the same time by sending them to the same parallel compressor. In this case, the aux send track could be defined as a parallel bus. Parallel busses are perfect for parallel processing multiple tracks that should more or less have the same sound. For instance, it might make sense to process multiple vocal layers through a parallel compression bus.
In simple terms, parallel compression boils down to sending part of your signal to a send track with compression. An aux send track doesn't necessarily have to hold compression, it can hold any effect or processing, just like a traditional audio track.
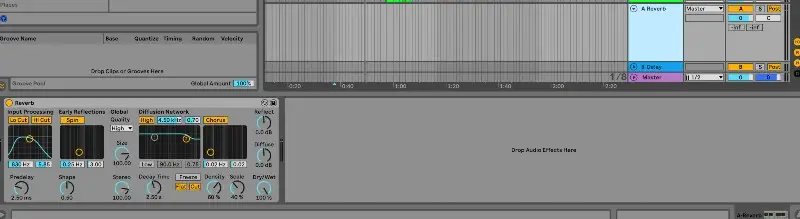
As shown above, Ableton Live gives you two send tracks by default, a reverb and delay . You can add a separate compressor send or edit one of the preexisting sends in order to prep your DAW for parallel compression:
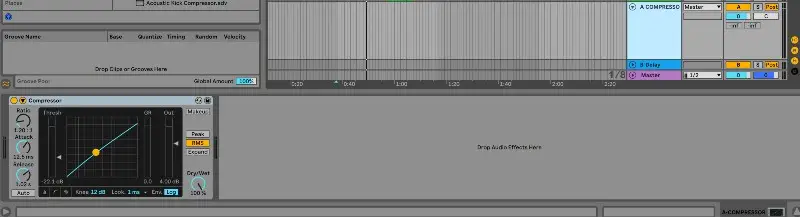
Notice how send A has now been updated from reverb to compressor since the send effect has been replaced in Ableton Live.
When Should I Use Parallel Compression?
You should use parallel compression for just about any instance where you might want to use compression with a strong degree of control. Here are the 3 main scenarios in which you'll be utilizing parallel compression.
Controlling The Dynamic Range
Just like traditional compression, sidebar parallel compression, multiband compression, or any other type under the compression umbrella, parallel compressors aim to tame the dynamic range of the track.
However, parallel compression techniques are often more subtle and precise, making them excellent at maintaining the original signal's live dynamics. That being said, if you're looking to use heavy compression on a track, there's no need to utilize parallel compression. The key difference is that parallel compression gives you more control over the blend between the compressed signal and dry signal.
Shaping Transients
Compressors can help shape waveforms which is why they are so useful when processing items like a dry kick or full drum kit. You might want to opt for parallel shaping as opposed to a straight-on compressor since you might not need to reign in the dynamics. Having the flexibility of the blend of the two signals makes it easy for you to create the sonic shapes you're looking for, all without losing power from aggressive compression.
To "Glue" Sounds Together
Any form of compression isn't just for processing one track, it can also be incredibly useful for bringing tracks together. For instance, you may have four speakers creating background vocals for a song. Using a parallel compressor within a send bus can help you process these similar tracks the same amount without heavily compressing the integrity of the original dynamics.
How To Set Up Parallel Compression
Understanding parallel compression is one thing, using parallel compression is another. We'll walk you through exactly how to set up parallel compression so that you can start using this unmatched processing method in your songs.
Hardware Parallel Compression
Setting up a hardware compressor can be a bit more challenging than creating a parallel setup in your DAW, but not too tricky as long as you have a functioning patch bay. To start, set up patch 1 as your dry, uncompressed signal.
Next, you would take an output of your dry signal and use it as the input of your hardware compressor. Finally, you would use the output of your compressor as your input for aux 2. This way, aux 1 serves as the source signal, and aux 2 hosts the one compressor blended with the track. Using the mix knobs, you can apply parallel compression by balancing the ratios between the compressed signal and dry sound.
DAW Parallel Compression
Any DAW can be used to perform parallel processing. A digital setup can also be easier to configure since you can toggle one or five compressors at once with the click of your mouse. We'll be demonstrating the setup for Ableton Live, but note that all DAWs have a similar process for creating parallel compression.
To start, identify a source track you want to use one compressor on via parallel processing. In this example, I selected the lead vocal track.
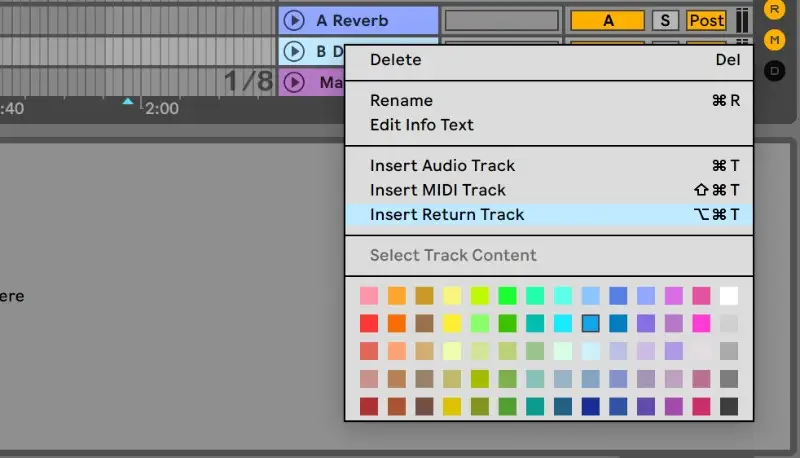
Next, right-click near the master track in Ableton Live to select "Insert Return Track":
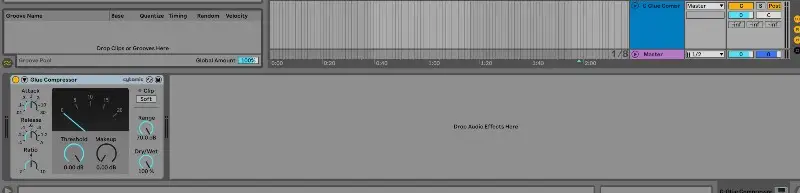
Once you've created the aux track, you can pick out a compressor. Place the compressor on the newly created return track like so:
Finally, return to the source track and adjust the send levels to send some of the signals through the compression. Note that sends will pick up on any processing on the original track applied pre-fader, so be mindful of your routing.
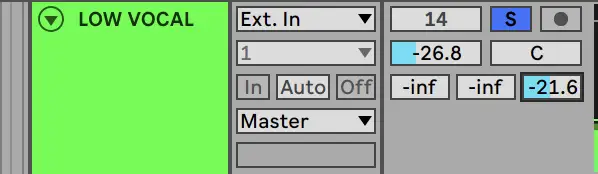
In Ableton, you can simply adjust the blue bar amount (In this case, the compression is on the third send track so I have to adjust the third one) in order to control how much of the signal you're sending through the compressor.
As shown above, the light blue -21.6 showcases how much of the vocal I'm sending to the compressor. Be sure to keep an eye out for output level as well since parallel processing can unsurprisingly bring up the overall amplitude of a signal.
6 Tips For Using Parallel Compression
Now that you know how to use parallel processing in your songs, it's time to put those new skills into practice! Here are a couple of tips to keep in mind while you're using parallel compression in your tracks.
1. Bring Your Drums Together
One of the best ways to process your song's drum kit is with compression. Not only can compression help solidify the dynamics of your drums, but it can also help shape the transients to create a consistent output level and listening experience. Experiment with sending drum parts to compression sends individually, and also through a grouped bus. You'd be surprised just how much difference a single send can make!
2. Work With Your Vocals
Main vocals can often benefit from a little parallel setup. It's challenging to keep the necessary energy from the original recording all while taming the dynamics. Thankfully, parallel compression can make this predicament a lot more manageable, so consider setting up those extra sends the next time you're mixing vocals.
3. Automate Your Sends
A great song is one that's dynamically interesting. Therefore, don't be afraid to automate your parallel compression! You can easily create dynamic contrast by automating the parallel compression send knob all throughout your mix or in specific sections, like a chorus vs. a verse, to create contrast. Who said mixing isn't as creative as producing?
4. Rear Bus Compression
One secret mixing technique audio engineers like to use late in the process is parallel processing via rear bus compression. In this method, all tracks are sent to the same compression send bus beside the drums. This can help the mix cut through since drums can easily distort compressors since they naturally vary greatly in amplitude. Play with the blend between your rear bus and drum group.
5. Remember To EQ Before Compressing
Don't forget that sends can be (and should be) shaped just like any other audio track. That means if you don't want your compressor amplifying unwanted frequencies, you better place an EQ before your compressor on your send. Routing and chain order is just as important here as it is anywhere else in the mix.
6. Don't Overdo It
As with any great mixing technique, it loses its power when it's constantly splattered across every track. Don't feel like you need to use parallel compression by default. While many times it will offer you more control, sometimes, we need an overly compressed signal depending on the context. Trust your ears and only use this powerful processing when the mix calls for it.
Hence, it's clear that parallel compression is an incredibly powerful tool that can be used in a variety of ways to enhance your music. Hopefully, this article made it easier for you to understand the importance of parallel processing and incorporate this essential technique into your workflow. Enjoy taking your tracks to the next level with the unmatched control and versatility of parallel compression.


