Mixing. It's a series of creative and technical decisions with one end goal in mind: deliver an absolutely stonking mix.
With this gauntlet of perfection hanging over your head it's easy to get mired down in every decision you make along the way. Should the snare have a 1.5dB boost at 2k, or a little bit more? What about the attack on the bass compressor?
Before you know it, you're lost in a sea of choices and the entire mix is sounding a bit sub-par.
But what if there was another way? A mixing strategy that brings a more efficient workflow to the art form?
There is. And it's called top down mixing. Whether you're a newbie with limited mixing skills, or an old pro in the area of music production, you're sure to learn something from this mixing approach favored by many engineers.
We'll be taking a look at the top down mixing technique in detail, and walking you through the process step-by-step.
So fire up your DAW, and get ready for a different approach to mixing!
What is Top Down Mixing?
In 'conventional' mixing (or bottom up mixing) an engineer will typically start with the foundations of the track - think bass, drums, and rhythmic instruments.
Once this foundation is set, the melodic, and mid- and high-range instruments are layered on top, and adjusted for clarity and impact. Each layer builds upon a well-defined base achieving an uncluttered and well-balanced mix. In theory at least.
Working this way can lead to second guessing your choices, and overly analytical thinking, especially from an inexperienced mixer. The final mix can end up sounding sterile, and lacking the emotional impact the song deserves.
A top down mixing approach takes this workflow and turns it on its head. Starting with the big picture, the engineer will apply broad strokes mix bus processing to get the overall sound and vibe of the song in the ball park.
From there, sub-mixes and instrument groups get their share of the sauce, before attention is given to any individual tracks that need work.
What Top Down Mixing Is NOT
Applying mix bus processing may sound a little like mastering. But that is definitely not what the top down approach is.
Yes, a mastering engineer will apply processing to the mix as a whole, but mastering is a whole lot more than just slapping a limiter on your stereo bus and calling it a day. There's metadata to prepare, and making sure your track plays back consistently on different sound systems for instance.
So while top down mixing shares a similar approach to a mastering workflow, don't be fooled into thinking it's a one stop shop for mixing and mastering.
Pros of Top Down Mixing
So why do many mixers prefer the top down mixing techniques?
Speed
One of the biggest benefits of the top down mixing process is speed. Focusing on the overall mix at the mix bus stage means you'll spend less time fiddling with individual tracks, and work quickly to get the mix bopping.
In addition, by making broad choices at the master bus stage, there are less tweaks to do at the individual track level, resulting in a more efficient workflow.
Improved CPU Efficiency
Focusing on the overall sound from the master channel means fewer plugins on individual tracks. And fewer plugins means less of a strain on the processing power of your 'pooter.
Better Decision Making
When mixing using the bottom up approach, it's easy to get stuck in analysis paralysis; obsessing over one instrument and never making any real progress on the overall sound.
When you work backward with top down mixing, this is much less likely to happen.
Emotional Authenticity
When you mix top down you're working with your gut instincts, focusing on the emotional sum of all the tracks. You'll get to the heart of the song, instead of being overly analytical about time constants on individual mix elements.
Follow the Vision
If you're a mixing engineer working from a session sent to you by a client, top down mixing makes it much easier to follow their vision for the track.
Learn Your Gear
Applying a compressor to a drum bus allows you to hear some of what it's capable of. But put it on the master bus with the full tonal range of the song running through it, and you'll get a stellar sense of just what it can do.
Top down mixing can be an excellent way to really learn how your plugins work!
Cons of Top Down Mixing
For every yin, there's a yang, and top down mixing has its drawbacks.
Garbage In, Garbage Out
For top down mixing to work, the individual tracks need to be recorded well. Making broad EQ moves on the master bus isn't going to fix ground loops, buzz, or any other audio anomalies . If you find yourself mixing a session that's been poorly recorded (and assuming you can't request a re-record) you'll need to take the reverse approach and mix from the bottom up.
Easy to be Hard
With top down mixing it can be easy to overdo the mix bus compression. Assuming you start with a compressor on your mix bus, any additional compression added to individual tracks or busses are going to feed into that and creating a slippery slope all the way down to over-processing.
Not All Genres are Created Equal
Top down mixing doesn't work on all styles of music production. Songs that have wide dynamic ranges, or divergent style changes may not benefit from this approach.
Beware the Stems
If you plan on creating stems or alt mixes for your song, be aware that top down mixing will likely lead to more work to ensure the stems add up to the original full mix.
Know Your Gear
Because the top down mixing technique relies so much on feeling your way through a mix, it's important that you know the tools you're using inside out. When choosing a plugin to use, you'll need the self confidence to know why you're reaching for it, and what it's going to do to the mix.
Top Down Mixing - A Step-by-Step Guide
Let's walk through a typical top down mixing session step-by step so you can see how the sausage is made.
Step 1: Organize & Route Your Tracks
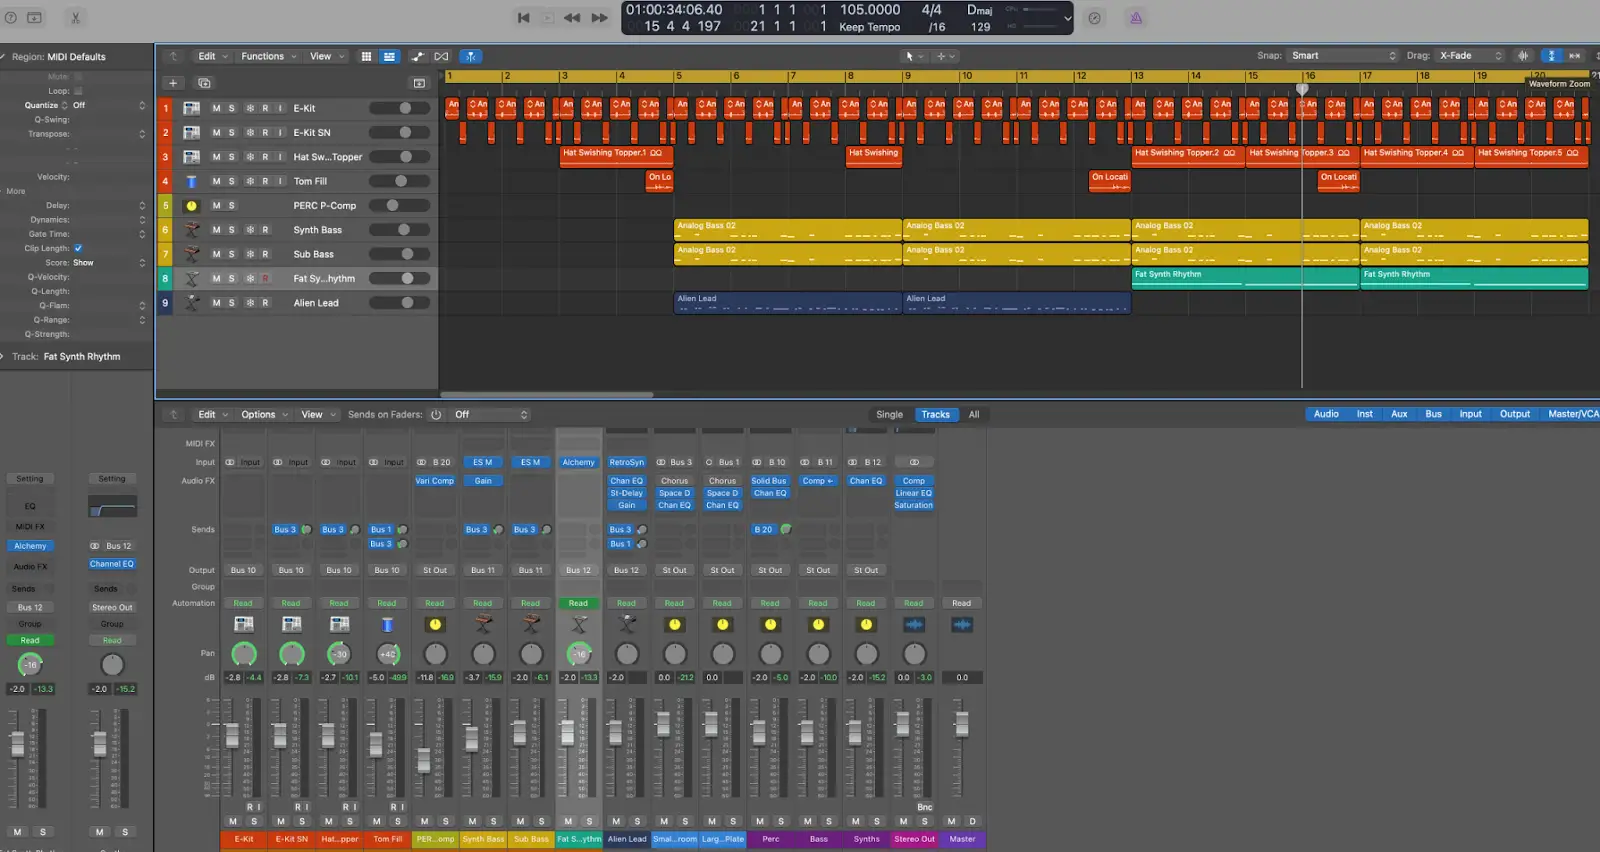
The first thing to do for any mix is to prepare . Organize individual tracks by instrument group and route them into sub-mixes for bus processing later on.
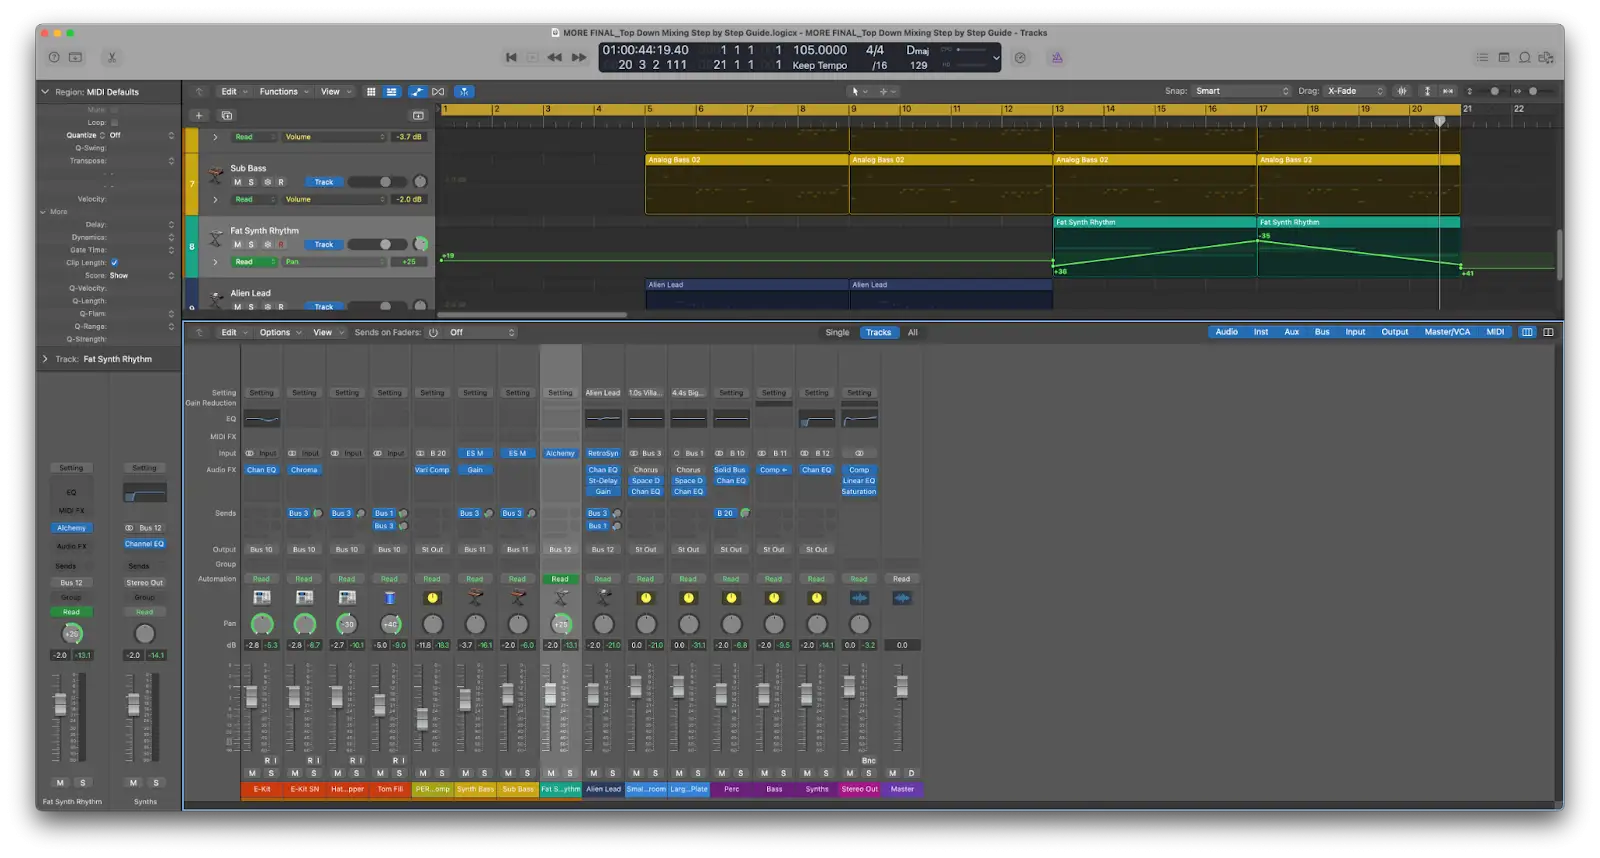
In this example, I've made three groups: a drum bus, one for the bass instruments, and a synth bus. Depending on the track you're working on, you may want to go further and arrange by function (melodic, low end, sound design elements, etc.).
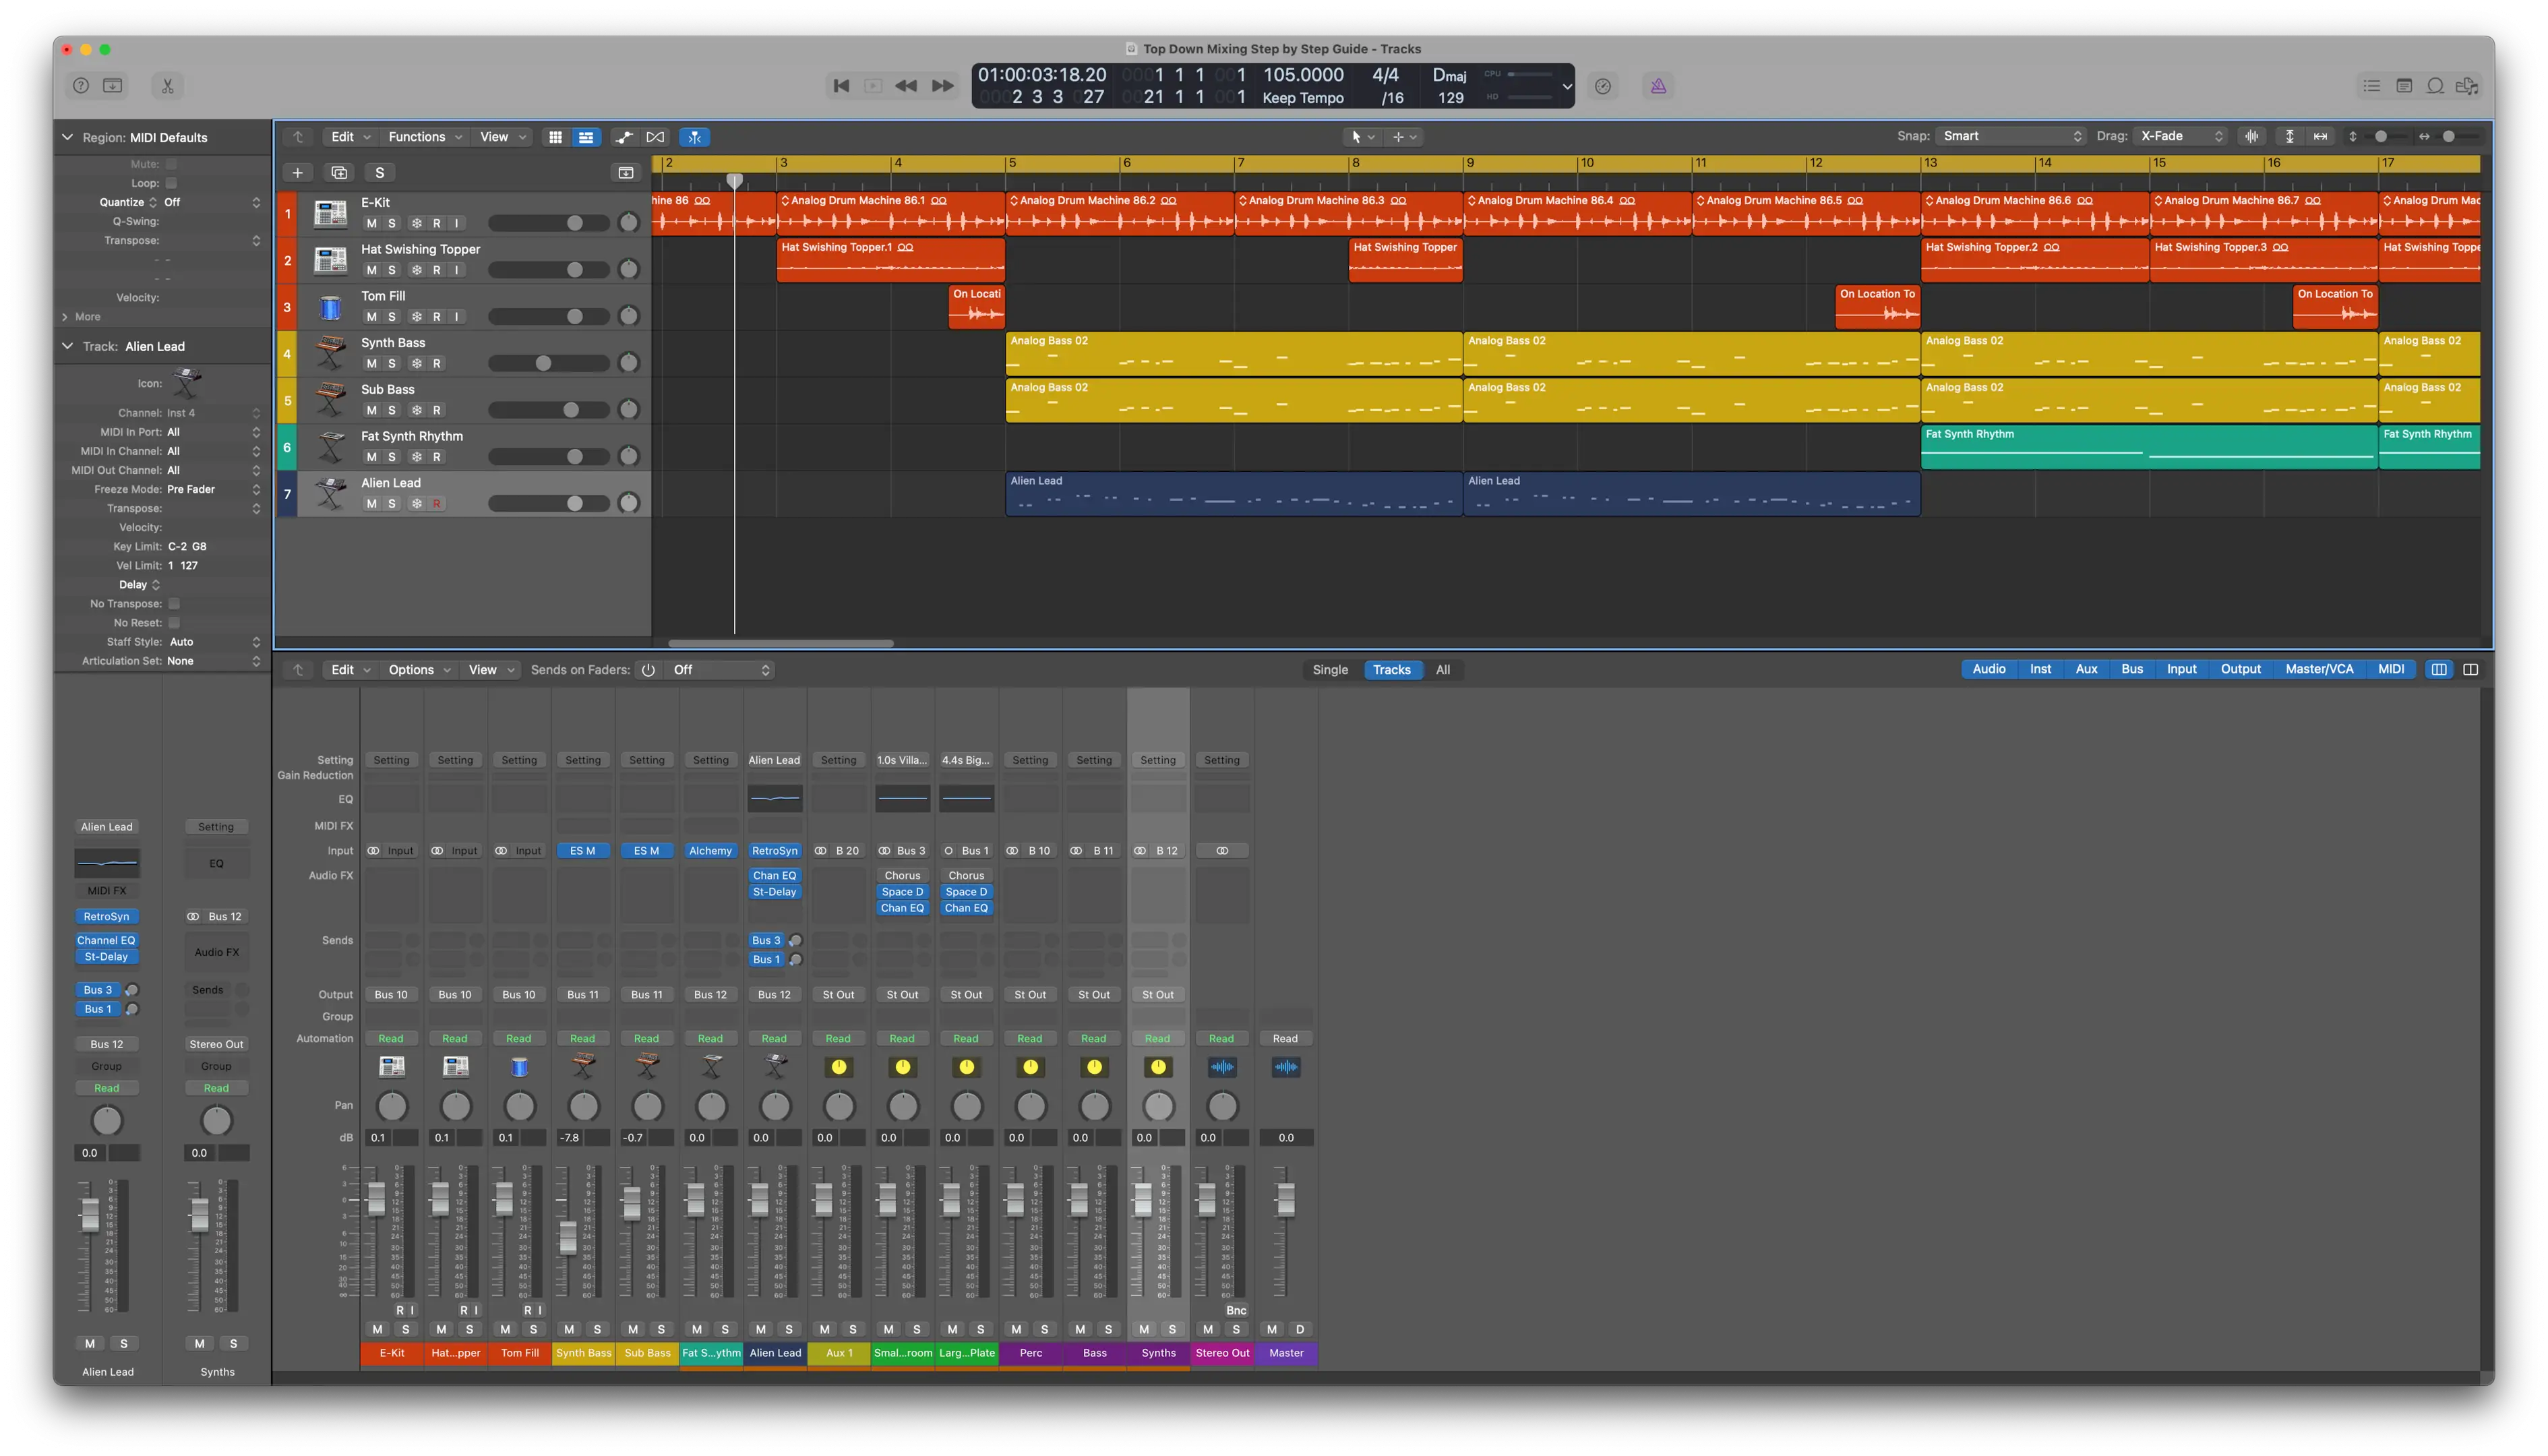
I like to color-code tracks according to their group to make things easy for visual referencing. Here the drums are all red, the bass yellow, and the bus channels a deep purple. It's a highly personal thing, but once you've done it enough times you'll develop your own system for grouping and sorting.
If you're working on your own material, I highly recommend setting up a template that you can work from, to save creating the same aux groups every time.
Step 2: Create a Static Mix
Next, create a static mix using the track faders and pan pots. A static mix is essentially a rough draft without any bus processing happening.
Balance out your instruments and place them in the stereo field as you see fit. Watch out for clipping, and be sure to leave plenty of headroom on the mix bus to allow room for later processing. If necessary, use a gain reduction plugin on tracks so you can keep the faders closer to unity.
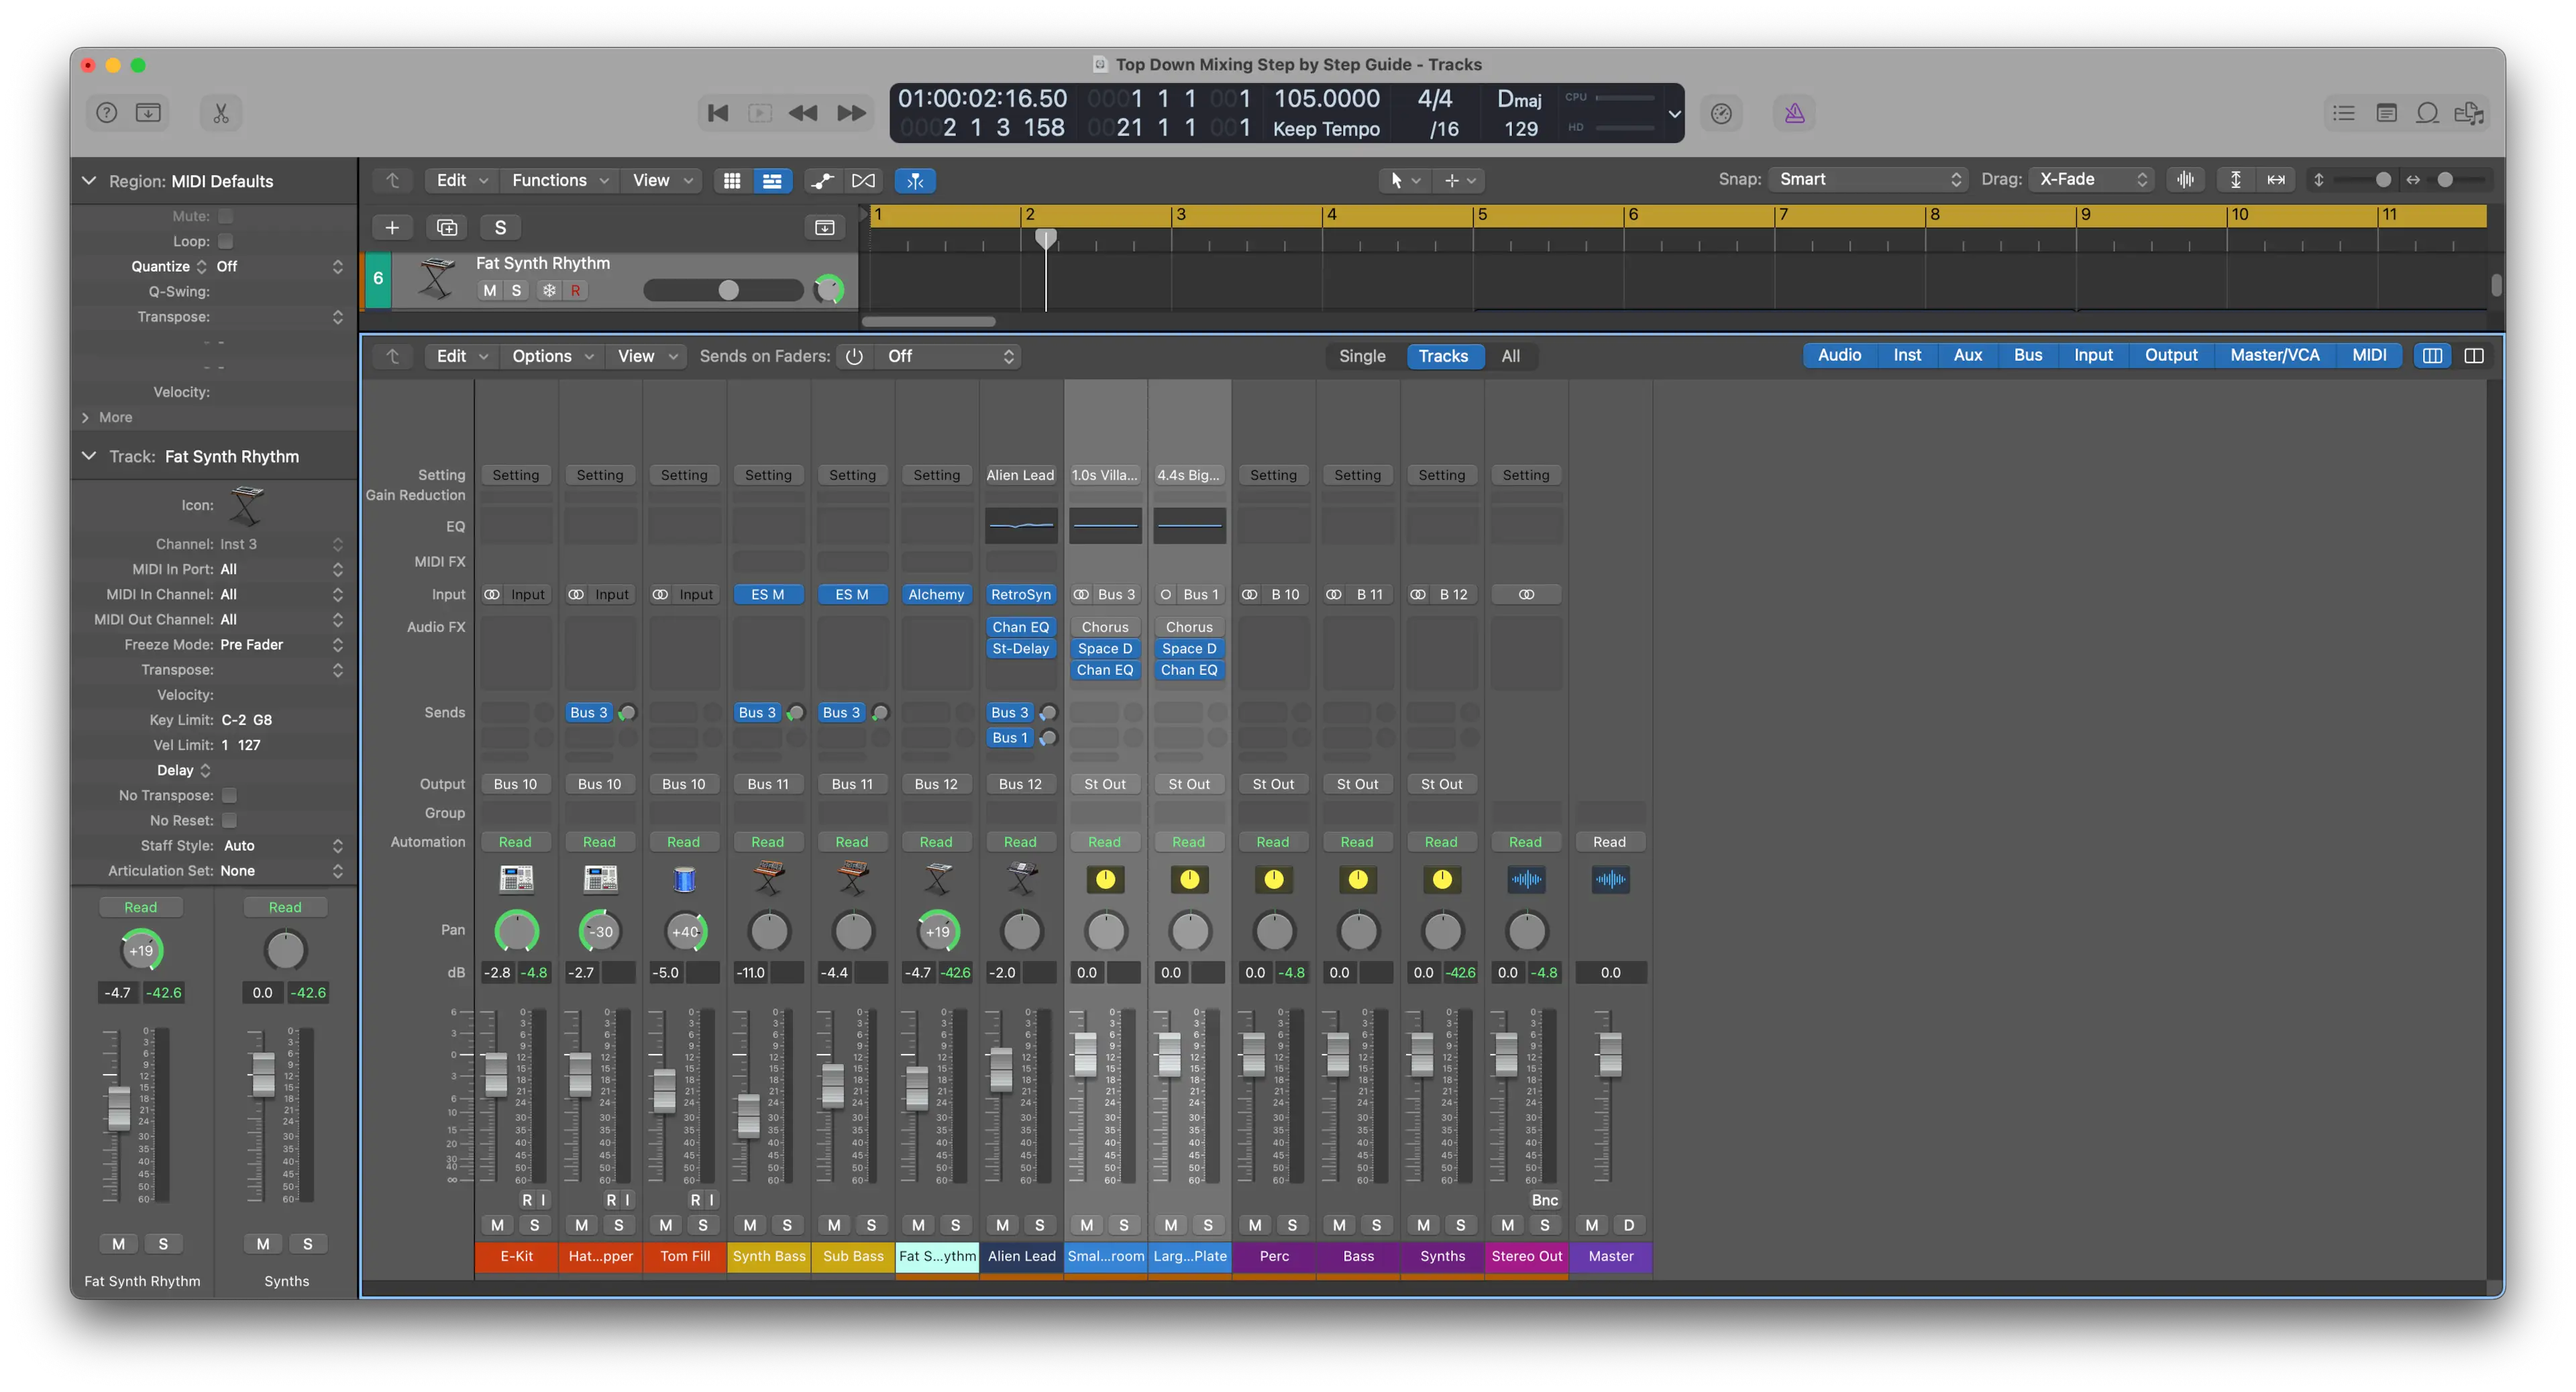
Here's what things sound like now:
Step 3: Look for Problem Areas
Assuming for the most part all the tracks have been recorded well, the next step is to look for any specific problem areas in individual parts.
This may include applying a de-esser to reduce sibilance, or using a dynamic EQ to tame resonant frequencies.
If there are any moments of questionable recording practice, now's the time to fix them using audio restoration tools.
It's important to tackle these problem areas before your start mixing to avoid tiny niggles being accentuated by any mix bus processing.
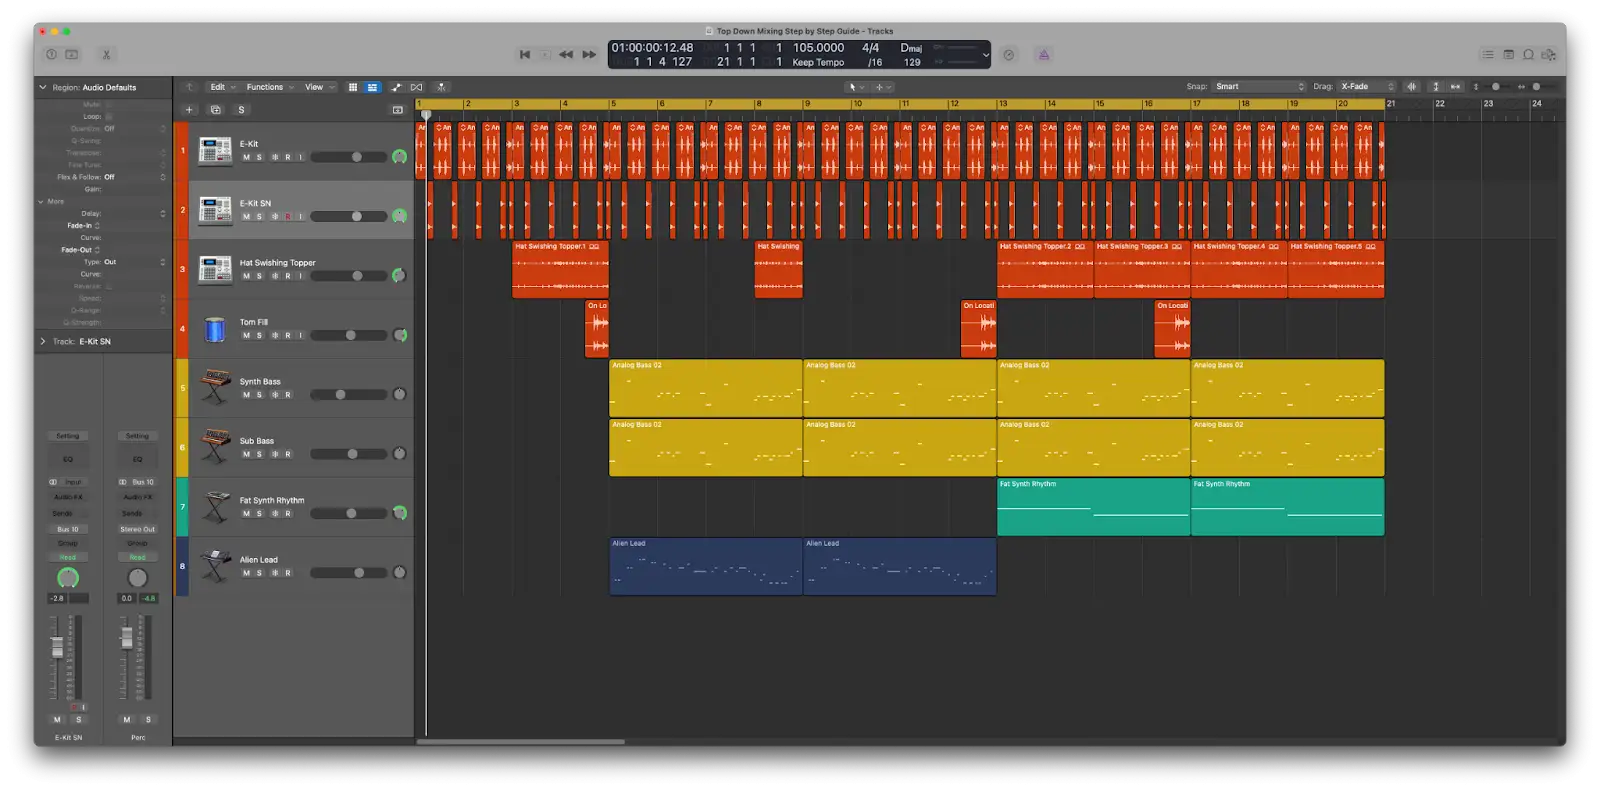
Now is also a good time to separate out any combined tracks (if possible). In this example, the snare was part of a loop, so I've cut all instances and placed them on a separate snare track. It'll still feed into the drum bus, but I can apply processing to just the snare, should I want to.
Step 4: Apply Master Bus Processing
Now we get to the juicy bit - mix bus processing!
Compression
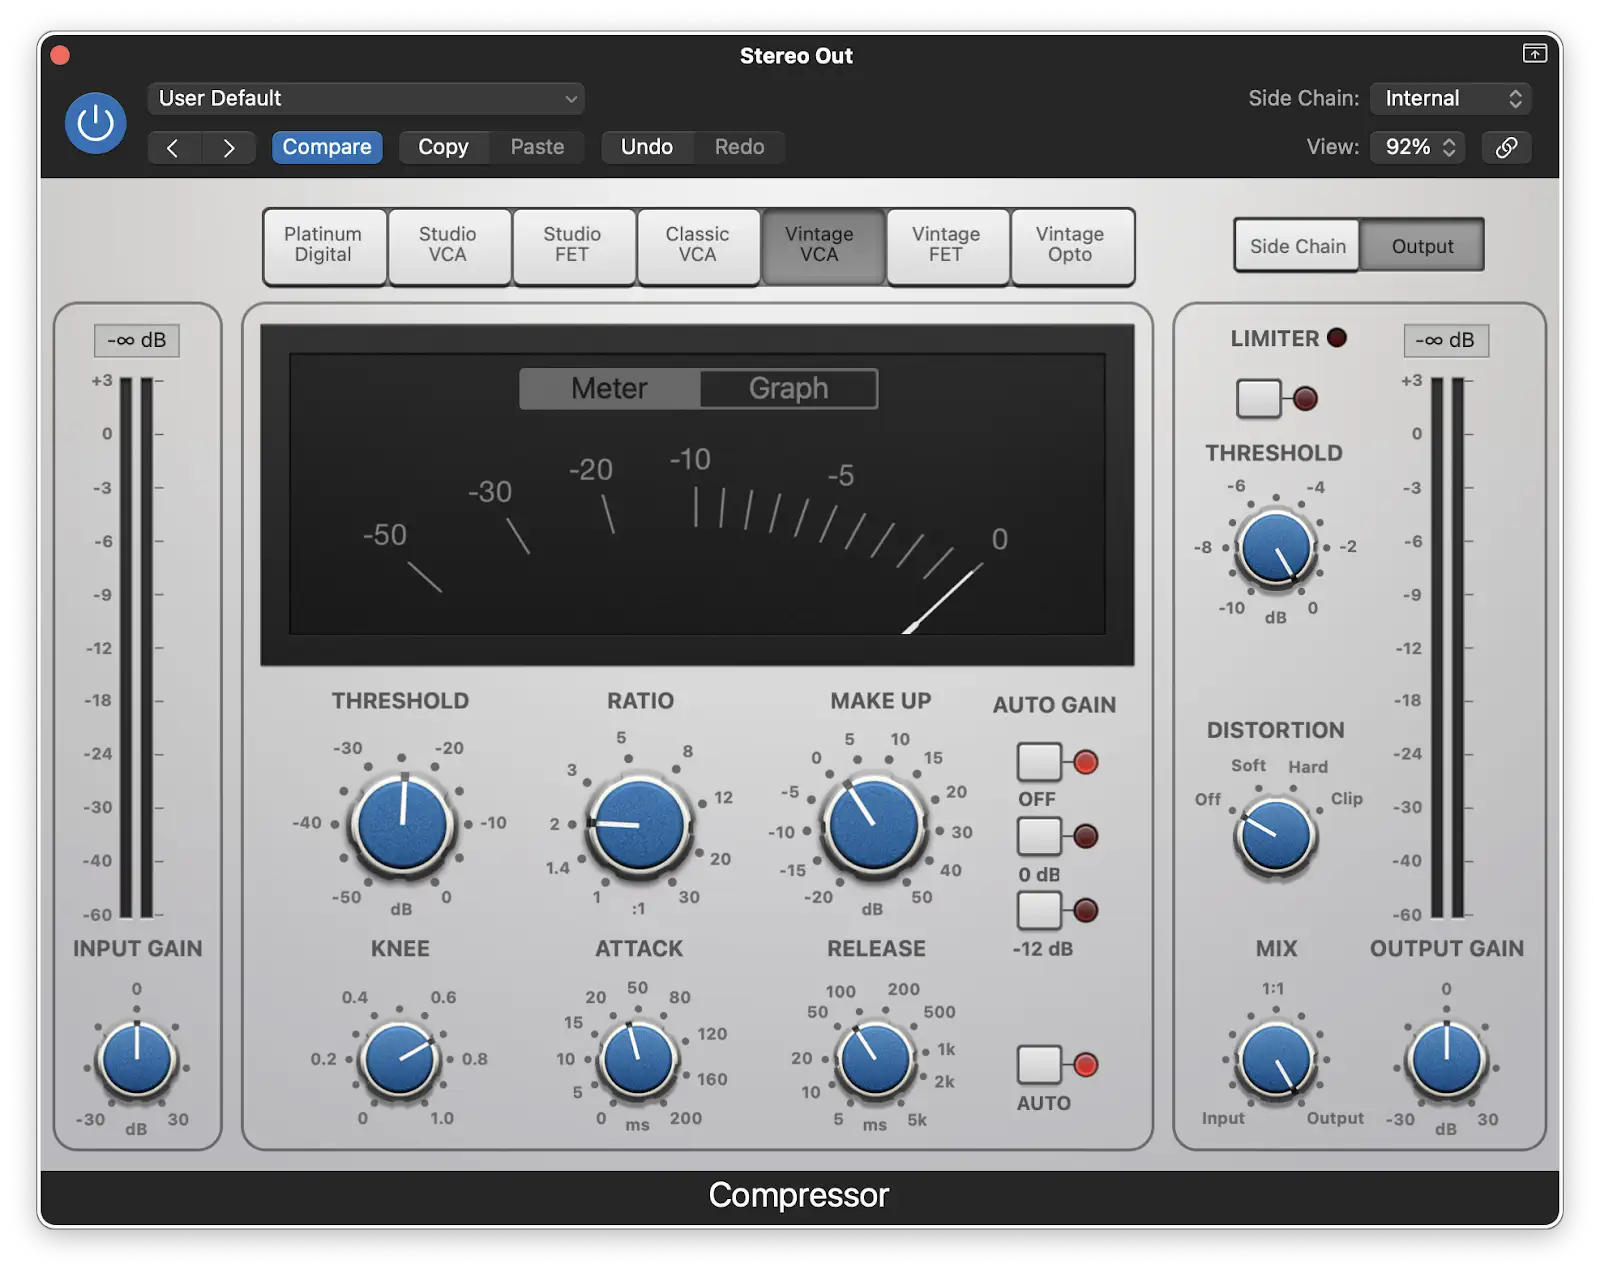
Start off with some light compression to glue things together. VCA-style compressors are a good choice as they provide glue for the different sounds within your mix, providing transparent compression without killing transients.
Go easy here; start with a ratio of 2:1, and don't be too harsh with the attack otherwise you'll suck all the life out of the mix. The release time will be dependent on the song, but if your compressor has an 'auto' setting try starting with that.
Aim for a small amount of gain reduction - between -2 and -4dB during the loudest parts of your mix.
EQ
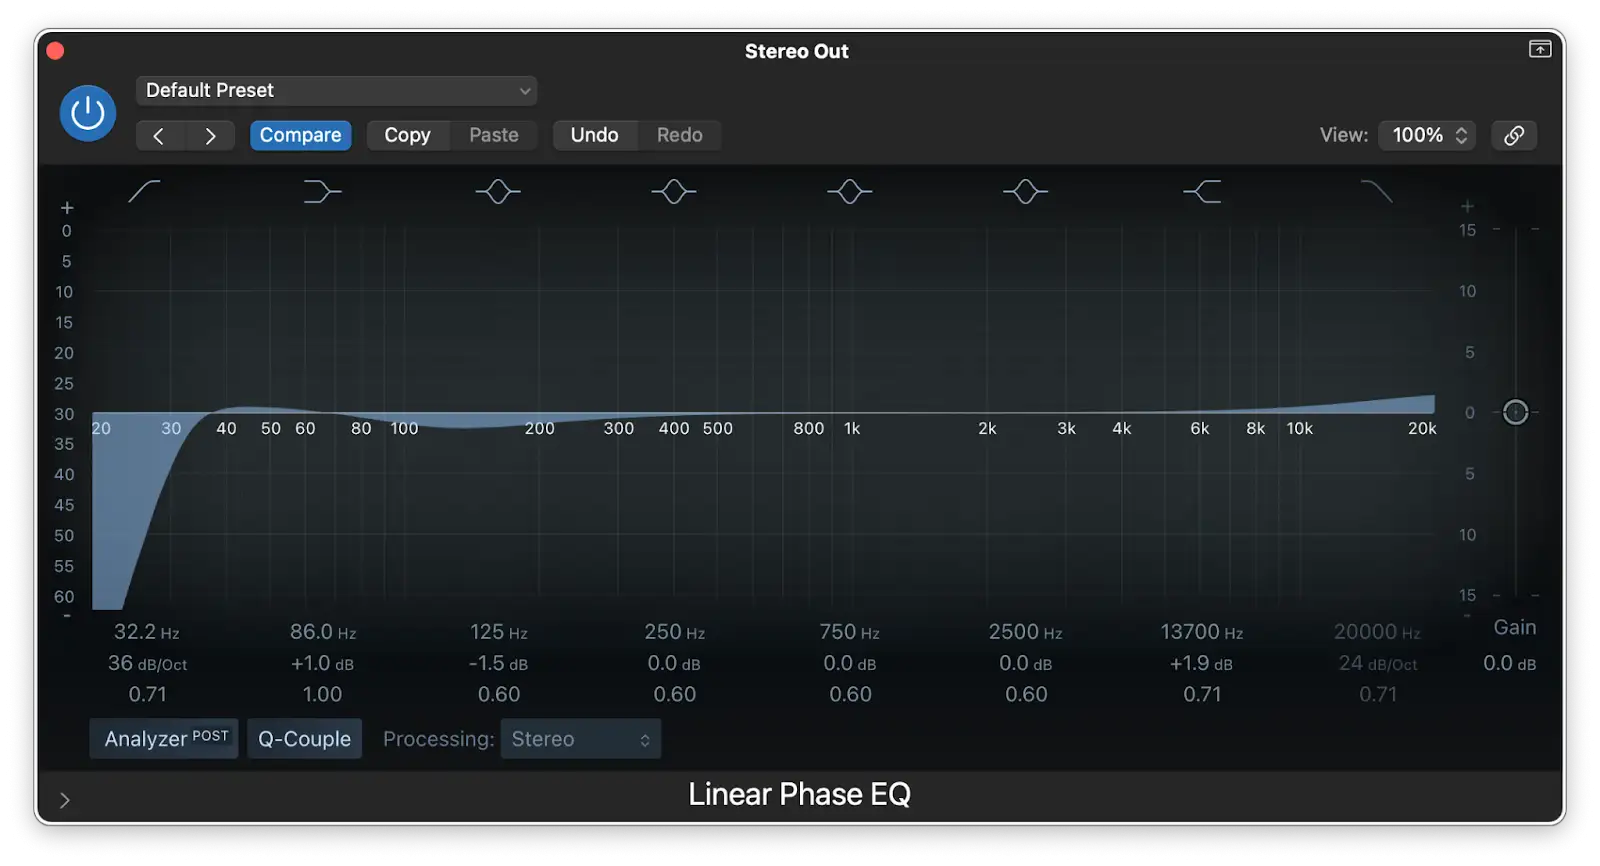
Next, see if your mix needs any EQ to smooth things out. Always be intentional about using an EQ - don't just slap it on for the sake of it.
At the very least you'll probably want to apply a high pass filter to remove anything below 30Hz. Try also adding high and low shelves at the upper and lower extremities to add a little bit of shine, and maybe a gentle dip around 150-250Hz to remove mud.
Always use your ears, and use broad moves rather than surgical ones.
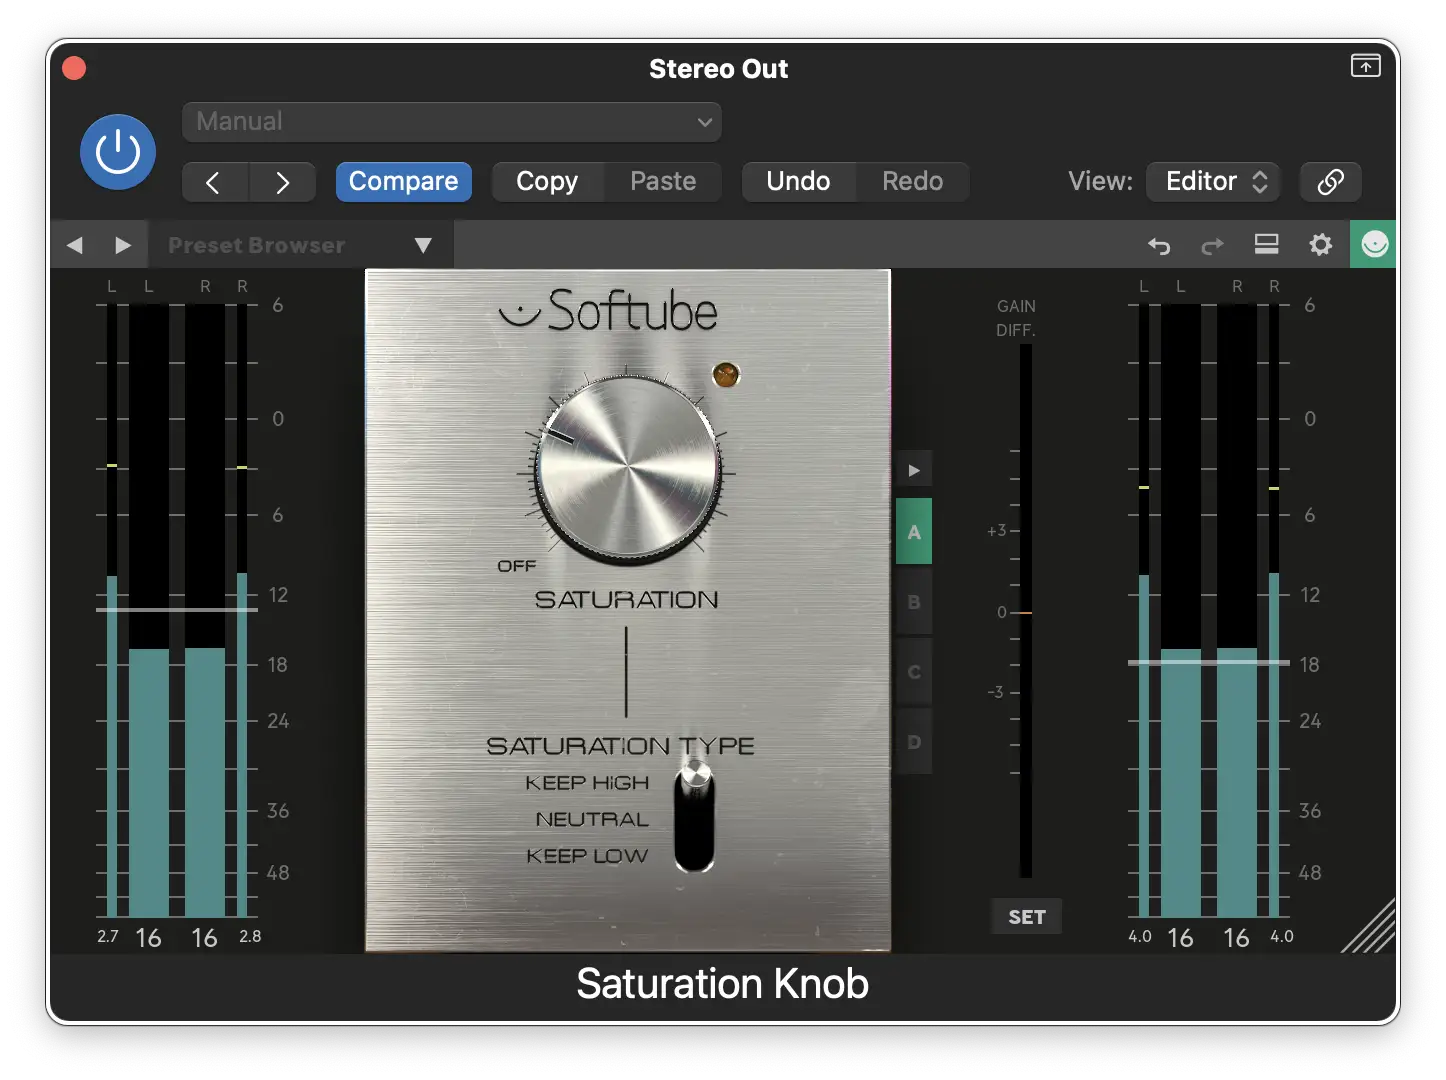
Additionally, you may want to use some subtle tube or tape saturation to put some final color on the sound.
Step 5: Apply Group Mix Processing
Next, move onto your groups/sub-mixes. It's a good idea to start with the drums, then move on to any other rhythmic parts, before handling harmonic and melodic content.
On this example track, I've added both serial and parallel compression to the drum bus for some extra punch. I've opted to use an additional aux for the parallel compression in this case, but the effect can also be achieved by inserting a compressor on the drum bus and adjusting the mix knob to taste.
On the synth bus I've added a low pass filter to make room for the deep subs in the bass track.
Finally, on the bass bus I've added some compression side-chained to the drums.
When you're working with groups (or individual tracks) always mix in context. If you need to hear the group you're working on more clearly, lower the volume of the other parts so you can still hear what's happening to the mix as a whole.
Step 6: Work on Individual Tracks
Things are shaping up, but I want to make a couple of tweaks to help the whole thing along.
The drums have a click in from the kick that is starting to get on my nerves, so I'm going to tame it using some EQ. I'll also add a gated reverb to the snare drum (because who doesn't love the 80s?).
Other finishing touches include some panning automation on one of the synth tracks, and a little reverb on the toms and hi hat part.
Step 7: Mix Bus Limiting
Finally, let's return to the mix bus and add a limiter for some final polish. The goal here is to give an impression of what the song will sound like when it's fully mastered and pushed louder. The process isn't true mastering, but if you're delivering for a client, or just want a fast and dirty idea of what the end result will sound like, it's a good move.
Here I've added FabFilter's Pro-L limiter to the stereo bus and gone for around -4dB in gain reduction.
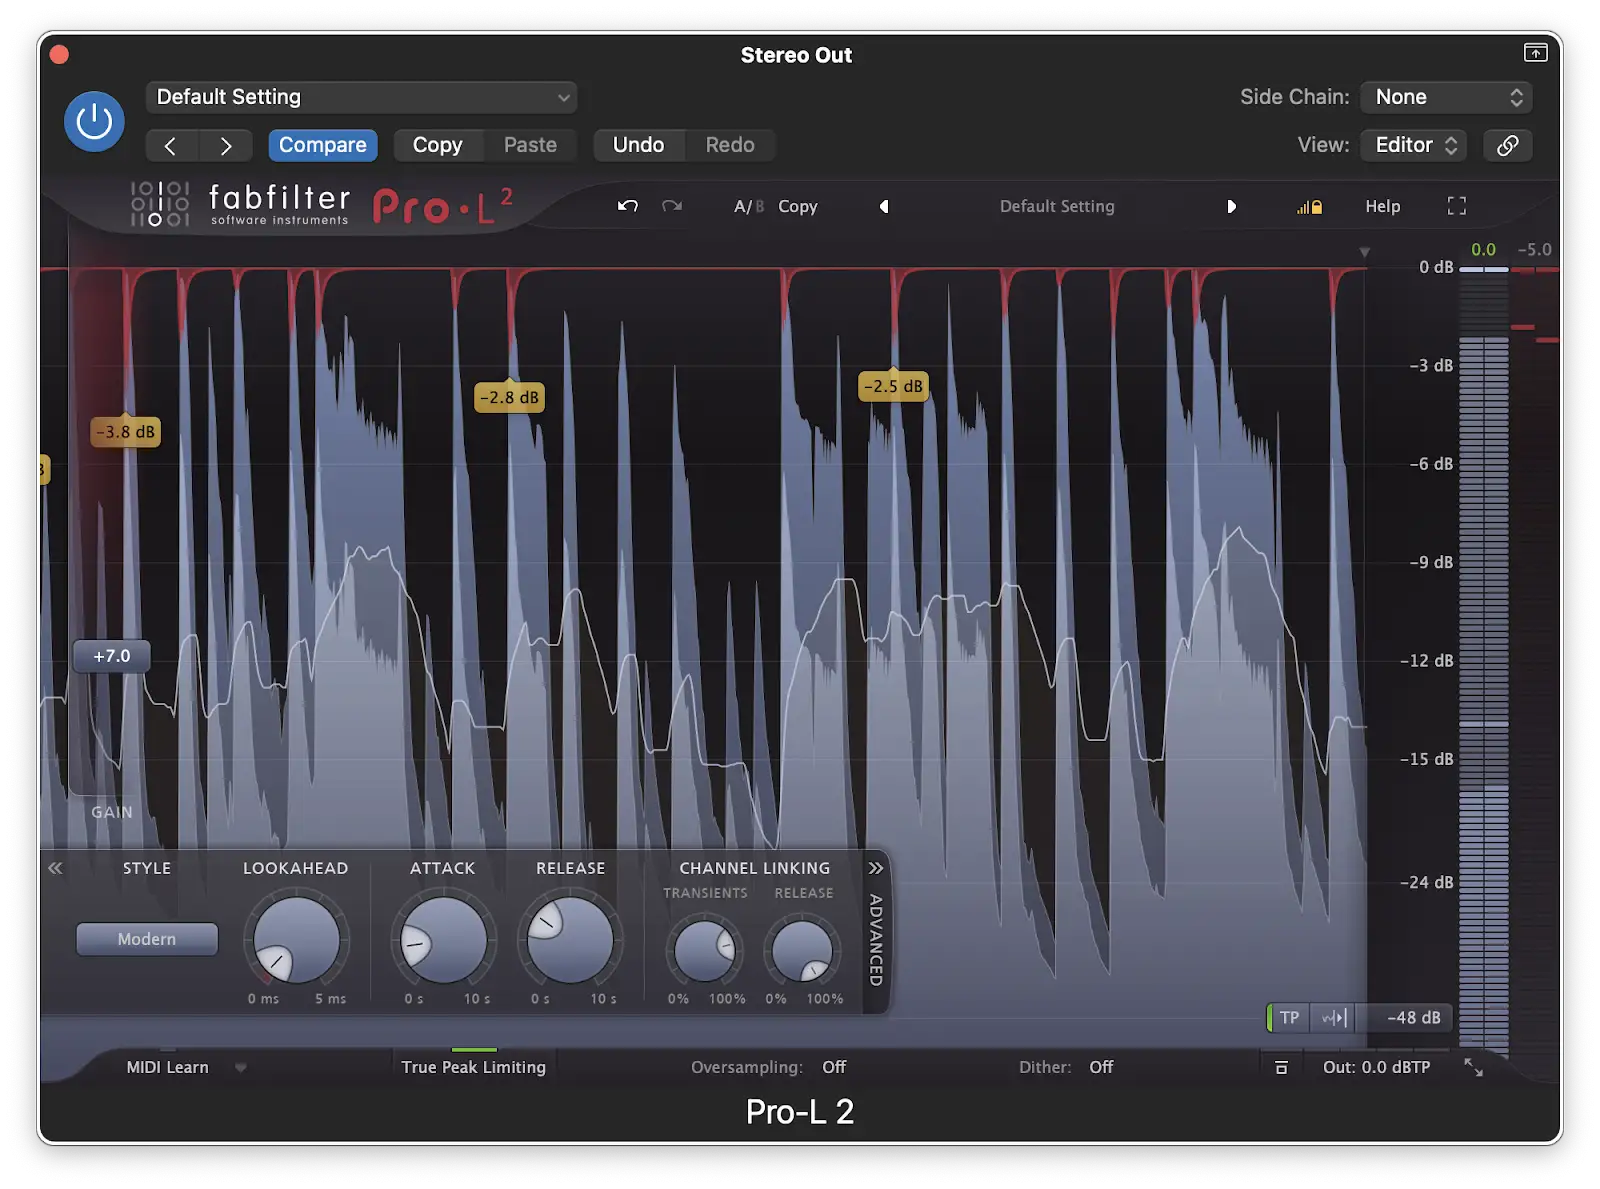
When you're happy with the settings, it's a good idea to do one mix with the limiter, and one without. That way if you're sending the track off to a mastering engineer, they'll know what you're aiming for.
Tips and Tricks for Top Down Mixing
Use your ears
The idea of top down mixing is to work quickly, so don't stress about what the 'correct' settings are for a particular plugin. Instead, go with what sounds right to you.
Work smarter, not harder
If you have a lot of tracks with many different tones, you may find it's better to mix into the stereo bus by playing around with group processing. On the other hand, if the song you're working on is simple, try mixing within the stereo bus itself.
Make big moves
Don't be afraid to be aggressive with your settings. Since you're playing around at the top of the mix bus, you can afford to be more adventurous with processing than if you are working at track level.
Keep gain staging in mind
Make sure your individual tracks aren't running too hot (or too quiet). You'll want to keep between -4 to -6dB of headroom on the final mix to allow for the mastering process, and since the mix bus processing will add to the overall level it's smart to gain stage accordingly before you start your top down mix.
Conclusion
As a music producer it's always worth trying out new techniques and tricks to see how they might affect your work. I highly encourage you to try out the top down mixing process a couple of times; you never know what you'll learn!
Now go forth and mixeth the music!


