


So you’ve finished recording your song – finally! After hours of painstakingly re-writing your lyrics , summoning up your best performance, and deftly displaying mad production skills, your opus is ready to be unleashed on the world!
But wait just a moment; how will your song sound next to tracks by other artists? Will it sit nicely in that Spotify playlist, or will it be conspicuously limp compared to the other tunes? My friend, this is where mastering comes into play.
In this post we're going to be looking in depth at the process of how to master a song. Beginning with an overview of the difference between mixing and mastering , we'll move on to look at what options are available to you when choosing how to get your song mastered, along with what equipment and software you need to accomplish this.
You'll find a step-by-step guide detailing how to do it yourself, along with how to use an AI powered site to do the grunt work for you. Add some tips, common mistakes to watch out for when beginning your mastering journey, a handful of FAQs, and you have a complete recipe for how to master a song!
Ready? Let's do this.
What is Mastering?
In a nutshell, mastering is the final step in preparing your music to be released into the world. The so-called 'dark art' of mastering includes fine-tuning the levels and EQ of a stereo track and preparing it for replication and broadcast. The work also includes optimizing volume levels to meet industry standards.
Other chores in a mastering engineer’s day include:
- Removing any pops or defects missed at the mixing stage
- Arranging tracks into a final sequence (for an entire album)
- Adding metadata for distribution
Mastering vs. Mixing: What's the difference?
It's easy to get muddled when talking about mixing and mastering a song.
Mixing involves taking the individual tracks of a song and balancing them using volume adjustments, equalization , panning , compression , and other audio effects , to make your song sound great. This is bounced down into a stereo mix, ready for mastering.
The mastering process involves taking that final mix and fine-tuning the levels and EQ, preparing it for replication and broadcast. It can make your track louder, widen the stereo image, and bring overall greater clarity to your killer anthem.
In the case of an album mastering, it also involves making sure all the songs have a similar tonal balance and perceived loudness.
Mastering a Song Yourself vs. Hiring a Mastering Engineer
While it's tempting to try and maintain creative control over every stage of the recording process, one of the main benefits of hiring a mastering engineer is to have a second opinion. Once you've been mixing a song for a while you'll lose objectivity, and hiring someone else to master the track gives you a fresh set of ears to listen out for any problem areas.
You can also learn a lot about your own mixes by hiring someone. Professional mastering gives you an objectivity on your work that you won't get by being completely DIY, and ultimately you want to mix with the master in mind. I'd recommend hiring a professional to work on at least some of your mixes, just so you can hear what can be achieved through mastering.
DIY Mastering vs. Using an Online Mastering Service
An alternative to mastering your own work (or hiring someone else to do it) is to use an online service like eMastered. The benefits of using an online service versus doing it yourself is that you'll be harnessing the vast knowledge of many mastering engineers and applying it to your track in a tiny fraction of the time it would take for you to learn it on your own. They're also a good alternative if your album budget is stretched and there's not much left in the jar.
Services like eMastered give your track a professionally mastered result in minutes by analyzing your track and comparing it to others in your genre. You can play around with various settings, giving you some creative control over the outcome, and with eMastered you can even try it out for free .
So if you’re the kind of dedicated artist who wants to focus on creating music and getting it out into the world, or if you're intimidated by the idea of mastering on your own, eMastered could be your ally.
Equipment/Software Needed to Master a Song
With advances in technology, it’s easier than ever for independent musicians to control every step of the recording process, and mastering is no different. There’s a wealth of affordable tools available to help you polish your music.
If you're not feeling flush enough to go out and grab dedicated software, fear not! Nearly any digital audio workstation (DAW) will include all the software you need to give your own mixes the additional processing you need to need to make your tracks sparkle.
Audio mastering is not simply a case of sticking a plug-in over your mix and calling it a day. It’s about subtlety and using your ears. It’s a skill honed over many years, and some would argue that mastering is best left to the experts.
But let’s be honest: you're a knowledge junkie and want to feed your grey matter. You know what audio mastering is, and you're ready to learn about the process. Grab a cuppa and read on.
How to Master a Song in 15 Steps
We're going to break down how to master a song into 15 manageable steps:
- Create your listening environment
- Prepare your mix
- Check levels for clipping
- Bounce down a stereo track
- Take a break
- Find some references
- Listen and take notes
- Take another break
- Listen again
- Dynamic control - compression
- Tone control - equalization
- Other enhancements
- Limiting
- Final level check
- Bounce the final master
You'll notice that a lot of the steps are about preparation. Alexander Graham Bell said it best:
"Before anything else, preparation is the key to success."
Whether you're inventing the telephone, or mastering, this advice is solid. Don't skip on getting all your ducks in a row!
So let's break down these steps and see what's involved with each one.
Step 1: Create your listening environment
The space you're in will affect how you hear the music coming out of your studio monitors. So if you were to do a slap up job of mastering your track but your room is poorly set up, your work will be wasted. Your song may sound great in your space, but everywhere else it's going to sound, well, kind of meh.
So make sure you have you monitors set up properly, with correct positioning. If necessary, treat your mixing room with acoustic panels . Whatever you do, don't master on basic computer speakers! If you're not in a position to spend money or time treating your room ,at least consider investing in a great pair of headphones, such as the Sennheiser HD600s.
Step 2: Prepare your mix
Next up you need to have a good mix. Scratch that; make it a great mix . While mastering can add glitz to your track, it’s going to be a lot easier if the song already sounds good. A lousy mix will only give you problems at the mastering stage.
If the snare is too loud, a mastering engineer may be able to tame it, but you’re much better off fixing it in the mix first. If you discover some problems with your own mix while you’re in the mastering stage, don’t be afraid to go back and fix the mix first. It’ll be worth the effort in the end.
Step 3: Check levels for clipping
Keep your mixes clean, with minimal bus compression on the tracks. Check your faders to make sure none are clipping , and making sure you leave enough headroom on each track AND the stereo output. The loudest parts of your track should be peaking at -6dB.
Step 4: Bounce down a stereo file
Export your unmastered original mix at the resolution (sample rate and bit rate) at which it was recorded. This needs to be a lossless file, so do not under any circumstances bounce down to an mp3! At the very minimum, make sure you bounce unmastered mixes at 16bit/48kHz.
If your digital audio workstation has a ' normalize ' option on the bounce menu, make sure the box is unchecked before you bounce.
Finally, import your mix(es) into a new project in your DAW. If you’re working on multiple songs for an album, place each song on a different track. Then proceed immediately to step 5...
Step 5: Take a break
Yep. You heard it; take some time off. What a difference a day makes! But ideally, leave your track a couple of days, or more, before you come back to it. Trust me - your mind will be fresh, your ears will be fresh, and you may possibly have had time to shower. The longer you can wait between mixing and mastering, the better you'll be at listening objectively to your work.
Step 6: Find some references
The first tool in mastering is to reach for someone else’s song. Nature abhors a vacuum, and as you work you'll want to compare what you're doing with something that has been professionally mastered to keep you focused and help you make the right decisions.
Even if you’re planning on hiring a mastering engineer or using an online service, you’d still be wise to choose some reference tracks to keep you on point.
Choose a piece that matches the tone and style of your track. If you’re working on an EDM anthem, you probably don’t want to reference a Nickelback single (but also, why would you anyway?).
Import these reference tracks into the project you set up in step 4.
Step 7: Listen to your track and take notes
Now sit back and listen critically to the mix-only version of your song. That break you gave yourself? It’s going to help you identify what’s missing from the mix. You're listening with a fresh set of ears, and this first listen is where you're going to hear most of the problems.
Listen on your regular studio monitors. Listen on different different playback systems, and make notes as you go along:
- Do the higher frequencies sound too harsh?
- Is it muddy in the low frequency range?
- Does it sound boring?
By making notes, you can be intentional when it comes to the work, and not spend the rest of your life endlessly tweaking settings. Sometimes you just have to put your baby out into the world.
Step 8: Take another break
At the risk of overkill, I'd recommend taking another break here, even if it's just for a couple of hours. Seriously, ear fatigue is a thing, so give your ears have a chance to freshen up.
Step 9: Listen to the references and compare them to your mix
At this stage you'll want to listen to your references. It’s essential to match the volume of this track with that of your mix. Bring the fader down until the peaks on both tracks are about the same. This way, you won’t be fooled into hearing things as a result of a louder track.
If you have a graphic analyzer in your DAW , use it to gauge the frequency spectrum of the reference mix and compare it to your own.
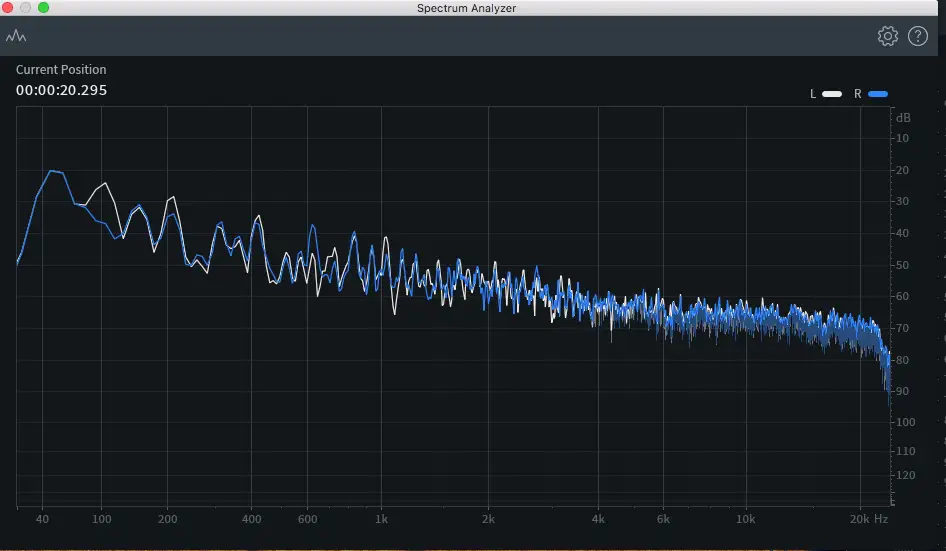
A spectrum analyzer will show you what your ears may be missing.
The secret to a good master is context. The final output has to sound good compared with other songs, so always use a reference track or three.
Step 10: Tone control - equalization
Place an EQ at the top of your signal chain, ideally a linear one if your DAW has one. These are designed to affect multiple instruments at once and are ‘clean’ sounding – great for mastering in the box. Refer to your notes to see what needed fixing.
Use it sparingly to brighten up a dull mix (add a small, wide boost around 12kHz), or scrape away the mud (scoop out some of those lower mids around 300Hz).
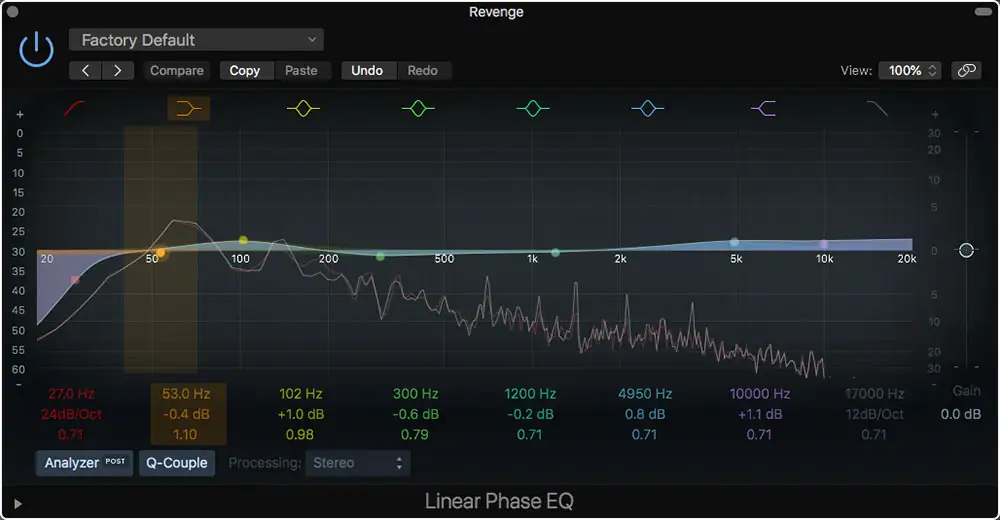
Logic’s native linear EQ has a transparent sound.
Be sure to use broad cuts and boosts in your frequency bands, and don’t change anything more than 3dB – remember subtlety is the key to mastering! If a frequency needs a more significant change, then there’s most likely a problem with the mix.
Some people also choose to add an EQ after the compression stage (see below), as compressors can color the sound. Again the same rules about subtlety apply.
Step 11: Dynamic control - compression
If you listen to classical music, you’ll hear that the recordings are noticeably quieter than your average pop song. That’s because the dynamic range of classical music is much greater than, say, a Post Malone single. If you want your track to sit nicely next to a Billboard Top 100 song, you’ll need to tame your dynamic range (down, boy!). Enter the compressor.
Dynamic range is the difference between how soft and how loud the music is. A compressor essentially ‘squashes’ a signal, reducing its dynamic range. This resulting signal means you can raise the overall volume without it peaking, making for a more even listening experience.
Back to your mix – insert a compressor after the EQ in your signal chain and start controlling the dynamic range. Again, subtle changes are the key here.
- Keep the ratio low – around 1.5:1
- Adjust the threshold to get no more than 1-2dBs of gain reduction.
- Use a slow attack. Start at around 10ms and adjust from there.
- If your compressor has an auto-release function, use that. Otherwise, adjust the release until it breathes in time with your tune.
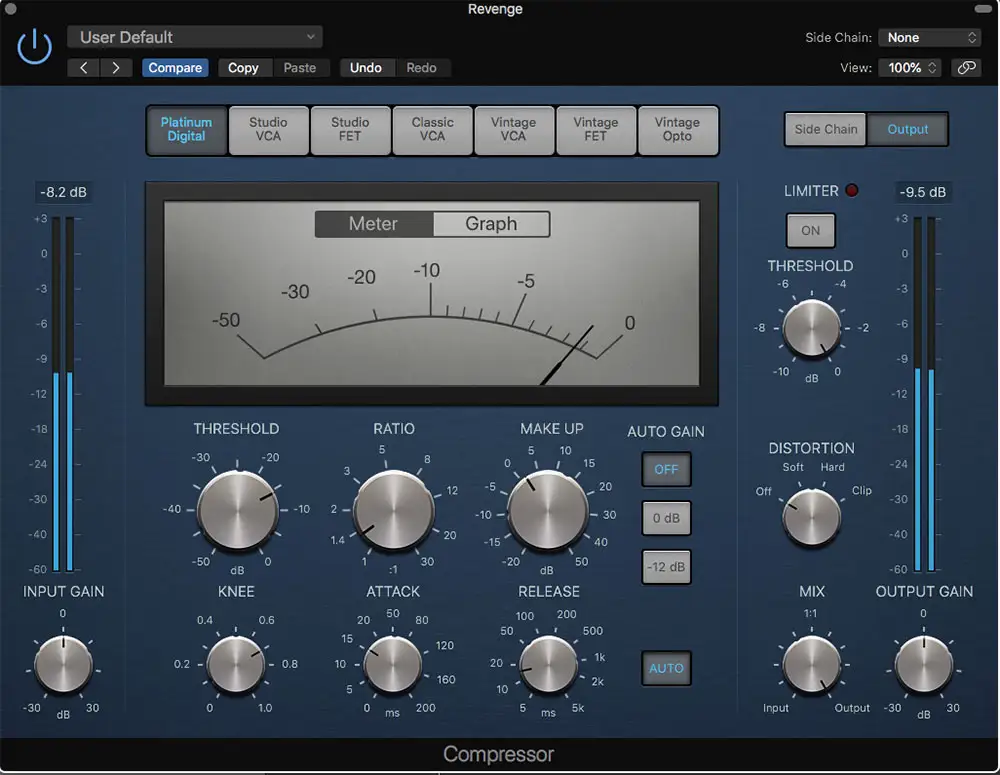
Choose a compressor that doesn’t color the sound.
Go back and listen to the mixed-only version of your track often. Use your ears – is it sounding better, or are you mangling the life out of it? Not every mix needs compression; many a good track has been ruined by over compression. So use your judgment. And don’t forget to compare it to your reference track too!
Step 12: Other enhancements
There's a couple more tricks up your sleeve that may be useful at this point.
Multiband compression:
If you have a problem in one specific area of the frequency spectrum you might want to experiment with a multiband compressor .
A multiband compressor works the same way as regular compressors, except that you can set the specific frequency range you want it to act on.
So if you notice an inconsistent mid range throughout the song, use multiband compression to attenuate that frequency range with a small (-2 to -3dB) gain reduction. Remember subtlety? You don't need much, just enough to remedy the inconsistent parts.
Saturation:
Tape saturation plugins can add color to your mix; make them a little more exciting, more full. Give them a little ba-da-bing. But be careful! Too much saturation can lead to unwanted distortion . So use your judgment, and err on the side of caution. In this case especially, less is always more.
Stereo Widening:
This can help a mix that sounds too cluttered, by widening the stereo image and spreading the sounds apart. It can sound cool, but it can also cause phase issues when your audio is played in mono. So be subtle, and ideally stay away from it unless you absolutely have to use it.
Step 13: Limiting
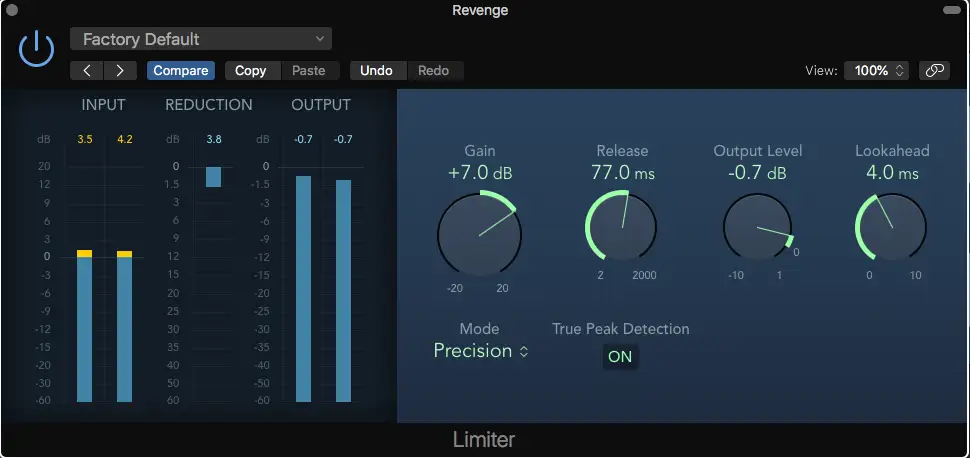
Limiting is the final stage of the mastering chain . Here you can control the signal to make sure it never goes above a certain level and raise the overall perceived volume of the track.
You guessed it – subtle settings are what’s required here too.
- Set your output to between -0.3 and -0.8 dBFS,
- Set your release time to 500ms (or auto if that’s an option).
- Increase the input gain until you have around 2dB in gain reduction.
- Reduce the release time as much as possible without affecting the quality of the sound.
Despite what 2 Unlimited says, there should be limits.
Some folks set the limiter first and then go back to the previous stages. Admittedly by doing it this way, you lose the magic moment when the limiter gets turned on, and your almost-mastered piece is immediately transported to Loudsville. But the benefit of working in reverse is that your choices at the EQ and compression stages won’t be adversely affected by the limiter – you’ll already be hearing it at work.
With the limiter, aim to level match to your reference track.
Step 14: Final level check
Almost there!
Now you’ve got the master sounding better than the mix-only version, and you’ve compared it to your reference(s), you need to listen to the result on a variety of systems. The average listener won’t be using flat-response studio monitors. Most likely, they’ll hear your music in a car, or on earbuds, or maybe coming out of a Bluetooth speaker.
So listen to your master on different playback systems and at various volumes to see how it sounds. If you’re going to be mastering a lot, it may make sense to have a choice of listening options available to you right from your mixing desk.
The last thing you want to do before rendering is to check the final loudness level. This can be done with an LUFS meter, or a true peak meter.
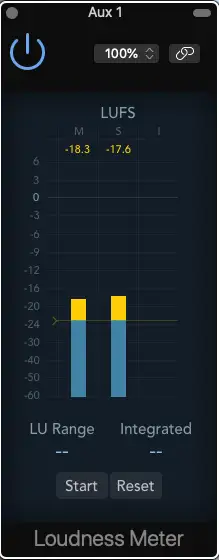
If your DAW doesn't have a plug in that can read the perceived loudness level, don't worry about it. At this stage, you've earned the right to cut yourself some slack.
The main thing is to make sure there's no clipping on the master output. If there is, reduce the input gain on your limiter.
Step 15: Bounce the final master
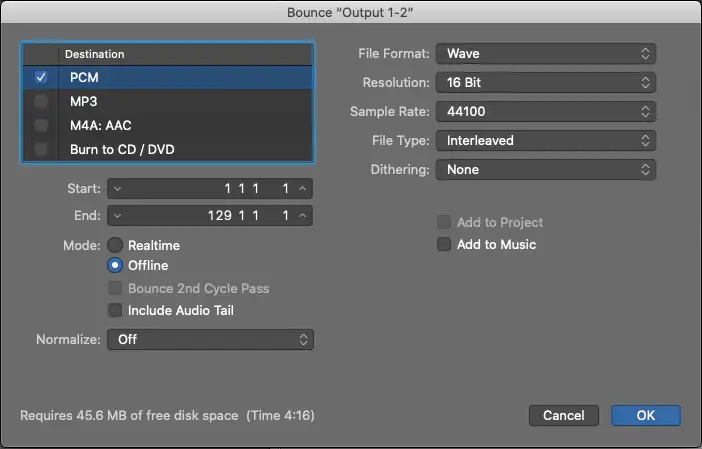
Yay! You did it! You earned the right to bounce your song into a gold-certified audio file for distribution among all streaming services. Here are some basic settings to use when rendering a great master:
- Format: WAV
- Bit depth: 16-bit
- Sample rate: 44kHz
- Headroom: 1dBFS
And if the mix-only audio file was at a higher sample rate, don’t forget to dither down to ensure a smooth sample rate conversion!
How to Master a Song Using eMastered
There may be times when you don't have the capacity to do your own mastering - perhaps you need to get your song submitted for distribution in just a couple of hours, and your ears are too baked from mixing.
Whatever the reason, sometimes you'll want to rely on an online service like eMastered to get the job done.
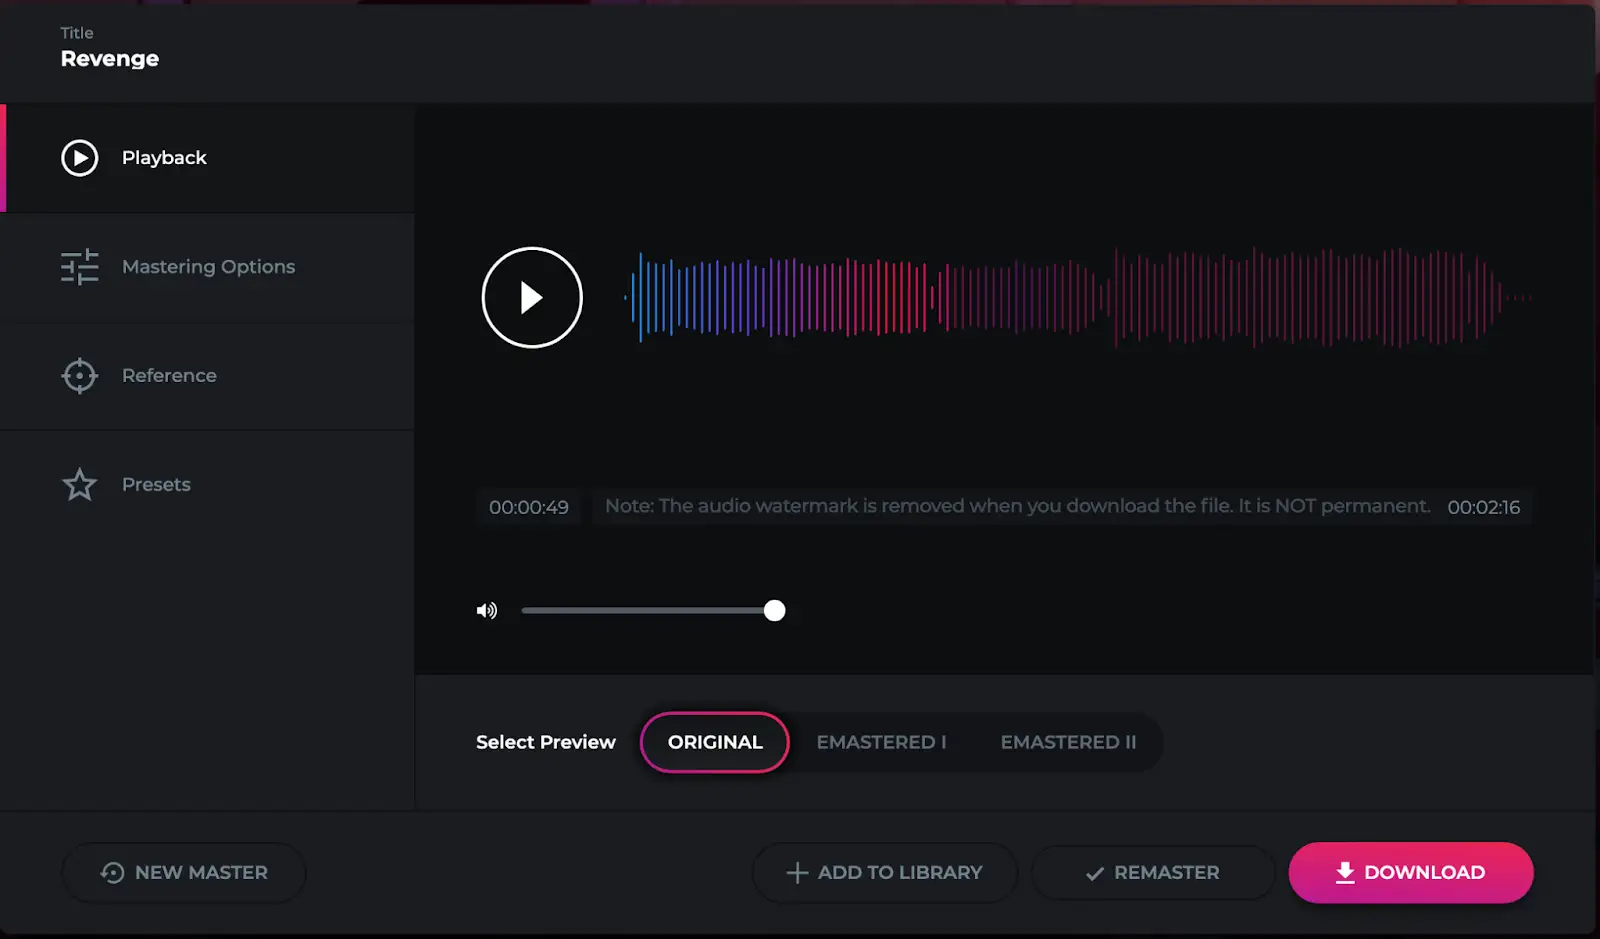
With eMastered you get the chance to try before you buy. It's a simple drag-and-drop interface where you upload your mix and, if desired, a reference track.

Once the file has been uploaded and processed by the magical power of AI, you'll be taken to a page where you can try out different settings on the song.
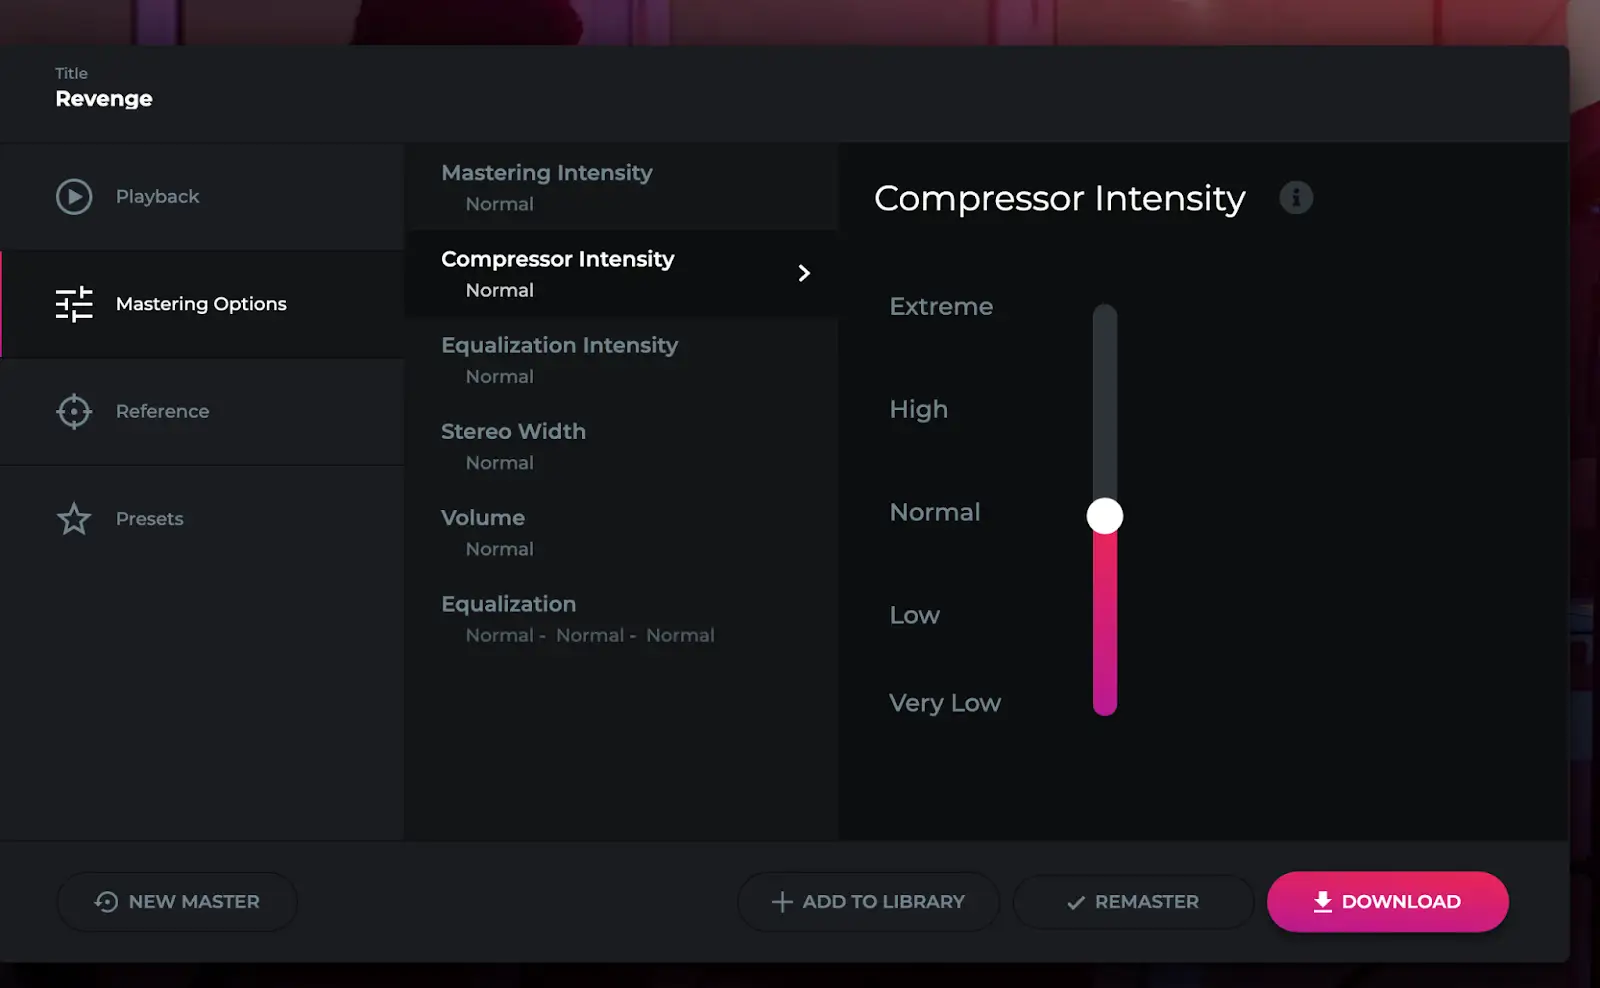
You can compare the difference between the master and original mix on the playback tab.
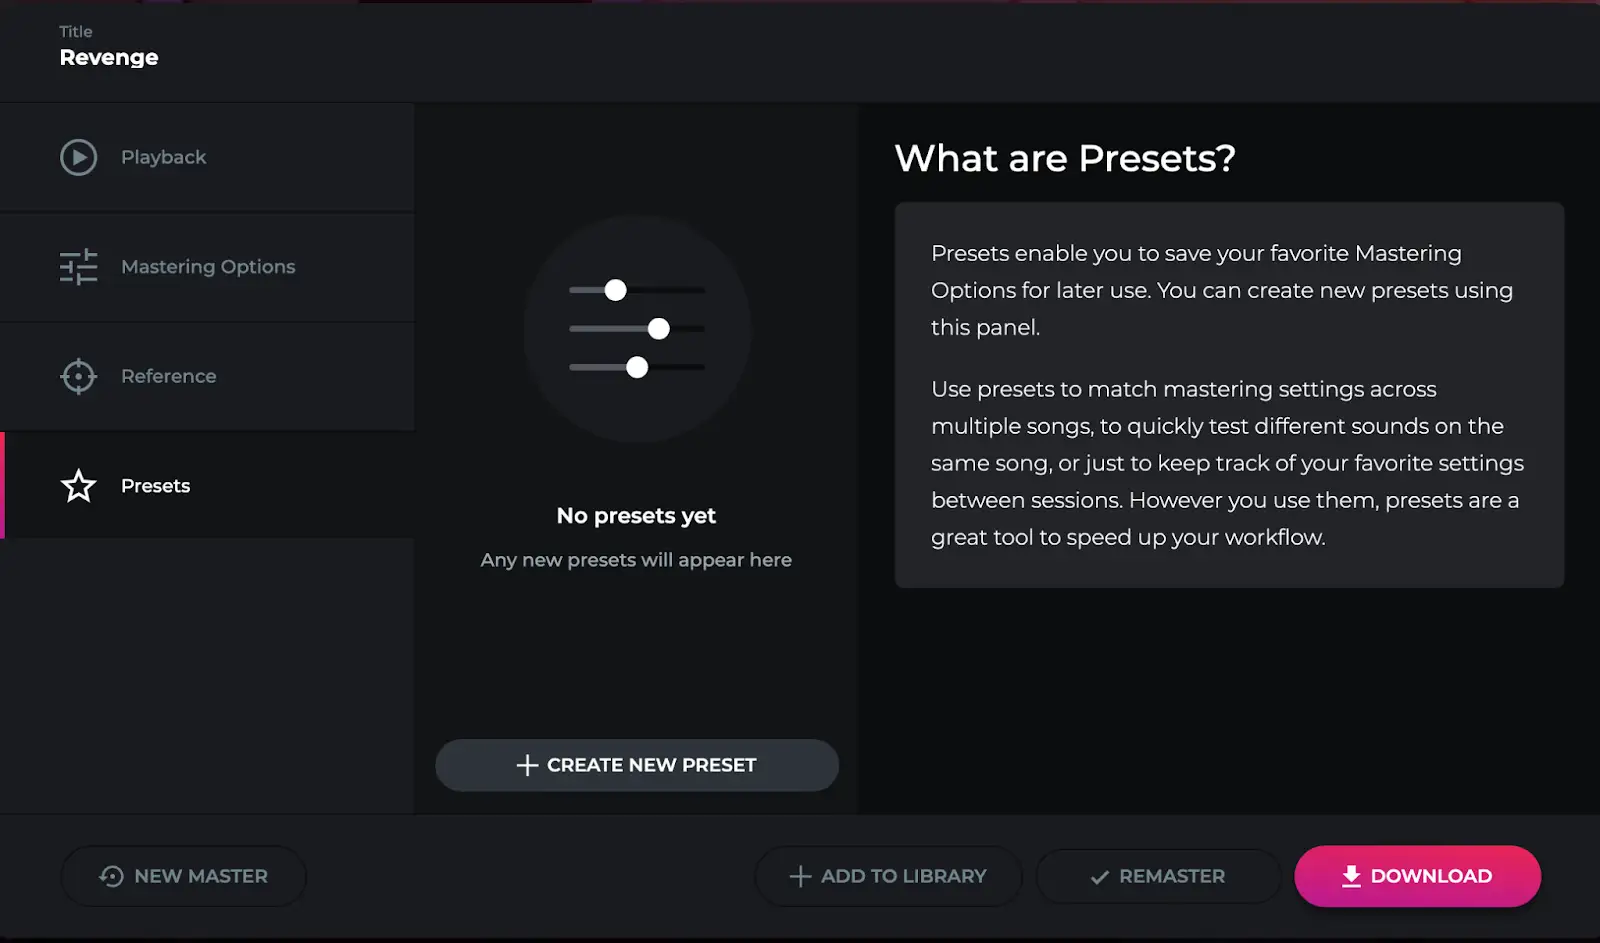
If you're mastering a bunch of songs with a similar sound, you can take advantage of the presets page to store your favorite settings.
The benefits of using an online service are the speed, efficiency, and low cost involved. You may want to go the DIY route if you want to learn about the ins and outs of mastering and how that can improve you mixes. If you're an artist who's spent a lot of time in the studio with live musicians to record an album, hiring a mastering engineer might be the way to go. I'd recommend trying all three routes, to see which one works for you and your music.
5 Music Mastering Tips For Beginners
Rest your ears often
It's easy to get ear fatigue when listening to the same piece of music again and again, so make sure you take regular breaks from your work so your ears stay fresh.
Use a reference track
Use a reference track when mastering your own song, and be sure to check back in with it often. How does your song stand up to the reference? Too much low end? Not enough punch? A reference will help you stay on course for a great master.
Monitor at a sensible volume
It's easy to just crank up your playback system and think you're doing an awesome job. But don't. Monitor at a comfortable level so you save your ears from tiring quickly, and to avoid making inconsistent choices.
Don't agonize over choices
While I'm all for making something the best it can be, there's a fine line between getting it right and overkill. At the end of the day, learning how to master a song is a journey that can take a lifetime. Do the best you can and move on to the next one.
Less is more
Both in terms of the number of plugins to use , and how you use them - don't go overboard. I recommend starting with just three plugins: EQ, compression, and peak limiting. And make any adjustments small and considered. If you need to you make large adjustments consider going back to the mix stage.
Common Beginner Mistakes
Using too many plugins
While you're learning, stick to the basics. EQ, compression, and a peak limiter are your basic tools. Once you've begun to learn a little more about mastering you can experiment with stereo imaging, saturation, and other tools.
Mastering on the mix bus
Yeah, no. There may be a temptation to get everything done in one project but resist it! Bounce your mix as a lossless file (i.e. the same bit and sample rate it was recorded in), and import it into a clean, empty project. You'll have more processing power available, and you won't be distracted with endless mix-fiddling.
Over-processing
If your ears are tired from not getting a break, or you haven't used your reference track, it's easy to go overboard with EQ and compression. It's always worth coming back the next day to make sure that high end boost was actually a good thing.
Not checking the file on different playback systems
Your final stereo file might sound great on your Yamaha NS10s, but have you checked to see what it sounds like coming through your sister's tiny laptop speakers?
Relying on presets
Don't get me wrong - presets are a great starting point. But you'll want to tweak that 'Rock Ballad Master' preset on your EQ to suit your particular song. So feel free to dial them in, just don't be the Prince (or Princess) of the Presets.
DIY Mastering FAQs

Can mastering fix a bad mix?
In a word, no. It can help smooth out inconsistencies, and add clarity and shine, but it won't mask a badly mixed song. If you come across problems with the mix while mastering consider returning to the mix stage to fix the problems first.
How loud should you master your music?
Always make sure you leave at least 1dBDS headroom, and make sure there's no clipping on the master channel. The requirements of streaming services and broadcasters are all different but a good rule of thumb is to aim for an integrated -14 LUFS.
How do you master low end?
Use multiband compression to tame any wayward low frequencies. Remember to use subtle amounts of gain reduction - no more than -2 to -3dB. It's also worth using a low cut to roll off anything below 3oHz. This leaves space for the low end to breathe.
How loud should my mix be before mastering?
While it's tempting to crank up the volume while you're mixing, don't! At the mix stage the loudest parts of your track should be peaking at -6dB. And make sure that you don't normalize a mix as you bounce it out. This option is often checked by default in some DAWs.
How loud is a SoundCloud master?
SoundCloud will normalize your song to -14 LUFS, so aim for somewhere between -18 and -10 LUFS.
How do I know if my master is good?
Great question! Try it out on different speakers, and in different listening environments. Your car stereo, your phone, laptop speakers, a soundbar. Can you hear everything clearly? Does anything jump out at you? Ultimately, the more you practice mastering the better you'll become at it.
Should you use a limiter before mastering?
Definitely not! Leave any processing on the entire mix for the mastering stage. Feel free to use a little compression and EQ on auxiliary channels (for instance a drum bus) to tighten things up, but leave the output channel empty of any plugins.
How much headroom should I leave for mastering?
Aim to have the loudest parts of your mix peak at -6dB at the mix stage. This way you'll have plenty of headroom for processing and increase the perceived loudness of your song.
Should you normalize after mastering?
Never check the 'normalize' box when bouncing down your final master! It will mess with all the hard work you've done to get to this stage. Leave the normalizing to streaming services, who will render your master to their requirements.
What is the best mastering software?
There are lots of individual plugins, and suites, that can help you master music. But really the most important thing to rely on is your ears. All of the techniques discussed in this article can be done with stock plugins that come with your DAW, meaning you can practice your art before you splash out on fancy software.
Is mastering more difficult than mixing?
Some people mix and master. Others gravitate toward one more than the other. Both require a good set of ears, technical knowledge, and the patience to practice.
What plugins should I use for mastering?
At the minimum, you'll need an equalizer for controlling different frequency ranges, a compressor to tame the dynamics, and a limiter to raise perceived loudness of the song and prevent clipping. If your DAW has a true peak meter that's great, but you can get by without it to begin with.
How do I get better at mastering?
The same way you get to Carnegie Hall: practice, practice, practice! Listen to your own work and commercial releases with a critical ear. What makes that song pop? How does your release compare? Don't get stuck in a rut of forever polishing one song; move on to the next and focus on improving your craft each time.
In Conclusion...
Mastering is a mysterious art that takes years to understand and a lifetime to perfect. Practicing will only make you better, so don’t skimp on time when it comes to the mastering stage.


