

Do you want your mix to stand out amongst the rest? Since a great vocal performance can make or break a song, it's important to understand the best way to process a singer's voice. Unfortunately, learning how to process a vocal recording requires a completely different approach from processing other instruments or sounds.
While perfecting your vocal sound is an art, there are a couple of EQ basics to keep in mind whenever you approach a session. In this step-by-step guide, we'll break down how to EQ vocals for beginners and experienced producers alike. This basic framework will help you eliminate unwanted frequencies and boost frequencies on your vocal track to create a polished, professional vocal in your mix.
What Is An EQ?
Before jumping into the art of vocal eq, it's key to understand how an EQ actually works. EQ stands for equalization, which is the processing of an audio signal. Equalization tools make it possible for you to separate an audio file out by frequencies, eliminating unwanted sounds or boosting the frequencies you'd like to highlight.
There are several types of EQs including:
Dynamic EQ
This is the most modern type of EQ. Unlike parametric EQs, dynamic EQs adapt their settings based on the input information. They often have attack and release controls that aim to provide compression within the context of your equalization settings.
Parametric EQ
These are the most common and versatile EQs seen in music production. Parametric EQs feature adjustable frequency bands with adjustable gain and filter types. Most parametric EQs display a full view of the frequency spectrum making it easy for the engineer to make surgical cuts to the audio signal. That being said, there are parametric EQs with more of a hardware appearance for engineers who like to use their ears first, eyes second.
Graphic EQ
Graphic EQs can boost or compress a range of specialized frequencies, utilizing slider controls. While you can't adjust the filter type or bandwidth as you would with a parametric EQ, they may be helpful for certain projects.
It's also worth noting that digital and analog EQs can have different sounds, though the perceived difference may be subtle. Just like any other plugin, an EQ can be used as a creative tool as much as a technical one.

How Can You Use an EQ?
So, how can you use an EQ? It all boils down to utilizing filters to boost or cut certain frequencies. Here are the specific methods in which you might use your parametric, graphic, or dynamic eq to eq vocals or the entire frequency range of your track.
- Low or high pass filter: A high or low pass filter simply rolls off frequencies on the low or high end of the frequency range. A high pass filter (sometimes called a low cut filter) eliminates unnecessary lower frequencies and the low pass filter takes out any unnecessary high frequencies. You might use a high pass to remove any low mids or anything lower than the fundamental frequency while still preserving the center frequency range on your vocal. A low pass filter could cut out any unnecessary sibilant sounds or air that you might not need from bass frequencies.
- De-esser: This process involves cutting out problem frequencies or sibilant sounds on the higher end of the frequency spectrum. These are usually harsh "S", "T" or "P" sounds made by the human voice that has frequency content usually somewhere around 5-8 kHz.
- Bell Filter: These more precise filters are primarily used to target specific desired or problematic frequencies. You can control a bell filter's Q, making the width of the bell filter expand or contract.
- Low or High Shelf Filter: These filters can be used to boost or cut all frequencies above or below a specified cutoff frequency. You can use this to add air to lead vocals, though this filter type can also be helpful when used amongst other instruments.
These are just some of the equalizer choices you have while mixing. It's also important to understand the eq decisions can be summed up by one of the following overarching umbrella terms:
Subtractive EQ
This simply refers to cutting out unwanted sounds in an audio file's frequency response. You could engage in subtractive equalization by cutting out frequencies that sound harsh or sound unnatural. This could also be a more subtle process, like reducing resonant peaks based on the information from your spectrum analyzer.
Additive EQ
Additive EQ is the opposite of subtractive EQ processes in that it involves boosting EQ frequencies throughout a piece of music. This could be boosting a bit of the high end on a vocal track to add a little extra shimmer to a mix. It could also be adding a boost to bass frequencies during the chorus of the song . Generally speaking, you should focus on creating a gentle boost during this process.
Creative Filtering
Just like any other audio effect , eqing vocals or any other track for that matter can be used for creative effect. You can automate dynamic EQs to create your own custom filters to add interest and create variation throughout your session.

How Does Vocal EQ work?
While vocal EQ is similar to other forms of equalization, it's important to note that this skill is an entire skill on its own. For one thing, every voice is unique. There's a huge difference in how you might process male and female vocals alone, which can make it difficult to produce clarity consistently throughout all of your mixes.
Here are a couple of ways in which you may go about processing your vocal using an equalizer. Don't forget that every song is different. The methods you use on one track may not work whatsoever for a different song and set of circumstances.
Bell Filter:
These more general filters can be used to add a more general boost to a section of an EQ or reduce frequencies across a certain section of a signal. These larger filters can make more of a drastic difference to the overall tone of the vocal.
EQ-sweeps
EQ sweeps aim to identify an unwanted frequency in the mix. This type of EQ processing is very surgical and usually involves making tight changes to cut out harsh or resonating tones with a tight Q filter.
De-essing
A de-esser is a special type of compressor that targets those frequencies known to produce sibilance. This is a particularly important tool for users of brighter microphones, like condenser mics. You'll need to find the right balance with a de-esser since too much compression can negatively affect the whole vocal, leaving an entire vocal performance sounding flat.
Low Pass and High Pass Filters
These filters are used to eliminate unwanted frequencies by rolling off the low or high end of the spectrum. You might use a high pass filter to cut out the unwanted low-frequency noise on the left side of your spectral analyzer. Conversely, you may use a low pass filter to eliminate excess air in your vocal recording.
Shelf Filters
Shelving EQ filters are another great way to produce the desired tone in your vocal mix . For example, you could use a high shelf feature to add a little bit of brilliance to your mix, without making those higher frequencies too loud.
How To EQ Vocals
Without further ado, here's a comprehensive guide on how to eq vocals. Keep in mind that every session may require a different set of steps, so there's no one-size-fits-all approach when it comes to vocal production. These steps can be used as a general framework to help a final vocal sound good, but always cater your approach based on the session at hand.
- Start With A Great Recording
- Subtractive EQ Processes Come First
- Add-In Presence
- Check Your Mix With Your Reference Track

Start With A Great Recording
In order to learn how to eq vocals, you have to understand that the best way to use your equalizer is as little as possible. Take care to learn about microphone selection and cater your recording environment to the needs of your individual session. You'll also want to take recording basics into account. Record your vocals in an environment without excess noise, and help guide your vocalist to prevent frequency content issues down the line.
Mic choice is as important as your approach to mixing vocals . Don't forget the proximity effect while recording. There's an audible increase in bass frequencies the closer you are to the mic. Therefore, if you don't want your backing vocals' low end to sound too loud, make sure you've established an appropriate distance from the microphone itself.
For example, you can advise a vocalist to avoid harsh consonants on the microphone to reduce the amount of baked-in sibilance. You'll also want to actively listen to a vocal's sound if possible. Practice idle takes with your vocalist and take care to get multiple good takes. Don't get it twisted, true vocal mixing starts with the recording process.
Subtractive EQ Processes Come First
I personally prefer to focus on subtractive EQ processes as much as possible above additive ones. It's also a good idea to perform any subtractive processes first since you don't want to amplify any problem frequencies. When you're learning how to eq vocals, you might engage in a variety of subtractive EQ processes.
For example, you might start by cutting out some unnecessary low mids with a high pass filter. While you might not use this method on a bass part, you don't need the lowest frequencies. Your main vocal and backing vocals primarily exist in the mid-range, though female vocals are slightly higher than male vocals .
During this stage of the process, you might also be eq-ing vocals to cut out specific harsh frequencies. Vocals cut with a sharp Q value can eliminate unwanted tones through a process called EQ sweeping:
It can be helpful to temporarily boost the unwanted frequency to make sure that you've properly identified the noise. Once you've found the unwanted sound, you can lower the gain so that it is less prevalent in the vocal.
Generally speaking, you shouldn't be making vocal cuts much greater than 3 dB or so. Too drastic of a cut can make eqing vocals sound incredibly unnatural and ruin your mix. If you find yourself overcompensating while using an equalizer, it's probably best to return to step 1 if possible and get another take or two of the vocal.
Add-In Presence
Once you've cleaned up your vocal, it's time to use additive EQ methods to highlight any of your preferred parts in a mix. This could be adding brilliance on the high-end of the mix, or simply bringing out more of your vocal annunciation in the core vocal range.
Additive changes can be fairly drastic, so make sure you utilize these changes subtly.
Check Your Mix With Your Reference Track
Above all, the best way to learn how to eq vocals is to actively listen to a reference track. Whenever you approach a mix, it's helpful to drag your target track into your session so that you can bounce back and forth between the reference and your mix.
Once you're happy with your vocal mix, check to see how it sounds in context. You can have a vocal that's eqed properly that still sounds harsh amongst the rest of your instrumentation. Above all, compare your master to your reference track.
Is your main vocal and backing vocals sitting the way you'd like in your mix? Is it too bright? Needs more or less reverb or clarity? Whatever it is, this is the time to evaluate where your mix effectively stands.
Vocal eq mixing can be incredibly tedious, but taking the time to rinse and repeat if needed is essential to your success within the music industry.
Best EQ Settings For Vocals: A Baseline
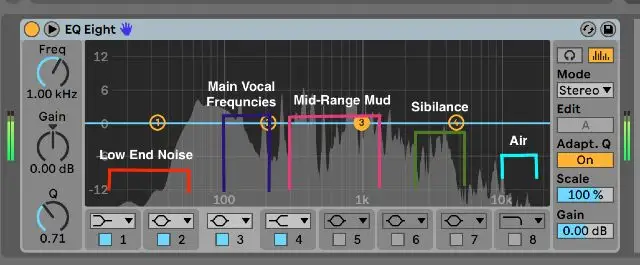
The best EQ settings are ones that are customized based on your project's needs. While there's no magic setting that can be used on all audio tracks, you can instead understand where certain types of sound typically reside on a spectral analyzer. Those key points are:
Low-End Excess- 20 Hz to 80 Hz
Key Vocal Frequencies - 80 Hz to 300 Hz
Muddiness - 250 Hz to 500 Hz
Mid Nasal - 800 Hz to 1.5 kHz
Presence / Sibilance - 4.5 kHz to 9 kHz
Air - 10 kHz to 15 kHz
If you can remember where each type of sound resides, you'll be able to cater your vocal eq strategy to each individual session as needed. When in doubt, trust your ears. Don't let anyone fool you into thinking that any EQ "rule" is better than what makes the most sense for the listener.
Most mixing engineers have a couple of general goals in mind while approaching a vocal EQ which may include:
- Reduce unneeded low-end noise
- Eliminate muddiness where possible
- Bring out the desired vocal tone
- Reduce sibilance
- Add brilliance without adding too much air
You can use these basic EQ goals as general guidelines, but know that every song is different and requires its own custom approach.

Vocal EQ Frequently Asked Questions
Are you still struggling to understand how to eq vocals? Here are a couple of commonly asked questions and answers to expand your understanding of the process.
What EQ frequencies work for vocals?
There isn’t a set-in-stone rule for what frequencies will “work” for vocals, since every voice is incredibly different. Instead, it’s more helpful to understand where certain types of frequencies reside across the entire spectrum. For example, you might expect muddiness around 250 Hz to 500 Hz and a little added presence around 4.5 kHz to 9 kHz.
Is an EQ necessary for vocals?
An EQ is used on vocals in most professional studio recordings. That being said, the less EQ you actually need, the better. It’s always best to focus on getting the best recording possible rather than banking on the post-production process. Make sure you’re using the right microphones too, to get the most out of your recordings.
How do you EQ nasal vocals?
The best way to fix “nasal” vocals or any type of problematic vocal is to perform an EQ sweep, where you actively listen for the select harsh frequencies. You can lower the gain of those points in the mix in order to produce a less nasal recording.
How do you fix muddy vocals?
In order to learn how to eq vocals, you need to understand where certain types of frequencies lie on the spectrum. “Muddiness” tends to exist in the 250 Hz to 500 Hz range. To fix a muddy vocal, you might use a low-cut filter to roll off the low end of your recording, thereby cleaning up the final track.

How do you add warmth to vocals?
In order to add warmth to vocals, you can try adding a subtle eq boost in the low mid-frequency range. Alternatively, you can utilize different types of saturation to achieve this. You can also experiment with different types of microphones for a warmer sound.
What Hz is a deep voice?
A male vocal is typically deeper than a female vocal. Male vocals usually sit somewhere between 85 to 155 Hz. Any voice that resides on the lower end of this spectrum would be considered a pretty deep voice that requires its own specialized vocal eq approach to avoid muddiness in the mix.
How do I make my vocals brighter?
You can make a vocal brighter by adding a subtle top-end boost somewhere around 4.5 kHz to 9 kHz. It’s also a good idea to utilize a condenser microphone which can add some presence to your recording. Make sure you take the time to de-ess properly, so the harsh frequencies don’t mask the brilliance of your vocals.
How do you EQ muffled vocals?
Muffled vocals can become more clear by boosting key frequencies with an EQ. That being said, it’s much easier to get a clear recording than attempt to reconstruct a line utilizing an EQ. If your vocals are muffled, it’s best to get a clear take if at all possible.
While learning how to eq vocals isn't always the easiest of tasks, it's essential to any engineer looking to succeed in the industry. Hopefully, this step-by-step guide will make it easier for you to process your vocals during the mixing stage.
However, note that nothing can substitute for sheer practice. Take the time to practice skills like using a high shelf and high pass filters on your vocal mixes. In time, using an EQ to shape your vocals will become second nature. Enjoy putting your new skills to the test!


