Vocals are an essential ingredient in any song. Without them, it’s just a backing track.
As a music producer or mix engineer, it’s crucial to get the vocals to sit nicely in the mix. What’s the point of painstakingly crafting a stonking arrangement if the vocals aren’t present and clear? Or worse, they’re overpowering the delicate cowbell part your teenage daughter played?
Getting vocals to sit in a stereo mix is a challenge every music producer and engineer faces. And eMastered is here to help!
In this guide, we’ll look at tips and techniques to get that perfect vocal sound and a professional-sounding mix. Whether you’re a newbie to mixing or looking to refine your approach, these steps will take you from basic preparation and clean-up, to advanced techniques used by mixing pros around the world. We’ll cover everything from EQ and compression, to creative effects, giving you all the tools you need to make vocals blend smoothly in a mix.
So read on, and let your voice be heard!
Understanding the Role of Vocals in a Mix
Pick a song. Any song. Now, depending on the genre or style of the piece, the vocals may be the main event of the track, or they may be decoration to another element that takes center stage. Understanding the role of vocals in the particular mix you’re working on will give you a better understanding about how to approach the mixing process.
Take a classic tune like Rolling in the Deep . Adele’s powerful vocals lead the way throughout the song, carrying the energy and setting the mood. The rest of the instruments, while important, are primarily there to serve the lead vocal.
When you’re working on a track like this, it’s important that the vocals are prominent and clear to achieve a polished, professional sound. The same applies to most pop music, rock, or singer-songwriter type tracks.
Other genres may require a different approach. Electronic music, for example, will often feature vocals as part of the texture supporting the overall groove. Avicii’s Levels has a nice vocal in the breakdown, but essentially the song is all about the drop. The energy comes from the rhythm section, and the focus is on the synth hook.
Hip-hop, R&B, and related genres also require their own approach to mixing vocals. Like pop and rock, the vocals are the dominant force but they demand a closer, more upfront treatment to give a raw and direct vibe.
Understanding the role the vocals should play in the mix will depend on the vibe you’re aiming for, the story you’re trying to tell, and the genre of the music. Knowing all this before you start mixing will help you make better decisions in terms of EQ, reverb, and other processing that may (or may not) enhance their role.
Begin With the End in Mind: Preparing the Vocal Track
A great vocal mix begins with a clean recording, and this is especially important if you’re recording vocals in a home studio . While a lot of software currently available can do a mind-boggling amount of cleaning up when it comes to shoddy audio, nothing beats just having it done right in the first place . Here’s some basics to look out for:
Recording Quality
Invest in a good quality microphone that’s suitable for vocals. A condenser mic is normally a good choice for capturing all the detail in a voice, but you may find that a dynamic mic works better for some singers, or styles of singing.
Make sure you have a good noise floor for the recording, and stay alert for any ground loop hums that may occur.
Finally, be sure that you’re only capturing the vocal, and not any room reflections or ambient noise. Room reflections can be tamed with acoustic paneling , or the more DIY approach of hanging blankets. Turn off any noisy appliances like your AC (or phone).
Mic Distance and Placement
Getting your mic placement right is crucial to capturing a great vocal take. Too close and the performance will suffer from plosives; too far and the voice will sound thin. Placing the vocalist 6-12 inches from the mic is a good rule of thumb, and investing in a pop shield (around $7-15) is a smart move to avoid the sound of popping p’s and b’s.
Similarly, make sure the vocalist has a good mic technique. Stay a consistent distance from the mic, and avoid any drastic changes in sound quality.
Ready, Set, Gain
When recording, be sure to set your input levels so the loudest part of the vocal isn’t distorting or clipping. Ideally, aim for the loudest parts to peak around -6dB to allow room for tweaking in the mix.
Get Your Sh*t Together
Once you’ve finished recording the lead vocal, it’s time to go through and comp all the best takes together into your ultimate vocal performance. By getting the best performances together now you’ll be able to focus 100% on the mix when it gets to that stage.
This is an essential step if you’re sending your session to an engineer for mixing. They have no way of knowing which takes you prefer, so get your ducks lined up beforehand.
Of course, if you’re the mixing engineer for an outside project you may not have any say over the vocal recording process. In which case you'll have to reach into your vocal mixing toolbox.
Basic Tools and Techniques for Mixing Vocals
Now that you have a solid vocal recording ready to mix, it’s time to look at some basic tools and tricks of the trade that will help a vocal sit in the mix.
In this section, we’ll be covering four main areas: EQ, compression, panning, and reverb. These tools can do a lot of heavy lifting, and when applied carefully will bring out the best qualities of a vocal, control the dynamics, and help it find its place in a mix.
EQ
With careful use of EQ you can shape the tone of a sound, reduce (or eliminate) problem frequencies, and carve out space for other instruments in the mix. Here’s some basic settings you can start with when mixing vocals.
Remove Low End Rumble
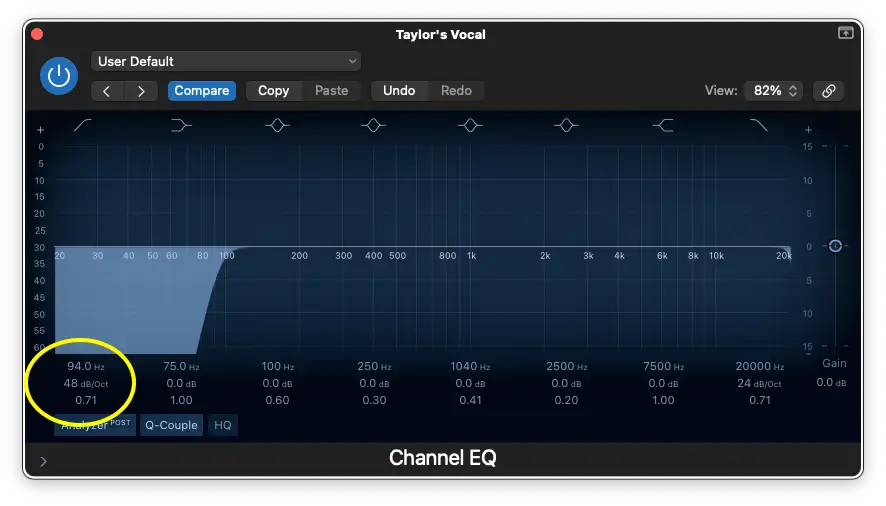
The human voice doesn’t produce anything useful below 100Hz but a vocal track will often have some low-frequency noise on it thanks to room noise or mic handling. While this noise might not be as audible as your work, it’s taking up space on the frequency spectrum and can adversely affect the mix. A high pass filter set to 80-100Hz is a good point to start from to remove low-end rumble.
Find the Body
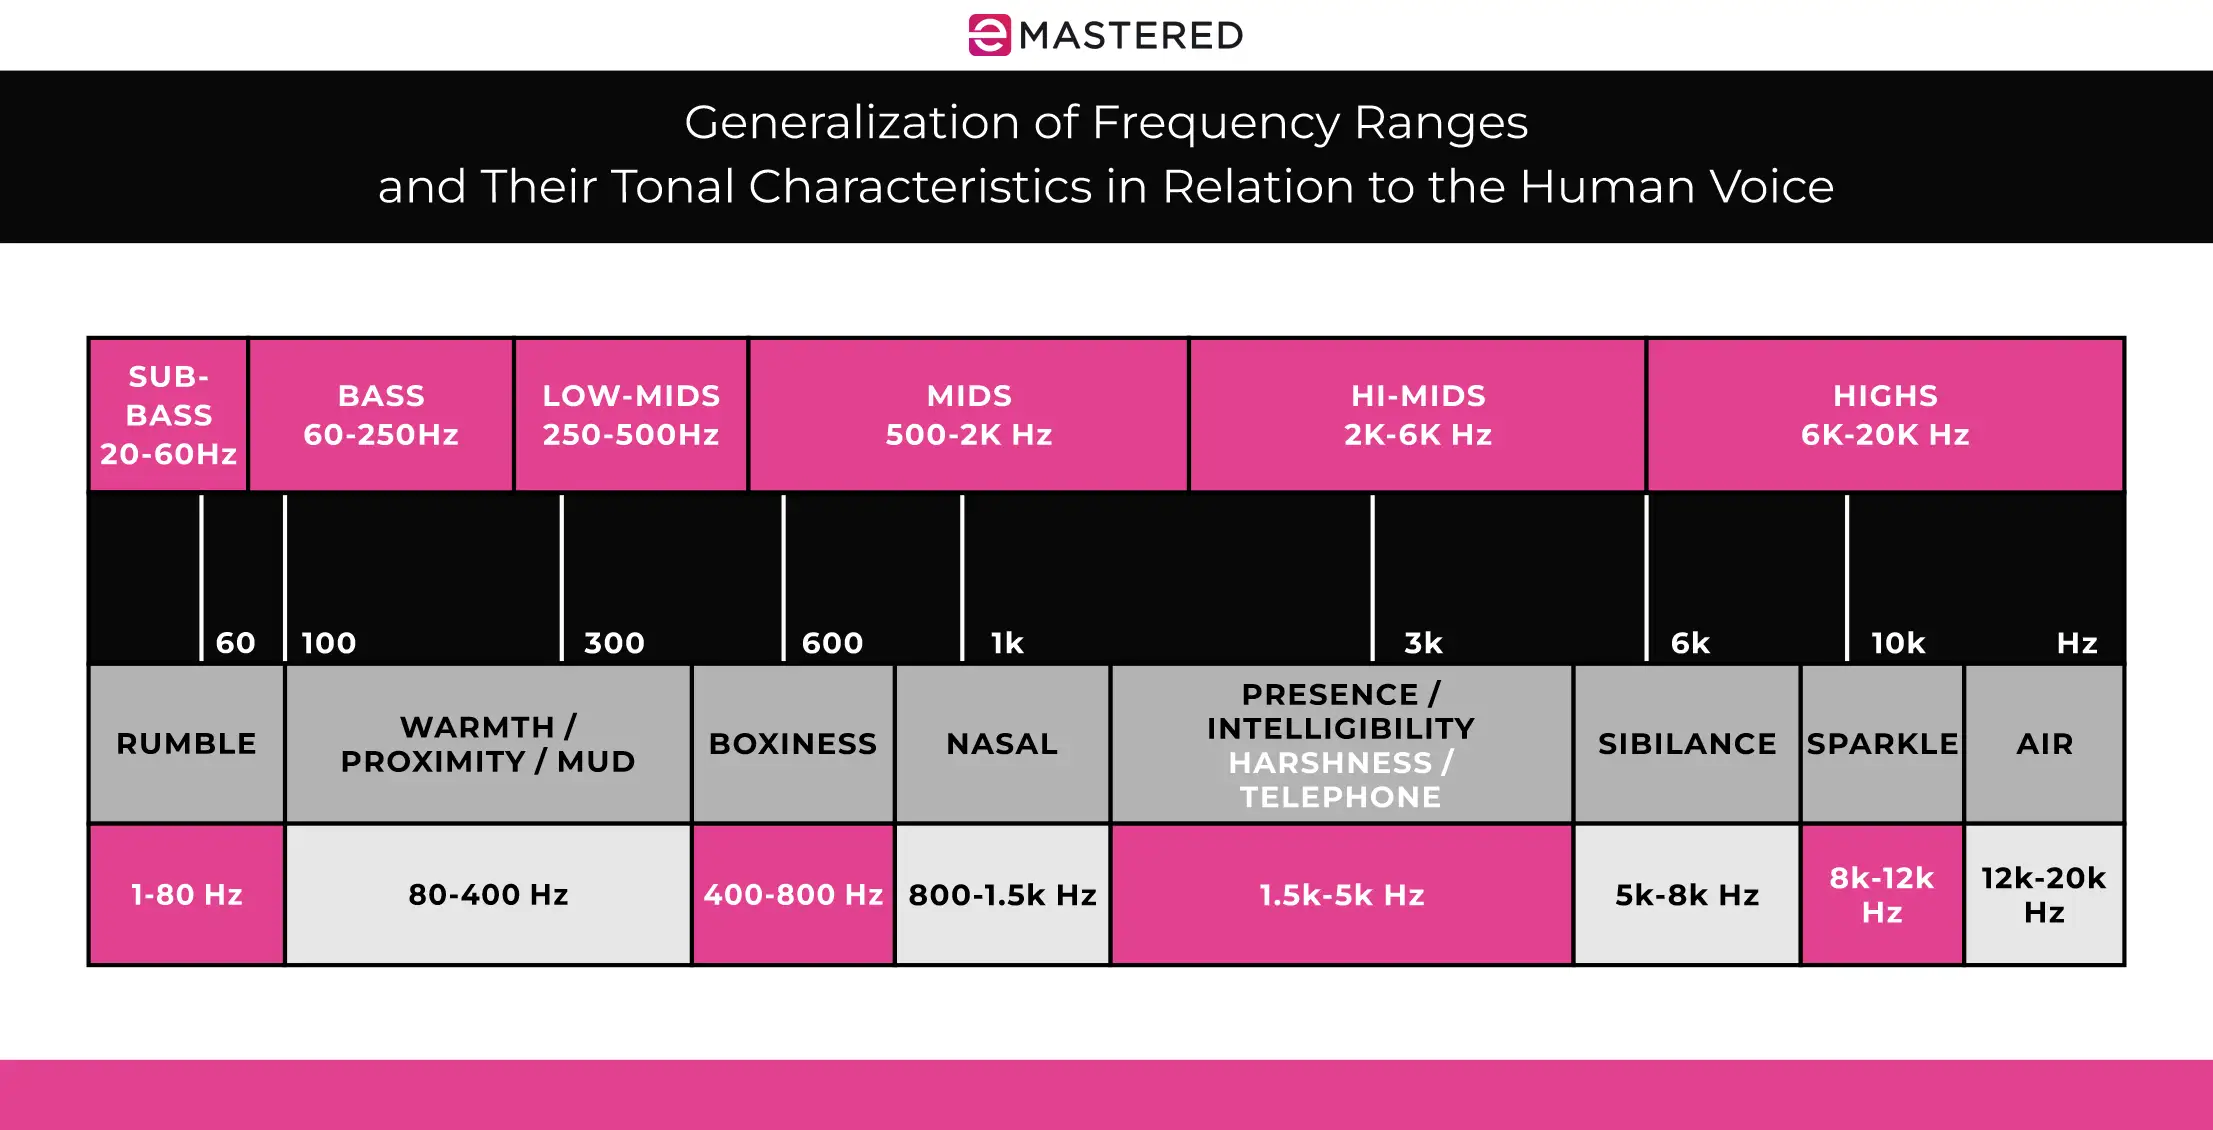
The main body of a vocal lives at around the 100 - 400Hz area. Making small boosts around this range can help fatten up a thin vocal, but too much of it can muddy up a vocal, so go easy.
Enhance Clarity and Presence
Our ears are most sensitive to the 2kHz - 5kHz frequency range, which handily is also where speech is most intelligible.
Making small boosts around this area can help add clarity to a vocal, but keep them around 1 or 2 dB. Too much presence here will result in a harsh sound.
Add Air
The main vocal in pop and acoustic songs can often benefit from some added sparkles. Using a gentle boost around 10-12kHz will help a vocal sound open and bright.
De-Essing
Sibilance can be really distracting in a mix, the harsh 's' sounds in a vocal making an unpleasant listening experience for all.
This can sometimes be tamed with EQ, but often it's better to use a dedicated De-Esser plug in to reign things in. Most DAWs come with their own native De-Esser so you don't need to splash out on extra software.
The frequency range of the sibilance will differ between singers, and will generally be higher for female vocals and lower for male.
Try stacking two De-Essers in series, each targeting different frequencies for an even smoother sound.
And be subtle - too much reduction can give your singer a lisp!
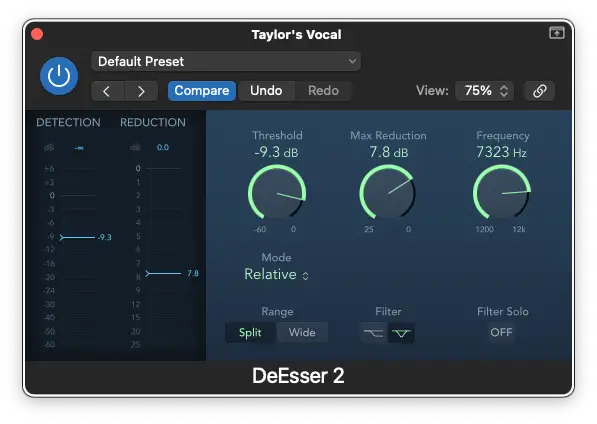
Remember, all these settings are a general guide. Each singer and style will need their own specific adjustments so take your time to fine tune and experiment when applying EQ. If you fancy doing a deeper dive into tonal shaping, check out our handy chart to frequency ranges and how they affect the tonal qualities of a human voice below:
Pro Tip: If you work with a vocalist regularly, it's a good idea to save EQ settings as a preset to work from - it'll save you heaps of time on every mix!
Compression
Compression is a way of reducing the dynamic range of an instrument, evening out the louder and quieter parts to make vocals sound more consistent. Compressors are an essential tool for making vocals sit comfortably in a mix.
Vocal compression is a topic worthy of it's own article , but here's some settings to help you get started taming your vocal levels.
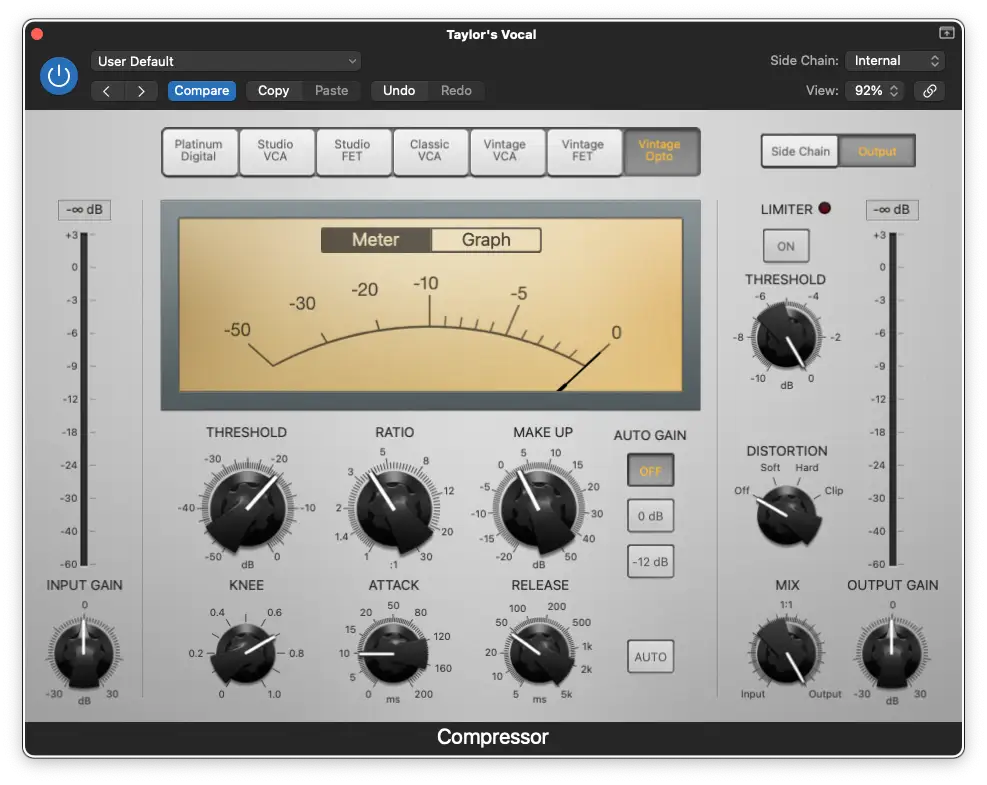
Threshold : Set the threshold so it catches the louder peaks without smashing down on quieter parts.
Ratio : Start off with a ratio of 3:1 or 4:1 to give you some control without being too heavy-handed.
Attack and Release : These two controls can make a huge difference to the sound of the vocal. Start with an attack time of around 10ms, and a release time of around 40ms, and experiment from there.
A faster attack time will make the vocals sound more consistent, whereas a slower attack time will give vocals a punchier edge. Slower release times will smooth things out; a faster release will give more distinction.
Adjust the settings until you're hitting around 2-3 dB of gain reduction. Adjust the makeup gain so the output and input levels match, and don't forget to listen to the vocal in context of the whole mix!
For an even smoother result, try using serial compression. Serial compression involves using multiple compressors stacked on top of one another, often using different models to create a blend of dynamic control and tonal shaping.
This process can easily get out of control, so be sure you know what you're doing with each compressor!
Panning
Sometimes it's the simple things that can have the most effect in making vocals sit in the mix nicely. If things are sounding cluttered, try panning some instruments in the stereo image, leaving key players like the bass, drums, and of course, the lead vocal in the center.
This is particularly effective if there's a large number of background vocals in play. Panning these hard left and right will keep them out of the way of the lead vocal.
Smaller vocal harmonies, such as the lead vocalist singing one line of harmony under the lead line, can be treated with less drastic panning.
Reverb & Delay
Effects like reverb and delay can create space and depth in a vocal, and help it feel like it's in the same room as the other recorded tracks in the mix.
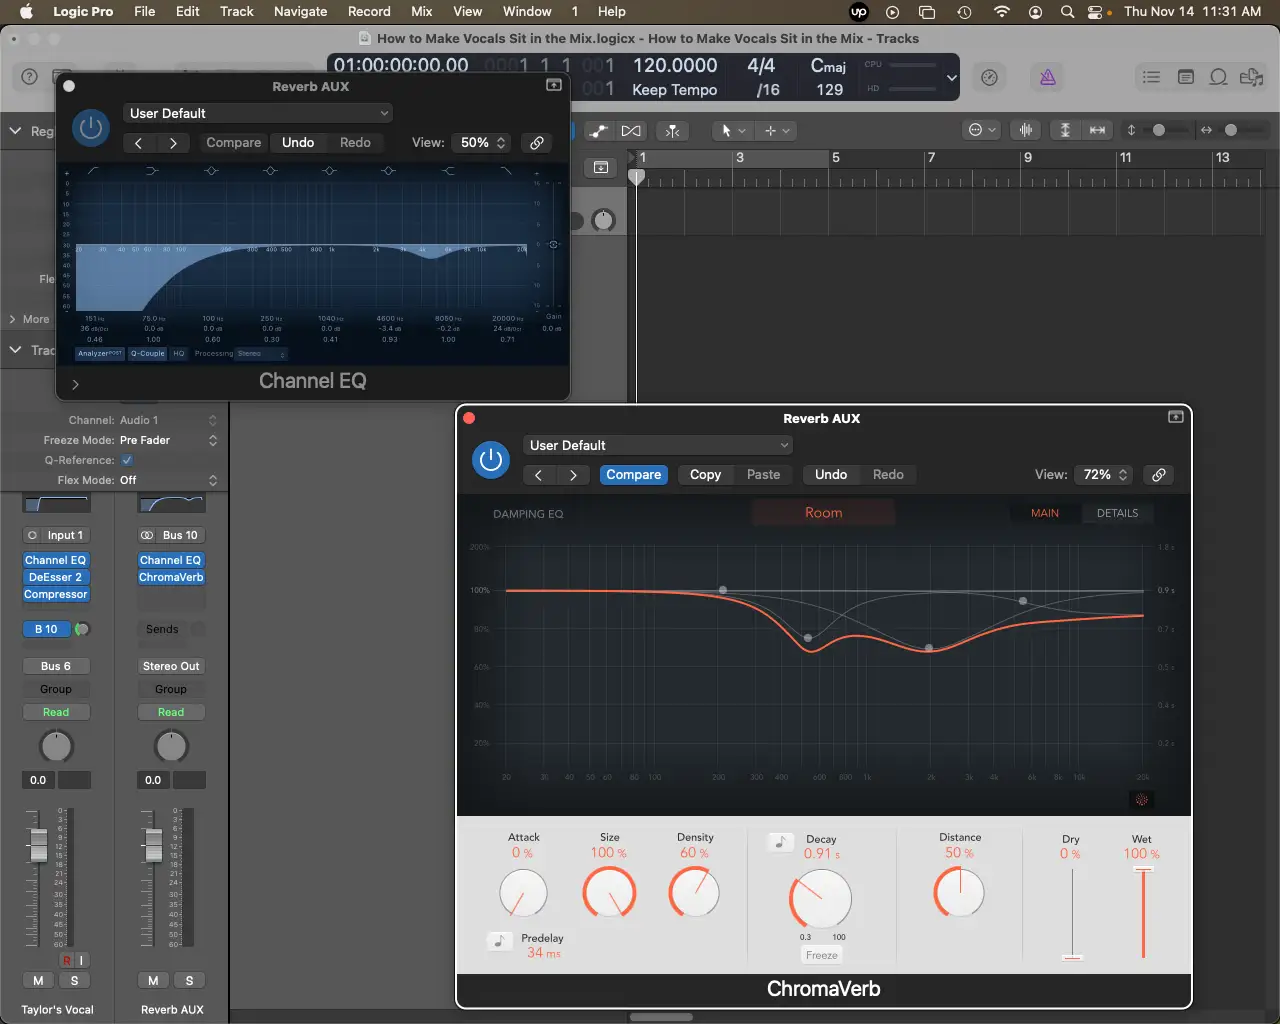
It's a common practice to set these up on separate aux channels that feed into a reverb or delay plug in, allowing you control over how much of each instrument is being sent to the effect.
Reverb :
Rather than have a 'universal' reverb for instruments and vocals, set up a small room or plate reverb for the lead vocals, and a small room or hall for rest of the instruments.
Use a short decay time to keep the vocal clear while still adding a sense of space. Add a small amount of pre-delay (30 - 100ms) to separate the initial onset of the vocal from the reverb.
Delay :
Delay can be used as a creative effect, or you can use small amounts of it to add depth and warmth to vocal tracks. Try adding a short slap back delay of around 80-120ms to a main vocal and see if it sounds good.
EQ :
Back to our old friend, the EQ. It's a smart move to add EQ to reverb and delay channels. This will prevent low end muddy frequencies, or unpleasant high- or mid-range frequencies from going into the effect. Too much low-end in a reverb gets messy faster than a 3 year old with ice-cream.
A lot of reverb plugins have their own built in EQ, but I find you get more control using a separate EQ plugin as an insert before the effect.
Advanced Techniques for Vocal Mixing
All the above techniques will help your vocal mixes sound good. But there's plenty more tricks in the bag when it comes to stellar vocal mixing. Want to take your final mix to the next level? Let's gooooooooo!
Frequency Slotting
EQ isn't just about reducing unpleasant frequencies, or boosting lovely ones. A smart engineer will use frequency slotting to create space in each track in order for the recorded vocals to shine.
Applying EQ in this way is especially useful if the mix you're working on contains instruments that share the same main frequency range as the vocals. Try cutting guitars or keys at around 300hZ, and maybe a slight cut between 1-5kHz.
Making room in other tracks by using this EQ method will help your vocals sit in the mix more smoothly. The trick here is to understand the frequency ranges occupied by instruments, and knowing what needs to be kept and where things can be cut.
Parallel Compression
Parallel compression is a great way to get vocals to sit at the forefront of the mix, and bring extra energy to the sound. Instead of applying extreme compression as an insert on the vocal track, the original signal is blended with a heavily compressed version.
Any compressor will work for the job. To set up parallel compression, either duplicate the vocal or send it to a dedicated aux track. On this track, insert a compressor with a high ratio and aim for a gain reduction between 10-20 dB. Then bring up the level of the affected track until you have a good balance with the original signal.
Because the compression is happening on it's own track, you can adjust the blend as the song progresses. Try boosting the volume of the compressed track during the chorus for some extra oomph.
Pro Tip : Place an EQ before the parallel compression so you don't boost unwanted frequencies.
Volume Automation and Clip Gain
Relying solely on a compressor to control the dynamics of a vocal can lead to an overly-compressed sound.
Volume automation can be a very effective way to get vocals to sit in the mix, and is particularly useful for bringing up the level of a signal on specific words, especially if the singer has a tendency to 'swallow' the ends of phrases.
Volume automation can also be used to raise the overall level of a track subtly when necessary - for instance, bringing up the backing vocals at the start of the chorus to make the entrance noticeable, before dropping them back down again.
Pro Tip : Try automating effects controls - like the parallel compression you just set up!
Clip gain is a form of automation, and can also help even things out. It's a well-used tool in Pro Tools , and many engineers use clip gain to manually even out the dynamics of a signal before it gets sent to a compressor.
The difference between this and volume automation is that clip gain changes the level of the vocal before any processing has taken place - before it even hits the fader in fact, whereas volume automation adjusts the signal after all processing has taken place.
Pro Tip : Use clip gain to smooth out the initial signal; use automation to control when a vocal feels out of place.
Sidechain Compression
Sidechain compression is often used to tuck the bass out of the way of the kick drum , but it can also help vocals sit in the mix without fighting the other elements of the track.
To set this up, send all the instruments of the song to their own bus, and insert a compressor with the lead vocals feeding into the sidechain input. Keep the compression levels very subtle - aim for only a few dB of gain reduction. Now every time the vocals come in, the other tracks will be lightly pulled back.
Multi-band compression is even better for this work as it can focus on specific frequencies where the vocal sits.
Pro Tip : Leave the drums out of this process to preserve the energy of the song!
Final Touches & Mixing in Context
Applying EQ, using sidechain compression, and making use of volume automation are all good processes to help vocals sit in the mix, but there's a few things more that will help your mix sound even better when you send it out into the world.
Listen on Different Playback Systems :
Just because a mix sounds great on your studio monitors (or your headphones, if that's how you roll), it doesn't necessarily mean the track sounds great on every system. At the very least, check out how your mix sounds through your phone speaker, and in a car. You may find the sound of a different set of speakers makes the vocal stick out more than you planned, or vice versa.
Listen in Mono :
Similarly, reference your mix in mono from time to time. The balance of instruments, as well as EQ discrepancies can be thrown into stark relief when summed to mono.
A simple way to do this is to insert a plug in to the master bus - most DAWs have a native plug in that will sum the signal to mono.
Keep Monitoring Levels Low :
Our ears are more sensitive to the high and low end of the frequency spectrum at louder volumes. In order to get a true, balanced picture of your mix, keep the volume down while mixing. It's also a smart way to protect your hearing.
Take Breaks :
In order to avoid ear fatigue and get lost in endless tweaking, be sure to take frequent breaks. When you come back your ears will be refreshed and it will be much easier to get things to sit in the mix properly.
Use Reference Tracks :
It's always a good idea to use a reference track when mixing. Find one that has the same vocal vibe that you're trying to achieve, and A/B between your mix and the reference track often.
Common Mistakes and How to Avoid Them
Bleed from other sources:
If the band are all recording in the same room, an otherwise great vocal take can be ruined by mic bleed from other backing vocals or instruments.
If this is the recording set-up you plan to use, make sure you isolate the vocal mic as much as possible. Ideally, have the vocalist in one room and the rest of the band in another.
Over-processing :
Given all the advice above about EQ-ing, compression, and effects, it's easy to go overboard on the processing side of things. Always lean towards a subtle approach, applying the effect until you can hear it make a difference, then dial it a back a bit for safety.
If you have an effects-heavy mix, consider using a compressor on the effects chain and side chain it to the lead vocal to keep things out of the way.
Remember, if in doubt, leave it out!
Neglecting Automation:
Automation, not just of volume levels but of effect parameters too, is an easily-overlooked area where a little extra work can go a long way.
Take the time to run through the mix a couple of times and ride the vocal faders. Then consider automating other aspects of the vocal track, like pushing up the parallel compression during the chorus.
Ignoring the Context:
A vocal may sound fantastic when soloed but not in the full context of the mix. Always listen to how the vocals sound with the other tracks playing.
Another contextual mistake is not understanding the relationship between the vocalist and the song. This is a more subjective area to tackle but will, to a certain extent, be dictated by the genre of the music and the artist's preferences.
Conclusion
Mixing is a skill that takes time to master. Take the ideas above and experiment with them to see what works best for your particular sound. Above all, trust your ears!
Now go forth and mixeth the music!


