


There's nothing more powerful than a standout lead vocal. When the vocal hits, the entire song does too, which is why mixing engineers spend so much time mastering the art of mixing vocals . There are a few key tools that engineers use to mix vocals . One of the most important but sadly misunderstood mixing essentials is the vocal compressor.
When it comes to producing a strong vocal performance, vocal compression is your best friend. This subtle yet powerful tool helps vocals sound present and dynamic, while still maintaining a degree of consistency throughout the range of the recording.
That being said, with great power comes great responsibility. Too much heavy compression can leave a vocal sounding flat whereas a vocal with not enough compression can be incredibly inconsistent and difficult to listen to.
Thankfully, we've put together the ultimate guide to vocal compression complete with vocal compression settings and specifics to help you understand this essential mixing concept. We'll also detail the different compressor types and explain where you might use different compressors so that you can start incorporating them into your sessions. Let's dive into it!
What Is Compression and How Does It Work?
So, what is a compressor anyway? Essentially, a compressor is a tool that reduces the dynamic range of an audio signal , or the distance between the lowest (in terms of amplitude) and highest points in an audio signal. Compressors are unique in that they can reduce the dynamic range in a smooth, consistent way in order to prevent peaking or clipping on the highest points of a signal.
It does this through a process called gain reduction , creating a ceiling called a threshold that the highest parts of an audio signal will not go past. Compressors can be used on a variety of instruments, and choosing to compress vocals is no exception to the rule.
To sum it up, compressors create a more consistent, and oftentimes perceived "louder" sound. They can also add tonal quality to the affected track or can be used to shape the transients of a particular signal.
How Do I Use A Compressor?
A compressor is controlled by using the standard controls like threshold, ratio, knee, gain reduction, along attack and release. You'll want to adjust these controls methodically and slowly so that you don't end up with an over-compressed signal. First, let's dive into what each of the compressor's controls is used for.
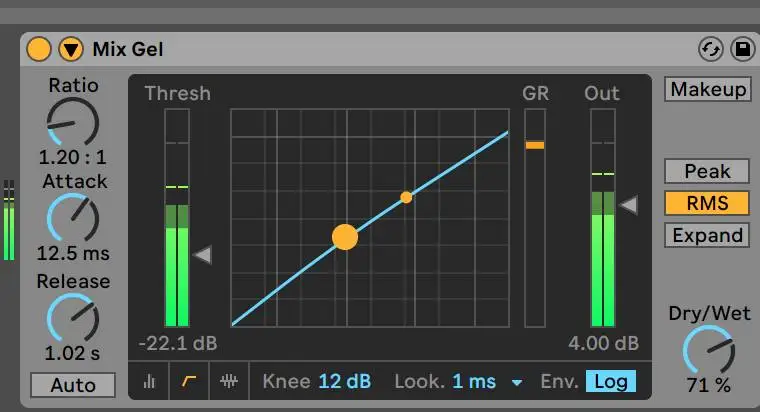
The Parts of a Compressor
Note that these are just the basic settings of the compressor. More specialized compressors may have other helpful controls such as a dry/wet knob, but these basic parameters should be available on any standard compressor.
Threshold
You can think of this as the "ceiling" of your compressor. A compressor's threshold determines at what point the compressor starts kicking in. Whenever the audio is louder than the threshold, the compressor kicks in to reduce the gain or amplitude of that signal, as shown in the gain reduction meter. Compressors make low sounds louder, but they also bring down the amplitude of louder sounds in order to make for a more consistent audio signal.
Ratio
This is how much the volume is reduced, or how powerful the gain reduction is. The greater the ratio, the more intense the compression is.
Attack
The attack refers to how quickly the compressor jumps into action after being triggered by the audio extending past the threshold. Slow attack times can make something sound more punchy and dynamic. Faster attack times may be more precise, but they may feel a bit more obvious from the listener's point of view.
Release
This is how long it takes for a compressor to return to its resting level after being engaged.
Knee
The knee is how intense compression sounds. More subtle compression uses a soft knee (1.0) and aggressive compression uses a hard knee (0) which is more obvious.
Makeup Gain
This is an increase in volume produced by the compression to compensate for the needed gain reduction. Make-up gain increased the volume of the fully compressed signal.
Gain Reduction Meter
The gain reduction meter displays how much gain needs to be reduced in order to compress a particular signal. This can also indicate how hard a compressor is working-- The greater db of gain reduction, the more intense the compression.
How To Use Any Compressor
When using a compressor, you want to aim for the most natural-sounding compression possible. While everyone has their own philosophy when it comes to using compression , the goals are more or less the same: Utilize one or multiple compressors to produce a consistent sounding track the doesn't sound unnatural or over-compressed.
Once you understand how the threshold, knee, attack, and release work, the best way to learn how compressors work is to use them yourself. One way to do this is to spend time in a blank session with an unprocessed vocal. Add different compressors one at a time to the audio track and notice with your eyes and ears how they affect the signal.
Know that all compressors are different. Some sound modern and have more of a crisp, precise sound, but these compressors can be just as desired as a slower compressor that may bring analog-like warmth to the table. Some of these characteristics can be identified through the name of the compressors, but it's best to just know your plugin suite by ear. Spend enough time in your DAW so that you can understand where and when each compressor should be used.
Two compressors with the same settings can have very different sonic outcomes based on the settings, but here are a couple of general rules you can keep in mind while setting up your compressor:
- Start with a medium attack time as a starting point and adjust according to preference. A fast attack makes the rate at which the compressor clamps faster, which may be preferable for tonally complex vocals. Contrastingly, a slow attack allows for the tail end of a sound to pop out. A slow attack time can make it easy for other instruments in your mix to stand out without interfering with the rest of the session.
- One strategy is to dial in a high ratio setting and then dial it back. A higher threshold will compress less since the threshold determines the point at which the compressor applies its magic. By starting with a lower threshold and high ratio, you'll be able to clearly hear what the compressor is doing. Be careful though, with makeup gain, this can get super loud fairly quickly.
- Go for a medium release time of around 40 ms as a starting point. Remember, the release setting dictates how fast the compressor breathes or lets go of a processed signal. If you can get the compressor to pump in time with the music, you'll have a processing flow that's natural-sounding and sonically pleasing. Your attack and release should work in tandem to produce your preferred style of compression.
- Once you've found a good balance of the attack and release, adjust the ratio and threshold of the compression. Ideally, you should have an average of 2 to 3 db of gain reduction on most tracks. Heavier genres of music may require more db of gain reduction. There aren't any hard and fast rules, but you should use your attack and release, threshold, and makeup gain to produce a dynamically consistent signal.
You might find yourself fiddling the most with the attack time. Arguably, the attack and release controls have the greatest impact on the tone of your audio signal, so take your time throughout the compression process.
Also, remember that this is just a starting point for a single compressor. It's not uncommon to have two compressors or more on a single track, especially if you're using more specialized types of compression like multiband compression or tube compression for a warmer presence.
What Is Vocal Compression?
Compressors are used on a wide variety of sounds. Vocal compression is applied to nearly every lead vocal and background vocal track since one of the trickiest aspects of managing vocals is taming the dynamic range. Vocal takes can vary greatly based on the singer's unique instrument, performance, and overall training. A refined vocal track has just the right amount of compression so that the vocals sound loud, forward, and full of life though consistent.
This is a tough balance to achieve, especially since any given track needs a custom amount of compression. Any audio professional understands that proper vocal compression is achieved when you create a natural, smooth vocal track within your session. This can take years to master, but it's certainly worth your time since strong, modern vocals can easily make or break a track.
Vocal Compression By Genre
It's important to note that each genre has its own set of stylistic parameters that absolutely affect how you approach compression. Here's a basic overview of vocal compression by genre:
- Pop and R&B: These genres gravitate towards a crisp, polished sound, oftentimes with heavy amounts of processing and audio effects as needed .
- EDM: Electronic music takes on a lot of similarities in terms of pop and R&B compression approaches, but takes it one step further. It's not uncommon to see more heavy compressor types like side chain compression or more noticeable processing in this genre.
- Rock: Rock music allows for a great emphasis on the high mid-frequency range. Rock vocals are also able to sit back further in the mix, which may allow for a greater amount of compression than pop genres. This tendency for large amounts of compression translates to related hardcore or metal genres.
- Jazz: With jazz music, it's essential to preserve the live-sounding nature of the vocal as much as possible. You'll want to keep dynamic control at a minimum to preserve the energy of the original recording. These recordings also have few obvious effects or additional processing.
While these are general guidelines for some of the main genres, there are always exceptions for stylistic reasons or otherwise. Take these guidelines with a grain of salt and use them as a basic framework for your compression philosophy while diving into a session.
When Do I Need To Compress Vocals?
Generally speaking, vocals need some form of compression, since they are such a dynamic instrument. With that in mind, vocal compression settings vary greatly depending on the particular use case within a session. You might need one compressor, or you may need six, but the main point is that most tracks need some form of compression on vocals to produce a consistent, smooth sound that's sonically pleasing to the listener.
Where Should A Vocal Compressor Be Placed?
Placing compression on vocals is an essential part of the mixing process . That being said, there can be a lot of variation in terms of compressor types and where you choose to use a compressor within a vocal's audio effect chain.
If you need to EQ a vocal to remove any audio imperfections, it's a good idea to do so before using a vocal compressor. This is because vocal compression will only amplify the pre-existing sound to some degree, so you'll certainly want to compress vocals that are as refined as possible.
However, remember that it's always best to get a better recording of vocals than to overcompensate with EQ and other effects. The better the source recording is, the better the vocals' sound. You may also use an EQ after you use a compressor. This is because the tonal compression may add certain imperfections within the audio signal that you can fine-tune using an equalizer.
Hence, there isn't a hard and fast rule of where compressors should be used and shouldn't. In fact, most engineers utilize multiple compressors through a method called serial compression.
This method allows subtle dynamic control with light compression from each compressor. Instead of using a single compressor, the audio signal is able to benefit from the tone and contextual control from the second compressor. A second compressor (or more for that matter) isn't always necessary, but it can provide more dynamic consistency depending on what comes before or after it.
Types of Compression
Before diving into the best vocal compression settings and how you can start compressing vocals out of your DAW, it's important to understand that a compressor plugin can have a wide variety of uses. Here are some of the main types of vocal compression to keep in the back of your mind when approaching any mixing session.
Tonal Compression
This type of compressor will still provide gain reduction and more consistent dynamics, but it will also provide its own tonal quality. Tonal compression can add warmth and presence in a vocal, allowing the track to sit appropriately within a mix. This general category of compressors can encompass more specified compressors like tube or VCA compression discussed below.
Dynamic Compression
Dynamic compression is used primarily to even out the gain of the full audio signal. In addition, dynamic compression reduces the peaks of the loud sections of heavy vocals and brings up the lower parts of the entire vocal. With dynamic compression, you're trying to create a smoother audio track.
Finding A Balance
It's essential to find a balance between the original vocal signal and the compressed vocal signal. This is because an overly compressed vocal can sound flat and unnatural, which will feel lifeless to the listener. On the other end of the spectrum, aggressive vocals that aren't compressed enough can feel abrasive and out of place.
For these reasons, you might consider utilizing a process called parallel compression, which is discussed below. In any case, your ideal compressed vocal should be dynamically consistent, while still retaining much of the energy and feeling of the original vocal.
Compressing Background Vocals
It's also worth noting that you'll likely have a different approach when compressing background vocals than you would while compressing a main vocal. With background vocals, it's less important that you maintain the original energy of the backing vocals.
Since backing vocals are meant to be heard in the background, they can be more heavily compressed. Stronger compression settings can help backing vocals blend and gel together properly within the context of the mix. You might also have a fast attack and hard knee with background vocals so that you can produce the most consistent output level as possible.

Other Types of Compression
Within the world of vocal compression, there are plenty of different types of compressors at your disposal. Here are some of the various types of compressors to consider while processing your vocals.
De-Esser
A De-Esser is a special type of compressor that primarily targets harsh frequencies with the 4.5 kHz to 9 kHz range. These harsh sounds, mainly "S", "T", or "P" noises are commonly referred to as sibilance.
De-essers work by compressing these regions whenever triggered by the engineer's set threshold. The compressor clamps down whenever this set frequency range exceeds the threshold ceiling, thereby reducing sibilance.
Parallel Compression
Parallel compression is the process by which a compressed audio signal is blended directly with the untouched audio signal. This type of compression may be preserved since it inherently preserves the energy of the original vocal while still providing an overall more polished, consistent sound.
Limiter
A limiter is basically an ultra-strong compressor. You might not always use a limiter on vocals, but in some cases, they can be instrumental. Whenever you use a limiter, it's imperative that you do so subtly: These tools are extremely powerful and can easily over compress a signal when not treated with care.
Multiband Compression
Multiband compression is like a more targeted form of general compression. The compressor clamp only targets your selected frequency range, allowing independent control amongst different parts of the signal.
You can use Multiband compression for a stronger hold over your sound, or as a way to create your own de-esser. These highly useful tools make it easy for producers to fine-tune compressor settings to the unique needs of the input signal.
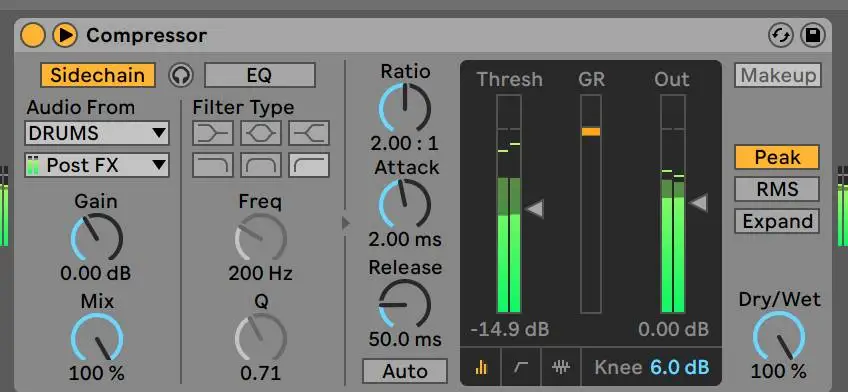
Sidechain Compression
Sidechain compression, sometimes referred to as ducking, is a specialized type of compressor that ducks according to a selected audio input level from another track within your session. This can be incredibly useful for different sounds that have competing frequencies.
For example, the bass and kick share a lot of muddy low end that can cloud up your mix quickly. In order to have both elements stand out appropriately within the mix, you would use sidechain compression .
The compressor would be placed on the track that you want to compress. In this instance, this would be the bass, since you want the kick sound to stand out amongst the constant hum of the bass notes. You can select "Sidechain" and then select the input as the kicks or drum group. This will make it so the bass ducks in volume whenever a kick is played.
Glue Compression
This special type of compression aims to "glue" multiple tracks together, making it a great fit for backing vocals, or multiple vocal tracks. You can still use this compressor on a single vocal or instrument track, however.
It's worth noting that this type of compressor is designed to emulate an analogue compressor from the 80s, so it can act as a form of tonal compression as well.
Tube Compression
This type of tonal compression is designed to add warmth to a mix by emulating the hardware equipment that utilized tubes to help color the sound. Plenty of producers still utilize hardware tube compressors to achieve that signature sound.
VCA Compression
VCA compression stands for voltage-controlled amplifier compressors. These precise compressors offer a more specialized compression experience since they have control parameters to dictate whether or not gain reduction is applied to an input audio signal. You'll find that these types of co-pressers have a clean sound, without much coloring in contrast to tube or glue compressors.
How To Compress Vocals: Producing A Strong Vocal Performance
Let's dive into a basic approach for compressing vocals! As with any vocal mix, remember that you should aim to use the least amount of compression needed on any given track. Make sure you have the best recording possible before diving into your audio effect processing for any given vocal.
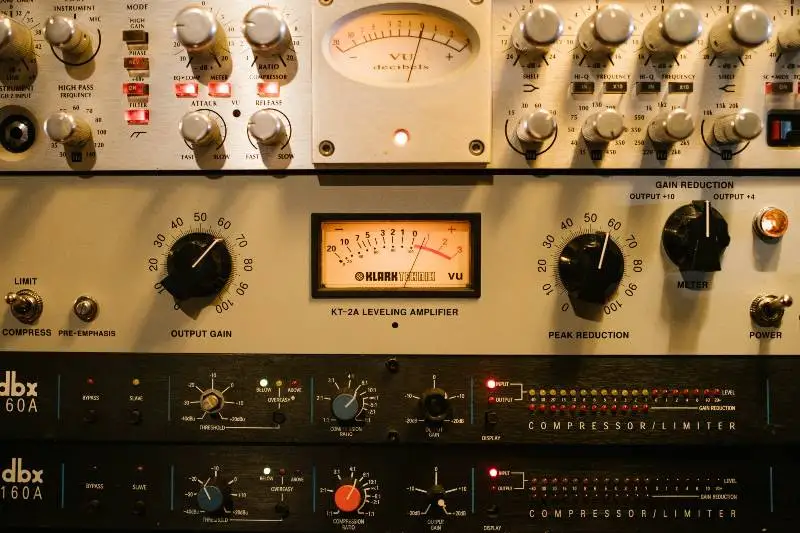
It's also worth exploring hardware compression on the input signal of a vocalist. These compressors, though expensive, can provide a presence and warmth that can be difficult to replicate digitally.
Once you have your polished recording, here are the basic steps for compressing your vocal.
Compressing Your Vocals
Here is a step by step process to compressing your vocals. Consider this outline a basic framework of how you might approach compressing your vocals rather than a rigid outline of how you should approach your processing.
- Determine your goals. You shouldn't put a plugin or effect on a track unless you know what you're trying to achieve. Remember, the less compression you need on a track, generally the better so that you can preserve the original energy of the input signal. Take into account where you want your vocal to sit and what makes sense in the context of the genre.
- Subtractive EQ any imperfections. Ideally, there won't be many imperfections for you to remove from your vocal. However, if you do have certain frequencies or tones in your source audio, you'll definitely want to use subtractive EQ before compressing it, since compression will only amplify those undesired sounds. Note that this point is subjective though. Some engineers firmly believe in utilizing a vocal EQ after the compressor rather than before. The good news is that you can conceivably do both or none at all! The main takeaway here is that each decision made should be within the context of your full audio effect chain. Think about your goals for the compressor on a micro level, but also on a macro level in respect to the rest of the session.
- Set an attack time. Attack and release controls are arguably the most important stylistic controls of the compressor, so you'll want to take your time here. It's a good idea to lower the threshold and raise the ratio so that you can clearly hear how the compressor is affecting the vocal. A good starting attack time is right around 10 ms. Once you're at this starting setting, experiment with different attack time options and notice how they affect the vocal. A slow attack time can make for a punchy vocal that pulses out in the mix. A fast attack aims to compress the vocal as quickly as possible for a more precise, consistent feel. Try on both slow and fast attack settings to see how they blend in with your mix.
- Determine your release time. Now, it's time to adjust the release setting. You can start at a medium level around 40 ms. A slower release time will produce a vocal that feels more connected at flowing at the same level. A faster release time can make more of a distinction between different parts of the audio signal. As you would with the attack, try on different release time options because experimentation is the key.
- Finalize your compression and check your gain reduction. Once you've found a happy balance, it's time to adapt to a higher threshold and lower compression ratio. Adjust these parameters until you've achieved about 2 to 3 dB of gain reduction or to taste.
- Consider volume automation or clip gain automation. Sometimes, compression can take the life out of a vocal. If you need all of the compression you've applied with consistency but are missing some of the vocal's original power, experiment! You can use volume automation to create tension throughout the vocal mix. Don't forget that you can also automate the clip gain of your compressor which may make for a more organic sound. Automating your clip gain or volume can feel tedious, but these small details can certainly bring your vocal to the next level. If you're still not achieving the sound balance you're looking for, it's a great time to try utilizing parallel compression to create a blend between your processed and unprocessed signals.
- Don't stop there! Once your compressor is set to your desired level and automated to taste, don't forget to add any other effects or plugins to your track. It's possible that what you add to any given track will require you to go back and tweak the settings on your main vocal compressor. There's also nothing wrong with having more than one compressor on your vocal, especially since compressors can be used for incredibly different purposes.
Just like any other skill, it's essential to recognize that vocal compression takes a lot of practice and training. Continue to try out different methods and seek out other compression philosophies to expand your approach along the way.
Also, pay attention to the way other engineers compress vocals via a reference track or two. It's always a good idea to drag a reference track into your session for easy comparison and contrast while you're setting up your vocal compression.
Vocal Compression FAQ
Are you still having trouble understanding vocal compression? Here are a couple of commonly asked questions and answers to expand your understanding of compressing vocals.
How much compression do you need for vocals?
This question varies greatly based on what genre of vocal you’re producing. For example, a hip-hop song is going to need a different type of compression from a pop song. That being said, a general rule of thumb is that you should have enough compression to bring the vocal forward, without killing the dynamics. Trust your ears above all.
Should you compress or EQ first?
It’s a good idea to EQ out any imperfections before compressing it, since compressors will only bring those imperfections more forward in a mix. However, it’s not uncommon to need to EQ before and after the compressor in the effect chain, since compression can add tonal qualities that may need some additional finessing.
Should I use a limiter on vocals?
You can definitely use a limiter on vocals, though you’ll need to do so carefully since these are essentially ultra-powerful compressors. Certain genres like pop may take to a more compressed sound. It’s also worth trying parallel compression in this instance and only sending part of your vocal through the limiter.
What does too much compression sound like?
Too much compression produces a flat, non-dynamic performance that doesn’t have a “live” feel to it. An overly compressed vocal will feel unnatural and dull to the listener, so it’s key to avoid this point if at all possible. Lead vocals should be consistent, but still, have a degree of dynamic fluctuation.
How loud should vocals be in a mix?
This depends greatly on what type of genre of music you’re going for. One of the best ways to determine this is to use a reference track so that you can easily compare levels of vocal on your current track and desired reference track.
How does compression make things louder?
Compression brings up the gain of the lowest points in an audio signal, thereby creating the perception that the entire track is louder . This can also make for a more consistent sound, which can be more pleasant for the listener.
Should you compress before auto-tune?
It’s a good idea to provide gentle compression before using auto-tune so that the software can more easily identify the pitches in your audio signal. That being said, you may also need to use more compression after autotune depending on your use case.
How do you know if your vocals are compressed?
You can see the gain reduction on your compressor to see that your compressor is working. Alternatively, a compressed sound should be perceived as louder and more consistent than the original recording. Most modern songs use some form of compression to maintain consistency and create a presence in the mix.
Vocal compression is an art in itself that should not be taken lightly. Engineers can take years to master this concept alone, so don't be discouraged if it takes you longer than expected to get the hang of this incredibly useful skill.
While we provided a couple of general tips for how you should compress vocals, remember that your ears are the most important sound evaluators. You may not think of them as such, but compressors can be just as stylistic and creative as they are technical. Allow yourself to experiment with compression to find what makes the most sense for you and your unique sound.
Hopefully, this guide brings you one step closer to producing properly processed vocals. Now go test out some of your DAW's compressors!


